- Installing and Using Nessus on Kali Linux
- Nessus, Kali, and Penetration Testing
- Installing and Configuring Nessus
- Conclusion
- Adam the Automator
- Installing Nessus and Getting Started with Kali (Jumpstart Guide)
- Justin Sylvester
- Prerequisites
- Downloading the Nessus Installation Package on Kali Linux
- Verifying the Nessus Installation Package Integrity
- Installing Nessus on Kali Linux
- Obtaining an Activation Code for Nessus Vulnerability Scanner
- Start the Nessus Service and Set for Automatic Startup
- Enabling the nessusd Service to Start on Boot
- Activating the Nessus Application
- Running a Nessus Vulnerability Scan
- Configuring a Nessus Vulnerability Scan Policy
- Configuring a Nessus Vulnerability Scan
- Launching a Nessus Vulnerability Scan
- Next Steps
Installing and Using Nessus on Kali Linux

Note: These 2014 instructions are for installing Nessus version 5 on Kali Linux. Please see the newer blog, Getting Started with Nessus on Kali Linux, for information on installing Nessus version 6 and higher on Kali Linux 2016.
Note: Nessus Cloud is now a part of Tenable.io Vulnerability Management. To learn more about this application and its latest capabilities, visit the Tenable.io Vulnerability Management web page.
I f you are using Nessus for vulnerability scanning activities, consider installing Nessus on Kali Linux. Kali Linux is a fantastic distribution specifically designed for penetration testing.
Nessus, Kali, and Penetration Testing
Tenable provides Nessus on a wide variety of platforms to choose from. One of those choices is a Linux distribution designed for penetration testers called Kali Linux. Kali Linux, formerly known as «Backtrack», is a Debian-based Linux distribution containing hundreds of tools to perform penetration tests.
The tools available in Kali Linux complement a Nessus installation, allowing everything to be in one place, easing maintenance and portability. Nessus reports on host discovery, vulnerability identification, and exploitability of a given vulnerability which are all important findings in the penetration testing process.
Nessus also has many other features to support penetration testing activities that you may not be aware of. These include:
- Correlating a vulnerability with an exploit (including cross referencing Metasploit, Core IMPACT, Immunity CANVAS, D2 exploitation packs, ExploitDB, vulnerabilities that do not require an exploit, and more)
- Filtering vulnerability results by exploit availability and/or exploitability ease
- Performing web application scanning and recon including site spidering, detecting common web application vulnerabilities specific to your applications, and fuzzing CGI parameters
- Using credentials harvested from other phases of testing to perform credentialed patch audits, local (client-side) application vulnerability scanning, and discovery of interesting configurations on targets
- Re-casting risk, identify low-severity vulnerabilities and allow an admin-level user to re-cast them as critical vulnerabilities. Re-casting risk empowers testers to review lower severity findings that often lead to serious exposures.
Installing and Configuring Nessus
Nessus does not come pre-installed on Kali Linux, but can be installed and activated easily:
- Step 1 — Purchase Nessus — You can purchase Nessus from Tenable’s online store (including bundles containing training and additional products such as the Passive Vulnerability Scanner) or through one of our resellers.
- Step 2 — Obtain Nessus and an Activation Code — Once you’ve purchased Nessus, you will receive an account on the Tenable Support Portal and an activation code to be used in the installation process. Simply login to the support portal download the Kali Linux install package based on your processor architecture, for example:
Step 3 — Installing Nessus:
Once you’ve transferred the appropriate Nessus Debian package to your Kali Linux installation, run the following commands to install and start Nessus (it is assumed that your Kali Linux is configured with access to the Internet):
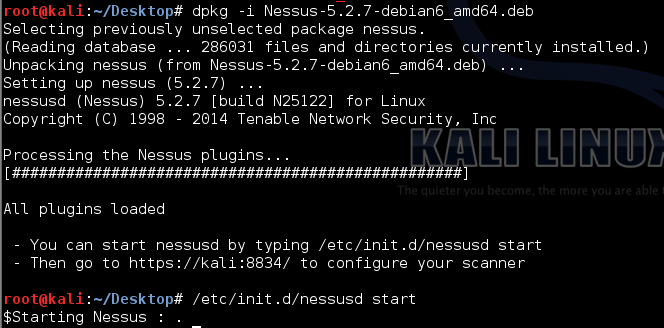 Installing Nessus on Kali Linux via the command line.
The web interface can be accessed with your browser by making an HTTPS connection to TCP port 8834 (e.g. https://localhost:8834/). You can also access the Nessus Web Interface remotely by using the default IP address assigned to Kali Linux (e.g. https://192.168.1.250:8834/). Make certain that Javascript is enabled in the browser you are using to manage the Nessus server.
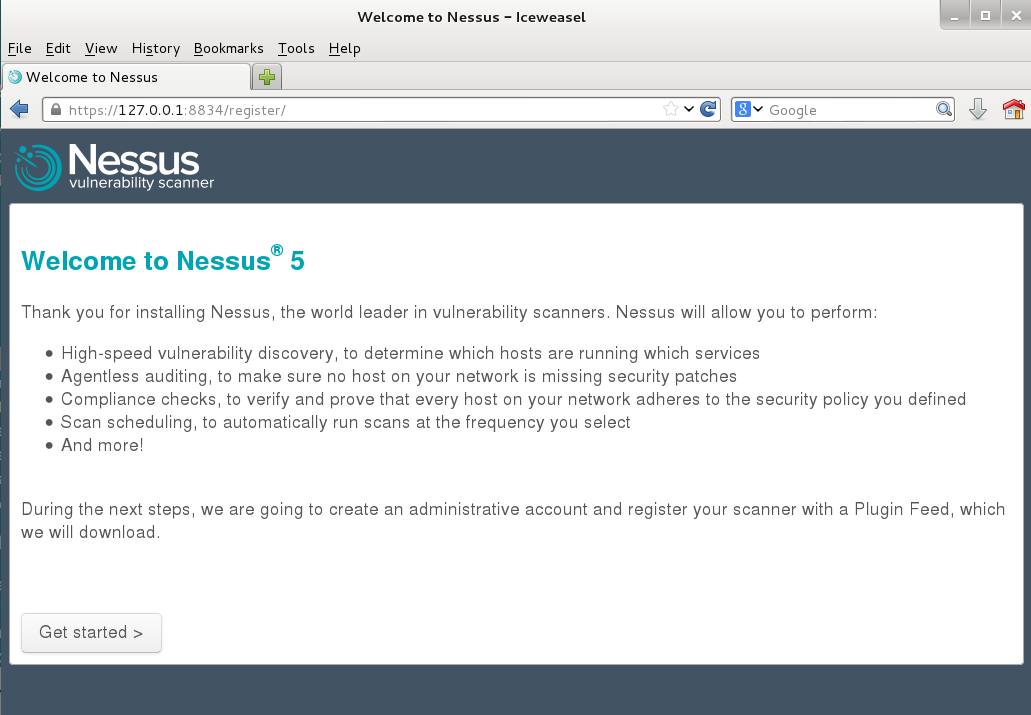 Accessing the Nessus Web Interface.
Follow the installation wizard, which will prompt you to create an account to log in to Nessus and install your activation code.
Note: Once Nessus has been initially started, it will begin the process of downloading, indexing and compiling all plugins. This can take some time, depending on the speed of your system (or virtual system). If Nessus is still processing plugins, you will see a progress bar in the web interface.
Please refer to the Nessus 5.2 Installation and Configuration Guide for answers to common installation questions and more information about installing and configuring Nessus.
Conclusion
Nessus is the most trusted, accurate, and reliable vulnerability scanner on the market, making it a perfect complement to your penetration tests and security assessments. Nessus Manager (and Nessus Cloud) allows you to further extend your vulnerability scanning program by engaging others in IT and auditing through sharing of scanning resources (including assigning roles, scanners, reports, policies, and more). Tenable’s other products, such as the Passive Vulnerability Scanner and SecurityCenter Continuous View, enable IT organizations to implement a continuous monitoring solution to collect vulnerability and operational data via scanning, sniffing and logging. All of these technologies combined allow for deep insights into your network, and any threats that may be lurking.
Источник
Adam the Automator
Installing Nessus and Getting Started with Kali (Jumpstart Guide)

Justin Sylvester
Read more posts by this author.
Tenable’s Nessus Vulnerability Scanner facilitates the quick identification of software flaws, missing patches, malware, and misconfigurations across your connected devices. Installing the Nessus application on Kali Linux assists with vulnerability prioritization and finding fixable actions.
Kali is a Debian-based Linux distribution focused on security professionals and provides hundreds of built-in penetration testing tools. In this article, you will learn how to couple Nessus with Kali to enhance an already capable Linux distribution with a powerful network testing tool.
Table of Contents
Prerequisites
To follow along with this tutorial, you will need to adhere to the following requirements.
- Administrative, or “root”, access to a Kali Linux installation with internet access. The following are recommended minimum system requirements, according to Tenable’s hardware recommendations:
- CPU: 4 * 2GHz cores
- Memory: 4 GB RAM (8 GB RAM recommended)
- Disk Space: 30 GB, not including space used by the host operating systemIn this article, a 64-bit Kali Linux (version 2020.4) Virtual Machine (VM) is used running on VMWare Workstation Player. Related: How to Install Ubuntu 20.04 [Step-by-Step]
- Access to a Nessus-supported browser. The following browsers are supported by Nessus, according to Tenable’s software requirements:
- Google Chrome (50+)
- Apple Safari (10+)
- Mozilla Firefox (50+)
- Internet Explorer (11+)
Downloading the Nessus Installation Package on Kali Linux
As Nessus is not installed by default on Kali, you will need to download the Nessus software package prior to installation. First, start the Kali Linux operating system and launch a supported web browser. Follow the below steps to download the necessary Nessus installation files.
2. Nessus is supported on a wide range of operating systems and architectures. In this article, a 64-bit version of Kali Linux (version 2020.4) is used. Therefore, the Nessus-8.13.1-debian6_amd.deb is the correct installation package:
3. Click on the download link and when prompted, review the License Agreement and select I Agree.
Now that the download is complete, it is time to verify the integrity of the installation package. It is important to verify that the file has not been modified during transit.
Verifying the Nessus Installation Package Integrity
Verifying file integrity becomes especially important when you download a file from an external source, such as a vendor website. Verify the listed checksum of the file to the computed hash of the downloaded Nessus installation package, as shown below.
- Open a Terminal by right-clicking anywhere on your Kali Linux desktop and selecting Open Terminal Here.
2. Click on the Checksum link to obtain the SHA256 hash from the downloads page.
3. A popup window will display showing both an MD5 and SHA256 hash value. To copy the SHA256 value to your clipboard, simply click the Copy icon to the right of the hash.
4. Run the following command, in the previously opened Terminal window, to verify the downloaded file’s checksum.
If the output of your command does not suggest that your installation package is OK, do not install the software.
Installing Nessus on Kali Linux
Once you’ve verified the package’s integrity, it’s time to install the Nessus application. Using the Debian Package Manager (dpkg) tool with the i (install) parameter, pass the downloaded installation package, as shown below.
Be sure to use the sudo command to install Nessus under an account with administrative rights.
Way to go! You’ve just installed the Nessus Vulnerability Scanner on your Kali Linux operating system. The next section walks you through obtaining an activation code.
Obtaining an Activation Code for Nessus Vulnerability Scanner
Tenable offers a few variations of their Nessus Vulnerability Scanner, two of which are Nessus Essentials and Nessus Professional. Nessus Essentials is free but provides a reduced feature set compared to its paid counterpart, Nessus Professional. A few of the main Nessus Essentials limitations are listed below:
This tutorial will be using Nessus Essentials. Despite being free, the software does require a valid activation code as outlined below.
2. Fill out the registration form with your First Name, Last Name, and Email Address.
3. Click on the Register button, to complete registration.
4. Upon successful registration, Tenable will send you a confirmation email. Finally, you will be prompted with the following message:
5. Now check your email, you should find an activation code that appears like D234-C7CB-04AF-79A6-1555 . The email sender address will be [email protected] . Be sure to check your junk mail if you do not see the registration email in your inbox!
Start the Nessus Service and Set for Automatic Startup
Before using the Nessus application, the nessusd system service must be started. This service controls and makes available the Nessus application interface and functions, such as scans. To start the nessusd service, follow the below steps.
- Open a terminal by right-clicking on your Kali Linux desktop and selecting Open Terminal Here.
2. Start the nessusd service by issuing the following command:
This article assumes you are not running under the root account, but an account with administrative elevation rights. Therefore commands requiring elevation are prefaced with the sudo command to ensure elevation.
3. Verify that the service is in the running state by issuing the following command and verifying the expected output is shown in the below screenshot, as indicated by the Active: active (running) output.
Enabling the nessusd Service to Start on Boot
By default, the nessusd service does not start when your Kali Linux operating system boots. To enable the nessusd service to run when the Kali Linux operating system starts, run the following command to enable the nessusd service on startup.
Verify that the service is in an enabled state by issuing the below command. As shown in the below screenshot, the nessusd service shows enabled in the Loaded output line.
Activating the Nessus Application
Now that you’ve obtained your activation code and started the nessusd service, it is time to activate your Nessus installation. To activate your Nessus installation follow the below steps.
- Open a web browser on your Kali Linux operating system and navigate to the address, https://localhost:8834 . Keep in mind that the default port is 8834 and not the typical port 443 .
The Nessus installation comes with a self-signed SSL certificate, which will likely prompt you with a warning when you attempt to access the Nessus application’s web interface. Tenable provides options to customize the SSL certificate used by your Nessus application.
2. On the Welcome to Nessus screen, select the product version, Nessus Essentials.
3. Select Skip on the Get an activation code screen, as you have previously obtained the activation code.
4. Enter the Activation Code, on the Register Nessus screen, that you received during the registration process and select Continue. In the screenshot below, you will see that this tutorial’s mock activation code is D234-C7CB-04AF-79A6-1555 :
5. When prompted with the Create a user account screen, define a Username and Password and click on Submit. The defined username and password are used to log into the Nessus application.
6. Once the scanner finishes initializing, which may take a while, enter the username and password for the user account that you established earlier in this tutorial and click on Sign In.
Awesome work! Installation and activation of your Nessus Vulnerability Scanner software is complete! In the next section, you will configure Nessus to target your local system with a vulnerability scan.
Running a Nessus Vulnerability Scan
You’ve now got Nessus up and running. It’s time to kick the tires and see what this handy tool can do; finding vulnerabilities! The remainder of this section provides instruction on how to configure and launch a scan against your Kali Linux host.
Assuming you’re still on the Nessus application page, supply the username and password for the user account that you established earlier in this tutorial if you are not currently logged in.
Upon initial login, you may be prompted with a welcome message that allows you to quickly configure a discovery scan, which locates networked devices. Feel free to close this message, as you are going to configure and launch a custom scan.
There are several different methods that can be used to configure a scan. This tutorial focuses on the following three-step approach, as outlined below and in the following sections.
- Configure a scan policy
- Configure a scan
- Launch the scan
Configuring a Nessus Vulnerability Scan Policy
Scan policies may be thought of as a set of scanning instructions. Scan policies direct the scanner on what tasks to perform and how to perform those tasks.
There is a collection of pre-configured scan policy templates or customize an advanced scan to choose from. Tenable categorizes Nessus scanning capabilities into the following three categories:
- Discovery Scan: Targets address space to report on live hosts and open ports.
- Vulnerability Scan: Targets endpoints to assess for known vulnerabilities.
- Compliance Scan: Targets endpoints to assess endpoint configuration for compliance with a particular standard (e.g., Center for Internet Security (CIS) benchmarks, Security Technical Implementation Guide (STIG), etc.).
To create and configure your scan policy follow the below steps.
- Select Policies from the menu on the left-hand side of the screen, under the Resources heading.
2. Select New Policy, which is located in the upper right-hand corner of the screen.
3. Select Basic Network Scan. The Basic Network Scan option includes pre-configured settings required to assess your Kali Linux host for vulnerabilities.
4. After selecting a scan policy template there are additional configurable elements shown. Leave each pre-configured setting in its default state for now, but feel free to experiment at a later time.
Enter a Name for your scan policy and click on the Save button. In the following screenshot, you will see that this tutorial’s scan policy name is Basic Network Vulnerability Scan Policy.
To launch specific vulnerability tests (some of which this tutorial will demonstrate), Tenable requires administrative credentials. Executing a scan without credentials provides insight into externally enumerable vulnerabilities, which mimics an attacker’s perspective.
Configuring a Nessus Vulnerability Scan
The next step in the process is to configure your scan. During this phase of the process, select a scan policy and target host as outlined below.
- Select My Scans from the menu on the left-hand side of the screen.
2. Click on the New Scan button, which is located in the upper right-hand corner of the screen.
3. Select the User Defined tab to choose the newly configured Basic Network Vulnerability Scan.
4. Select the scan policy that you configured in the previous section. In the following screenshot, you will see that this tutorial’s Basic Network Vulnerability Scan Policy appears for selection.
5. Define your target(s). To target your local Kali Linux host, specify localhost in the Targets text entry box.
Define multiple targets within a single scan by separating each target with a comma. For example, specifying localhost,10.10.10.10 will target your localhost and the 10.10.10.10 IP address.
6. Provide a Name for your scan and click on the Save button. In the following screenshot, you will see that this tutorial’s scan has a Name of Basic Network Vulnerability Scan.
Launching a Nessus Vulnerability Scan
After saving your scan, create an entry in the My Scans section of the Nessus application.
- To launch your scan, click on the Play button, next to the Basic Network Vulnerability Scan.
2. The rotating green arrow icon indicates that the scan is running. Be patient, as it takes time for the scan to complete.
3. When the rotating green arrow icon changes to a green checkmark, the scan is complete. Click on the scan name to view the results!
Awesome work! You just ran a vulnerability scan against your local Kali Linux host! To display the results click on the Vulnerabilities tab on the scan summary page.
Next Steps
In this tutorial, you downloaded, installed, and configured Nessus on a Kali Linux host. You then leveraged the Nessus technology to assess a local Kali Linux host for vulnerabilities.
Take a more in-depth look at the scan results. What information can you gather from the scan that you performed? After you gain comfort using the Nessus application, feel free to target additional hosts by supplying the host’s IP address as a target within your scan.
More from Adam The Automator & Friends

With an ever-increasing visitor base searching for solutions to their problems, we can help you connect with and reach the right kind of audience and generate targeted sales leads.

We’ve put together a list of the resources we, at ATA, can wholeheartedly recommend!

Why not write on a platform with an existing audience and share your knowledge with the world?
Источник


