- Установка Docker на Linux
- Ubuntu
- CentOS 8
- CentOS 7
- Fedora
- Проверка
- Установка Compose
- Возможные проблемы
- 1. undefined symbol: seccomp_api_set
- 2. error initializing network controller list bridge addresses failed no available network
- docker version
- Description
- Usage
- Extended description
- Options
- Examples
- Default output
- Get the server version
- Dump raw JSON data
- Print the current context
- DATAENGINER
- Как работает Docker Compose
- Шаг 1 Установка Docker Compose
- Шаг 2 Создаем Docker Compose файл
- Шаг 3 Проверка валидности файла Docker Compose
- Шаг 4 Запуск файла docker-compose.ym l
- Шаг 5 Проверка работающих контейнеров
- Шаг 6 Изменение конфигурации контейнеров
- Шаг 7 Остановка Docker Compose
- Compose file versions and upgrading
- Compatibility matrix
- Versioning
- v2 and v3 Declaration
- Version 1 (Deprecated)
- Version 2
Установка Docker на Linux
Мы рассмотрим процесс установки Docker на системы семейства Linux — а именно, CentOS, Fedora и Ubuntu.
Ubuntu
Docker на Ubuntu ставится, относительно, просто.
Обновляем список пакетов:
Устанавливаем докер командой:
apt-get install docker docker.io
Разрешаем автозапуск докера и стартуем его:
systemctl enable docker
systemctl start docker
CentOS 8
dnf install wget
Скачиваем конфигурационный файл для репозитория докер:
wget -P /etc/yum.repos.d/ https://download.docker.com/linux/centos/docker-ce.repo
Теперь устанавливаем docker:
dnf install docker-ce docker-ce-cli
И разрешаем автозапуск сервиса и стартуем его:
systemctl enable docker —now
CentOS 7
yum install wget
Скачиваем файл репозитория:
wget -P /etc/yum.repos.d/ https://download.docker.com/linux/centos/docker-ce.repo
yum install docker-ce docker-ce-cli containerd.io
Запускаем его и разрешаем автозапуск:
systemctl enable docker —now
Fedora
Устанавливаем плагин, дающий дополнительные инструменты при работе с пакетами:
yum install dnf-plugins-core
dnf config-manager —add-repo https://download.docker.com/linux/fedora/docker-ce.repo
dnf install docker-ce docker-ce-cli containerd.io
Запускаем его и разрешаем автозапуск:
systemctl enable docker —now
Проверка
Чтобы убедиться, что docker в рабочем состоянии, выполняем команду:
docker run hello-world
Сначала система обнаружит, что нужного образа нет и загрузит его:
Unable to find image ‘hello-world:latest’ locally
latest: Pulling from library/hello-world
b8dfde127a29: Already exists
Digest: sha256:308866a43596e83578c7dfa15e27a73011bdd402185a84c5cd7f32a88b501a24
Status: Downloaded newer image for hello-world:latest
После отобразит приветствие:
Hello from Docker!
This message shows that your installation appears to be working correctly.
To generate this message, Docker.
Docker работает корректно.
Установка Compose
Команда docker-compose позволяет развернуть многоконтейнерные Docker-приложения.
Для ее установка сначала переходим на страницу github.com/docker/compose/releases/latest и смотрим последнюю версию docker-compose. В моем случае, это была 1.29.2.
curl -L «https://github.com/docker/compose/releases/download/$COMVER/docker-compose-$(uname -s)-$(uname -m)» -o /usr/bin/docker-compose
* где 1.29.2 — последняя версия файла.
Даем права файлу на исполнение:
chmod +x /usr/bin/docker-compose
Запускаем docker-compose с выводом его версии:
Возможные проблемы
1. undefined symbol: seccomp_api_set
Сервис докера не запускается, а в логе можно увидеть следующий текст ошибки:
/usr/bin/containerd: symbol lookup error: /usr/bin/containerd: undefined symbol: seccomp_api_set
Причина: ошибка возникает, если установить свежую версию containerd на систему с необновленной библиотекой libseccomp.
Решение: обновляем libseccomp.
yum update libseccomp
apt-get —only-upgrade install libseccomp2
2. error initializing network controller list bridge addresses failed no available network
Сервис докера не запускается, а в логе можно увидеть следующий текст ошибки:
error initializing network controller list bridge addresses failed no available network
Причина: система не может создать docker-интерфейс.
Решение: создаем docker-интерфейс вручную. Устанавливаем утилиту для работы с bridge-интерфейсами.
yum install bridge-utils
apt-get install bridge-utils
brctl addbr docker0
Назначаем IP-адреса на созданный интерфейс:
ip addr add 192.168.84.1/24 dev docker0
* в нашем примере для docker мы задали адрес 192.168.84.1.
Источник
docker version
Description
Show the Docker version information
Usage
Extended description
By default, this will render all version information in an easy to read layout. If a format is specified, the given template will be executed instead.
Go’s text/template package describes all the details of the format.
For example uses of this command, refer to the examples section below.
Options
| Name, shorthand | Default | Description |
| —format , -f | Format the output using the given Go template | |
| —kubeconfig | deprecated Kubernetes Kubernetes config file |
Examples
Default output
Get the server version
Dump raw JSON data
Print the current context
The following example prints the currently used docker context :
As an example, this output can be used to dynamically change your shell prompt to indicate your active context. The example below illustrates how this output could be used when using Bash as your shell.
Declare a function to obtain the current context in your
/.bashrc , and set this command as your PROMPT_COMMAND
After reloading the
/.bashrc , the prompt now shows the currently selected docker context :
Refer to the docker context section in the command line reference for more information about docker context .
Источник
DATAENGINER

Docker compose — это простой, но мощный инструмент, который используется для запуска нескольких контейнеров как одного сервиса. Например , предположим, что у вас есть приложение, которому требуется веб-сервер и службы базы данных. В этом случае вы можете создать один файл (docker-compose.yml) , который будет создавать оба контейнера как один сервис без запуска каждого отдельно.
Как работает Docker Compose
- Используйте yaml файл для настройки ваших служб и приложений ( docker-compose.yaml )
- Вы можете запустить все сервисы одной командой ( docker-compose up )
- Вы можете остановить все сервисы одной командой ( docker-compose down )
- Возможность расширения конкретных сервисов и приложений при необходимости.
- работает во всех средах: производство, подготовка, разработка, тестирование, а также рабочие процессы CI
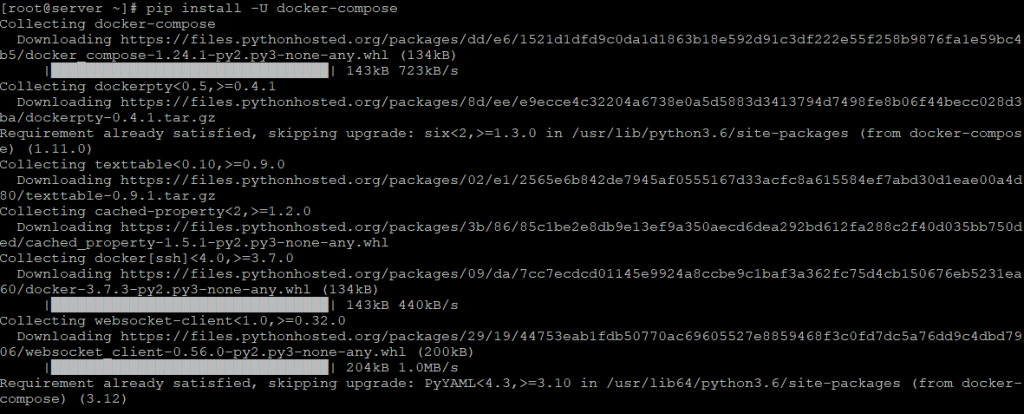
Шаг 1 Установка Docker Compose
Запустите команду из вашего терминала Linux, чтобы установить docker-compose:
Посмотрим на версию Docker Compose установленную на CentOS 8:

Шаг 2 Создаем Docker Compose файл
Теперь давайте создадим файл, для нашего docker compose, в качестве расположения файла вы можете использовать любую директорию, я же создам в корневом каталоге CentOS8 отдельную директорию, для файла docker compose:

Теперь перейдем вновь созданный каталог и при помощи редактора vim создадим файл docker-compose.yml:
Добавим в yml файл следующее содержимое:
Если вы хотите запустить больше изображений docker, то вы всегда их можете найти по ссылке: https://hub.docker.com/search?q=&type=image
Шаг 3 Проверка валидности файла Docker Compose
Проверить работоспособность yaml файла для docker compose можно следующей командой:
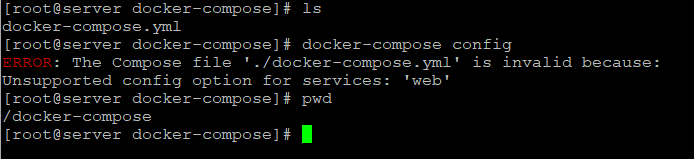
Так, как docker compose проверяет синтаксис используемый в yaml файле перед нами появится ошибка. Узнать подробнее о совместимости версий вы можете по ссылке: https://docs.docker.com/compose/compose-file/
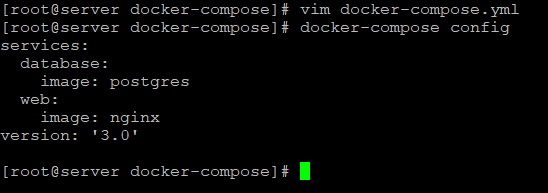
Обновим наш docker-compose файл, чтобы он принял следующий вид:
Еще раз проверим работоспособность файла yaml. Если файл сконфигурирован верно Docker Compose отобразит конфигурацию файла.
Шаг 4 Запуск файла docker-compose.ym l
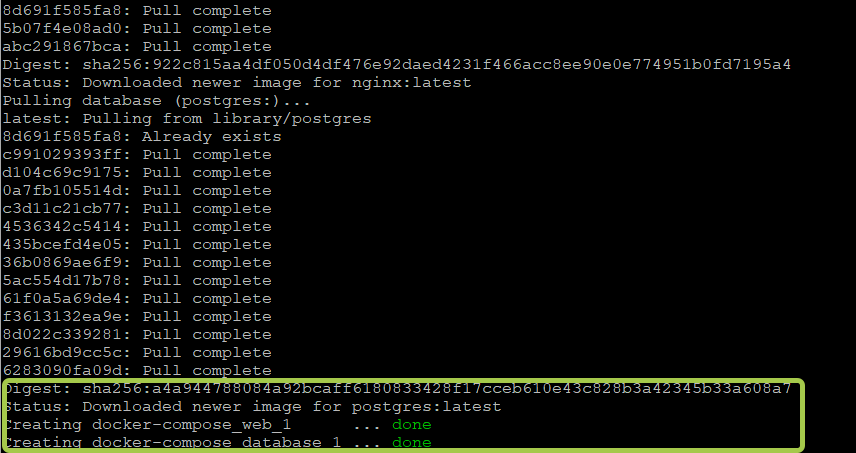
Раз наш файл теперь содержит корректную конфигурацию самое время его запустить, для этого выполним команду:
detached mode (-d, —detach): фоновый режим запускается с ключом -d or —detach , работая в фоновом режиме вашего терминала он не получает информацию на вход и не отображает вывод.
По окончании загрузки перед нами появится следующая информация об окончании загрузки.
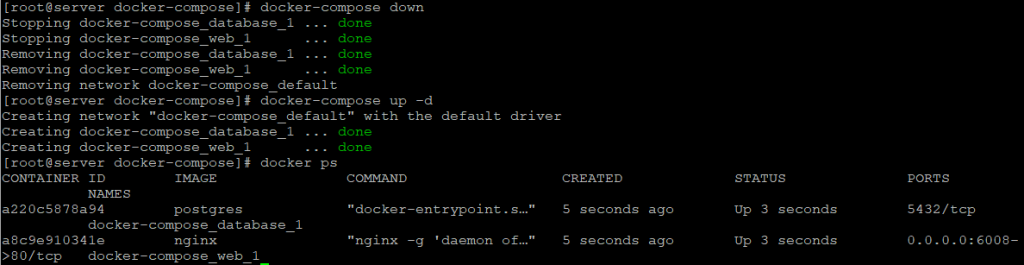
Шаг 5 Проверка работающих контейнеров
Теперь убедитесь, что ваши контейнеры запущены, для этого используйте следующую команду:
Если контейнеры успешно запущены, перед Вами появится примерно следующий вывод.

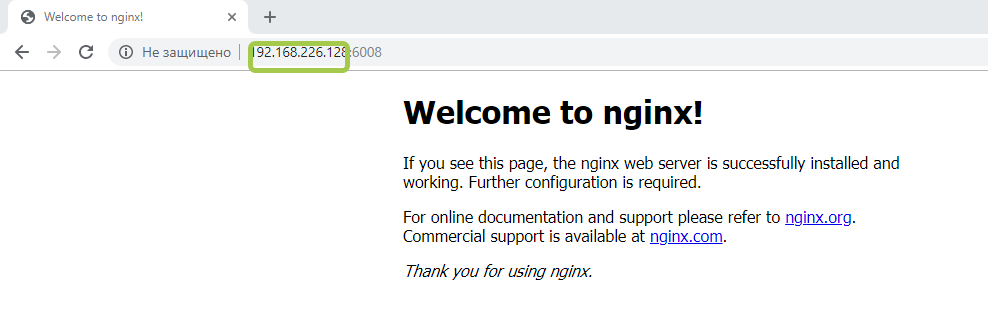
Шаг 6 Изменение конфигурации контейнеров
В нашем yaml файле мы только что использовали минимальный код для запуска сервиса. Теперь, если мы хотим указать больше данных конфигурации, к примеру изменить в nginx на указанный вручную порт, мы можем сделать это, мы можем это исправить приведя yaml файл dcoker compose к виду:
Перезапустим docker compose и вновь проверим состояния docker выполнив docker ps:
Проверим переадресацию портов перейдя в браузере по адресу http://ip:6008 если настройка прошла успешно перед нами появится страница приветствия Nginx. В моем случае ip — адрес: 192.168.226.128
Шаг 7 Остановка Docker Compose
Остановить работу docker контейнеров Вы можете выполнив команду:
После проверки Вы увидите, что все контейнеры docker остановлены.

Предположим, вам нужно расширить вашу базу данных и вам нужно четыре экземпляра базы данных вместо одного . Вы можете увеличить количество сервисов, следующей командой:
Проверим количество контейнеров database выполнив: docker ps
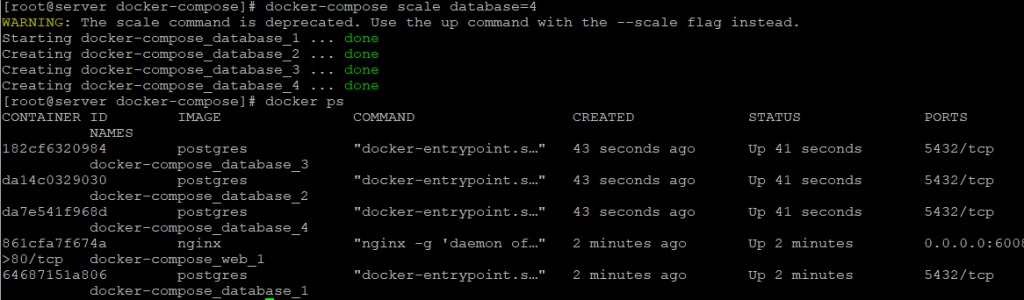
вы можете видеть, что у нас запущен один сервер nginx и запущены целых четыре службы баз данных.
Теперь остановите работу контейнеров docker-compose down
О, круто! К настоящему времени мы закончили с основными docker-compose .
Источник
Compose file versions and upgrading
Estimated reading time: 15 minutes
The Compose file is a YAML file defining services, networks, and volumes for a Docker application.
The Compose file formats are now described in these references, specific to each version.
| Reference file | What changed in this version |
|---|---|
| Compose Specification (most current, and recommended) | Versioning |
| Version 3 | Version 3 updates |
| Version 2 | Version 2 updates |
| Version 1 (Deprecated) | Version 1 updates |
The topics below explain the differences among the versions, Docker Engine compatibility, and how to upgrade.
Compatibility matrix
There are several versions of the Compose file format – 1, 2, 2.x, and 3.x
This table shows which Compose file versions support specific Docker releases.
| Compose file format | Docker Engine release |
|---|---|
| Compose specification | 19.03.0+ |
| 3.8 | 19.03.0+ |
| 3.7 | 18.06.0+ |
| 3.6 | 18.02.0+ |
| 3.5 | 17.12.0+ |
| 3.4 | 17.09.0+ |
| 3.3 | 17.06.0+ |
| 3.2 | 17.04.0+ |
| 3.1 | 1.13.1+ |
| 3.0 | 1.13.0+ |
| 2.4 | 17.12.0+ |
| 2.3 | 17.06.0+ |
| 2.2 | 1.13.0+ |
| 2.1 | 1.12.0+ |
| 2.0 | 1.10.0+ |
In addition to Compose file format versions shown in the table, the Compose itself is on a release schedule, as shown in Compose releases, but file format versions do not necessarily increment with each release. For example, Compose file format 3.0 was first introduced in Compose release 1.10.0, and versioned gradually in subsequent releases.
The latest Compose file format is defined by the Compose Specification and is implemented by Docker Compose 1.27.0+.
Looking for more detail on Docker and Compose compatibility?
We recommend keeping up-to-date with newer releases as much as possible. However, if you are using an older version of Docker and want to determine which Compose release is compatible, refer to the Compose release notes. Each set of release notes gives details on which versions of Docker Engine are supported, along with compatible Compose file format versions. (See also, the discussion in issue #3404.)
For details on versions and how to upgrade, see Versioning and Upgrading.
Versioning
There are three legacy versions of the Compose file format:
Version 1. This is specified by omitting a version key at the root of the YAML.
Version 2.x. This is specified with a version: ‘2’ or version: ‘2.1’ , etc., entry at the root of the YAML.
Version 3.x, designed to be cross-compatible between Compose and the Docker Engine’s swarm mode. This is specified with a version: ‘3’ or version: ‘3.1’ , etc., entry at the root of the YAML.
The latest and recommended version of the Compose file format is defined by the Compose Specification. This format merges the 2.x and 3.x versions and is implemented by Compose 1.27.0+.
v2 and v3 Declaration
Note: When specifying the Compose file version to use, make sure to specify both the major and minor numbers. If no minor version is given, 0 is used by default and not the latest minor version.
The Compatibility Matrix shows Compose file versions mapped to Docker Engine releases.
To move your project to a later version, see the Upgrading section.
Note: If you’re using multiple Compose files or extending services, each file must be of the same version — you cannot, for example, mix version 1 and 2 in a single project.
Several things differ depending on which version you use:
- The structure and permitted configuration keys
- The minimum Docker Engine version you must be running
- Compose’s behaviour with regards to networking
These differences are explained below.
Version 1 (Deprecated)
Compose files that do not declare a version are considered “version 1”. In those files, all the services are declared at the root of the document.
Version 1 is supported by Compose up to 1.6.x. It will be deprecated in a future Compose release.
Version 1 files cannot declare named volumes, networks or build arguments.
Compose does not take advantage of networking when you use version 1: every container is placed on the default bridge network and is reachable from every other container at its IP address. You need to use links to enable discovery between containers.
Version 2
Compose files using the version 2 syntax must indicate the version number at the root of the document. All services must be declared under the services key.
Version 2 files are supported by Compose 1.6.0+ and require a Docker Engine of version 1.10.0+.
Named volumes can be declared under the volumes key, and networks can be declared under the networks key.
By default, every container joins an application-wide default network, and is discoverable at a hostname that’s the same as the service name. This means links are largely unnecessary. For more details, see Networking in Compose.
When specifying the Compose file version to use, make sure to specify both the major and minor numbers. If no minor version is given, 0 is used by default and not the latest minor version. As a result, features added in later versions will not be supported. For example:
Источник


