edrawmax.co
Iperf For Mac Os
Compiling and Using iperf3 on OS X
The app can operate as a client and/or server. WiFiPerf can be used for OS X-to-OS X testing or iOS-to-OS X testing. WiFiPerf should work with other operating systems that support iPerf3 and free WiFiPerf Endpoints. WiFiPerf can be used for both wired and wireless network testing. Compatibility: WiFiPerf is based on iPerf 3.x version.
Mac OS; iOS; Android; Windows. IPerf Compatibility. WiFiPerf will work with any operating system that supports iPerf3. Note: iPerf3 is not the same or compatible with iPerf, iPerf2 or jPerf. WiFiPerf iOS — iOS App Store. Download WiFiPerf Endpoints. WiFiPerf User Guide. But if 20 seconds after the iperf -s -t 30 a client connect, e.g. Iperf -c -t 30, then the listener/server will to stay around for 20 + 30 seconds before terminating. (Note: The client’s -t isn’t passed to the server so the server -t needs to be equal or greater than the clients -t.). Cd /Documents/; chmod u+x iperf. Or, if you have the Mac OS X developer tools, you can download and compile a newer version. Go to Sourceforge to get the iperf source code. Click on the Download.
iperf is a free and open source network testing utility that allows you to measure the speed of IP networks. It has been around for many years and has undergone some major updates along the way. Because of its long history and many iterations, I have always found it a little confusing to get started with. For the purposes of this blog, I am going to focus on the latest incarnation which is iperf3. The official home of iperf3 is http://software.es.net/iperf/.
I primarily work with Wi-Fi and I use iperf3 to test the performance of wireless networks. If you work with wired networks, have no fear; the steps I outline below will serve you equally well. If you are intimidated by using the command line and the thought of compiling an application from source code makes you break out in a cold sweat, this blog post may not be for you. However, many folks have turned iperf3 into precompiled software that can be purchased for use on OS X or iOS through the respective App Stores. There may be commercial versions available for Windows and Android as well, but I am too lazy to look. Finally, if you are comfortable with Linux or FreeBSD, there are precompiled binary distributions for those platforms. Check the iperf3 web site for links.
iperf3 can be used in a variety of ways, but I find it especially useful in change impact analysis. I run iperf3 to establish a baseline. I then make one or more changes to the network and run my iperf3 tests again to see if the results changed. I also use iperf3 to test the current load on a wireless network. If I have measurements from a time when the network was underutilized, I can compare those results to what is currently happening on the network and make some determination about what users are experiencing. iperf is a great way to put some numbers behind your observations. You can tell somebody that their network is running slowly or you can show them actual performance metrics to back it up.
To get started you will need to download the latest version of the iperf3 source code. The link to the download site is:
If you need a specific version, they are all listed on the site. The latest version at the time of this writing is 3.1.2 and I will refer to that version through the examples. Although there is a quick link at the top of the site named “iperf-3-current.tar.gz” that will always download the latest version, spend a few extra seconds and locate the latest version in the list. If you do that, you will find three separate files:
- iperf-3.1.2.tar.gz — the source files in a compressed archive
- iperf-3.1.2.tar.gz.sha256 — the sha256 cryptographic hash of the source archive file
- iperf-3.1.2.txt.asc — a text file with information about the current version of iperf3
Download the compressed archive file and the sha256 file.
Open the Terminal application
Change to the directory containing the two files you just downloaded. On my system that command looks like this:
The tilde character (
) is a shortcut for the path to your home directory. On an OS X system, that would typically be something like /Users/johndoe and the longhand version of the above command would be:
Run the following command to generate the sha256 hash for the archive file:
shasum -a 256 iperf-3.1.2.tar.gz
That should return a long string of text that looks something like this:
Compare that string of text to the contents of the iperf-3.1.2.tar.gz.sha256 file (it’s a text file and can be viewed in your favorite text editor). They should be an exact match. If there is any difference, then you may have downloaded a compromised version of the archive file and you should stop immediately, not open the archive, and certainly not compile the source code. Admittedly this is a rare occurrence, but it never hurts to be careful and spend a few extra minutes on good security. Also keep in mind that the sha256 value will be different if you are working with a different version of the files. Don’t worry if you don’t match what I recorded here. Focus on what your system calculates and compare that to the contents of the .sha256 file you downloaded.
Everybody has their own way of setting up a build environment. I like to keep the source archive files in one directory (usually Downloads) and create a dedicated directory (cleverly named “Build”) where I extract the archives and compile the software. Both Downloads and Build sit at the top of my home directory. That is the model I will be using here and you are welcome to adapt the commands to suit your own setup.
I begin by changing to my Build directory and then I unarchive the iperf-3.1.2.tar.gz file.
You should have a new directory named iperf-3.1.2 sitting in your Build directory. Change into that directory:
For your edification, be sure to read the INSTALL text file located in the iperf-3.1.2 directory. It has detailed instructions on how to compile and install the software. Oh good, you’re back. Let’s continue by running the configure command to set our compile options.
By default iperf3 will be installed in the /usr/local/bin directory. If you prefer a different location, you can run the configure command with the —prefix= option. For example, if I wanted the software installed into my home directory in a folder called iperf3, then I would run this command:
Iperf For Mac Os X
character in the example above because it was hard to read squished up next to the equal sign, and, more importantly I discovered, prefix demands an unambiguous full path.
If you have compiled software before and/or if you already have Xcode installed, you should see the configure command do its thing and spew many lines of text across your Terminal window. However, if this is your first time compiling software, you may see this window appear:
Compiling and Using iperf3 on OS X
Iperf For Mac Os
iperf is a free and open source network testing utility that allows you to measure the speed of IP networks. It has been around for many years and has undergone some major updates along the way. Because of its long history and many iterations, I have always found it a little confusing to get started with. For the purposes of this blog, I am going to focus on the latest incarnation which is iperf3. The official home of iperf3 is http://software.es.net/iperf/.
I primarily work with Wi-Fi and I use iperf3 to test the performance of wireless networks. If you work with wired networks, have no fear; the steps I outline below will serve you equally well. If you are intimidated by using the command line and the thought of compiling an application from source code makes you break out in a cold sweat, this blog post may not be for you. However, many folks have turned iperf3 into precompiled software that can be purchased for use on OS X or iOS through the respective App Stores. There may be commercial versions available for Windows and Android as well, but I am too lazy to look. Finally, if you are comfortable with Linux or FreeBSD, there are precompiled binary distributions for those platforms. Check the iperf3 web site for links.
Realtek rtl8168 for mac. iperf3 can be used in a variety of ways, but I find it especially useful in change impact analysis. I run iperf3 to establish a baseline. I then make one or more changes to the network and run my iperf3 tests again to see if the results changed. I also use iperf3 to test the current load on a wireless network. If I have measurements from a time when the network was underutilized, I can compare those results to what is currently happening on the network and make some determination about what users are experiencing. iperf is a great way to put some numbers behind your observations. You can tell somebody that their network is running slowly or you can show them actual performance metrics to back it up.
To get started you will need to download the latest version of the iperf3 source code. The link to the download site is:
If you need a specific version, they are all listed on the site. The latest version at the time of this writing is 3.1.2 and I will refer to that version through the examples. Although there is a quick link at the top of the site named “iperf-3-current.tar.gz” that will always download the latest version, spend a few extra seconds and locate the latest version in the list. If you do that, you will find three separate files:
- iperf-3.1.2.tar.gz — the source files in a compressed archive
- iperf-3.1.2.tar.gz.sha256 — the sha256 cryptographic hash of the source archive file
- iperf-3.1.2.txt.asc — a text file with information about the current version of iperf3
Download the compressed archive file and the sha256 file.
Open the Terminal application
Change to the directory containing the two files you just downloaded. On my system that command looks like this:

The tilde character (
) is a shortcut for the path to your home directory. On an OS X system, that would typically be something like /Users/johndoe and the longhand version of the above command would be:
Run the following command to generate the sha256 hash for the archive file:
shasum -a 256 iperf-3.1.2.tar.gz
That should return a long string of text that looks something like this:
Compare that string of text to the contents of the iperf-3.1.2.tar.gz.sha256 file (it’s a text file and can be viewed in your favorite text editor). They should be an exact match. If there is any difference, then you may have downloaded a compromised version of the archive file and you should stop immediately, not open the archive, and certainly not compile the source code. Admittedly this is a rare occurrence, but it never hurts to be careful and spend a few extra minutes on good security. Also keep in mind that the sha256 value will be different if you are working with a different version of the files. Don’t worry if you don’t match what I recorded here. Focus on what your system calculates and compare that to the contents of the .sha256 file you downloaded.
Everybody has their own way of setting up a build environment. I like to keep the source archive files in one directory (usually Downloads) and create a dedicated directory (cleverly named “Build”) where I extract the archives and compile the software. Both Downloads and Build sit at the top of my home directory. That is the model I will be using here and you are welcome to adapt the commands to suit your own setup.
I begin by changing to my Build directory and then I unarchive the iperf-3.1.2.tar.gz file.
You should have a new directory named iperf-3.1.2 sitting in your Build directory. Change into that directory:
For your edification, be sure to read the INSTALL text file located in the iperf-3.1.2 directory. It has detailed instructions on how to compile and install the software. Oh good, you’re back. Let’s continue by running the configure command to set our compile options.
By default iperf3 will be installed in the /usr/local/bin directory. If you prefer a different location, you can run the configure command with the —prefix= option. For example, if I wanted the software installed into my home directory in a folder called iperf3, then I would run this command:
character in the example above because it was hard to read squished up next to the equal sign, and, more importantly I discovered, prefix demands an unambiguous full path.
Iperf Mac Os X Brew
If you have compiled software before and/or if you already have Xcode installed, you should see the configure command do its thing and spew many lines of text across your Terminal window. However, if this is your first time compiling software, you may see this window appear:
Источник
Installing iPerf on a Mac OS X system
It can be used to determine available bandwidth using both Transmission Control Protocol (TCP) and User Datagram Protocol (UDP) data streams.
To install an already compiled version of iPerf on a Mac OS X system, such as a MacBook Pro laptop, download the Apple macOS Intel 64bits version. The latest version is a 3.x version. You will need matching versions on both the client and server systems. E.g., a 2.x version on both or a 3.x version on both. The software is available in ZIP file format. If you double-click on the zip file in the Apple Finder application, a Unix Executable File will be extracted from the .zip file, e.g., iperf3 . You can move the file to the Applications/Utilities directory or place it wherever you like on the system.
To run the program, open a Terminal window — the Terminal application is found in the Applications/Utilities directory. If you type /pathtofile/iperf3 -h , where pathtofile is the location where you placed the executable file, for the iperf3 version you will see the following «help» information on the usage of the program:
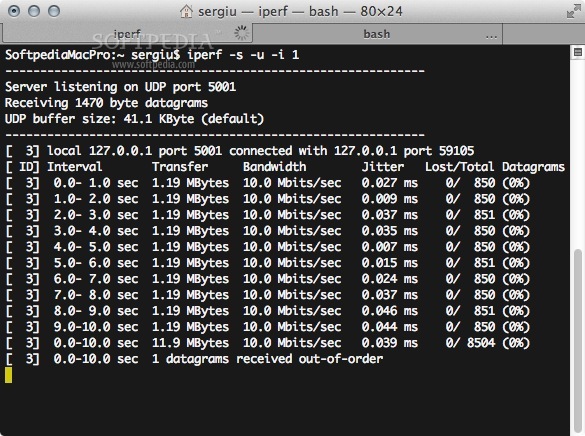
If you run iPerf version 3in server mode with the command iperf -s , you will see the following:
Version 3 of the program listens on TCP port 5201 by default whereas version 2.x versions listen on TCP port 5001 by default.
You will also see a window open with the following question (image):
![]()
Do you want the application «iperf3» to
accept incoming network connections?
Clicking Deny may limit the application’s behavior.
This setting can be changed in the Firewall pane of
Security & Privacy preferences.
You will need to click on Allow to allow external systems running iPerf in client mode to connect to the system. You can terminate the program from the command line by hitting control-C , i.e., hit the control and c keys simultaneously.
You can check on whether iPerf is allowed to listen for incoming connections on an OS X system by the following steps:
- Click on the Apple icon at the top, left-hand corner of the screen and select System Preferences.
- Click on Security & Privacy.
- Click on the Firewall tab. If the padlock icon is showing a closed lock, click on it to unlock it, which will require that you provide credentials for an account with administrator level access to the system.
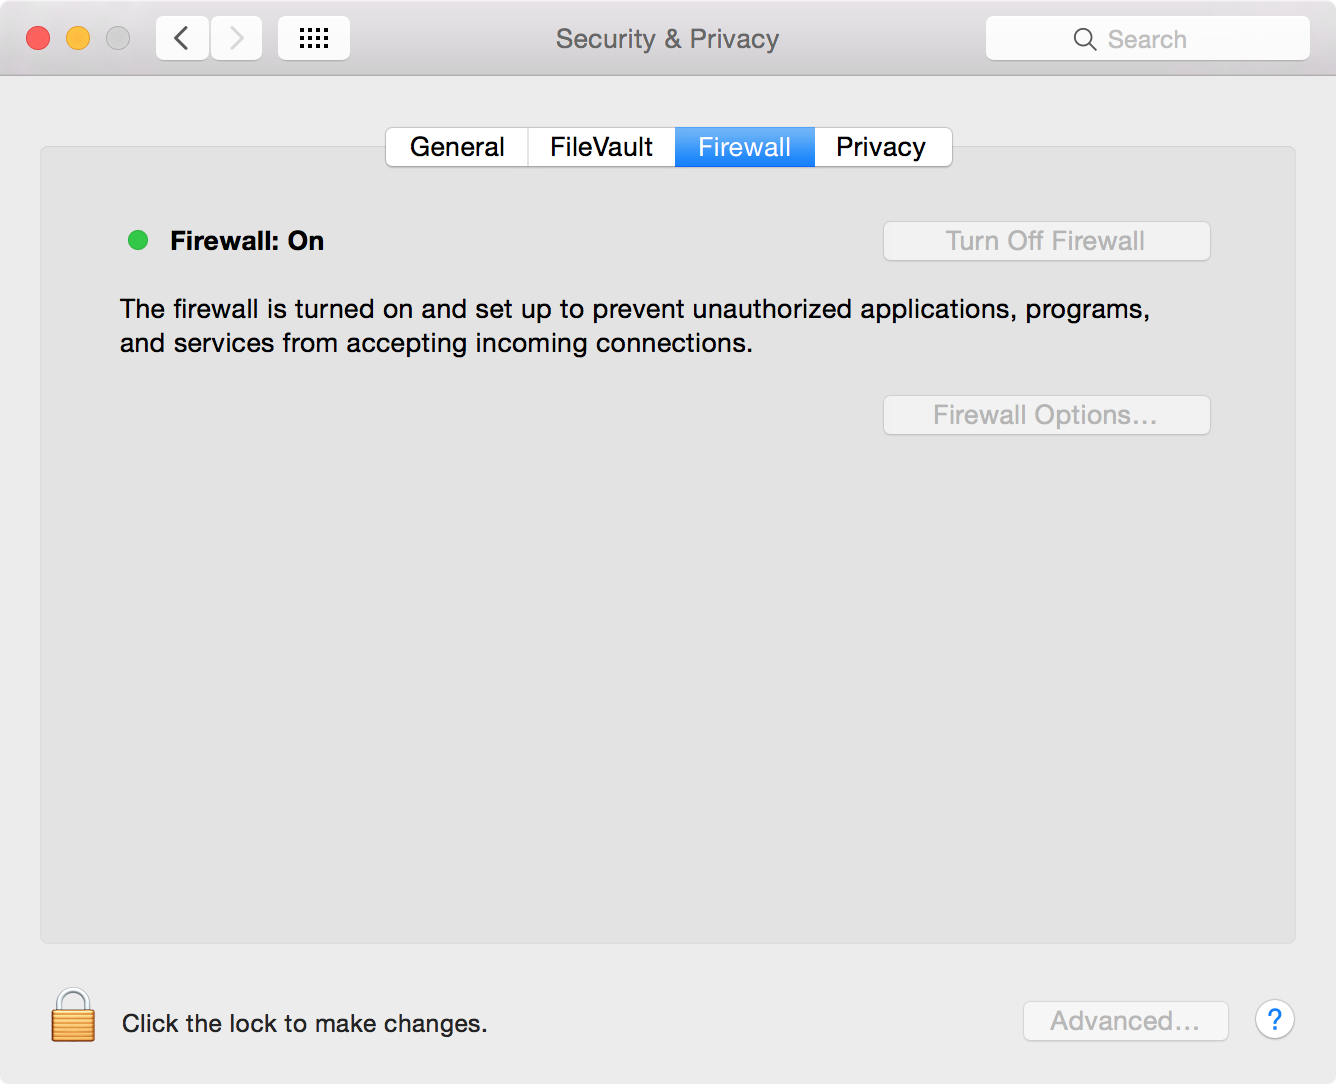
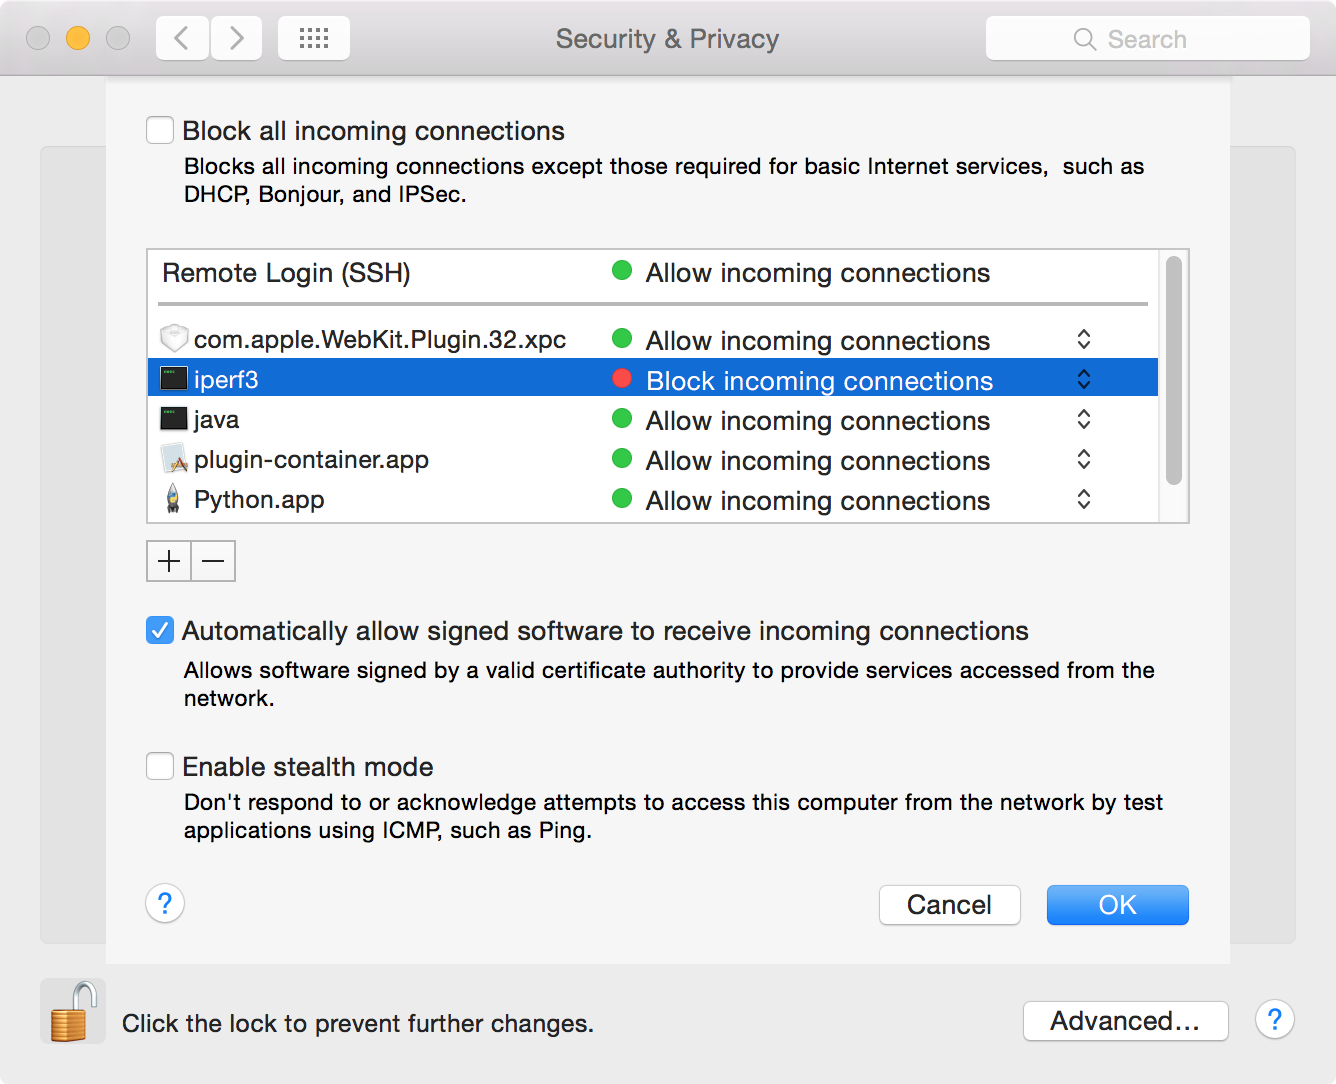
Then click on Firewall Options. You should see iPerf listed. If you see «Block incoming connections» click on «Block incoming connections» and choose «Allow incoming connections» instead.

You can determine if iperf is allowed to accept incoming connections from a command line interface (CLI), e.g., a Terminal window — the Terminal program is found in the Applications/Utilities directory — by using the socketfilterfw —listapps command as shown below:
The above command shows the status of firewall rules for other applications as well; you can restrict the displayed output to just the rule for iperf with the command shown below:
If the firewall software on the system is blocking incoming connectivity to iperf, you would see the following, instead.
To run iPerf in client mode to connect to an external iPerf system, use the command iperf -c remotehost where remotehost is the IP address or fully qualified domain name (FQDN) for the remote system. E.g., the iPerf output included below is from a test to a publicly available iPerf server, bouygues.testdebit.info .
- Using iperf on a Microsoft Windows system
Created: Tuesday June 28, 2016
Last modified: Tuesday June 28, 2016
MoonPoint Support - Installing iperf on CentOS
Created: Tuesday October 27, 2015
Last modified: Tuesday October 27, 2015 MoonPoint Support
Created: Saturday October 22, 2016
Last modified: Saturday October 22, 2016 10:55 PM
Источник


