- How To Install and Use Telnet Client In Linux and Windows
- Install
- Ubuntu, Debian, Mint, Kali
- Fedora, CentOS, RHEL
- Windows
- Security
- Connect Telnet Server
- Connect Different Telnet Port
- Specify Login Name
- Interactive Shell
- Статья Доступ к хосту используя TELNET
- Как пользоваться telnet
- Что такое Telnet?
- Как пользоваться telnet?
- 1. Доступность сервера
- 2. Проверка порта
- 3. Отладка
- 4. Консоль telnet
- 5. Посмотреть сайт telnet
- 6. Удаленное управление telnet
- Выводы
- Telnet kali linux
- Как пользоваться telnet
- Что такое Telnet?
- Как пользоваться telnet?
- 1. Доступность сервера
- 2. Проверка порта
- 3. Отладка
- 4. Консоль telnet
- 5. Посмотреть сайт telnet
- 6. Удаленное управление telnet
- Выводы
- Hacking Articles
- Raj Chandel’s Blog
- Penetration Testing on Telnet (Port 23)
- SSH Banner grabbing through telnet
- SMTP Banner grabbing through telnet
- Telnet Banner Grabbing through Metasploit
- Brute Force Attack
- Stealing credential through sniffing
- Secure Telnet through Port forwarding
- Kali Linux Cheat Sheet for Penetration Testers
- Recon and Enumeration
- NMAP Commands
- SMB enumeration
- Other Host Discovery
- SMB Enumeration
- Python Local Web Server
- Mounting File Shares
- Basic FingerPrinting
- SNMP Enumeration
- DNS Zone Transfers
- DNSRecon
- HTTP / HTTPS Webserver Enumeration
- Packet Inspection
- Username Enumeration
- SMB User Enumeration
- SNMP User Enumeration
- Passwords
- Wordlists
- Brute Forcing Services
- Hydra FTP Brute Force
- Hydra POP3 Brute Force
- Hydra SMTP Brute Force
- Password Cracking
- John The Ripper – JTR
- Exploit Research
- SUID C Shell for /bin/sh
- Building the SUID Shell binary
- TTY Shells
- Python TTY Shell Trick
- Spawn Interactive sh shell
- Spawn Perl TTY Shell
- Spawn Ruby TTY Shell
- Spawn Lua TTY Shell
- Spawn TTY Shell from Vi
- Spawn TTY Shell NMAP
- Metasploit
- Kali Linux Telnet Bruteforce Cve 1999 0502
- Metasploitable 2 : Vulnerability assessment and Remote Login
- Portscan
- Vulnerabilities
- Exploiting The Vulnerabilities
- Remote access vulnerability — Rlogin
How To Install and Use Telnet Client In Linux and Windows
Telnet is easiest remote management protocol used in Computer networks. It remains popular even today because of its simplicity. Telnet is a client server protocol where clients uses telnet tool which to connect remote telnet server. This telnet server may be switch, router, windows operating system, linux server or a printer. In this tutorial we will look how to install and enable telnet with some usage examples.
Install
Ubuntu, Debian, Mint, Kali
We can install telnet package with the following command in deb based Linux distributions.
Fedora, CentOS, RHEL
We can install telnet package with yum command for rpm based distributions like Fedora, centOS and RHEL.
Windows
As windows operating system do not have online package manager telnet is provided by inline. By defualt telnet server and client applications are not enabled. We will enable the client where server can be enabled too. Follow these instructions.
- Click Start >Control Panel.
- Click Programs and Features.
- Click Turn Windows features on or off.
- In the Windows Features dialog box, check the Telnet Client check box.
 Windows
Security
As telnet is old fashion protocol it provides some defects. One of the most important negative issue with telnet is its security features. Telnet do not have any encryption support as builtin. So telnet traffic can be easily eavesdropped during transmission. So do not rely telnet on insecure networks.
Connect Telnet Server
We will start by simply connecting a telnet server. The simplest form is just providing the host name or IP address of the telnet server. The syntax is like below. In this example telnet server is a Ubuntu 17.10 .
 Connect Telnet Server
Connect Different Telnet Port
The default port for telnet is TCP 23 . By default it is not specified during connection. But in some cases telnet server may use different then 23. We can specify the port number by adding after the host name or IP address. In this example we will connect port number 2323 .
Specify Login Name
Most cases telnet servers requires authentication. In order to authenticate ourself we need to provide some user name and password. The regular usage is providing username and then put password interactively. We will use -l which stands for login.
Interactive Shell
Telnet provides interactive shell where it provides its own environment. We can enter interactive shell just putting telnet command.
We can get help for interactive shell with help command. We can see that we will use open command and the hostname or IP address to connect telnet server.
 help
help
We will connect to the localhost telnet server.
 Open Connection
Источник
Статья Доступ к хосту используя TELNET
Привет. В этой статье я хочу показать несколько способов получения доступа к удаленному хосту с помощью протокола telnet.
Протокол прикладного уровня TELNET (от англ. TErminaL NETwork) — сетевой протокол для реализации текстового интерфейса по сети. Название telnet получили также клиентские программы реализации данного протокола, практически для всех существующих операционных систем.
Из плюсов нужно отметить простоту, быстроту и удобство протокола. Меньше чем за минуту удобный клиент обратится к выбранному TCP-порту сервера и создаст эмуляцию локального терминала. Стандартный его рабочий порт — 23. На самом деле и «прослушивать», и «разговаривать» по Telnet можно на любом порте. Именно в этом и заключается гибкость работы протокола.

Мною в качестве атакующей системы, будет использоваться Kali Linux 2016.2 Rolling, а в качестве подопытного Windows Server 2008.
1. Первый способ – Medusa:
Медуза предназначена для быстрого, массового параллельного, модульного, брутфорса связок логина – пароля.
> medusa –h 172.16.0.232 –u Administrator –P /root/password.txt –M telnet
Как видим в итоге, пароль был найден, и брутфорс прекратился.
2. Hydra – она не нуждается в представлении.
Вводим следующую команду:
> hydra -l Administrator –P /root/password.txt 172.16.0.232 telnet
Гидра работает быстрее, примерно через секунду получаем результат:
3. Еще один способ, это собственные средства Metasploit Framework, сканер telnet.
Запускаем фреймворк, затем запускаем сканер.
> set rhosts 172.16.0.232
> set verbose true
Тут нам понадобится файл со связками логина и пароля.
Запускаем сканер, и он тоже не заставляет себя долго ждать:
Источник
Как пользоваться telnet
Telnet — это сетевая утилита, которая позволяет соединиться с удаленным портом любого компьютера и установить интерактивный канал связи, например, для передачи команд или получения информации. Можно сказать, что это универсальный браузер в терминале, который умеет работать со множеством сетевых протоколов.
Эта утилита очень часто использовалась раньше, для удаленного управления компьютером с Linux, но потом ей на замену пришел защищенный протокол SSH. Но telnet все еще используется, например, для тестирования сети, проверки портов, а также для взаимодействия с различными IoT устройствами и роутерами. В этой статье мы рассмотрим что такое telnet, а также как пользоваться telnet для решения своих задач.
Что такое Telnet?
Как я уже сказал, эта утилита предназначена для создания интерактивного соединения между удаленными компьютерами. Она работает по протоколу TELNET, но этот протокол поддерживается многими сервисами, поэтому ее можно использовать для управления ими. Протокол работает на основе TCP, и позволяет передавать обычные строковые команды на другое устройство. Он может использоваться не только для ручного управления но и для взаимодействия между процессами.
Для работы с этим протоколом мы будем использовать утилиту telnet, ею очень просто пользоваться. Давайте рассмотрим синтаксис telnet:
$ telnet опции хост порт
Хост — это домен удаленного компьютера, к которому следует подключиться, а порт — порт на этом компьютере. А теперь давайте рассмотрим основные опции:
- -4 — принудительно использовать адреса ipv4;
- -6 — принудительно использовать адреса ipv6;
- -8 — использовать 8-битную кодировку, например, Unicode;
- -E — отключить поддержку Escape последовательностей;
- -a — автоматический вход, берет имя пользователя из переменной окружения USER;
- -b — использовать локальный сокет;
- -d — включить режим отладки;
- -р — режим эмуляции rlogin;
- -e — задать символ начала Escape последовательности;
- -l — пользователь для авторизации на удаленной машине.
Это все, что касается команды telnet для установки соединения. Но соединение с удаленным хостом, это только полдела. После установки подключения telnet может работать в двух режимах:
- Построчный — это предпочтительный режим, здесь строка текста редактируется на локальном компьютере и отправляется только тогда, когда она будет полностью готова. На такая возможность есть не всегда и не у всех сервисов;
- Посимвольный — все набираемые вами символы отправляются на удаленный сервер. Тут будет сложно что-либо исправить, если вы допустили ошибку, потому что Backspace тоже будет отправляться в виде символа и стрелки движения тоже.
Использование telnet заключается в передаче специальных команд. У каждого сервиса свои команды, но у протокола есть свои команды telnet, которые можно применять в консоли telnet.
- CLOSE — закрыть соединение с сервером;
- ENCRYPT — шифровать все передаваемые данные;
- LOGOUT — выйти и закрыть соединение;
- MODE — переключить режим, со строчного на символьный или с символьного на строчный;
- STATUS — посмотреть статус соединения;
- SEND — отправить один из специальных символов telnet;
- SET — установить значение параметра;
- OPEN — установить подключение через telnet с удаленным узлом;
- DISPLAY — отобразить используемые спецсимволы;
- SLC — изменить используемые спецсимволы.
Мы не будем рассматривать все команды, поскольку они вам вряд ли понадобятся, а если и понадобятся, то вы легко сможете их найти в официальной документации.
Как пользоваться telnet?
Дальше мы рассмотрим как использовать telnet для решения ваших задач. Обычно, утилита уже установлена в большинстве систем, но если это не так, то вы можете установить telnet из официальных репозиториев, например, в Ubuntu:
sudo apt install telnet
Теперь перейдем к применению утилиты. Изначально она использовалась для удаленного управления компьютером, но поскольку потом был разработан более безопасный протокол SSH, использовать ее перестали.
1. Доступность сервера
Утилита все еще может быть полезной при поверке доступности узла, для этого просто передайте ей ip адрес или имя хоста:

Для этого не обязательно применять telnet, есть ping.
2. Проверка порта
C помощью telnet мы можем проверить доступность порта на узле, а это уже может быть очень полезным. Чтобы проверить порт telnet выполните:
telnet localhost 123
$ telnet localhost 22
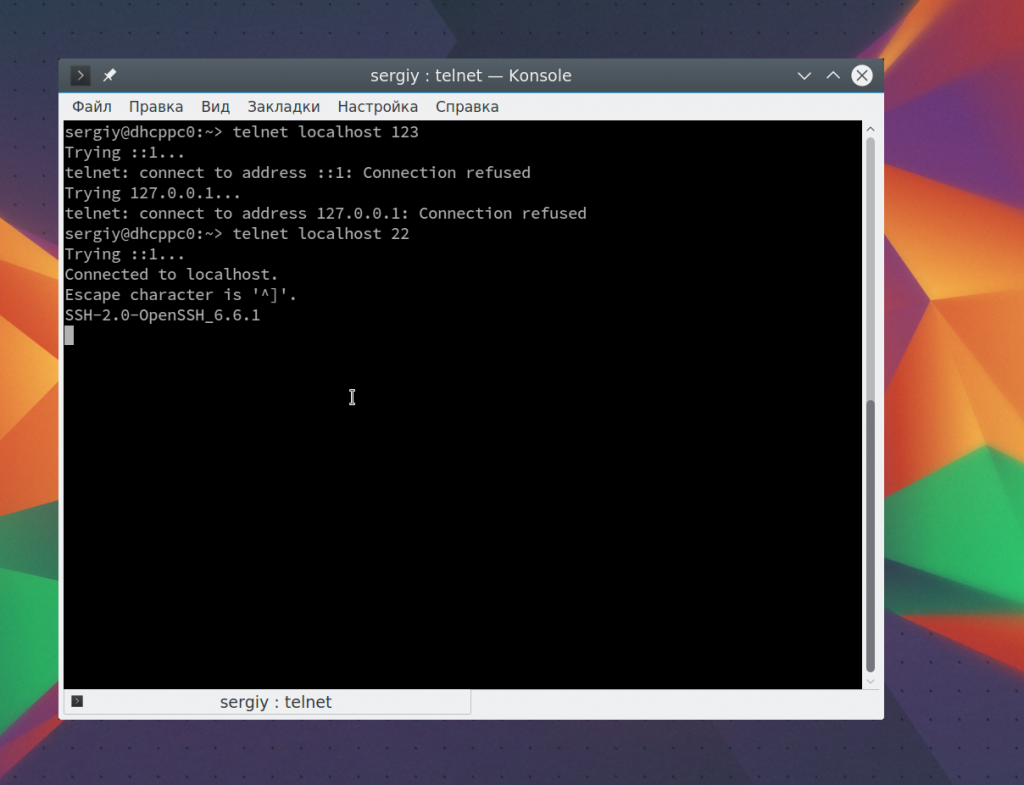
В первом случае мы видим, что соединение никто не принимает, во втором же выводится сообщение об успешном подключении и приветствие SSH сервера.
3. Отладка
Чтобы включить режим отладки и выводить более подробную информацию во время работы используйте опцию -d во время подключения:
sudo telnet -d localhost 22
4. Консоль telnet
Использование консоли telnet тоже важный момент в разборе как пользоваться telnet. В основном режиме вы можете выполнять команды, на удаленном сервере, если же вы хотите адресовать команду именно telnet, например, для настройки ее работы, необходимо использовать спецсимвол для открытия консоли, обычно утилита сразу говорит вам что это за символ, например, по умолчанию используется «^[«:
Для его активации вам нужно нажать сочетание клавиш Ctrl+[, затем вы уведите приглашение ввода telnet.
Чтобы посмотреть все доступные команды, вы можете набрать ?. Например, вы можете посмотреть статус подключения:
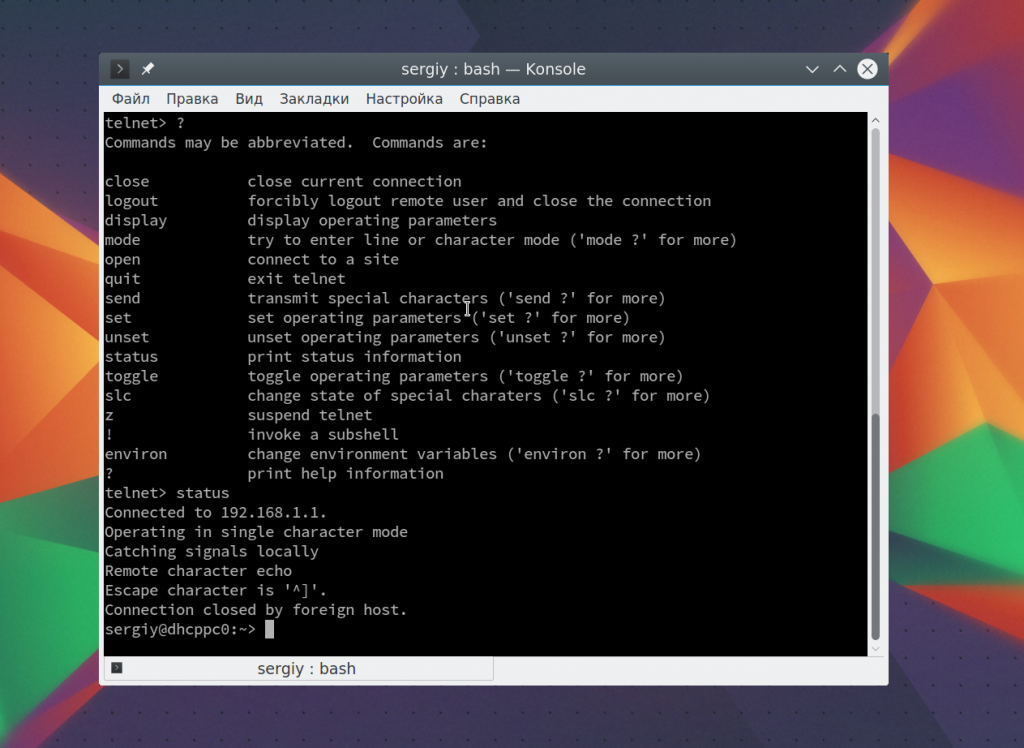
Здесь есть и другие интересные возможности. Такие вещи можно проделывать при любом подключении с помощью утилиты telnet.
5. Посмотреть сайт telnet
Один из распространенных способов использования telnet — это тестирование сайта из консоли. Да, красивую веб-страницу вы не получите, но можете вручную собрать запросы и видеть все переданные сервером данные.
telnet opennet.ru 80
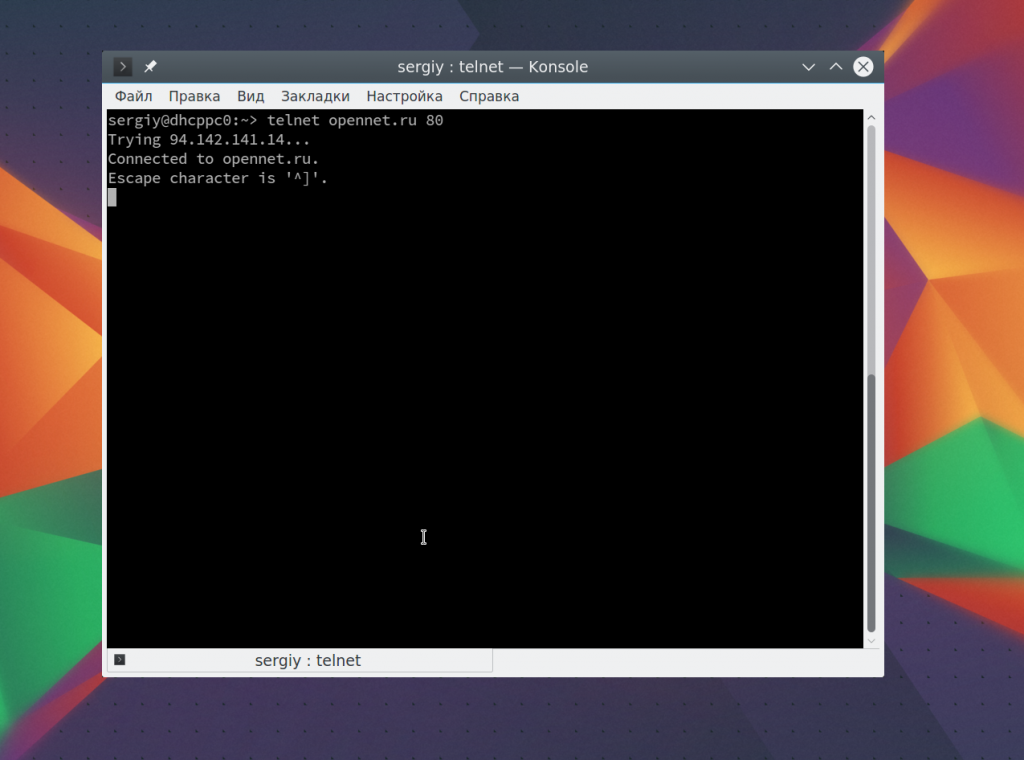 Затем наберите команду веб-серверу:

Веб сервер вернет полностью страницу, а также заголовки, которые необходимы для ее отображения браузером.
6. Удаленное управление telnet
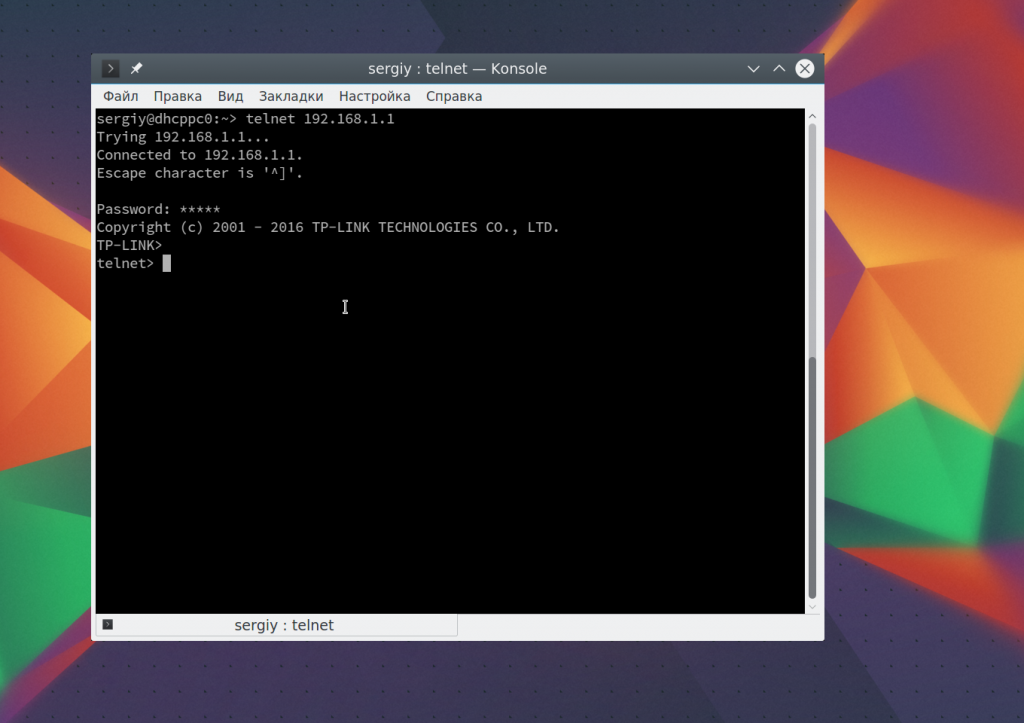
Настоятельно не рекомендуется использовать небезопасный telnet для удаленного управления, потому что все команды и пароли могут быть прослушаны сторонним пользователем. Но иногда, например, для роутеров telnet все же используется для удаленного управления. Все работает точно так же, как и для других подключений, только нужно использовать порт 23, а на удаленном компьютере должен быть установлен telnet-server:
telnet localhost 23
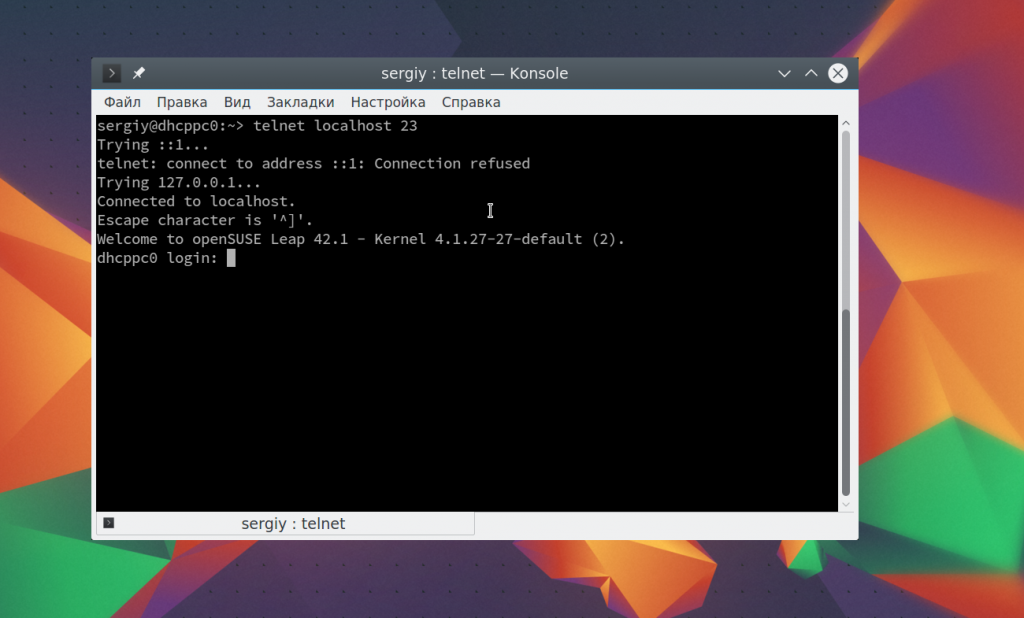 Тут порт можно даже не указывать, потому что по умолчанию будет использоваться именно 23. Далее, вам нужно ввести логин и пароль, а затем вы сможете выполнять команды в удаленной системе.
Выводы
В этой статье мы рассмотрели примеры использования telnet, а также что представляет из себя эта утилита, хотя она уже не используется по своему основному назначению, но до сих пор может быть полезной многим пользователям и системным администраторам. Если у вас остались вопросы, спрашивайте в комментариях!
Источник
Telnet kali linux
Как пользоваться telnet
Telnet — это сетевая утилита, которая позволяет соединиться с удаленным портом любого компьютера и установить интерактивный канал связи, например, для передачи команд или получения информации. Можно сказать, что это универсальный браузер в терминале, который умеет работать со множеством сетевых протоколов.
Эта утилита очень часто использовалась раньше, для удаленного управления компьютером с Linux, но потом ей на замену пришел защищенный протокол SSH. Но telnet все еще используется, например, для тестирования сети, проверки портов, а также для взаимодействия с различными IoT устройствами и роутерами. В этой статье мы рассмотрим что такое telnet, а также как пользоваться telnet для решения своих задач.
Что такое Telnet?
Как я уже сказал, эта утилита предназначена для создания интерактивного соединения между удаленными компьютерами. Она работает по протоколу TELNET, но этот протокол поддерживается многими сервисами, поэтому ее можно использовать для управления ими. Протокол работает на основе TCP, и позволяет передавать обычные строковые команды на другое устройство. Он может использоваться не только для ручного управления но и для взаимодействия между процессами.
Для работы с этим протоколом мы будем использовать утилиту telnet, ею очень просто пользоваться. Давайте рассмотрим синтаксис telnet:
$ telnet опции хост порт
Хост — это домен удаленного компьютера, к которому следует подключиться, а порт — порт на этом компьютере. А теперь давайте рассмотрим основные опции:
- -4 — принудительно использовать адреса ipv4;
- -6 — принудительно использовать адреса ipv6;
- -8 — использовать 8-битную кодировку, например, Unicode;
- -E — отключить поддержку Escape последовательностей;
- -a — автоматический вход, берет имя пользователя из переменной окружения USER;
- -b — использовать локальный сокет;
- -d — включить режим отладки;
- -р — режим эмуляции rlogin;
- -e — задать символ начала Escape последовательности;
- -l — пользователь для авторизации на удаленной машине.
Это все, что касается команды telnet для установки соединения. Но соединение с удаленным хостом, это только полдела. После установки подключения telnet может работать в двух режимах:
- Построчный — это предпочтительный режим, здесь строка текста редактируется на локальном компьютере и отправляется только тогда, когда она будет полностью готова. На такая возможность есть не всегда и не у всех сервисов;
- Посимвольный — все набираемые вами символы отправляются на удаленный сервер. Тут будет сложно что-либо исправить, если вы допустили ошибку, потому что Backspace тоже будет отправляться в виде символа и стрелки движения тоже.
Использование telnet заключается в передаче специальных команд. У каждого сервиса свои команды, но у протокола есть свои команды telnet, которые можно применять в консоли telnet.
- CLOSE — закрыть соединение с сервером;
- ENCRYPT — шифровать все передаваемые данные;
- LOGOUT — выйти и закрыть соединение;
- MODE — переключить режим, со строчного на символьный или с символьного на строчный;
- STATUS — посмотреть статус соединения;
- SEND — отправить один из специальных символов telnet;
- SET — установить значение параметра;
- OPEN — установить подключение через telnet с удаленным узлом;
- DISPLAY — отобразить используемые спецсимволы;
- SLC — изменить используемые спецсимволы.
Мы не будем рассматривать все команды, поскольку они вам вряд ли понадобятся, а если и понадобятся, то вы легко сможете их найти в официальной документации.
Как пользоваться telnet?
Дальше мы рассмотрим как использовать telnet для решения ваших задач. Обычно, утилита уже установлена в большинстве систем, но если это не так, то вы можете установить telnet из официальных репозиториев, например, в Ubuntu:
sudo apt install telnet
Теперь перейдем к применению утилиты. Изначально она использовалась для удаленного управления компьютером, но поскольку потом был разработан более безопасный протокол SSH, использовать ее перестали.
1. Доступность сервера
Утилита все еще может быть полезной при поверке доступности узла, для этого просто передайте ей ip адрес или имя хоста:
Для этого не обязательно применять telnet, есть ping.
2. Проверка порта
C помощью telnet мы можем проверить доступность порта на узле, а это уже может быть очень полезным. Чтобы проверить порт telnet выполните:
telnet localhost 123
$ telnet localhost 22
В первом случае мы видим, что соединение никто не принимает, во втором же выводится сообщение об успешном подключении и приветствие SSH сервера.
3. Отладка
Чтобы включить режим отладки и выводить более подробную информацию во время работы используйте опцию -d во время подключения:
sudo telnet -d localhost 22
4. Консоль telnet
Использование консоли telnet тоже важный момент в разборе как пользоваться telnet. В основном режиме вы можете выполнять команды, на удаленном сервере, если же вы хотите адресовать команду именно telnet, например, для настройки ее работы, необходимо использовать спецсимвол для открытия консоли, обычно утилита сразу говорит вам что это за символ, например, по умолчанию используется «^[«:
Для его активации вам нужно нажать сочетание клавиш Ctrl+[, затем вы уведите приглашение ввода telnet.
Чтобы посмотреть все доступные команды, вы можете набрать ?. Например, вы можете посмотреть статус подключения:
Здесь есть и другие интересные возможности. Такие вещи можно проделывать при любом подключении с помощью утилиты telnet.
5. Посмотреть сайт telnet
Один из распространенных способов использования telnet — это тестирование сайта из консоли. Да, красивую веб-страницу вы не получите, но можете вручную собрать запросы и видеть все переданные сервером данные.
telnet opennet.ru 80
Затем наберите команду веб-серверу:
Веб сервер вернет полностью страницу, а также заголовки, которые необходимы для ее отображения браузером.
6. Удаленное управление telnet
Настоятельно не рекомендуется использовать небезопасный telnet для удаленного управления, потому что все команды и пароли могут быть прослушаны сторонним пользователем. Но иногда, например, для роутеров telnet все же используется для удаленного управления. Все работает точно так же, как и для других подключений, только нужно использовать порт 23, а на удаленном компьютере должен быть установлен telnet-server:
telnet localhost 23
Тут порт можно даже не указывать, потому что по умолчанию будет использоваться именно 23. Далее, вам нужно ввести логин и пароль, а затем вы сможете выполнять команды в удаленной системе.
Выводы
В этой статье мы рассмотрели примеры использования telnet, а также что представляет из себя эта утилита, хотя она уже не используется по своему основному назначению, но до сих пор может быть полезной многим пользователям и системным администраторам. Если у вас остались вопросы, спрашивайте в комментариях!
Hacking Articles
Raj Chandel’s Blog
Penetration Testing on Telnet (Port 23)

Welcome to Internal penetration testing on telnet server where you will learn about telnet installation, configuration, enumeration and attack, system security and precaution.
From Wikipedia
Telnet is a protocol used on the Internet or local area networks to provide a bidirectional interactive text-oriented communication facility using a virtual terminal connection. This protocol is used to establish a connection to Transmission Control Protocol (TCP) port number 23, where a Telnet server application (telnetd) is listening.
Let’s start.
Requirements
Telnet Server: Ubuntu
Attacker system: Kali Linux
Telnet Installation & Configuration in 3 steps
Installing telnet server is very simple, it will get activated by following three steps:
Open the terminal in Ubuntu and type given below command with root access.

Open ineted.conf file adds given below statement inside it, then save it.

Now open xibetd.conf and add the following line to configure the settings and save it.
gedit /etc/xinetd.conf

Now execute the following command to restart the service.

Now you can ensure whether telnet service is getting activated or not and for this we have scanned our own system with nmap.
If service is activated in the targeted server then nmap show open STATE for port 23.

SSH Banner grabbing through telnet
Telnet plays an important role in the banner grabbing of other service running on the target system. Open the terminal in Kali Linux and type following command for finding the version of SSH service running on the target machine.
From the given image, you can observe that it has successfully shown the SSH version “2.0-openSSH_6.6.1p1” has been installed on the target machine.

SMTP Banner grabbing through telnet
Similarly, we can also find out version and valid user of SMTP server using telnet. Execute the following command and find out its version and valid user.
From the given image you can observe that it has successfully shown “220 mail.ignite.lab ESMTP Postfix” has been installed on the target machine.
You can guess for valid user account through the following command and if you receive response code 550 it means unknown user account:
If you received a message code 250,251,252 which means the server has accepted the request and user account is valid.
But if you received a message code 550 it means invalid user account as shown in given image

Telnet Banner Grabbing through Metasploit
An attacker always performs enumeration for finding important information such as software version which is known as Banner Grabbing and then identifies its state of vulnerability against any exploit.
Open the terminal in your Kali Linux and Load Metasploit framework; now type the following command to scan for TELNET version.
From the given image you can read the installed version of TELNET on the target’s system.

Brute Force Attack
An attacker always tries to make a brute force attack for stealing credential for unauthorized access.
This module will test a telnet login on a range of machines and report successful logins. If you have loaded a database plugin and connected to a database this module will record successful logins and hosts so you can track your access.
Now type the following command to Brute force TELNET login:
From given image you can observe that our TELNET server is not secure against brute force attack because it is showing a matching combination of username: raj and password: 123 for login simultaneously it has opened victims command shell as session 1.

From the given image you can see now we have unauthorized access on the victim’s system as [email protected] and executed ifconfig to verify the network interface.

We can also convert command shell into the meterpreter shell using the following command
From the given image you can see that now we are having two sessions; 1 st for command shell session and 2 nd for the meterpreter session.

Stealing credential through sniffing
Telnet, by default, does not encrypt any data sent over the connection (including passwords), and so it is often feasible to eavesdrop on the communications and use the password later for malicious purposes; anybody who has access the network between the two hosts where Telnet is being used can intercept the packets passing between source and destination and obtain login, password and data information.
From the given image, you can observe that here the client is login into telnet server by submitting valid credential on the other hand attacker is sniffing network packet using Wireshark or other tools.

Here you can notice Wireshark had captured telnet information by sniffing the network. It follows a similar protocol as FTP where telnet users may authenticate themselves with a clear-text sign-in protocol for username and password. As result attacker can easily sniff login credential.

From given below image you can read the username: raj and password: 123 moreover complete information traveling through packet between source to destination.
Since Telnet implementations do not support Transport Layer Security (TLS) security and Simple Authentication and Security Layer (SASL) authentication extensions. Therefore in favor of that the Secure Shell (SSH) protocol, first released in 1995 in replace of Telnet.

Secure Telnet through Port forwarding
In order to secure telnet server, admin can forward port from default to specific port to run the service. Open services file using the following command for making changes:
Kali Linux Cheat Sheet for Penetration Testers
 Penetration testing (also called pen testing) is the practice of testing a computer system, network or Web application to find vulnerabilities that an attacker could exploit.
Kali Linux Cheat Sheet for Penetration testers is a high level overview for typical penetration testing environment ranging from nmap, sqlmap, ipv4, enumeration, fingerprinting etc. Always view man pages if you are in doubt or the commands are not working as outlined here (can be OS based, version based changes etc.) for the operating system you are using (such as BlackBox, Black Ubuntu, ParrotSec OS, Debian, Ubuntu etc.). I’ve also referenced some guides that I found useful in different sections and it might come in handy.
Recon and Enumeration
NMAP Commands
Nmap (“Network Mapper”) is a free and open source utility for network discovery and security auditing. Many systems and network administrators also find it useful for tasks such as network inventory, managing service upgrade schedules, and monitoring host or service uptime. Nmap uses raw IP packets in novel ways to determine what hosts are available on the network, what services (application name and version) those hosts are offering, what operating systems (and OS versions) they are running, what type of packet filters/firewalls are in use, and dozens of other characteristics. It was designed to rapidly scan large networks, but works fine against single hosts. Nmap runs on all major computer operating systems, and official binary packages are available for Linux, Windows, and Mac OS X.
Router hack using nmap here.
SMB enumeration
In computer networking, Server Message Block (SMB), one version of which was also known as Common Internet File System (CIFS, /ˈsɪfs/), operates as an application-layer network protocol mainly used for providing shared access to files, printers, and serial ports and miscellaneous communications between nodes on a network
Other Host Discovery
Other methods of host discovery, that don’t use nmap…
SMB Enumeration
Enumerate Windows shares / Samba shares.
Python Local Web Server
Python local web server command, handy for serving up shells and exploits on an attacking machine.
Mounting File Shares
How to mount NFS / CIFS, Windows and Linux file shares.
Basic FingerPrinting
A device fingerprint or machine fingerprint or browser fingerprint is information collected about a remote computing device for the purpose of identification. Fingerprints can be used to fully or partially identify individual users or devices even when cookies are turned off.
telnet 192.168.1.1 25
SNMP Enumeration
SNMP enumeration is the process of using SNMP to enumerate user accounts on a target system. SNMP employs two major types of software components for communication: the SNMP agent, which is located on the networking device, and the SNMP management station, which communicates with the agent.
snmpwalk -c public -v1 192.168.1.X 1|
grep hrSWRunName|cut -d* * -f
snmpenum -t 192.168.1.X
onesixtyone -c names -i hosts
DNS Zone Transfers
DNSRecon
DNSRecon provides the ability to perform:
- Check all NS Records for Zone Transfers
- Enumerate General DNS Records for a given Domain (MX, SOA, NS, A, AAAA, SPF and TXT)
- Perform common SRV Record Enumeration. Top Level Domain (TLD) Expansion
- Check for Wildcard Resolution
- Brute Force subdomain and host A and AAAA records given a domain and a wordlist
- Perform a PTR Record lookup for a given IP Range or CIDR
- Check a DNS Server Cached records for A, AAAA and CNAME Records provided a list of host records in a text file to check
- Enumerate Common mDNS records in the Local Network Enumerate Hosts and Subdomains using Google
HTTP / HTTPS Webserver Enumeration
Packet Inspection
Username Enumeration
Some techniques used to remotely enumerate users on a target system.
SMB User Enumeration
SNMP User Enumeration
Passwords
Wordlists
Massive wordlist here at g0tm1lk’s blog
Brute Forcing Services
Hydra FTP Brute Force
Hydra is a parallelized login cracker which supports numerous protocols to attack. It is very fast and flexible, and new modules are easy to add. This tool makes it possible for researchers and security consultants to show how easy it would be to gain unauthorized access to a system remotely. On Ubuntu it can be installed from the synaptic package manager. On Kali Linux, it is per-installed.
Hydra POP3 Brute Force
Hydra SMTP Brute Force
Use -t to limit concurrent connections, example: -t 15
Cracking password using Hydra guide here
Password Cracking
John The Ripper – JTR
John the Ripper is different from tools like Hydra. Hydra does blind brute-forcing by trying username/password combinations on a service daemon like ftp server or telnet server. John however needs the hash first. So the greater challenge for a hacker is to first get the hash that is to be cracked. Now a days hashes are more easily crackable using free rainbow tables available online. Just go to one of the sites, submit the hash and if the hash is made of a common word, then the site would show the word almost instantly. Rainbow tables basically store common words and their hashes in a large database. Larger the database, more the words covered.
Cracking password using John the Ripper guide here
Exploit Research
Ways to find exploits for enumerated hosts / services.
SUID C Shell for /bin/sh
Building the SUID Shell binary
TTY Shells
Tips / Tricks to spawn a TTY shell from a limited shell in Linux, useful for running commands like su from reverse shells.
Python TTY Shell Trick
Spawn Interactive sh shell
Spawn Perl TTY Shell
Spawn Ruby TTY Shell
Spawn Lua TTY Shell
Spawn TTY Shell from Vi
Run shell commands from vi:
Spawn TTY Shell NMAP
Metasploit
Metasploit was created by H. D. Moore in 2003 as a portable network tool using Perl. By 2007, the Metasploit Framework had been completely rewritten in Ruby. On October 21, 2009, the Metasploit Project announced that it had been acquired by Rapid7, a security company that provides unified vulnerability management solutions.
Like comparable commercial products such as Immunity’s Canvas or Core Security Technologies’ Core Impact, Metasploit can be used to test the vulnerability of computer systems or to break into remote systems. Like many information security tools, Metasploit can be used for both legitimate and unauthorized activities. Since the acquisition of the Metasploit Framework, Rapid7 has added two open core proprietary editions called Metasploit Express and Metasploit Pro.
Metasploit’s emerging position as the de facto exploit development framework led to the release of software vulnerability advisories often accompanied by a third party Metasploit exploit module that highlights the exploitability, risk and remediation of that particular bug. Metasploit 3.0 began to include fuzzing tools, used to discover software vulnerabilities, rather than just exploits for known bugs. This avenue can be seen with the integration of the lorcon wireless (802.11) toolset into Metasploit 3.0 in November 2006. Metasploit 4.0 was released in August 2011.
Kali Linux Telnet Bruteforce Cve 1999 0502

Название: Kali Linux Telnet Bruteforce Cve 1999 0502
Загрузил: Linux Unix
Длительность: 3 мин и 3 сек
Битрейт: 192 Kbps
4.01 MB и длительностью 3 мин и 3 сек в формате mp3.
Похожие песни
Brute Force Authentication With Nmap
MrDoel Hacking Tutorial
How To Generate Wordlists With Crunch Kali Linux
Part 3 Detecting Brute Force Attacks Over Telnet
Wifi Pineapple Nano Kali Linux 2 0 Internet Connection Sharing
Kali Linux Scapy Traceroute Tcp Dns
How To Use Telnet Command In Kali Linux
Pentesting With Bash Kali Linux Cracking The Telnet Password Login Prompt Bruteforce
Wordlist Generation With Crunch Kali Linux Hd
Thc Hydra Brute Force Command Line Tool
Brute Force Cisco Router Gns 3 Kali Linux
Ethical Hacker Brasil
Crack Email Password With Hydra Kali Linux Bruteforce No Password List Tutorial
How To Install Medusa And Brute Force Ssh
Sniffer Telnet Ftp Kali 2 0
Тelnet Linux Command Line
Kali Linux Dictionairy Attack Router Admin Password
Configuring Remote Access Telnet Ssh
Install And Enable Telnet In Windows 10 8 1 Use The Telnet Client Utility
Tricks That Make you Smart
How To Run Kali Linux On Android
How To Use Nmap For Beginners
Cve 2011 4862 Freebsd Telnet Buffer Overflow Metasploit Demo
Install Kali Linux 2 0 Sana In Uefi Mode Dual Boot Windows 8 8 1 10
Install Kali Linux In Virtualbox
How To Install Putty Ssh And Telnet Client In Ubuntu Linux
Lesson 1 Introduction
Free Education For All
Kali 2 Review And Challenge Coins Hak5 1901
012 Scapy Deauthentication Attack
Pentester Academy TV
Nethunter Kali Linux For Android On Nexus 7
Sniffing With Scapy
Using Telnet To Send Fake Emails
Ataque Por Brute Force Cmd Windows Password Cracker
Tut How To Connect With Telnet To Others Tut
Raspberry Pi Openelec Vs Raspbmc
How To Find Someones Ip Address
The Villain Pub Palpatine S Quarantine
How It Should Have Ended
Kali Svetat Shte Obarna Кали Светът Ще Обърна 1999 By Planetcho
Сейчас скачивают
Pentatonix Funny Moments Part 1
Rune Besomorph Myself Again Ft Cluda Bass Boosted
Kali Linux Telnet Bruteforce Cve 1999 0502
Destroy Your Ego
Jay Alvarrez Photo Editing Tutorial Lightroom Preset 2019
Jewel Supermarket Song
Kalau Unbk Dihapus Nanti Masuk Sma Bagaimana
Юлия Савичева Девчонка Рыжая Три Аккорда Четвертый Сезон Фрагмент Выпуска От 19 07 2019
Kakashi Vs Obito Amv Rude Eternal Youth Insta Edit 4
Im Ready Meme Happy Birthday To Me
Фильм Не Упускай Из Виду
Клип Баходур Ва Шахло Азизбек Оча Зан Намегирум 2 Bahodur Juraev Shahlo Azizbek Juraev
Ограбление Ювелирки Прохождение Mafia 2 4
One Run Fabian Bo Sch Glacier 3000
Simakui2019 Bahas Simak Ui 2019 Matdas Kode 525 No 13
Tumhe Apna Banane Ka Video Song Simmba Ranveer Singh Deepika Padukone New Songs 2018
Carnavales En Ica Huirpacancha 2016
Nightcore Stamp On The Ground
Como Perder O Medo De Saltos Mortais Ep 02 Front Flip Mortal De Frente
Красный Волк Против Собаки Динго Кто Сильнее
Stoney Cove Courtship Behaviour Of Pike
Celine Dion Lolita
Парень Бойца Ufc Виновен В Его Поражении Wsof Отменили Свои Турниры
Sako S20 Daz Horkings Review
Симон Вернер Исчез 2010 Dvdrip
Смешные Моменты С Булкиным 30 Beam Ng Drive
Besame Mucho Consuelito Velazquez Video En Vivo De Ella
Машинные Метчики Yamawa Серия Au Sp Series
Квартира Свидание Родинки Моника Белуччи Венсан Кассель
Фиксики Все Серии Подряд Сборник 3 Познавательные Мультики Для Детей
Техно 90 Х Лучшее Techno 90S Best Q Q Biko Picture Of Me
Huntercraft Hcs Это Не Мувик Это Забей Красотища 45
Накладка На Панель Ваз 21213 Нива Видеообзор
Состояние Баяна Ленинград До Ремонта
Female Crossed Legs Smorgasbord
Burda Style 8 2017
Pura Luce Renato Zero 13 La Curva Dell Angelo Rzchannel
Timbeando En Moscu Fest Mega Latino 2019
30 April 2017 Waarland Az Supporters Richting De Kuip
Intro Acdc Gelredome Arnhem 2015
Маша Распутина Живи Страна 1993
Я Играю К Нам Гости Пришли На Гитаре
Aamir Right Now Na Na Na Akon R B Remix Cover Lyrics
Танец Говорят Мы Бяки Буки
Furstenau Hemelvaart 2013 3
Сборка Lq Автомобилей Для Gta Samp Carpack Samp Установка
Metasploitable 2 : Vulnerability assessment and Remote Login
If you’ve followed my previous tutorial on Introduction to Metasploitable 2, then you should be sitting here with Kali Linux and Metasploitable 2 up and running. So, I’m gonna skip the formalities and move right ahead.

Portscan
On a Kali Linux machine, open a terminal. Type ifconfig, and note the eth0 IP address. This will give you an idea of what the ip of your target machine could be. In my case, ifconfig returned my IPv4 address as 192.168.154.131. This means that Metasploitable must have an IP residing somewhere in the 192.168.154.xxx range. To scan all ports in that range, you can use Nmap scan. Here is what it should look like.
nmap -sS 192.168.154.0/24
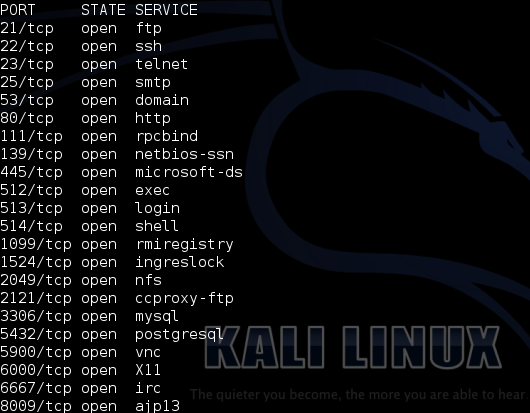
The conclusion that can be drawn here is that the Metasploitable 2 machine has IP 192.168.154.132. Also, it has a huge lot of open ports. As you will discover later, each of these ports is a potential gateway into the machine. On the metasploitable machine, after logging in with msfadmin:msfadmin, you can execute an ifconfig to verify that the IP is indeed 192.168.154.132 (or whatever may be your case).
Vulnerabilities
- Misconfigured Services — A lot of services have been misconfigured and provide direct entry into the operating system.
- Backdoors — A few programs and services have been backdoored. These backdoors can be used to gain access to the OS.
- Weak Passwords — These are vulnerable to bruteforce attacks.
- Vulnerable Web Services— A few web services pre-installed into Metasploitable have known vulnerabilities which can be exploited.
- Web Application Vulnerabilities — Some vulnerable web applications can be exploited to gain entry to the system.
Exploiting The Vulnerabilities
Remote access vulnerability — Rlogin
Remember the list of open ports which you came up across during the port scan? The 512,513 and 514 ports are there for remotely accessing Unix machines. They have been misconfigured in such a way that anyone can set up a remote connection without proper authentication. This vulnerability is easy to exploit. We will use rlogin to remotely login to Metasploitable 2. Type rlogin to see the details about the command structure.
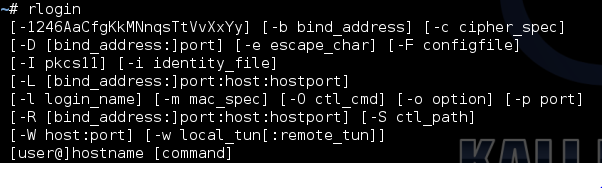
# rlogin usage: ssh [-1246AaCfgKkMNnqsTtVvXxYy] [-b bind_address] [-c cipher_spec] [-D [bind_address:]port] [-e escape_char] [-F configfile] [-I pkcs11] [-i identity_file] [-L [bind_address:]port:host:hostport] [-l login_name] [-m mac_spec] [-O ctl_cmd] [-o option] [-p port] [-R [bind_address:]port:host:hostport] [-S ctl_path] [-W host:port] [-w local_tun[:remote_tun]] [user@]hostname [command] rlogin -l root 192.168.154.132 Most probably you will get something like this-
# rlogin -l root 192.168.154.132 The authenticity of host ‘192.168.154.132 (192.168.154.132)’ can’t be established. RSA key fingerprint is *****. Are you sure you want to continue connecting (yes/no)? yes Warning: Permanently added ‘192.168.154.132’ (RSA) to the list of known hosts. root@192.168.154.132’s password:
As you can see, it is asking for a password. It’s not because the target is not vulnerable. It’s because we don’t have ssh-client installed on Kali Linux. The rsh-client is a remote login utility that it will allow users to connect to remote machines.
apt-get install rsh-client This will start the installation progress, you’ll have to type yes once or twice, Kali will do the rest for you. After the installation is successful, you should try your previous command again. This time around, things will be better.

# rlogin -l root 192.168.154.132 Last login: Thu May 1 11:34:55 EDT 2014 from :0.0 on pts/0 Linux metasploitable 2.6.24-16-server #1 SMP Thu Apr 10 13:58:00 UTC 2008 i686
The programs included with the Ubuntu system are free software; the exact distribution terms for each program are described in the individual files in /usr/share/doc/*/copyright.
Ubuntu comes with ABSOLUTELY NO WARRANTY, to the extent permitted by applicable law.
To access official Ubuntu documentation, please visit: http://help.ubuntu.com/ You have mail. root@metasploitable:
#
Now you have an administrator privilege shell on Metasploitable 2. That was as easy as typing one line. (and installing an application). We have one more such vulnerability that can be exploited easily.
Источник


