- Кали линукс live usb
- What You’ll Need
- Creating a Bootable Kali USB Drive on Windows (Etcher)
- Creating a Bootable Kali USB Drive on Windows (Rufus)
- Booting A USB Drive In Windows
- Кали линукс live usb
- What You’ll Need
- Kali Linux Live USB Install Procedure
- Creating a Bootable Kali USB Drive on macOS/OS X (DD)
- Creating a Bootable Kali USB Drive on macOS/OS X (Etcher)
- Кали линукс live usb
- Multiple Persistence Stores
- Emergency Self Destruction of Data in Kali
- Установка Кали Линукс Live USB
- Установка Kali Linux Live USB
- Как скачать дистрибутив
- Запись носителя
- Добавление раздела с сохранением данных
Кали линукс live usb
One of the fastest method, for getting up and running with Kali Linux is to run it “live” from a USB drive. This method has several advantages:
- It’s non-destructive — it makes no changes to the host system’s hard drive or installed OS, and to go back to normal operations, you simply remove the Kali Live USB drive and restart the system
- It’s portable — you can carry Kali Linux in your pocket and have it running in minutes on an available system
- It’s customizable — you can roll your own custom Kali Linux ISO image and put it onto a USB drive using the same procedures
- It’s potentially persistent — with a bit of extra effort, you can configure your Kali Linux “live” USB drive to have persistent storage, so the data you collect is saved across reboots
In order to do this, we first need to create a bootable USB drive which has been set up from an ISO image of Kali Linux.
The specifics of this procedure will vary depending on whether you’re doing it on a Linux, macOS/OS X, or Windows system.
What You’ll Need
A verified copy of the appropriate ISO image of the latest Kali build image for the system you’ll be running it on.
If you’re running under Windows, there is not one tool that is considered the overall best for imaging. We recommend Etcher (installer or portable) as it is simpler to use, however Rufus is another popular option with its advance options. If one does not work for you, consider the other.
A USB drive, 8GB or larger (Systems with a direct SD card slot can use an SD card with similar capacity. The procedure is identical.)
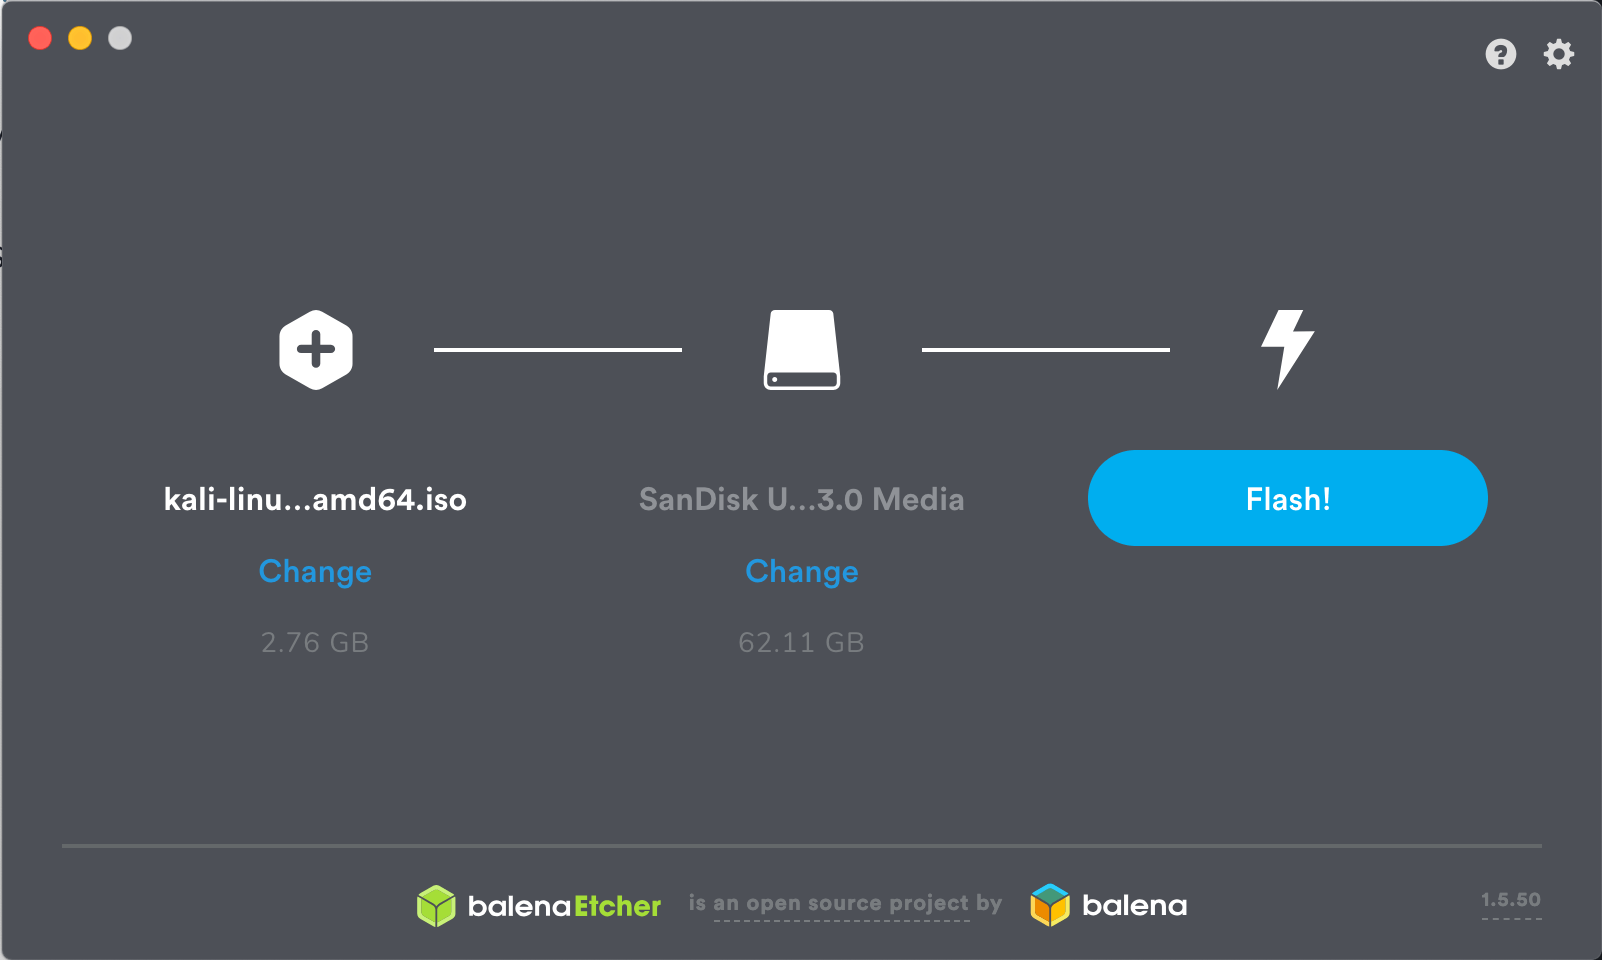
Creating a Bootable Kali USB Drive on Windows (Etcher)
Plug your USB drive into an available USB port on your Windows PC, note which drive designator (e.g. “ G:\ «) it uses once it mounts, and launch Etcher.
Press Flash from file, and locate the Kali Linux ISO file to be imaged with.
Press Select target and check the list of options for the USB drive (e.g. “ G:\ ”, the manufacture and size).
Click the Flash! button once ready.
Note: You may get a UAC prompt asking for administrator privileges that you will need to accept.
 5. Once Etcher alerts you that the image has been flashed, you can safely remove the USB drive and proceed to boot into Kali with it.
At the time of writing, Etcher will use MBR. This is to allow for the most hardware compatibility.
Creating a Bootable Kali USB Drive on Windows (Rufus)
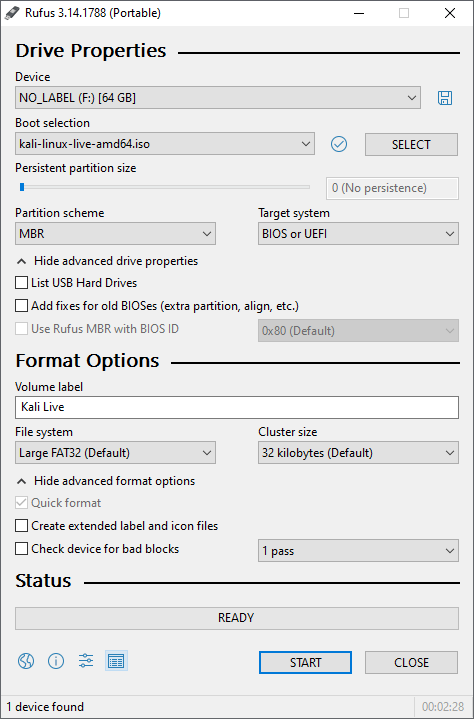
Plug your USB drive into an available USB port on your Windows PC, note which drive designator (e.g. “ G:\ «) it uses once it mounts, and launch Rufus.
With Device, check the dropdown list of options for the USB drive (e.g. “ G:\ ” and size).
Boot section needs to point to point to the Kali Linux ISO file, which can be done by clicking the SELECT button
Depending on your configuration, you can set the Partition scheme, as well as Target system. If you are not sure, leave it as the default values.
Click the START button once ready.
 6. You may get a prompt saying about ISOHybird image. Selecting ISO image, will allow you to edit the files from the Kali Linux ISO, but at the potential lose of hardware compatibility. As a result, we recommend selecting DD Image.
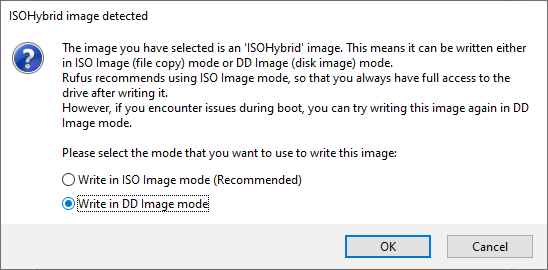
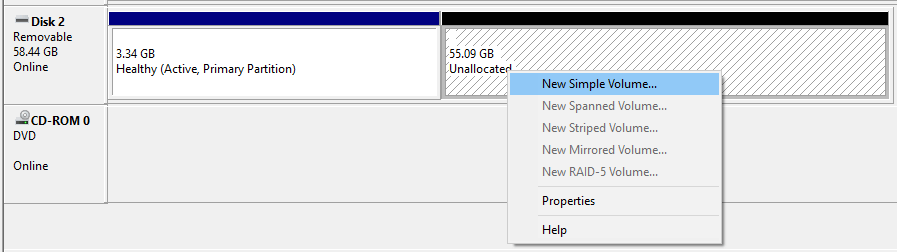
Note: If you select “DD Image” option, you can create another partition on the USB drive, allowing you to use the rest of the space. Start -> Run (Windows + R) -> diskmgmt.msc -> Locate the USB drive -> Right-click in “Unallocated” -> New Simple Volume -> Follow the rest of the wizard with next, next, next…
Booting A USB Drive In Windows
Depending on the system (such as BIOS or UEFI), as well as the version of Windows, and how they are each configured, you may need to re-image the USB drive.
- Master Boot Record (MBR) is often used on legacy systems that use BIOS as well as UEFI which has Compatibility Support Module (CSM) enabled
- GUID Partition Table (GPT) is required where UEFI has CSM disabled, forcing to use the modern standard
After writing the image to the USB drive, reboot Windows with the USB inserted. Depending on the motherboard manufacture, will also depend on the next stage. Some motherboard’s support a “temporary” boot menu, allowing for a one off selection. Others you need to enter BIOS/UEFI to configure it to try and boot from USB first. Entering either location, also depends on the motherboard. You can look up on the manufactures website and read the manual, try and read the screen when booting (however the text may be shown too quick or full logos used), or try common key combinations (such as ESC , F1 , F2 , F3 , F4 , F8 , F10 , F11 , F12 or DEL ).
Updated on: 2021-Sep-27
Author: g0tmi1k
Источник
Кали линукс live usb
Our favourite way, and the fastest method, for getting up and running with Kali Linux is to run it “live” from a USB drive. This method has several advantages:
- It’s non-destructive — it makes no changes to the host system’s hard drive or installed OS, and to go back to normal operations, you simply remove the “Kali Live” USB drive and restart the system.
- It’s portable — you can carry Kali Linux in your pocket and have it running in minutes on an available system
- It’s customizable — you can roll your own custom Kali Linux ISO image and put it onto a USB drive using the same procedures
- It’s potentially persistent — with a bit of extra effort, you can configure your Kali Linux “live” USB drive to have persistent storage, so the data you collect is saved across reboots
In order to do this, we first need to create a bootable USB drive which has been set up from an ISO image of Kali Linux.
What You’ll Need
A verified copy of the appropriate ISO image of the latest Kali build image for the system you’ll be running it on: see the details on downloading official Kali Linux images.
If you’re running under macOS/OS X, you can use the dd command, which is pre-installed on those platforms, or use Etcher.
A USB thumb drive, 4GB or larger. (Systems with a direct SD card slot can use an SD card with similar capacity. The procedure is identical.)
Kali Linux Live USB Install Procedure
The specifics of this procedure will vary depending on whether you’re doing it on a Windows, Linux, or macOS/OS X system.
Creating a Bootable Kali USB Drive on macOS/OS X (DD)
macOS/OS X is based on UNIX, so creating a bootable Kali Linux USB drive in an macOS/OS X environment is similar to doing it on Linux. Once you’ve downloaded and verified your chosen Kali ISO file, you use dd to copy it over to your USB drive. If you would prefer to use Etcher, then follow the same directions as a Windows user. Note that the USB drive will have a path similar to /dev/disk2.
WARNING: Although the process of imaging Kali on a USB drive is very easy, you can just as easily overwrite a disk drive you didn’t intend to with dd if you do not understand what you are doing, or if you specify an incorrect output path. Double-check what you’re doing before you do it, it’ll be too late afterwards.
Consider yourself warned.
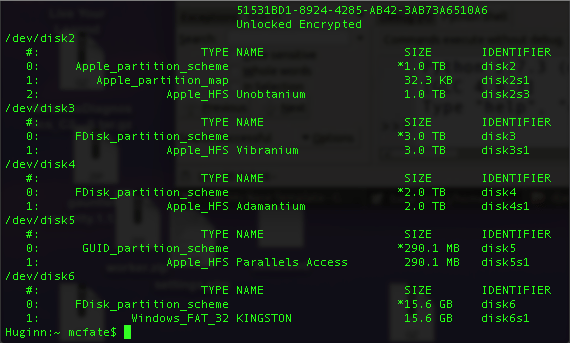
Without the USB drive plugged into the system, open a Terminal window, and type the command diskutil list at the command prompt.
You will get a list of the device paths (looking like /dev/disk0, /dev/disk1, etc.) of the disks mounted on your system, along with information on the partitions on each of the disks.
 3. Plug in your USB device to your Apple computer’s USB port and run the command diskutil list a second time. Your USB drive’s path will most likely be the last one. In any case, it will be one which wasn’t present before. In this example, you can see that there is now a /dev/disk6 which wasn’t previously present.
 4. Unmount the drive (assuming, for this example, the USB drive is /dev/disk6 — do not simply copy this, verify the correct path on your own system!):
- Proceed to (carefully!) image the Kali ISO file on the USB device. The following command assumes that your USB drive is on the path /dev/disk6, and you’re in the same directory with your Kali Linux ISO, which is named “kali-linux-2021.3-live-amd64.iso”. We will replace /dev/disk6 with /dev/rdisk6 to improve the write speeds:
Increasing the blocksize (bs) will speed up the write progress, but will also increase the chances of creating a bad USB drive. Using the given value on macOS/OS X has produced reliable images consistently.
Imaging the USB drive can take a good amount of time, over half an hour is not unusual, as the sample output below shows. Be patient!
The dd command provides no feedback until it’s completed, but if your drive has an access indicator, you’ll probably see it flickering from time to time. The time to dd the image across will depend on the speed of the system used, USB drive itself, and USB port it’s inserted into. Once dd has finished imaging the drive, it will output something that looks like this:
Creating a Bootable Kali USB Drive on macOS/OS X (Etcher)
Alternatively, Etcher can be used.
Download and run Etcher.
Choose the Kali Linux ISO file to be imaged with “select image” and verify that the USB drive to be overwritten is the correct one. Click the “Flash!” button once ready.
 3. Once Etcher alerts you that the image has been flashed, you can safely remove the USB drive.
You can now boot into a Kali Live / Installer environment using the USB device.
To boot from an alternate drive on an macOS/OS X system, bring up the boot menu by pressing the Option key immediately after powering on the device and select the drive you want to use.
Updated on: 2021-Sep-27
Author: g0tmi1k
Источник
Кали линукс live usb
In this workshop, we will examine the various features available to us when booting Kali Linux from USB devices. We will explore features such as persistence, creating LUKS encrypted persistence stores, and even dabble in “LUKS Nuking” our USB drive. The default Kali Linux ISOs (from 1.0.7 onwards) support USB encrypted persistence.
0x01 — Start by imaging the Kali ISO onto your USB drive (ours was /dev/sdb). Once done, you can inspect the USB partition structure using parted /dev/sdb print:
For ease of use, please use a root account. This can be done with “sudo su”.
0x02 — Create and format an additional partition on the USB drive. In our example, we create a persistent partition of about 7 GB in size:
0x04 — Encrypt the partition with LUKS:
0x05 — Open the encrypted partition:
0x06 — Create an ext3 filesystem and label it:
0x07 — Mount the partition and create your persistence.conf so changes persist across reboots:
Now your USB drive is ready to plug in and reboot into Live USB Encrypted Persistence mode.
Multiple Persistence Stores
At this point we should have the following partition structure:
We can add additional persistence stores to the USB drive, both encrypted or not…and choose which persistence store we want to load, at boot time. Let’s create one more additional non-encrypted store. We’ll label and call it “work”.
0x01 — Create an additional, 4th partition which will hold the “work” data. We’ll give it another 5GB of space:
0x02 — Format the fourth partition, label it “work”:
0x03 — Mount this new partition and create a persistence.conf in it:
Boot the computer, and set it to boot from USB. When the boot menu appears, edit the persistence-label parameter to point to your preferred persistence store!
Emergency Self Destruction of Data in Kali
As penetration testers, we often need to travel with sensitive data stored on our laptops. Of course, we use full disk encryption wherever possible, including our Kali Linux machines, which tend to contain the most sensitive materials. Let’s configure a nuke password as a safety measure:
The configured nuke password will be stored in the initrd and will be usable with all encrypted partitions that you can unlock at boot time.
Backup you LUKS keyslots and encrypt them:
Now boot into your encrypted store, and give the Nuke password, rather than the real decryption password. This will render any info on the encrypted store useless. Once this is done, verify that the data is indeed inacessible.
Lets restore the data now. We’ll decrypt our backup of the LUKS keyslots, and restore them to the encrypted partition:
Our slots are now restored. All we have to do is simply reboot and provide our normal LUKS password and the system is back to its original state.
Updated on: 2021-Sep-27
Author: g0tmi1k
Источник
Установка Кали Линукс Live USB

Когда нужно аккуратно проверить систему и оставить жесткий диск нетронутым, выручит Kali Linux Live USB. Но у него есть один недостаток – некуда сохранять найденную информацию. К счастью, возможна установка Kali Linux Live USB на носитель с сохранением данных на нем же.
Установка Kali Linux Live USB
Для хранения данных потребуется создать не только Kali Linux Live USB, но и дополнительный раздел под данные (найденный password, например).
Как скачать дистрибутив
Для создания Kali Linux Live USB потребуется загрузить образ со страницы загрузок на официальном ресурсе https://www.kali.org.

Образы для установки Kali Linux Live USB можно сохранить напрямую с сайта по http-ссылке или использовать торрент.

Запись носителя
Если бы требовалось создать Live CD Kali Linux, то скачанный ISO файл было бы достаточно прожечь на диск. Для USB потребуется специальная утилита – например, можно взять WinSetupFromUSB.
В главном окне нужно выбрать носитель для установки, подключить автоформатирование и затем в поле Linux ISO открыть загруженный образ.

Внимание! Лучше использовать накопитель от 8 ГБ – сам полный образ занимает порядке 3 ГБ, так что при меньшем размере места под раздел с сохранением данных остается совсем мало.
Если отметить пункт «Test in QEMU», то после записи утилита проведет тестирование на возможность загрузки и установки.
Перед записью программа предупредит о стирании данных.

Затем будет показана информация по форматированию.

Затем образ установки будет записан.

При отмеченном тесте появится окно эмулятора со стартовым меню. Но пока еще флешка не умеет работать с сохранением данных.

Добавление раздела с сохранением данных
Дальнейшие действия выполняются уже из самого Линукса (можно загрузиться из полной установки или с Лайв-версии). Для работы с разделами используем утилиту gparted, запустив ее из командной строки.

Откроется основное окно программы. Нужно в выпадающем списке справа выбрать Kali Linux Live USB.

Откроется просмотр структуры разделов. Чтобы можно было работать с Kali Linux Live USB, следует размонтировать раздел.

Теперь нужно сжать его через соответствующую команду в меню «Раздел».

Откроется окно с установкой параметров.

Нужно указать новый размер раздела. Свободное место пересчитывается автоматически.

Затем на освободившемся месте нужно создать раздел, с которым Kali будет работать с сохранением данных.

Следует выбрать файловую систему ext4, в качестве метки прописать persistence и нажать «Добавить».

В результате получится примерно такая структура Kali Linux Live USB.

Теперь нужно применить все установки через меню Правка.

Приложение предупредит о возможном риске.

Затем операции будут выполнены.

Теперь нужно создать в разделе с сохранением данных конфигурационный файл. Для этого открываем диспетчер файлов.

И затем кликаем по разделу Kali Linux Live USB, чтобы он примонтировался.

Запустим текстовый редактор и в новом документе напишем «/ union» (чтобы использовать с сохранением данных).

После этого его нужно сохранить с именем persistence.conf на созданном разделе с сохранением данных.

Если его открыть, будет виден файл.

При загрузке с Kali Linux Live USB нужно будет выбрать пункт Live USB Persistence. Пароль для раздела не требуется.
Источник


