- Kali linux boot manager
- Installation Prerequisites
- Resize Windows Procedure
- Kali Linux Installation Procedure
- Post Installation
- Time/System Clock
- Kali linux boot manager
- Process
- Troubleshooting USB Connections
- Troubleshooting EFI
- Final option
- Kali linux boot manager
- What You’ll Need
- Creating a Bootable Kali USB Drive on Windows (Etcher)
- Creating a Bootable Kali USB Drive on Windows (Rufus)
- Booting A USB Drive In Windows
Kali linux boot manager
Installing Kali Linux next to a Windows installation has its benefits. However, you need to exercise caution during the setup process. First, make sure that you’ve backed up any important data on your Windows installation. Since you’ll be modifying your hard drive, you’ll want to store this backup on external media. Once you’ve completed the backup, we recommend you peruse our Kali Linux Hard Disk install guide, which explains the normal procedure for a basic Kali Linux install.
In our example, we will be installing Kali Linux alongside an installation of Windows (10), which is currently taking up 100% of the disk space in our computer. We will start by resizing our current Windows partition to occupy less space and then proceed to install Kali Linux in the newly-created empty partition.
Installation Prerequisites
This guide will make the following assumptions:
- You have read our single boot Kali Linux install guide, as this has the same Installation Prerequisites (System requirements & setup assumptions).
- When downloading Kali Linux, pick the live image, rather than the installer option.
- A single disk to install to (rather than a dedicated disk per operating system).
We need to use a different image from the single boot Kali Linux install guide, as we need the live image. This is because we need to edit the disk structure without mounting any partitions (otherwise they would be in-use). After we have finished altering the disk layout, we can still install Kali Linux using the live image, but there will be a few differences such as:
Both of these can be addressed post installation, as it saves swapping to the installer image (as you will need either multiple CD/DVD/USBs or to re-image half way though).
This installation has the potential to go wrong very easily as it involves editing existing partitions. Be aware of what partitions you are modifying and where you are installing Kali Linux to.
Having a backup of your Linux files available is a good idea in the event something goes wrong.
Resize Windows Procedure
Before we can install Kali Linux, there needs to be room on the hard disk. By booting into a live Kali Linux session with your chosen installation medium, we can resize the partition to our desired size, as the disk will not be in use because Kali Linux will all be in memory.
To start resizing, make sure you insert your Kali Linux installation medium and power on the device. If needed, press any keyboard shortcuts for a “boot order menu” (depends on each manufacture) or boot into BIOS/UEFI and change the boot order to point to the installation medium first.
When the boot menu/options appears, you should see at least one new option. Depending on the manufacture, hardware, how the system is configured and install medium, you may see more options (e.g. Can you boot into non-UEFI?).
You may need to try a few different options in order to find success.
You may need to disable secure boot
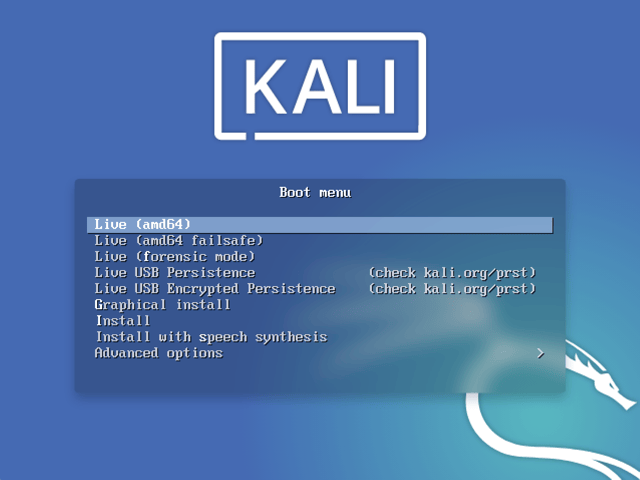
- You should be greeted with the Kali Linux boot screen. Select Live, and you should be booted into the Kali Linux default desktop.
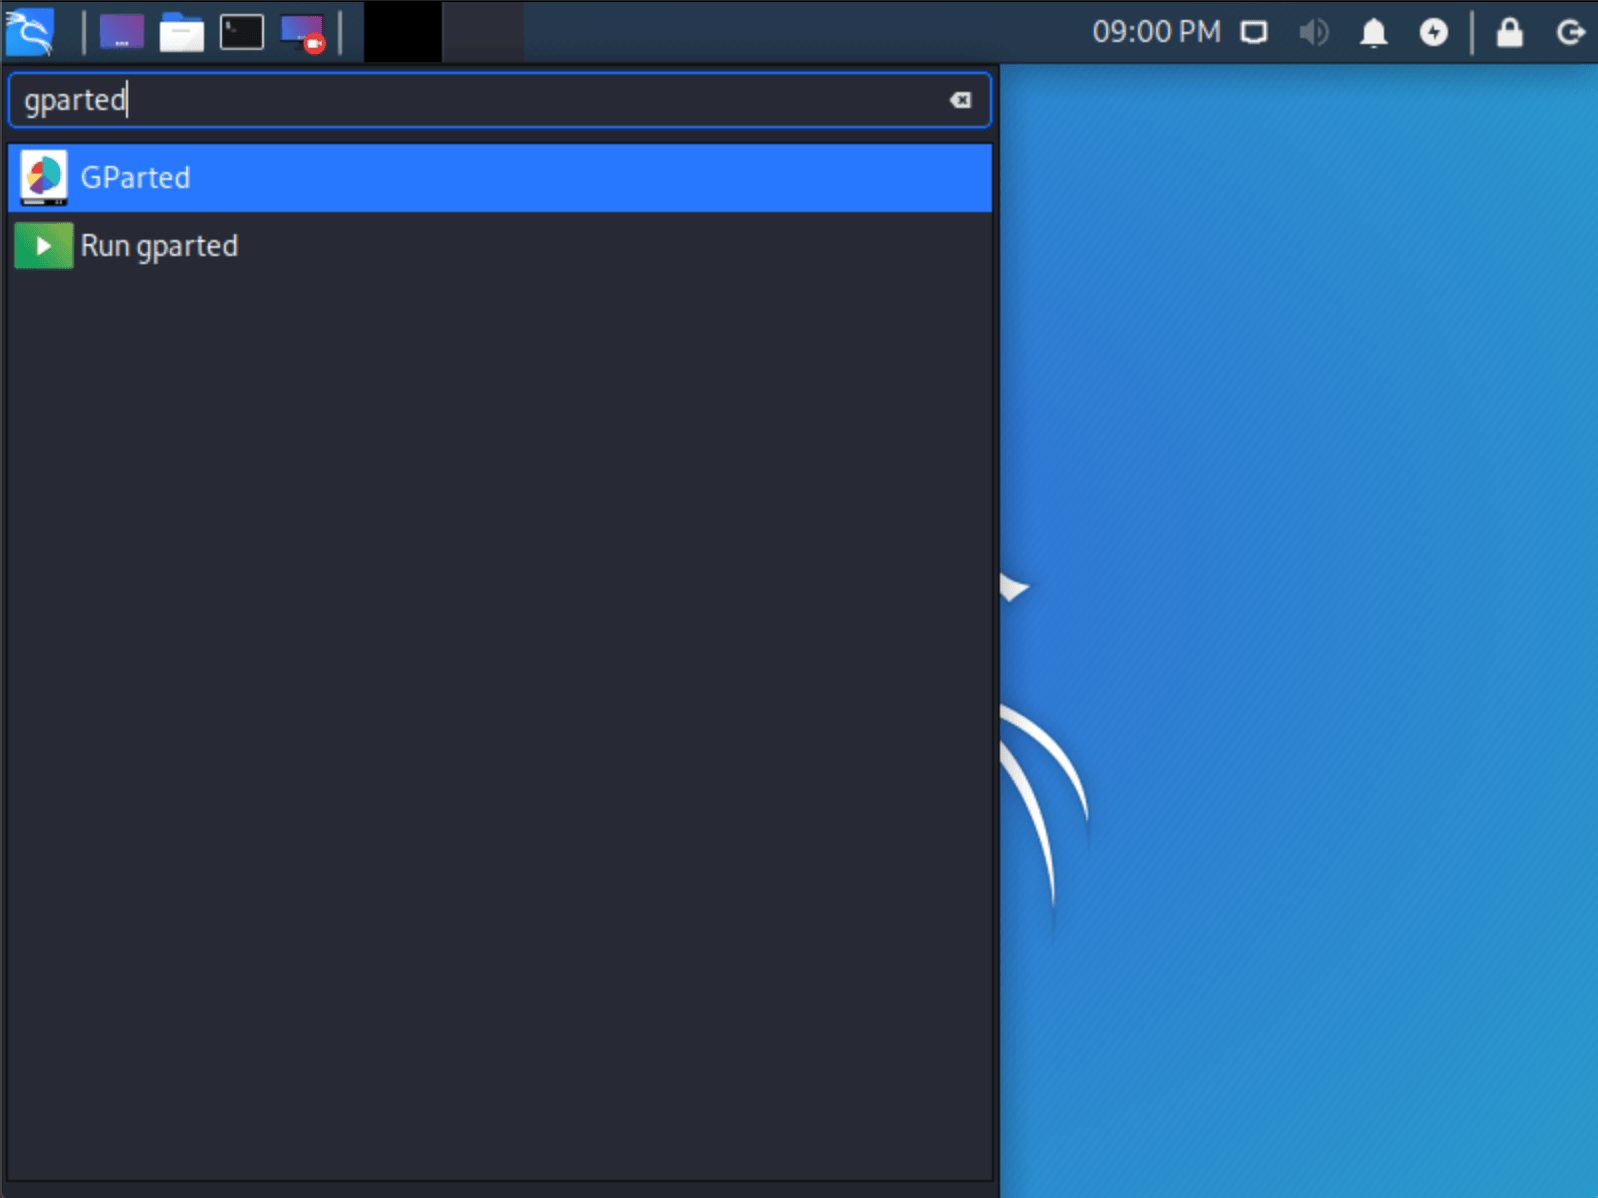
- Now launch GParted, which we’ll use to shrink the existing Windows partition to give us enough room to install Kali Linux in the free space.
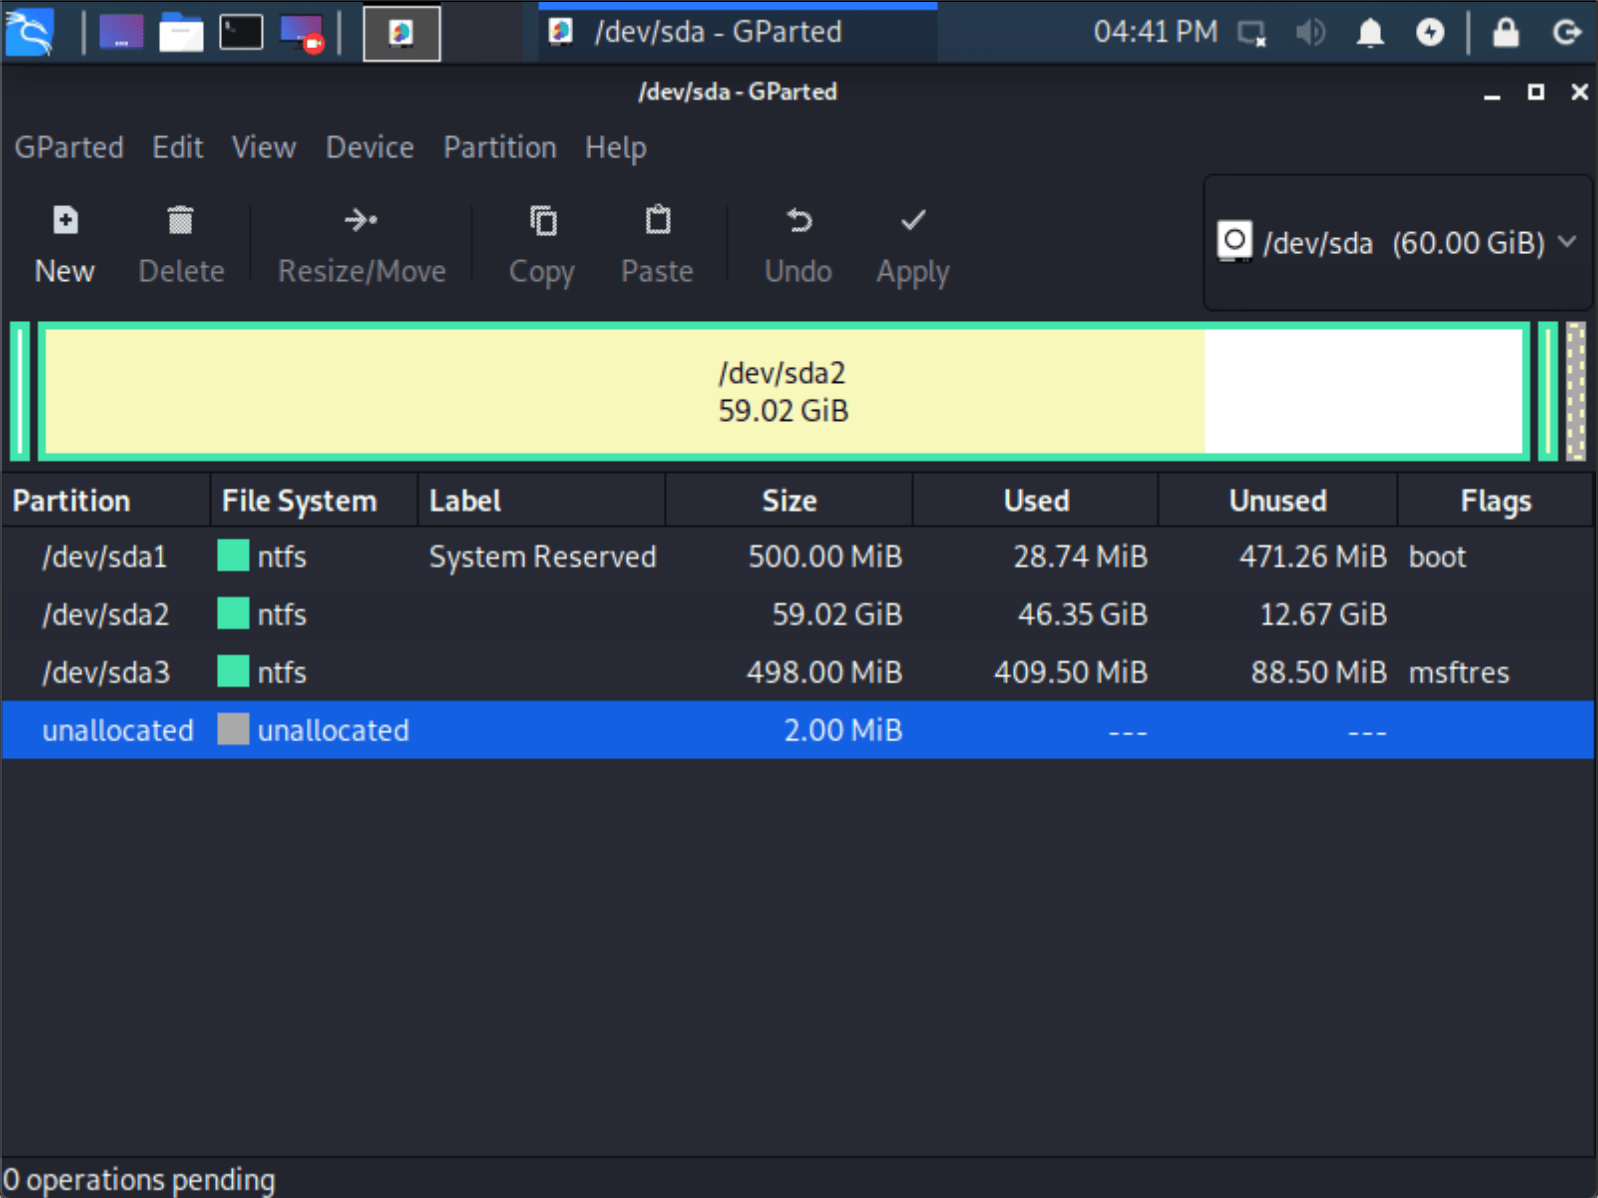
- Once GParted has opened, select your Windows partition ( /dev/sda2 ) & resize it leaving enough space (we recommend at least 20 GB) for the Kali Linux installation.
Depending on your setup, it is often the second option (the largest partition). In our example, there are three partitions:
- Window’s boot partition ( /dev/sda1 )
- Window’s main operating system itself ( /dev/sda2 )
- Window’s System Recovery partition ( /dev/sda3 )
If you are moving past into any non-white in the partition then you are editing a section that is in use.
Only remove from the area of the partition that is not in use.
It is normal to leave the third partition ( /dev/sda3 ), and only shrink the actual install ( /dev/sda2 ).
If you wish to organize the partition to group all the Windows partitions together, placing the free space at the end, you may do so.
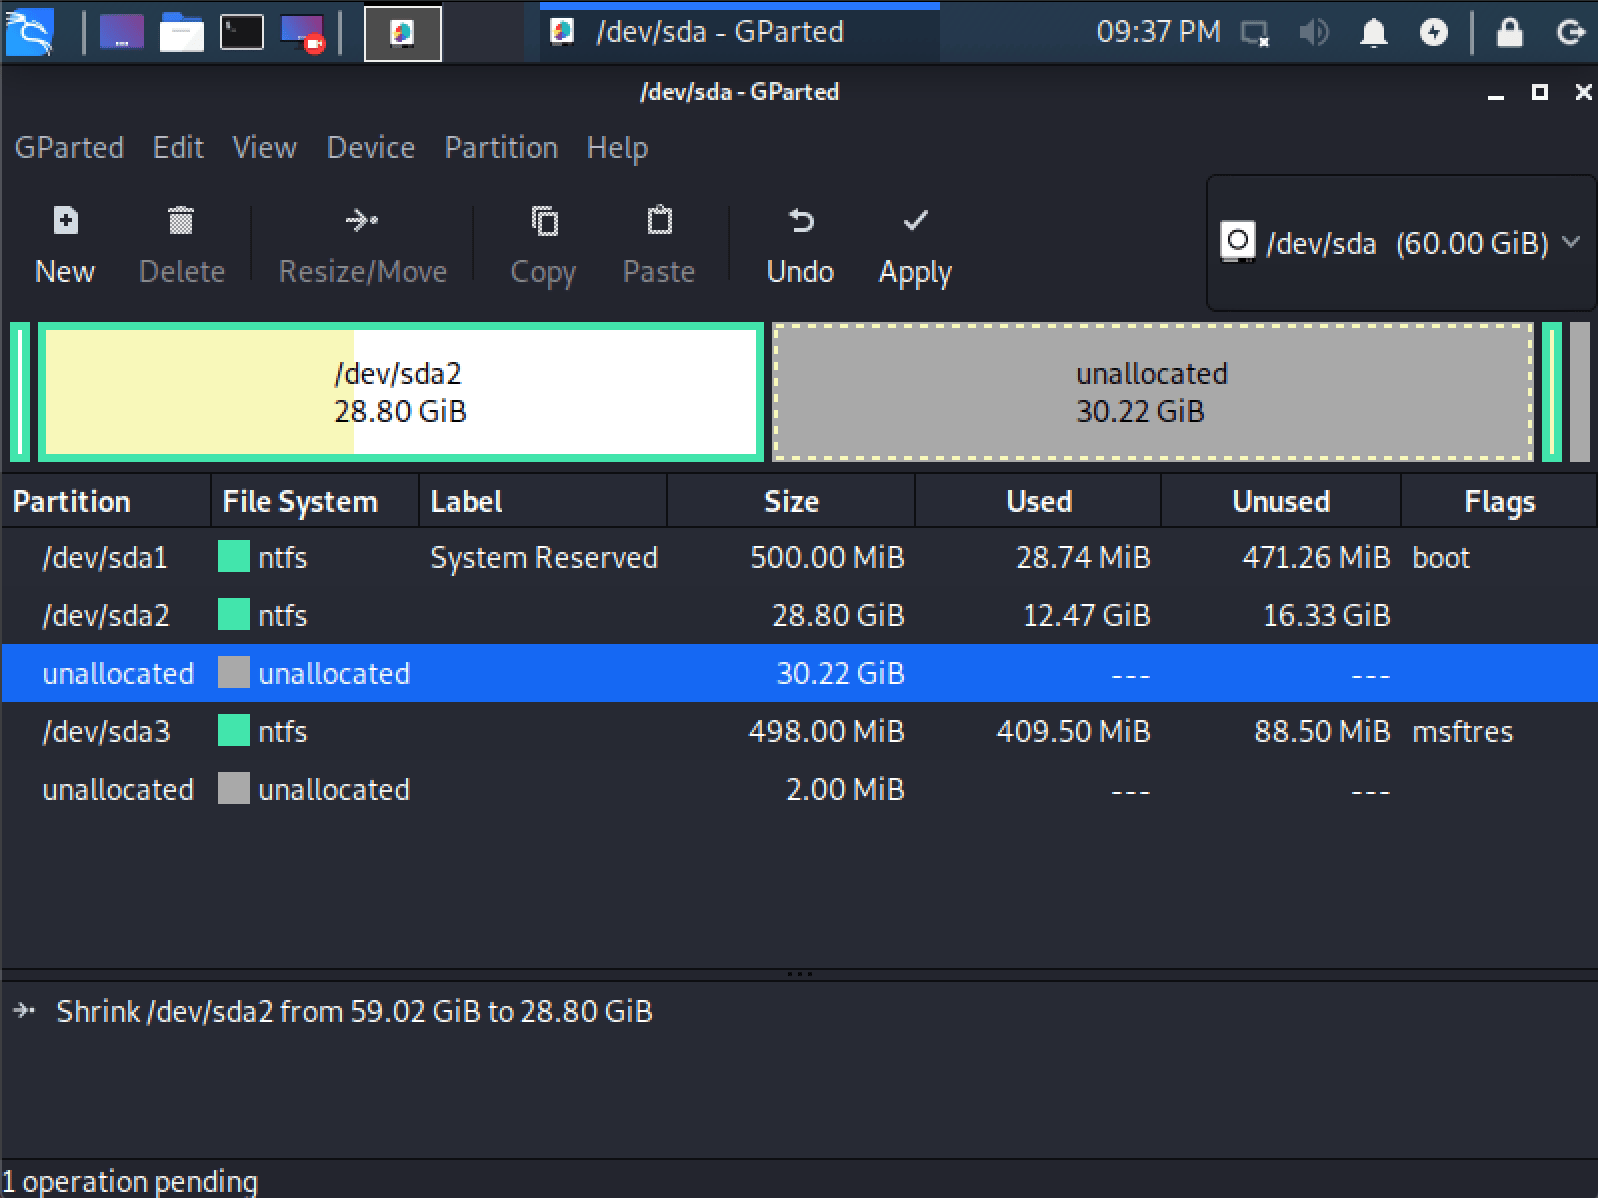
- Once you have resized your Windows partition, ensure you “Apply All Operations” on the hard disk. Exit gparted and reboot.
Kali Linux Installation Procedure
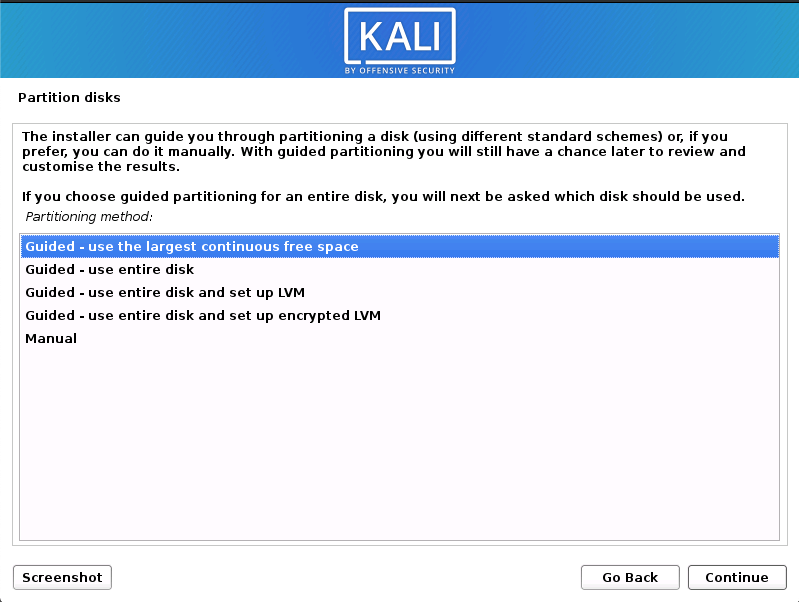
- The installation procedure from this point onwards is similar to a Kali Linux Hard Disk install, until the point of the partitioning. At this point, you need to select “Guided — use the largest continuous free space” (rather than “Guided — the entire disk”) which got created earlier with gparted.
- You can carry on following the single boot Kali Linux install guide, except you will not have the option to select desktop environment or metapackages as you are using the live image. Once the installation is done, reboot.
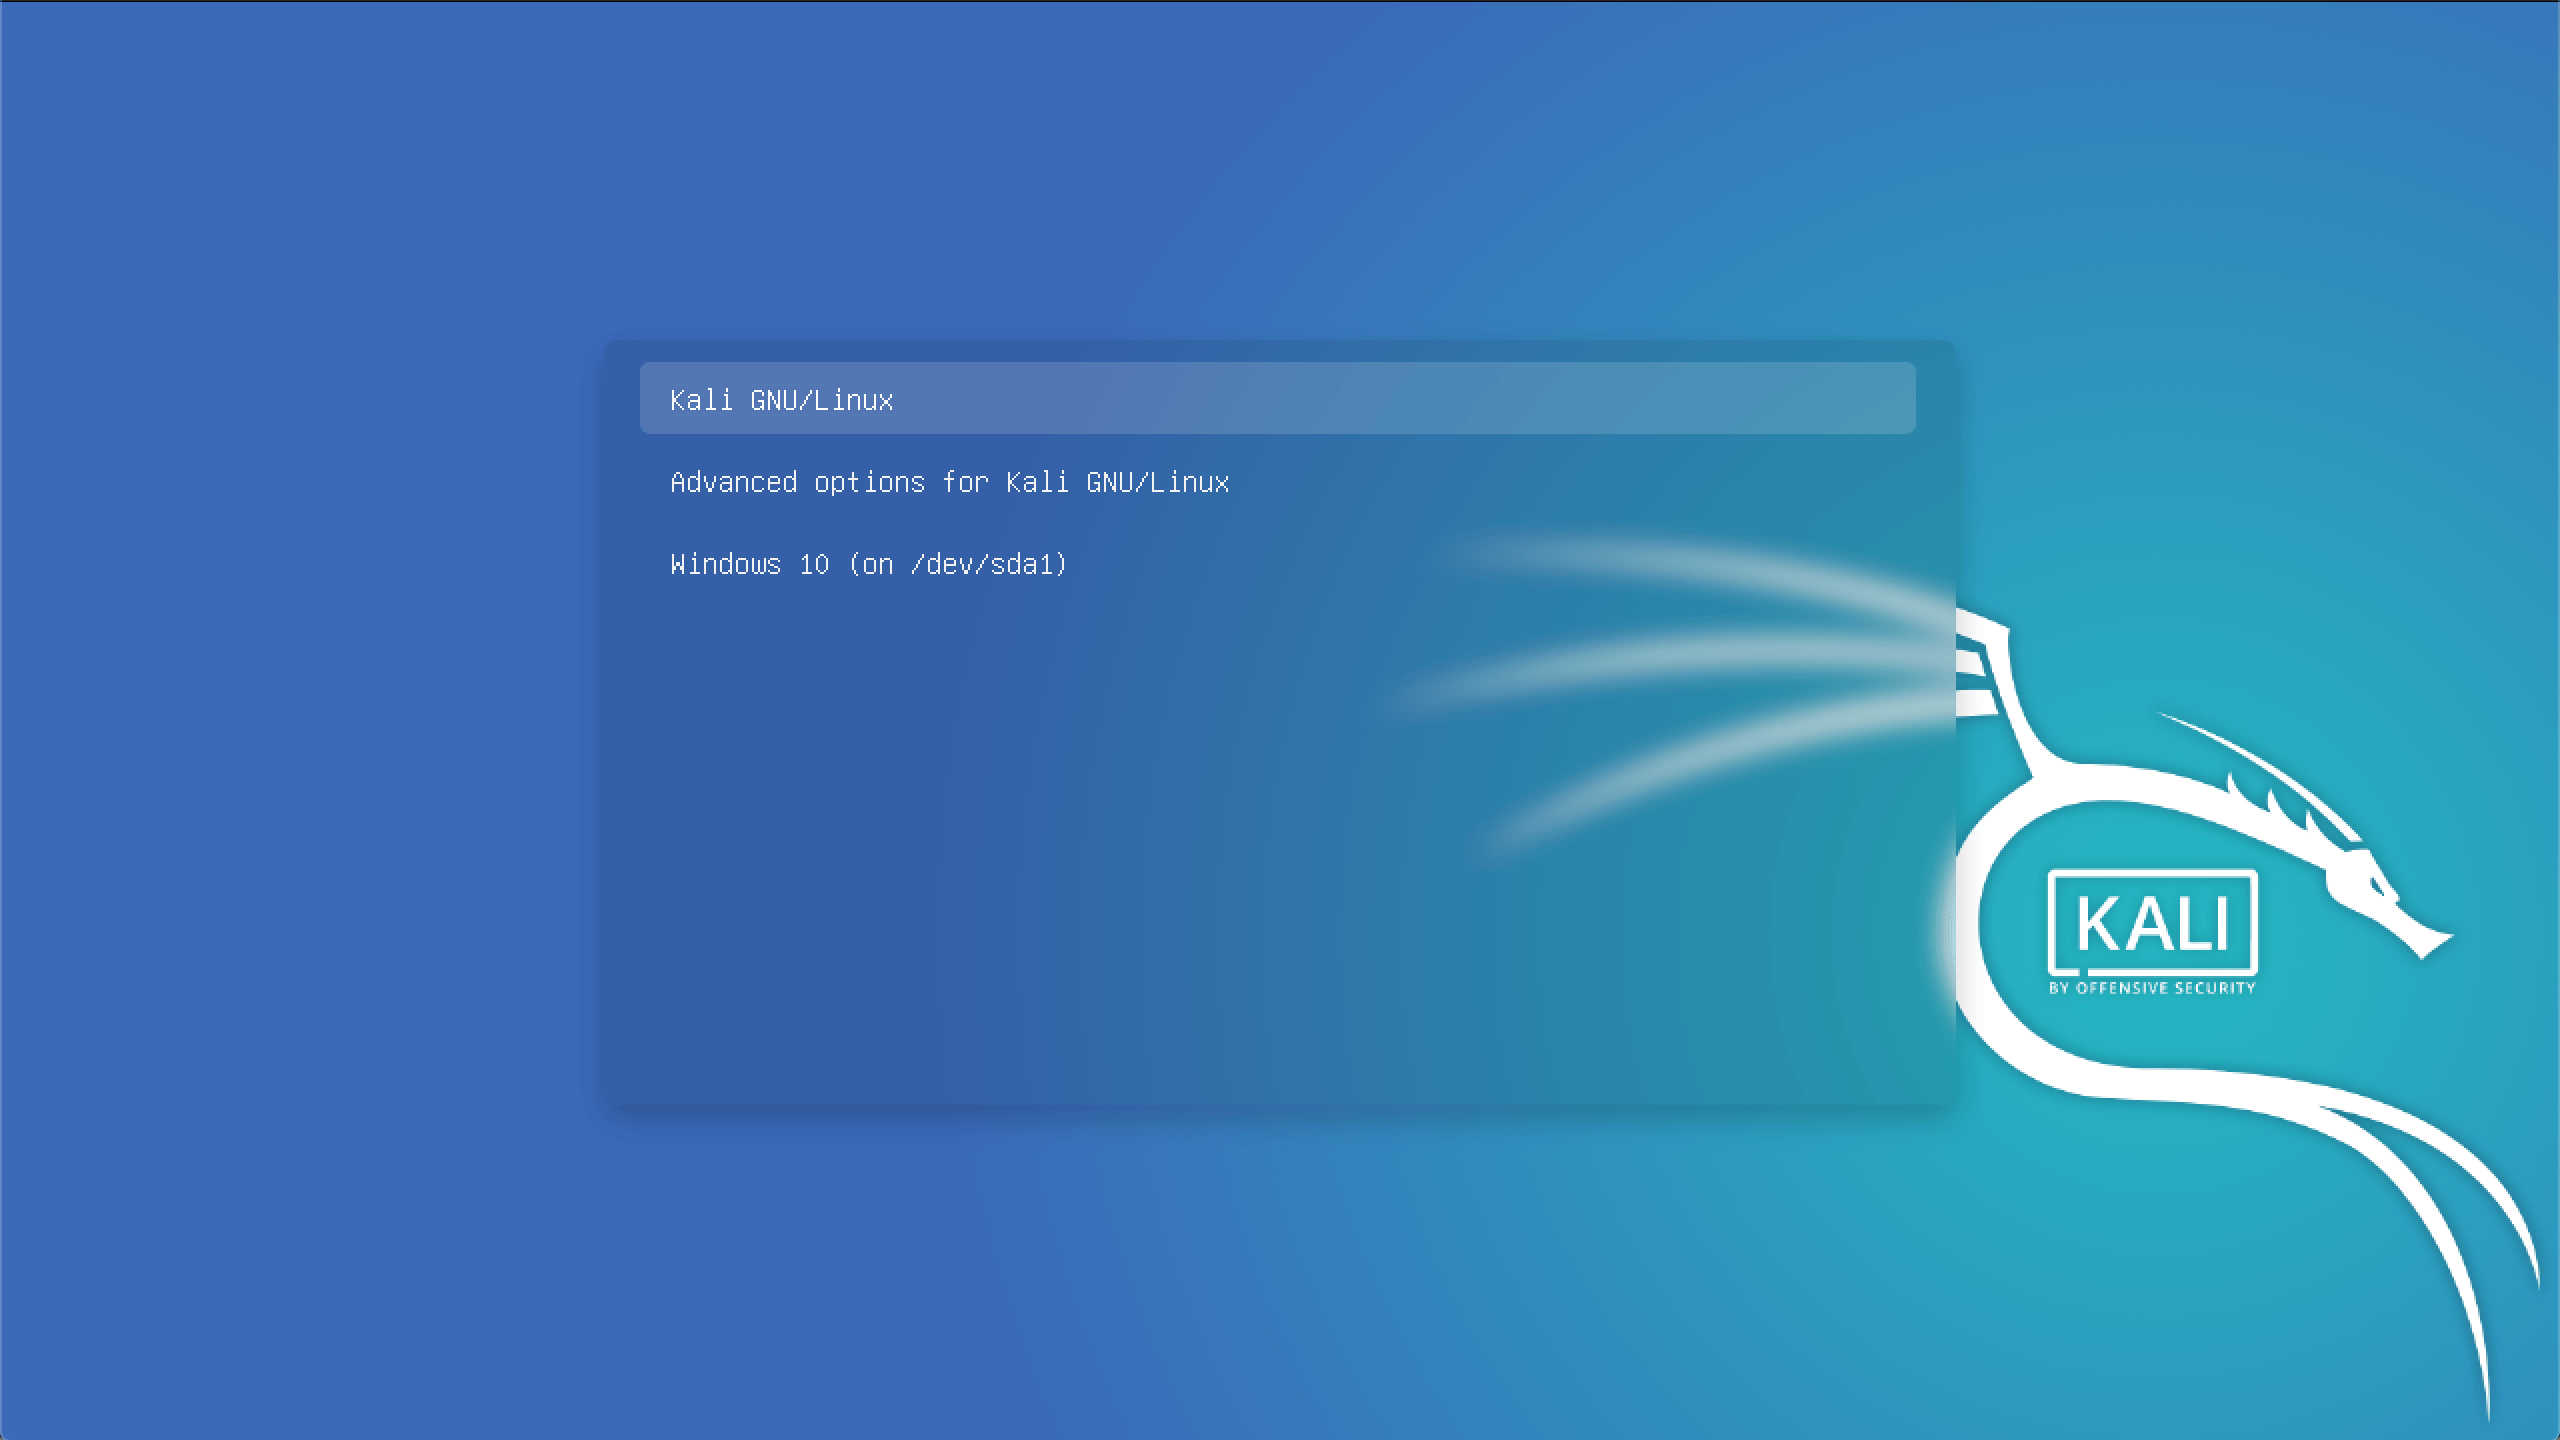
You should be greeted with a GRUB boot menu, which will allow you to boot either into Kali Linux or Windows.
Post Installation
Now that you’ve completed installing Kali Linux, it’s time to customize your system.
The General Use section has more information and you can also find tips on how to get the most out of Kali Linux in our User Forums.
Time/System Clock
One thing that may be worth knowing about is that occasionally the time will get changed between the Windows and the Linux system. To fix this, we can do the following:
To undo this we can simply do:
Updated on: 2021-Sep-27
Author: g0tmi1k
Источник
Kali linux boot manager
A few years ago we released a blog post on VMware Fusion Kali USB Boot. This can come in handy if a USB is not working how it should, as it can reduce time from needing to reboot or transfer it to another machine. Since then there have been some updates to VMware Fusion that make this process a bit easier.
As a review, we will be creating a VM that has no hard drive attached and will boot the USB off of EFI.
Process
Create a new custom VM
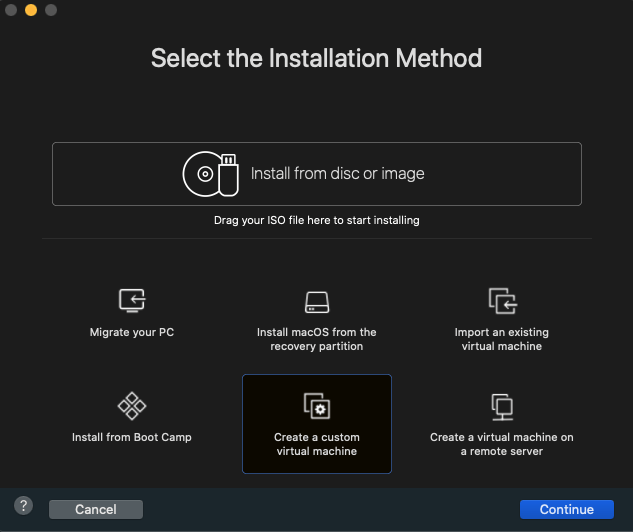
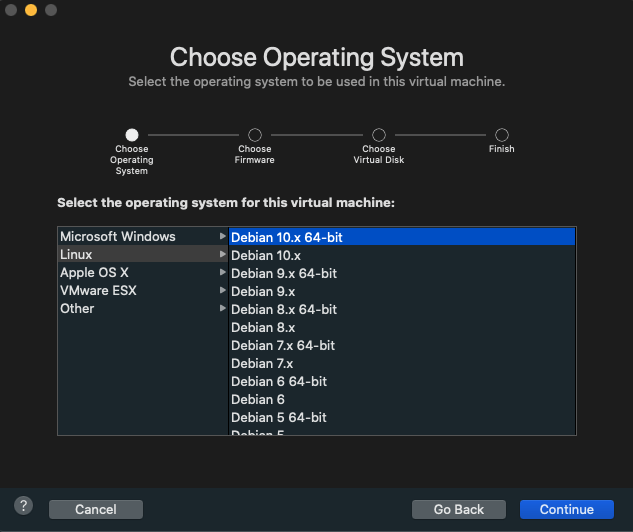
Be sure to select “Linux” and the latest Debian 64-bit version
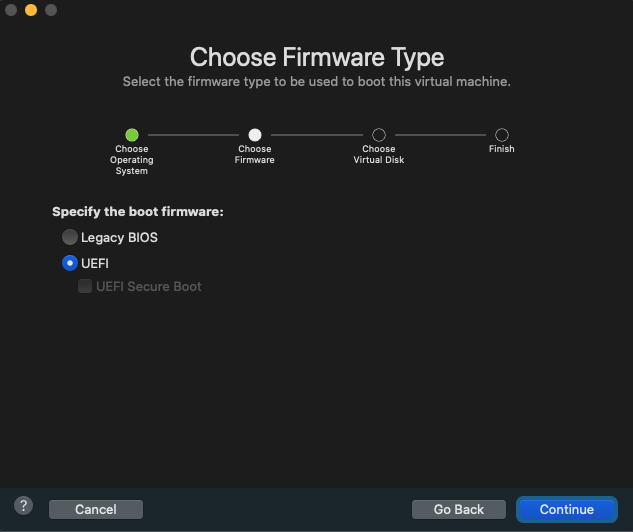
Select “UEFI” as the boot option.
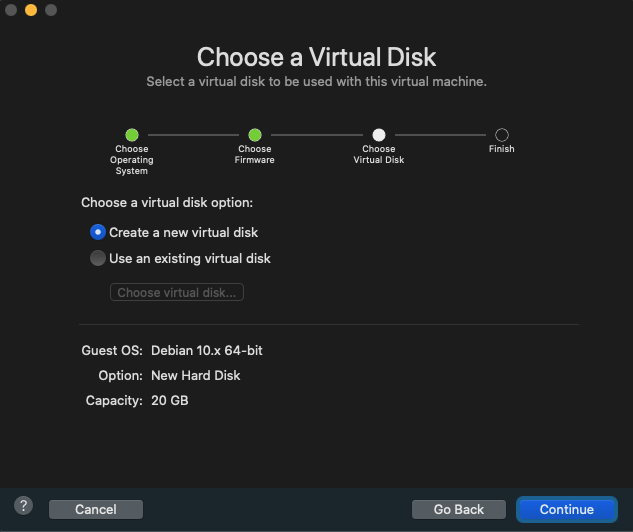
Create a new virtual disk (This will be removed later)
Click “Customize Settings”
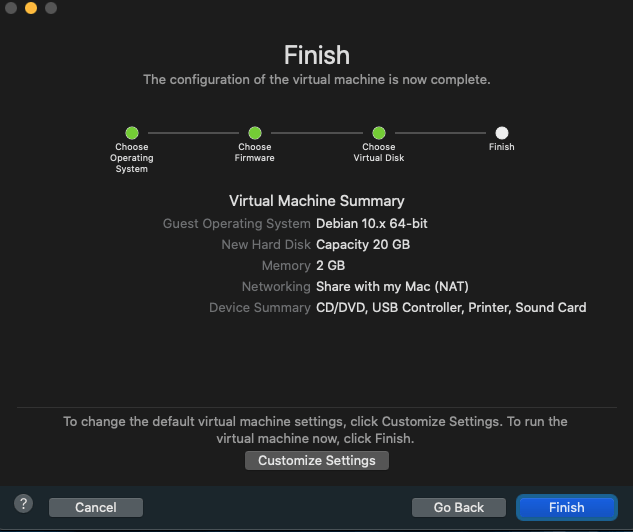
Give it a name you will remember

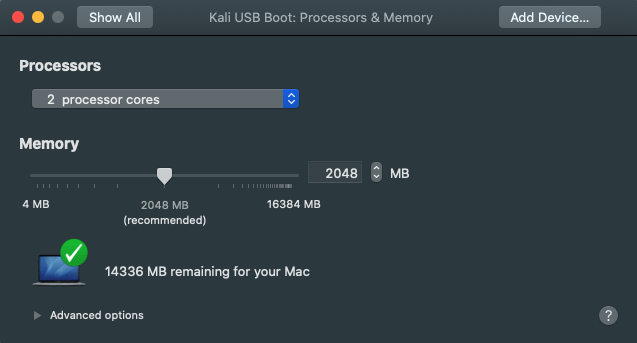
In settings, click Processor and Memory. Ensure at least 2048MB memory is allocated, and at least 2 cores.
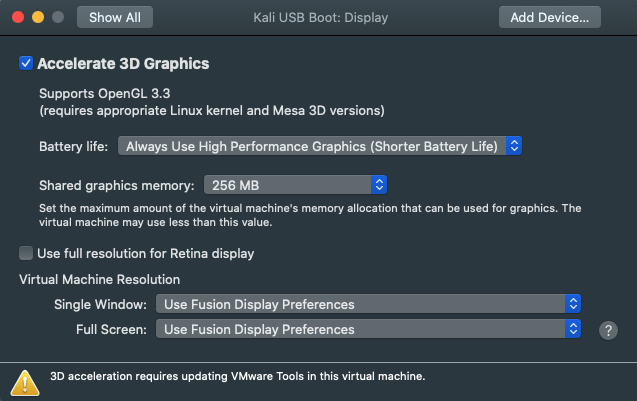
Next, in “Display”, check “Accelerate 3D Graphics”. This is an optional option, however it improves the performance. Optionally, check “Use full resolution for Retina display”.
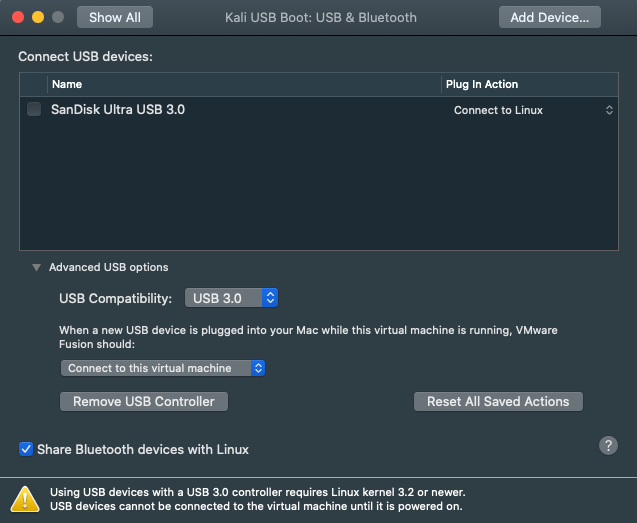
Now we can get into the USB section and ensure everything will work like a real system. In “USB Devices” ensure that “USB Compatibility” is set to “USB 3.0” if you have a compatible setup. If you are using USB-C, ensure that you have USB 3.0 selected. The “Plug In Action” should be set to “Connect to Linux”.
To remove the hard disk, go to “Disks” and then expand the “Advanced options” and click “Remove Hard Disk”. You can send it to the trash.

Now we can power on the VM, and it should boot to Kali.
Troubleshooting USB Connections
If you run into problems, you have a few options. First, power off your VM. Go to “Settings” -> “USB Devices” and leave this settings screen up next to your powered-off VM. (You can also expand your toolbar and look at the USB icon). Now, power on the VM. Immediately, you should see the USB Settings screen update with a check next to your USB device:
If you don’t get a check mark, this means that your Mac has grabbed the USB drive. Power off your VM, eject the drive from the Mac, and power on the VM again with the USB settings screen up. You should see the check mark and get the Kali boot screen.
Troubleshooting EFI
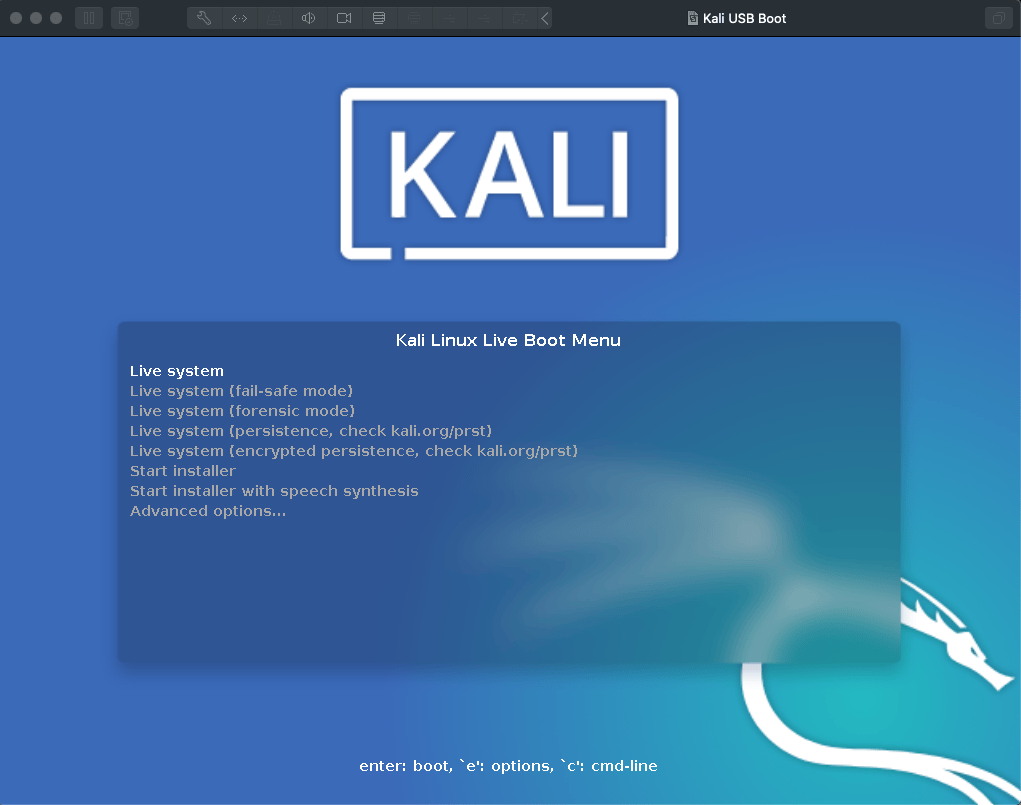
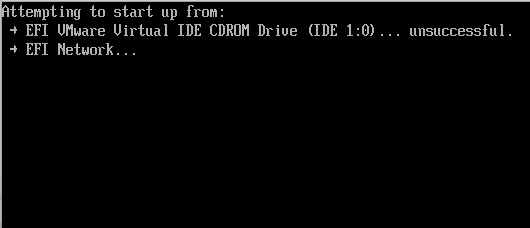
When booting with EFI, your boot screen should look like this:
This indicates that EFI is enabled. If it’s not, triple-check that you entered the firmware line correctly in the “Advanced” section of settings. Note that in some cases, this EFI Network check may hang. Simply pressing ESC within the VM nudges the process along.
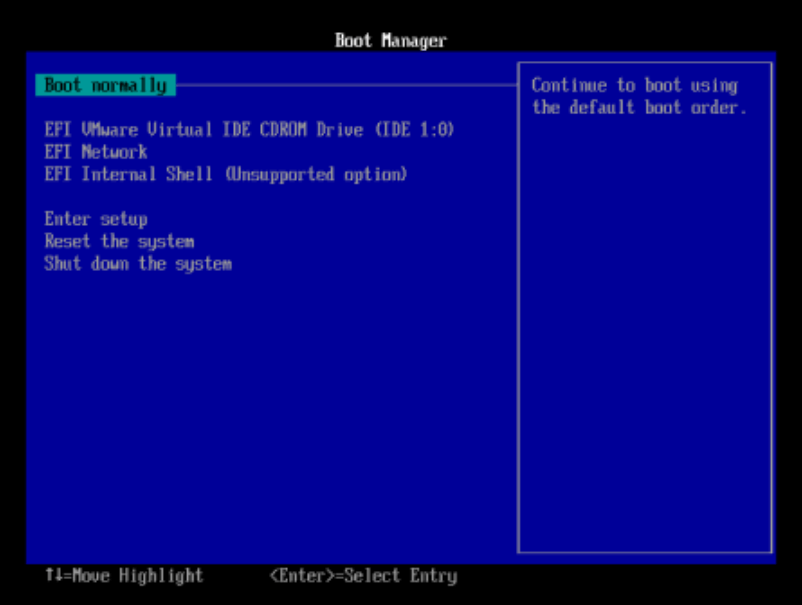
To access the Boot Manager, you can click on “Virtual Machine” on the Apple window bar at the top, and then click “Power on to firmware”.
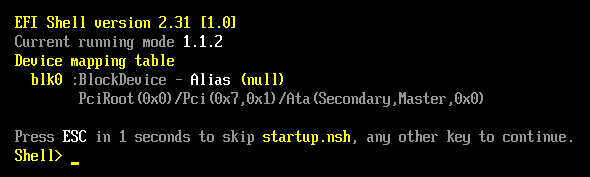
From here, you can select “EFI Internal Shell” to get into the shell. If you get something like this, missing an fs0 map, then EFI doesn’t see your USB drive. If this is the case, power off the virtual machine, unplug the USB, start the VM, and immediately after pressing start, insert the drive, looking for the checkmark in settings.
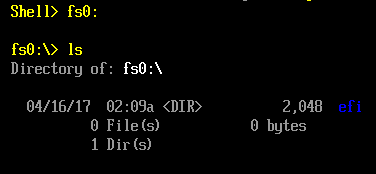
If everything goes well, you’re booted into Kali Linux. Otherwise, you can get to an EFI shell with ESC, “EFI Internal Shell”. A “happy” EFI shell looks like this:
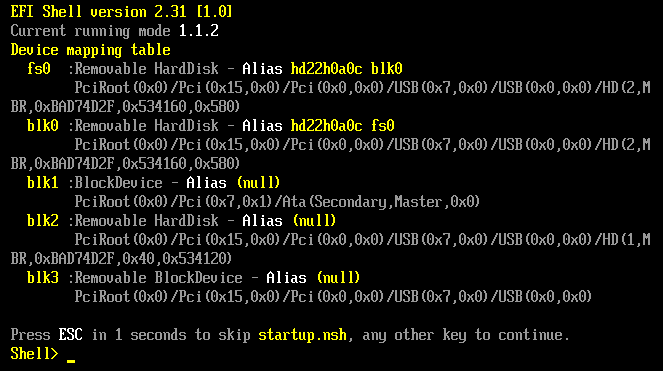
Note the fs0 map. Next, you can enter ‘fs0:’ and ‘ls’ to look around.
You can enter ‘cd efi\boot’ (notice the backslash, not a forward slash!) and boot the device manually with ‘bootx64.efi’
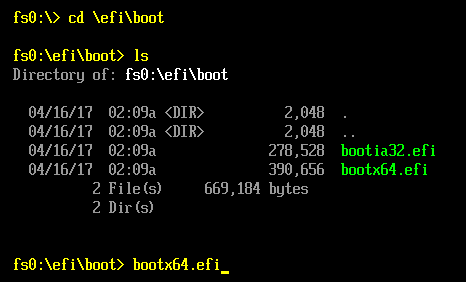
This should give you a happy EFI boot:
Note that on some installations, the shutdown, followed by removing the drive, powering on the VM and inserting the drive might be required. This likely has much to do with the Mac grabbing the USB drive, or half-grabbing it (without mounting).
Final option
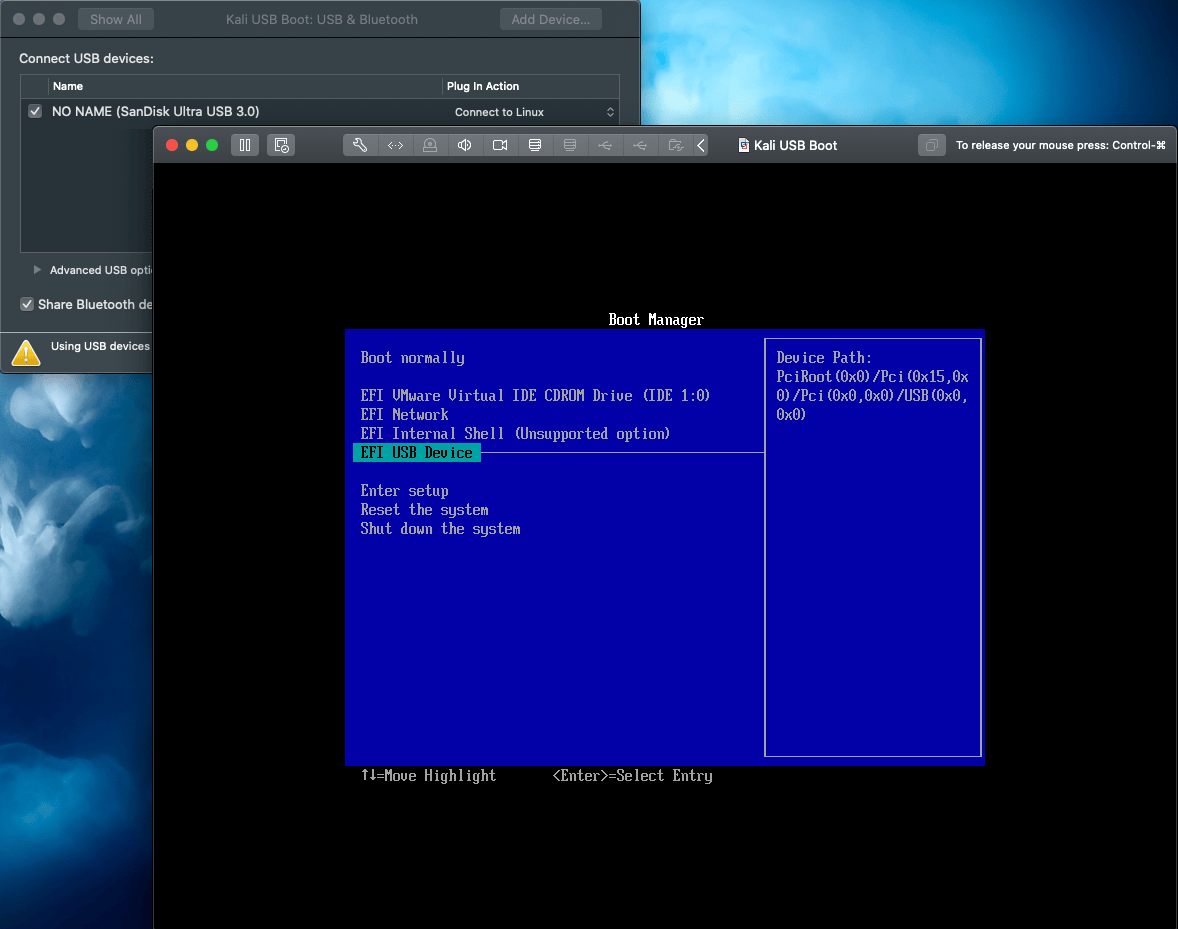
If neither of the above worked to fix you booting directly into Kali, but you can boot as seen by troubleshooting EFI, you can always use the boot manager to boot into Kali Linux. Access the Boot Manager by clicking on “Virtual Machine” on the Apple window bar at the top, and then click “Power on to firmware”. Select the option “EFI USB Device” and hit enter.
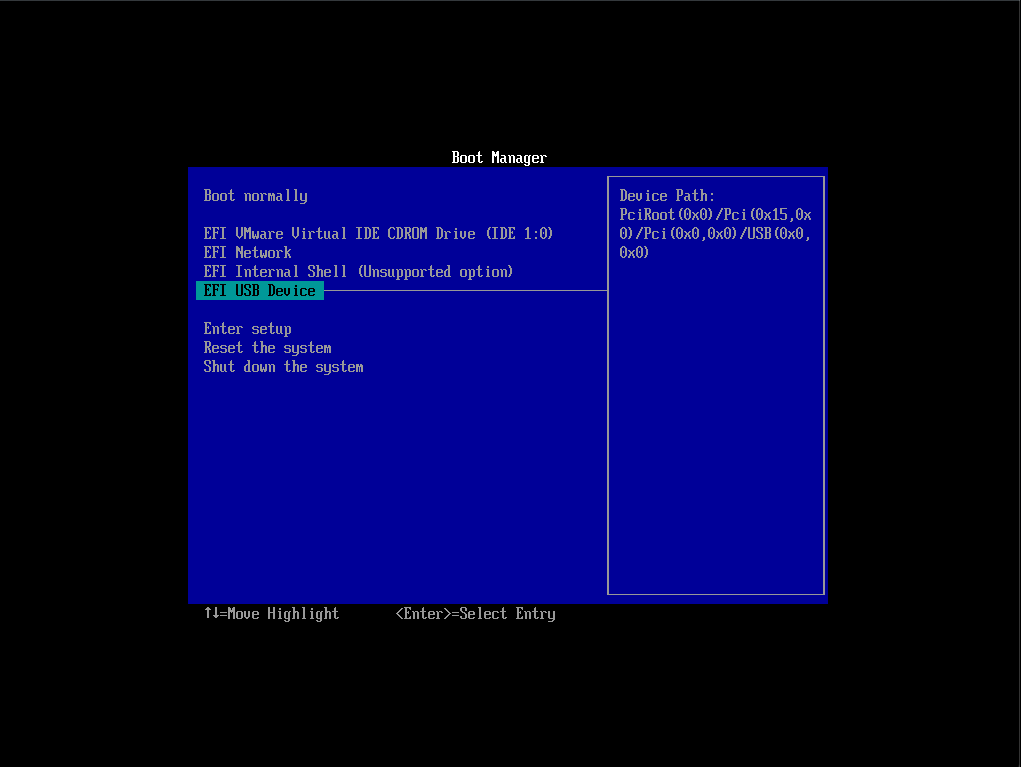
This should give you a happy EFI boot:
Updated on: 2021-Sep-27
Author: gamb1t
Источник
Kali linux boot manager
One of the fastest method, for getting up and running with Kali Linux is to run it “live” from a USB drive. This method has several advantages:
- It’s non-destructive — it makes no changes to the host system’s hard drive or installed OS, and to go back to normal operations, you simply remove the Kali Live USB drive and restart the system
- It’s portable — you can carry Kali Linux in your pocket and have it running in minutes on an available system
- It’s customizable — you can roll your own custom Kali Linux ISO image and put it onto a USB drive using the same procedures
- It’s potentially persistent — with a bit of extra effort, you can configure your Kali Linux “live” USB drive to have persistent storage, so the data you collect is saved across reboots
In order to do this, we first need to create a bootable USB drive which has been set up from an ISO image of Kali Linux.
The specifics of this procedure will vary depending on whether you’re doing it on a Linux, macOS/OS X, or Windows system.
What You’ll Need
A verified copy of the appropriate ISO image of the latest Kali build image for the system you’ll be running it on.
If you’re running under Windows, there is not one tool that is considered the overall best for imaging. We recommend Etcher (installer or portable) as it is simpler to use, however Rufus is another popular option with its advance options. If one does not work for you, consider the other.
A USB drive, 8GB or larger (Systems with a direct SD card slot can use an SD card with similar capacity. The procedure is identical.)
Creating a Bootable Kali USB Drive on Windows (Etcher)
Plug your USB drive into an available USB port on your Windows PC, note which drive designator (e.g. “ G:\ «) it uses once it mounts, and launch Etcher.
Press Flash from file, and locate the Kali Linux ISO file to be imaged with.
Press Select target and check the list of options for the USB drive (e.g. “ G:\ ”, the manufacture and size).
Click the Flash! button once ready.
Note: You may get a UAC prompt asking for administrator privileges that you will need to accept.
 5. Once Etcher alerts you that the image has been flashed, you can safely remove the USB drive and proceed to boot into Kali with it.
At the time of writing, Etcher will use MBR. This is to allow for the most hardware compatibility.
Creating a Bootable Kali USB Drive on Windows (Rufus)
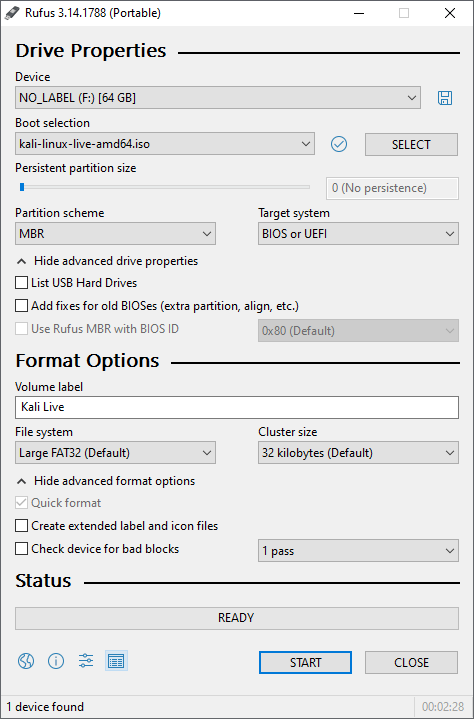
Plug your USB drive into an available USB port on your Windows PC, note which drive designator (e.g. “ G:\ «) it uses once it mounts, and launch Rufus.
With Device, check the dropdown list of options for the USB drive (e.g. “ G:\ ” and size).
Boot section needs to point to point to the Kali Linux ISO file, which can be done by clicking the SELECT button
Depending on your configuration, you can set the Partition scheme, as well as Target system. If you are not sure, leave it as the default values.
Click the START button once ready.
 6. You may get a prompt saying about ISOHybird image. Selecting ISO image, will allow you to edit the files from the Kali Linux ISO, but at the potential lose of hardware compatibility. As a result, we recommend selecting DD Image.
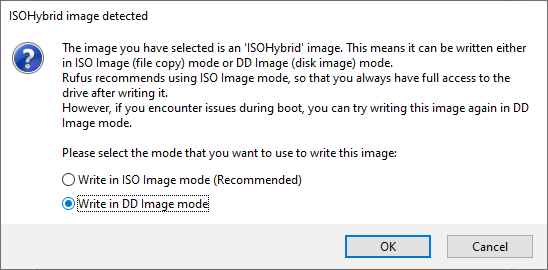
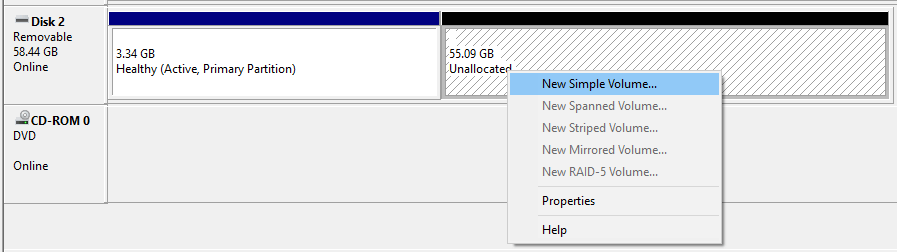
Note: If you select “DD Image” option, you can create another partition on the USB drive, allowing you to use the rest of the space. Start -> Run (Windows + R) -> diskmgmt.msc -> Locate the USB drive -> Right-click in “Unallocated” -> New Simple Volume -> Follow the rest of the wizard with next, next, next…
Booting A USB Drive In Windows
Depending on the system (such as BIOS or UEFI), as well as the version of Windows, and how they are each configured, you may need to re-image the USB drive.
- Master Boot Record (MBR) is often used on legacy systems that use BIOS as well as UEFI which has Compatibility Support Module (CSM) enabled
- GUID Partition Table (GPT) is required where UEFI has CSM disabled, forcing to use the modern standard
After writing the image to the USB drive, reboot Windows with the USB inserted. Depending on the motherboard manufacture, will also depend on the next stage. Some motherboard’s support a “temporary” boot menu, allowing for a one off selection. Others you need to enter BIOS/UEFI to configure it to try and boot from USB first. Entering either location, also depends on the motherboard. You can look up on the manufactures website and read the manual, try and read the screen when booting (however the text may be shown too quick or full logos used), or try common key combinations (such as ESC , F1 , F2 , F3 , F4 , F8 , F10 , F11 , F12 or DEL ).
Updated on: 2021-Sep-27
Author: g0tmi1k
Источник


