- Kali linux custom image download
- Content
- Which Image to Choose
- Which Desktop Environment and (Meta)Packages to Choose During Installation:
- Kali linux custom image download
- Where Should You Build Your ISO?
- Kali Environment
- Getting Ready — Setting Up The build-script Kali System
- Building an Updated Live Image
- Building an Updated Installer Image
- Non-Kali Debian-Based Environment
- Setting Up The build-script Non-Kali Debian-Based System
- Configuring The Kali ISO Build (Optional)
- Building Kali Live With Different Desktop Environments
- Controlling The Packages Included In Your Build
- Overlaying Files In Your Build
- Build Hooks, Binary and Chroot
- Building a Kali Linux ISO for Different Architectures (Optional)
- Building a Kali Linux ISO for Older i386 Architectures
- Using A Custom Network Mirror For Building (Optional)
- Testing Built Image
- Kali Linux Rolling Virtual & ARM Images
- VMware and VirtualBox Kali Rolling Images
- Kali Rolling ARM Images
- Kali Linux Support for NanoPi2 by FriendlyARM
- Category: Kali Linux
- Creating Kali i3-gaps
- Customizing Kali Linux
- Kali Linux 2.1.2 ARM Releases
- Kali Rolling ISO of DOOM, Too.
- Kali Linux Rolling Virtual & ARM Images
- Kali Linux 2.0 Top 10 Post Install Tips
- Kali 2.0 Dojo Black Hat / DEF CON USA 2015
- Booting Kali Linux Live Over HTTP
- Kali Linux on a Raspberry Pi (A/B+/2) with Disk Encryption
- Kali USB – Multiple Persistent Stores
- Bypassing Windows and OSX Logins with NetHunter & Kon-boot
- Kali with Raspberry Pi TFT support
- Kali Nexus NetHunter 1.0.2
- Kali Linux Evil Wireless Access Point
- Announcing the Kali Linux Dojo
- Kali Encrypted USB Persistence
Kali linux custom image download
In this section, we will describe the process of installing Kali Linux on 32-bit and 64-bit hardware using the images published on the Kali Linux download page.
Content
Which Image to Choose
The Kali Linux download page offers three different image types (Installer, NetInstaller and Live) for download, each available for both 32-bit and 64-bit architectures.
If in doubt, use the “Installer” image. You will need to check your system architecture to know whether to get 32-bit or 64-bit. If you don’t know it, you’re best to research how to find out (As a rule of thumb, if your machine’s newer than 2005 you should be okay with amd64/x64/64-bit)
Installer
This is the recommended image to install Kali Linux. It contains a local copy of the (meta)packages listed (top10, default & large) so it can be used for complete offline installations without the need of a network connection.
This image cannot be used to boot a live system (such as directly running Kali from a USB). It is only an installer image.
NetInstaller
This image can be used if you want the latest package every time you install Kali Linux or the standard installer image is too big to download. This image is very small because it does not contain a local copy of (meta)packages to install. They will all be downloaded during installation, so as a result this requires a network connection which will slow down the installation time.
Only use this image if you have reasons not to use the standard installer image above.
This image cannot be used to boot a live system (such as directly running Kali from a USB). It is only an installer image.
This image is for running Kali Linux without installing it first so it is perfect for running off a USB drive (or a CD/DVD).
You are able to install Kali Linux in its default configuration from this image but you will not be able to choose between desktop environments or to specify additional (meta)packages to install.
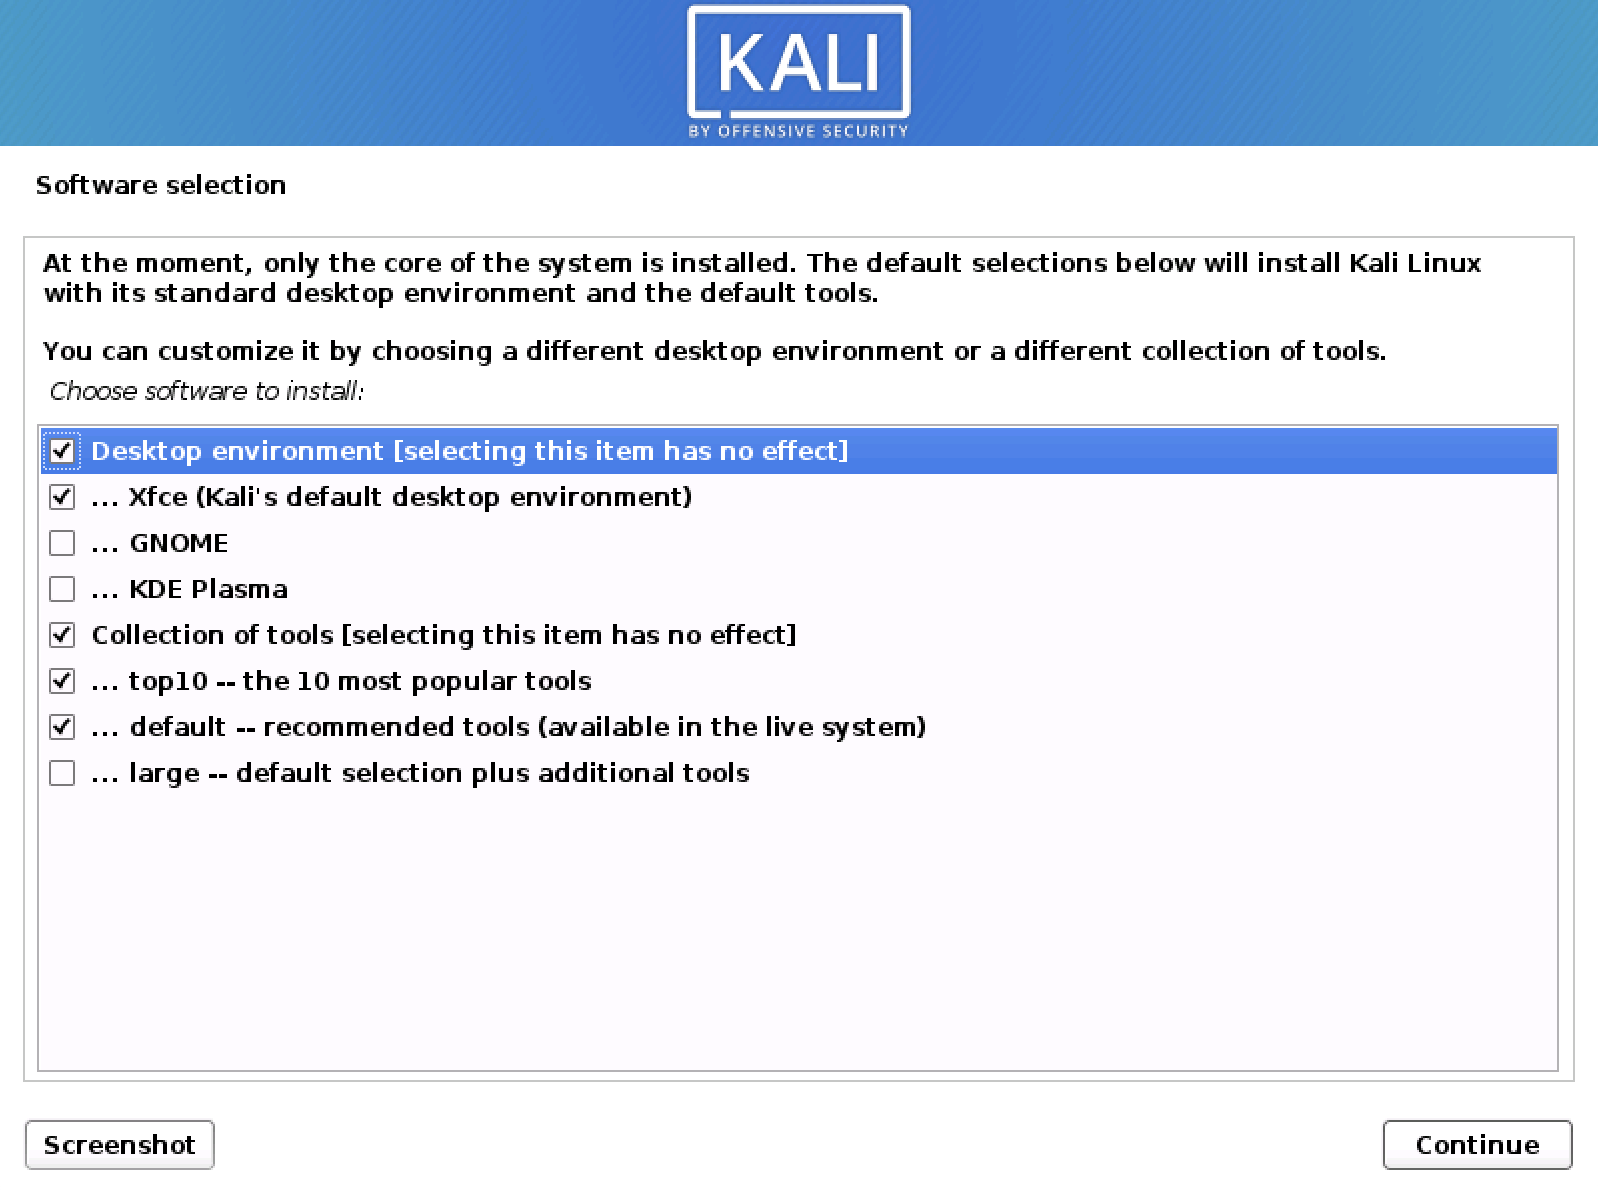
Which Desktop Environment and (Meta)Packages to Choose During Installation:
Each Kali Linux installer image (not live) allows the user to select the preferred “Desktop Environment (DE)” and software collection (metapackages) to be installed with operating system (Kali Linux).
We recommend sticking with the default selections and add further packages after the installation as required. Xfce is the default desktop environment, and kali-linux-top10 and kali-linux-default are the tools which get installed at the same time.
At this screen, you may wish to not install a desktop environment, then Kali Linux becomes “headless” (no graphic interface) which uses less system resources up and commonly found on servers, dropboxes, low powered ARM devices, and the cloud. This is meant for people who are completely comfortable with the command line. You are able to install multiple Desktop Environments, allowing you to switch, we wouldn’t recommend it. You may change your mind and switch desktop environments at a later date.
May wish to not to install any of the pre-defined software packages/bundles/collections (metapackages), giving you a finer degree of control of manually installing exactly what software you want. Alternatively you may want to be more prepared and install more than the default toolset. Please be aware, that there are more tools available in Kali which has be manually installed after the setup (as they all cannot be stored in the setup image).
Overall, these extra choices are for a more efficient installation experience, meant for advanced users. Please be aware of their pitfalls.
The following sections in the “Kali Documentation Installation” of this documentation, will be using the “Installer” image for the guides unless stated otherwise.
Updated on: 2021-Sep-27
Author: Re4son
Источник
Kali linux custom image download
Building a customized Kali Linux image is not as complex as you may be thinking. It is easy, fun, and rewarding! Kali Linux traditionally, has been a Live Image, but since Kali 2020.1 an Installer Image was introduced. Both these images have different functions, and are also built in different ways.
- Live Image — allows you to try Kali, without altering the system (making it create for USB). It is created using live-build
- Installer Image — allows for you to customize Kali by picking packaging during installation, such as picking the desktop environment as well as what metapackages get installed. This image is powered by simple-cdd(which uses debian-cd to make Debian-Installer ).
You can configure virtually any aspect of your Kali ISO build, such as adding packages from outside of Kali network repositories, unattended installations to changing the default wallpaper. Our build-scripts provides a framework that uses a configuration set to automate and customize all aspects of building the images. The Kali Linux development team use the same build-scripts to produce the official Kali ISO releases.
Where Should You Build Your ISO?
Ideally, you should build your custom Kali ISO from within a pre-existing Kali environment, as there is less chance of items going wrong. However, it is possible to generate the images on a Non-Kali but still a Debian-Based system.
Kali Environment
Getting Ready — Setting Up The build-script Kali System
We first need to prepare the Kali ISO build environment by installing and setting up the required packages with the following commands:
Building an Updated Live Image
Now you can simply build an updated Kali ISO (with our default configuration) by entering the live-build-config/ directory and running our build.sh wrapper script, as follows:
The build.sh script will take a while to complete, as it downloads all of the required packages needed to create your ISO. Good time for a drink.
Building an Updated Installer Image
By default, it will generate a Live Image. If you want an Installer Image, add —installer :
We are using the —verbose to output more on the screen rather than it being captured in just the build.log output. If you want even more output, you can use —debug instead, which will then give more information.
Non-Kali Debian-Based Environment
Setting Up The build-script Non-Kali Debian-Based System
You can build an Kali ISO on a Debian-based systems other than Kali Linux. The instructions below have been tested to work with both Debian and Ubuntu.
First, we prepare the system by ensuring it is fully updated, then proceed to download the Kali archive keyring and packages:
Note: You may need to check that kali-archive-keyring_20YY.X_all.deb & live-build_20YYMMDD_all.deb are the latest files.
With that completed, we install some additional dependencies and the previously downloaded files:
With the environment all prepared, we start the process by setting up the build-script profile and clone out the build config:
At this point, depending on the host OS and its version, we may need to edit build.sh to bypass a version check for debootstrap. We do this by commenting out the exit 1 below:
With the above change made, build.sh should look similar:
At this point, we can build our ISO as normal
Configuring The Kali ISO Build (Optional)
If you want to customize your Kali Linux ISO, this section will explain some of the details. Through the kali-config/ directory, there are a wide range of customization options, which are well-documented for live-build page. Simple-CD is a little more limited with options. For the impatient, here are some of the highlights.
Building Kali Live With Different Desktop Environments
Since Kali 2.0, we now support built in configurations for various desktop environments, including Xfce (default), Gnome, KDE, E17, I3WM, LXDE, MATE. To build any of these, you would use syntax similar to the following:
This is not required with the installer images, as it includes Xfce, Gnome and KDE by default. You can add others by including their packages as explained in the section below.
Controlling The Packages Included In Your Build
The list of packages included in your build will be present in the the respective kali-config/ directory. For example, if you’re wanting to edit:
- The default Installer ISO, you would use the following package lists file — kali-config/installer-default/packages
- The default Live ISO, you would use the following package lists file — kali-config/variant-default/package-lists/kali.list.chroot
- A non-default Live ISO desktop environment, such as Gnome — kali-config/variant-gnome/package-lists/kali.list.chroot (You can replace Gnome with any supported desktop environments)
By default, these lists will includes the kali-linux-default metapackage, as well as some others. These can be commented out and replaced with a manual list of packages to include in the ISO for greater granularity.
Overlaying Files In Your Build
With Live images, you have the option to include additional files or scripts in your build by overlaying them on the existing file-system, inside the includes.
For example, if we wanted to include our own custom script into the /root/ directory of the ISO (this would correspond to the chroot stage), then we would drop this script file in the kali-config/common/includes.chroot/ directory before building the ISO.
For more information see the live-build documentation.
Build Hooks, Binary and Chroot
For live images, live-build supports hooks allows us to “hook scripts” in various stages of the Kali ISO live image. For more detailed information about hooks and how to use them, refer to the live-build manual.
As an example, we recommend you check out the existing hooks in kali-config/common/hooks/ .
Building a Kali Linux ISO for Different Architectures (Optional)
By default, the build-script will generate the Kali image based on the architectures of the current operating system. If you wish to alter this:
- x64: ./build.sh —verbose —arch amd64
- x86: ./build.sh —verbose —arch i386
Building a Kali Linux ISO for Older i386 Architectures
The Kali Linux i386 ISO has PAE enabled. If you require a default kernel for older hardware with PAE disabled, you will need to rebuild a Kali Linux ISO. The rebuilding process is much the same as described above, except that the 686-pae parameter needs to be changed to 686 in auto/config before building:
Using A Custom Network Mirror For Building (Optional)
If you build multiple images, you will find you are often waiting on build.sh to finish. There are a few ways to speed up the build process, such as:
- Building Installer images as they often build quicker than Live images
- Have less packages included (such as switching kali-linux-default to kali-linux-top10 )
- Improve access to packages
You often find that you are waiting on packages to be pulled down. You can either setup a local proxy on the same machine (such as apt-cacher or apt-cacher-ng ). Alternatively, you can setup a local network mirror.
We can instruct the build-script to use a different mirror, by doing the following (assuming our network mirror is located at http://192.168.0.101/kali ):
Testing Built Image
After producing the issue, you can treat it like any Kali base image, so you can install it (either on bare metal or virtually), or copy to a CD/DVD/USB.
If you are wanting to quickly test the image before putting it “in production”, we can use qemu (and ovmf for UEFI). First we install the packages:
Next we produce a hard disk to use:
Afterwards, to boot from the image produced (we will be using the Live image on x64):
The above will be a “BIOS” boot. For a “UEFI” boot:
Note: We have set UEFI configuration file to be read only
Updated on: 2021-Sep-27
Author: g0tmi1k
Источник
Kali Linux Rolling Virtual & ARM Images
With the recent release of Kali Rolling 2016.1 completed, we’ve gone ahead and updated our custom Kali VMware, VirtualBox, and ARM images. Here’s a few news items and updates that we have regarding these images for those who prefer to get them pre-built.
VMware and VirtualBox Kali Rolling Images
The VMware and VirtualBox images were built from scratch and for the first time, installed together with packaged, native guest tools. What this means is that for both images, the guest tools are installed with apt commands and enjoy upgrades just like all other Kali packages. What this means for you is that you no longer need to recompile and update the guest tools manually anymore. These virtual images also have a weeks worth of updates compared to the 2016.1 ISO releases, including a fix for a Ralink wireless driver monitor mode regression in kernel 4.3.
Kali Rolling ARM Images
Our extensive collection of Kali ARM images have also undergone a massive overhaul – they have all been updated to Kali rolling and now enjoy the same range of updated tools as the regular distribution. This makes those little ARM devices just that more effective at their nefarious deeds! We’ve also updated our Github ARM build script repository, for those who want to build these images from scratch or modify the build process to their liking.
Kali Linux Support for NanoPi2 by FriendlyARM
One of the more exciting updates we have in our ARM hardware collection is a newcomer to the field, the NanoPi2, by FriendlyARM. It has an impressive Samsung Quad Core Cortex-A9 1.4 GHz CPU, 1GB DDR3 RAM, along with built in Wireless and Bluetooth. Whats more, its adoption of the Raspberry Pi’s GPIO pin header makes it compatible with both Raspberry Pi external GPIO modules and Arduino shield boards. We’re definitely excited about this newcomer to our collection and expect to see it adopted for various projects quite quickly.
Источник
Category: Kali Linux
Kali Linux related news and updates from the Offensive Security Team
Creating Kali i3-gaps
i3 is a tiling window manager for Linux and BSD systems. In this blog post, Arszilla gives a walk through on how he created his custom Kali i3-gaps ISO.
Customizing Kali Linux
One of the designers on the Kali Linux team shares his top tips and tools to customize Kali Linux. Dig in under the hood with Daniel Ruiz de Alegría.
Kali Linux 2.1.2 ARM Releases
The time has come for yet another Kali ARM image release with new and updated images. Our collection of supported ARM hardware grows constantly with new images from Raspberry Pi 3, Banana Pi and Odroid-C2, with the latter being our first real arm64 image. We’re really excited about our new arm64 build environment and hope to see more 64bit ARM devices running Kali in the future. Feel free to visit our Kali Linux ARM downloads page to get the latest goodness.
Kali Rolling ISO of DOOM, Too.
A while back we introduced the idea of Kali Linux Customization by demonstrating the Kali Linux ISO of Doom. Our scenario covered the installation of a custom Kali configuration which contained select tools required for a remote vulnerability assessment. The customised Kali ISO would undergo an unattended autoinstall in a remote client site, and automatically connect back to our OpenVPN server over TCP port 443. The OpenVPN connection would then bridge the remote and local networks, allowing us full “layer 3” access to the internal network from our remote location. The resulting custom ISO could then be sent to the client who would just pop it into a virtual machine template, and the whole setup would happen automagically with no intervention – as depicted in the image below.
Kali Linux Rolling Virtual & ARM Images
With the recent release of Kali Rolling 2016.1 completed, we’ve gone ahead and updated our custom Kali VMware, VirtualBox, and ARM images. Here’s a few news items and updates that we have regarding these images for those who prefer to get them pre-built.
Kali Linux 2.0 Top 10 Post Install Tips
With Kali 2.0 now released, we wanted to share a few post install procedures we find ourselves repeating over and over, in the hopes that you will find them useful as well. We’ve also slapped in some answers to common questions we’ve been getting. Here is our top 10 list:
Kali 2.0 Dojo Black Hat / DEF CON USA 2015
Last years event was a rousing success, with many attendees staying all day long and working through the multiple exercises. We had such a great time, we wanted to do it again. This is a great chance to get hands on with Kali 2.0, learning the cutting edge features and how to best put them to use. In this two session workshop series, we will be covering how to create your own custom Kali ISO that is tweaked and modified to exactly fit your needs. This will be followed up in the second session with a hands-on exercise of deploying Kali on USB sticks so that it contains several persistent storage profiles, both regular and encrypted – including the LUKS nuke feature.
Booting Kali Linux Live Over HTTP
Kali Linux Features
Here at Offensive Security, we tend to use Kali Linux in unconventional ways – often making use of some really amazing features that Kali Linux has to offer. One of these interesting use-cases includes booting instances of Kali Linux Live over HTTP, directly to RAM. We realized there’s little documentation around this feature and thought we’d shed some light on it so others may enjoy this feature as well.
Booting Kali Over HTTP – Overview
The basic premise involves using the Kali Live kernel and initrd for booting,
Kali Linux on a Raspberry Pi (A/B+/2) with Disk Encryption
With the advent of smaller, faster ARM hardware such as the new Raspberry Pi 2 (which now has a Kali image built for it), we’ve been seeing more and more use of these small devices as “throw-away hackboxes“. While this might be a new and novel technology, there’s one major drawback to this concept – and that is the confidentiality of the data stored on the device itself. Most of the setups we’ve seen do little to protect the sensitive information saved on the SD cards of these little computers.
Kali USB – Multiple Persistent Stores
One of the markings of the 1.0.7 Kali release was the introduction of Kali Live USB LUKS encrypted persistent storage, on which we further elaborated in one of our previous blog posts. However, we’re not done yet with USB persistent storage as more features in Kali remain to be explored.
Bypassing Windows and OSX Logins with NetHunter & Kon-boot
The Kali Linux NetHunter platform has many hidden features which we still haven’t brought to light. One of them is the DriveDroid application and patch set, which have been implemented in NetHunter since v1.0.2. This tool allows us to have NetHunter emulate a bootable ISO or USB, using images of our choosing. That’s right, you can use NetHunter as a boot device which holds a library of bootable ISOs and images…And so we begin:
Kali with Raspberry Pi TFT support
Several weeks ago a request in the Kali forums prompted us to look at the integration of the Adafruit 2.8in TFT touch screen for Kali Linux. A few weeks and much less hair later, we are happy to announce the availability of this image in our Offensive Security custom Kali images section.
Kali Nexus NetHunter 1.0.2
It’s been a week since our release of the Kali Linux NetHunter, and the feedback is amazing. A NetHunter community has sprung up from nowhere, and the forums and github pages are really active. We’re completely stoked about this community response, and are eager to see it grow. After an intense week of community testing and a slew of bugfixes (including shellshock), we thought it would be a good opportunity to release a NetHunter update. Please welcome NetHunter 1.0.2 .
Kali Linux Evil Wireless Access Point
A few days ago, we had the opportunity to deploy a rogue access point that would steal user credentials using a fake, captive web portal, and provide MITM’d Internet services via 3G. We needed reliability and scalability in our environment as there would potentially be a large amount of, erm….”participants” in this wireless network. We were pretty happy with the result and quickly realized that we had created a new “Kali Linux recipe”. Or in other words, we could create a custom, bootable wireless evil access point image, which could do all sorts of wondrous things.
Announcing the Kali Linux Dojo
For the past 6 months, we’ve been busy silently developing an advanced Kali Linux course the likes of which has not yet been seen in the industry. This set of in-depth, practical workshops focuses on the Kali operating system itself, demonstrating some of its advanced features and use-cases by its developers. As with all “Offensive Security” training, this workshop is intensive, educational, and addictively engaging. If you’ve ever wished for fluent proficiency with Kali Linux, this workshop is for you.
Kali Encrypted USB Persistence
A couple of days ago, we added an awesome new feature to Kali allowing users to set up a Live Kali USB with encrypted persistence. What this means is that you can now set up a bootable Kali USB drive allowing you to either boot to a “clean” Kali image or alternatively, overlay it with the contents of a persistent encrypted partition, allowing you to securely save your changes on the USB drive between reboots. If you add our LUKS nuke feature into this mix together with a 32GB USB 3.0 thumb drive, you’ve got yourself a fast, versatile and secure “Penetration Testing Travel Kit”.
Источник


