- Customizing Kali Linux
- General Tips and Tricks
- Changing the theme to dark/light
- General script
- Transparent panel
- Change the menu icon
- Improve the taskbar with Plank
- Numerical workspace switcher
- Window animations using Compton
- Restore Kali’s default appearance
- Some customization examples
- Wallpaper
- Awesome terminal graphical tools
- gotop
- neofetch
- lolcat
- How have you customized Kali Linux?
- Change Install Theme in Kali Linux – GTK 3 themes
- Choice A: Manually install theme
- Step A.1: Install gnome-tweak-tool in Kali Linux
- Step A.2: Open Gnome Tweak Tool
Customizing Kali Linux
By Daniel Ruiz de Alegría, art designer on the Kali Linux project
We added Xfce as the new default desktop environment in Kali Linux for the 2019.4 release. One of the key benefits of Xfce, in terms of customization, is that it is a fully modular desktop. You can use all kinds of programs to change its behavior and appearance.
While we think Kali looks impressive out of the box, we know users love to customize. In this post, I’ll show you some tricks to customize the new Xfce desktop and help you make your computer stand out.
General Tips and Tricks
We’ll start by providing a few general tips, then demonstrate some examples.
Changing the theme to dark/light
Changing Kali’s look isn’t overly complicated, but if you are switching the dark/light theme or want to install a new one, you need to know which settings will make the whole desktop look uniform. Those are the following:
- Appearance theme
- Icon theme
- Window Manager theme
- Terminal color scheme
- Text editor color scheme
General script
With these scripts you can quickly switch between Kali’s light/dark themes. The only thing you need to change manually is qterminal’s color scheme.
Light theme
xfconf-query -c xsettings -p /Net/IconThemeName -s Flat-Remix-Blue-Light
xfconf-query -c xsettings -p /Net/ThemeName -s Kali-Light
xfconf-query -c xfwm4 -p /general/theme -s Kali-Light
gsettings set org.xfce.mousepad.preferences.view color-scheme Kali-Light
Dark theme
xfconf-query -c xsettings -p /Net/IconThemeName -s Flat-Remix-Blue-Dark
xfconf-query -c xsettings -p /Net/ThemeName -s Kali-Dark
xfconf-query -c xfwm4 -p /general/theme -s Kali-Dark
gsettings set org.xfce.mousepad.preferences.view color-scheme Kali-Dark
Transparent panel
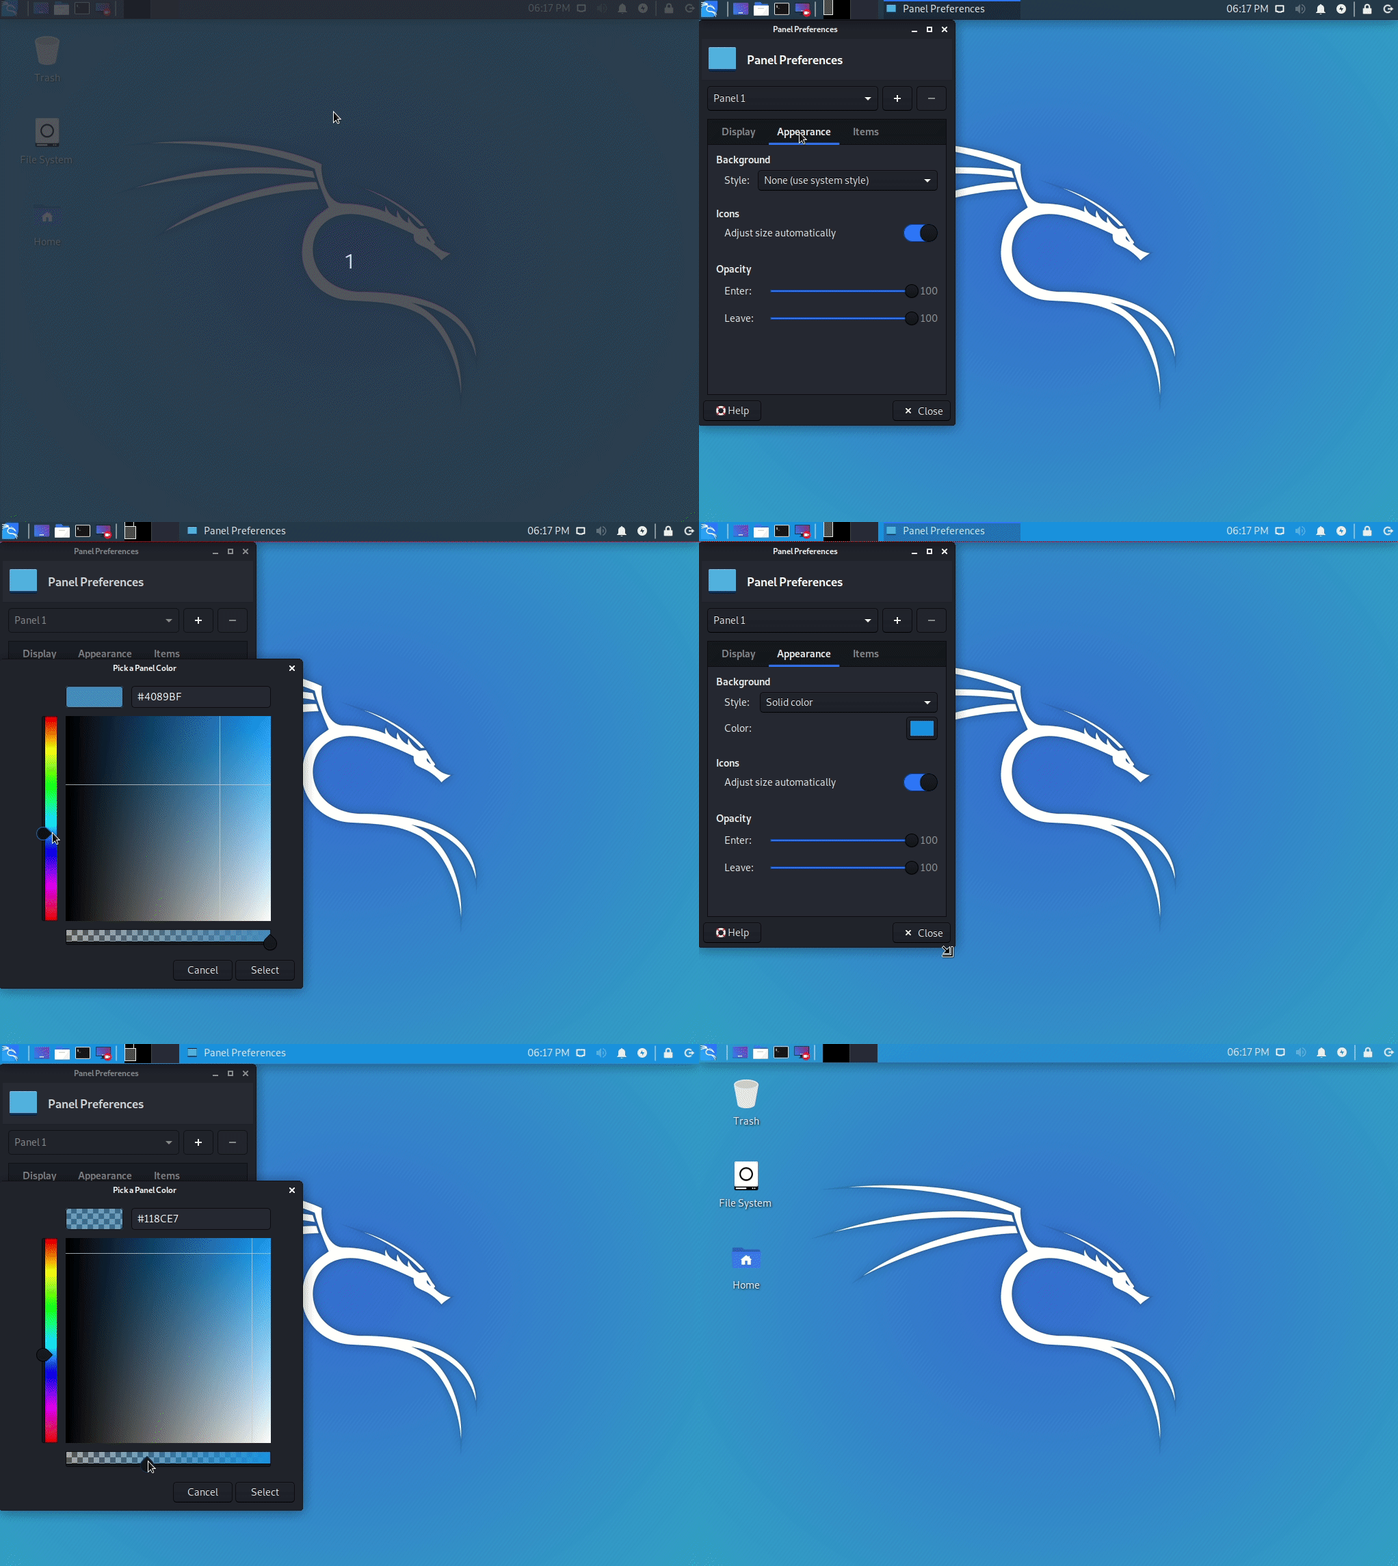
Xfce-panel settings allows you to modify each panel configuration separately (right-click over the panel → Panel → Panel preferences).
Once you’ve selected the one you want to modify, go to the Appearance tab, change the Background→Style setting to Solid color and use the color selector that will appear below. In case you want to adjust its opacity or make it completely transparent, move the slider located under the color box.
If you also want to remove the panel’s shadow, open the Window Manager Tweaks application, and, inside the Compositor section, disable the Show shadows under dock windows check-box. Alternatively, you can use the following command:
Change the menu icon
Right-click over the menu icon → Properties
The icon selector will show you all the icons already installed on your computer, but, if you want, you can use a custom image as well. Here are the ones I’ve used:
Improve the taskbar with Plank
Plank is a customizable dock.
Plank is meant to be the simplest dock on the planet. The goal is to provide just what a dock needs and absolutely nothing more.
You can install plank via apt:
The only tricky part is that you need to configure it to launch on login. To do so, open the Session and Startup application and add Plank to the autostart list.
As with Xfce-panel, you will need to disable dock shadows. Otherwise, it will draw a shadow line in the middle of your desktop.
Window Manager Tweaks → Compositor → disable Show shadows under dock windows
Tip: If you want to open Plank settings, press Ctrl + Right-click over it. You can change the theme and make it completely transparent.
Numerical workspace switcher
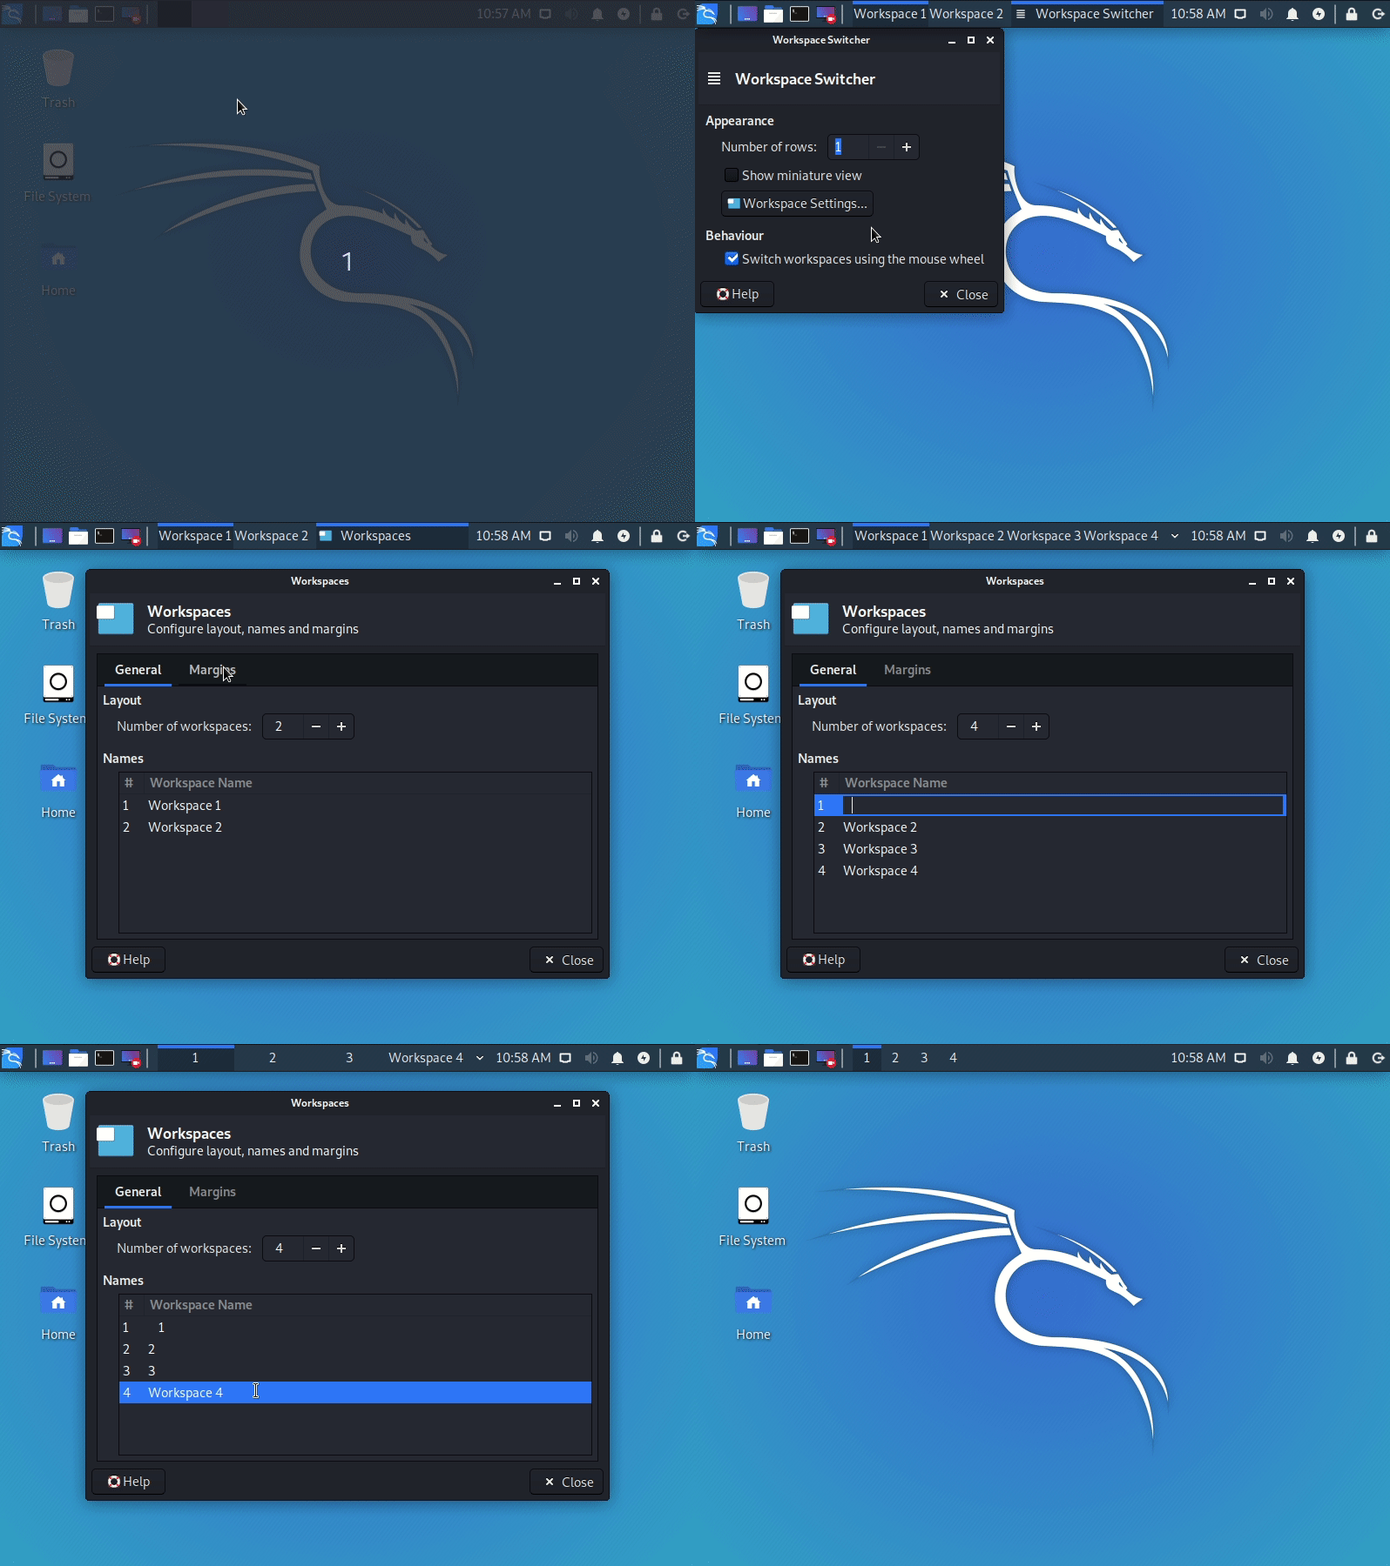
In many cases, the numerical workspace switcher looks better than the miniature view. To configure it, disable the Show miniature view inside the widget’s settings (right-click it → Preferences). Then, open the workspace settings and manually replace their names with numbers.
Tip: If you want to increase the button dimension, add some spaces to each side of the workspace name. You don’t need to do it with all of them, only with one, and the rest will use the same size.
Window animations using Compton
Xfce uses Xfwm4 as the default display compositor, which fulfills its function, still being lightweight enough. But, it lacks all the animations of the modern desktops, which makes it look outdated. Hopefully, as I mentioned before, Xfce is a modular desktop, thus you can replace it with a different display compositor, such as Compton.
It is crucial to disable Xfwm compositing before launching Compton (inside Window Manager Tweaks → Compositor), and you will need to add it to the autostart list as well. I also recommend disabling the Draw frame around selected window while cycling option. Alternatively, you can use the following command:
Restore Kali’s default appearance
If you want to undo all the visual changes that you’ve applied to your desktop, simply run:
/.config/xfce4/ && sudo reboot
Some customization examples
Bear in mind all customizations are based using Kali’s default settings as the start point. Therefore, it may be easier to follow these customizations after restoring desktop defaults.
- Theme: Kali-Dark
- Wallpaper: kali-rings
- Panel settings:
- Theme: Kali-Light
- Wallpaper: kali-small-logo
- Font Family: Quicksand Medium Bold
- Panel settings:
- Theme: Kali-Dark
- Wallpaper: kali-small-logo
- Desktop Icons:
- Icons orientation: Bottom Right Vertical
- Window Manager settings:
- Title alignment: Left
- Move window close/maximize/minimize buttons to the left side
These settings allow you to save some vertical space, as the title-bar and the panel will be joined when the window is maximized.
- Plank settings:
- Theme: Transparent
- Position: Left
- Alignment: Center
- Icon Size: 48
- Icon Zoom: Enabled
- Behaviour:
- Hide Dock: Enabled – Intellihide
- Panel settings:
- Theme: Kali-Dark
- Wallpaper: New wallpaper! included below
- Plank settings:
- Theme: Transparent
- Position: Bottom
- Alignment: End
- Icon Size: 64
- Icon Zoom: Disabled
- Behaviour:
- Hide Dock: Enabled – Intellihide
- Panel settings:
Wallpaper
You can also find more by doing either:
sudo apt install -y kali-community-wallpapers
sudo apt install -y kali-legacy-wallpapers
Awesome terminal graphical tools
I promise, I was only going to talk about desktop customizations. But after adding all the screenshots with the terminal windows, I needed to share the tools I was using.
To stylize the terminal a bit more, I like to hide the menu bar and increase the terminal’s transparency to 15%. You can find both settings inside the preferences window with right-click → Preferences, in the Appearance section.
There, you need to uncheck the Show the menu bar box and change the transparency values. For this, you will find two different values: the Application transparency will change the whole window opacity, and the Terminal transparency will only change the area of the terminal.
This is an interactive process viewer and process manager.
gotop
This terminal-based graphical activity monitor doesn’t appear in the screenshots, but many people asked me about it in other pictures I’ve posted, so I thought it would be great to add it.
sudo apt install -y golang
go get github.com/cjbassi/gotop
go run github.com/cjbassi/gotop
neofetch
This is the command line system information tool I use.
lolcat
Get rainbows and unicorns! This tool commonly appears used together with neofetch, adding a stunning rainbow effect to its output.
How have you customized Kali Linux?
It’s time for you to go forth and customize! If you use any of the tips in this post, we’d love to see the results. Share a screenshot and tag us on Twitter: Kali Linux or Offensive Security.
Daniel Ruiz de Alegría (DяA) is a computer geek passionate about anything related to technology, from software to hardware. He loves programming as well as designing, and believes that even the simplest projects deserve an awesome design. His role in Kali Linux is to ensure everything looks stunning. Visit his website, or connect with him on Twitter: @dani_ruiz24
Источник
Change Install Theme in Kali Linux – GTK 3 themes
Kali Linux default GNOME Theme is very boring and plain. The reason it is like that is because Kali Linux Dev team wanted to make a fast and reliable environment so that you can boot your system quickly and ge to work. But work (or hacking?) is just part of it. Like you, I sometimes get bored looking into the same old desktop over and over again and feel like having a new desktop or change color here and there. If you have a decent enough graphics card and processor (and RAM??) you might want to change or install theme in Kali Linux (this guide applies to any Kali version, so don’t worry which version you have). As Kali uses GNOME3 (GDM) Window Manager, so we will stick with GTK3 themes. The whole process takes only a few minutes and by the end of that, you should be able to:
- Install theme in Kali Linux
- Change default theme in Kali Linux
- Most importantly, roll back your changes and get same old Desktop back.
I’m a big fan of being able to roll back my changes so that if I mess up things, at least I will know where to go back and how to roll back. This saves a lot of trouble for later usage. Some themes are poorly made and throws errors all over my terminal. In that case, rolling back and using a different theme is the best idea. At the same time, I prefer to remove that erroneous theme or clean up theme directory. I guess that’s sound good, so let’s get on with it.
Before we start, there’s two different ways you can change theme.
- Manually install theme
- Install theme via PPA repository.
I will show both because both got their own merits and the only way you learn enough is by trying every possible corners on anything.
Choice A: Manually install theme
A lot of people wants to manually install theme and there’s nothing wrong with it. Takes a few more minutes, but in this way you learn how theme works in Linux rather than just blindly typing in few commands and install themes.
Step A.1: Install gnome-tweak-tool in Kali Linux
To install themes manually, we need to install a tool called Gnome Tweak Tool . But before you do that, please ensure you have the correct Kali Repositories added. You can follow my guide on adding official repositories in Kali Linux.
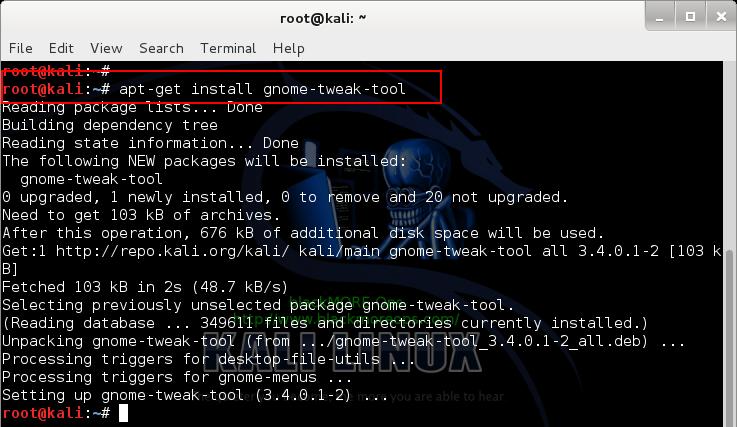
At this point I would assume you have the correct repositories added. So just type in the following command to install gnome-tweak-tool.
Step A.2: Open Gnome Tweak Tool
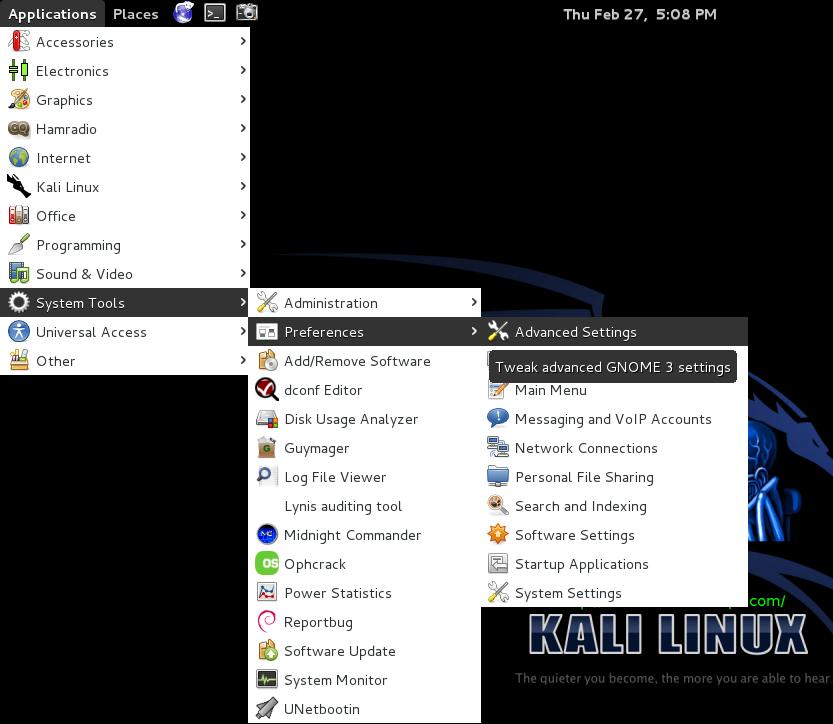
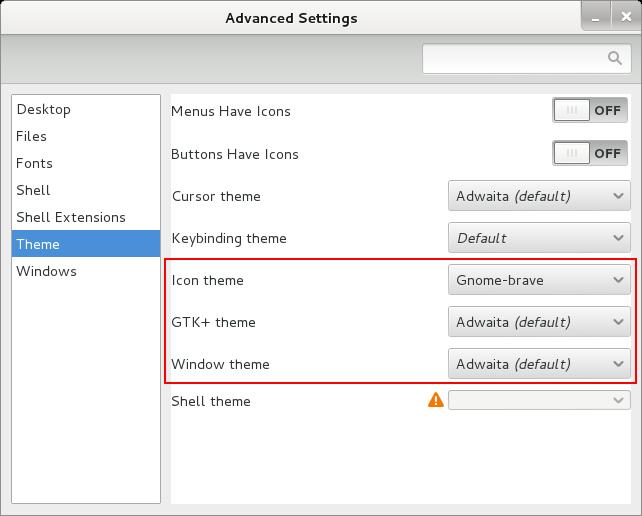
You can now go to Applications > System Tools > Preferences > Advanced Settings and select Theme TAB to inspect the current settings.
STOP : At this point I would like to take a screenshot of GNOME Tweak Tool. The reason I want it because I want to keep a copy of existing settings so that if I want, I can re-select the same settings to roll back my changes.
See the Tab Window Theme, Theme Icon and GTK + Theme I still use (the default) as my default settings.
Источник


