- Kali linux hyper v 64 bit
- Configurating Kali
- Changing the Setting of the Virtual Machine
- Test and Troubleshooting
- Disabling Hyper-V Enhanced Session Mode
- Further notes
- Install Kali Linux 2.0 On Hyper-V
- Required software
- Preparations
- Convert The Image
- Using The Image
- 24 thoughts on “ Install Kali Linux 2.0 On Hyper-V ”
- How to run Kali Linux on Client Hyper-V
- Table of contents
- What is Kali Linux?
- Why use Kali Linux?
- Why Use Client Hyper-V for Kali Linux?
- Downloading Kali Linux
- Verifying the ISO File Hash
- Installing Kali Linux as a Guest in Client Hyper-V
- Creating a Hyper-V Virtual Machine for Kali Linux
- Installing Kali Linux from ISO
- Getting Started with Kali
- Post-Install Wrap-Up
- Install Extra Hyper-V Services
- Change the Scheduler to NOOP
- Exploring Kali Linux
- Get Testing!
Kali linux hyper v 64 bit
Installing “Guest VM Packages”, gives a better user experience with VMs in general. This is why since Kali Linux 2019.3, during the setup process it should detect if Kali Linux is inside a VM. If it is, then automatically install any additional tools (in Hyper-V’s case, hyperv-daemons ). The Kali Linux Live image also comes with hyperv-daemons pre-installed since Kali Linux 2021.3.
However this is not the end of the story, and more can be done to improve the experience afterwards. This is because Hyper-V can connect to Virtual Machines using Remote Desktop Protocol (RDP).
This article will help you to enable the Enhanced Session Mode, which improves latency and opens up the possibility of clipboard sharing and windows resizing.
Configurating Kali
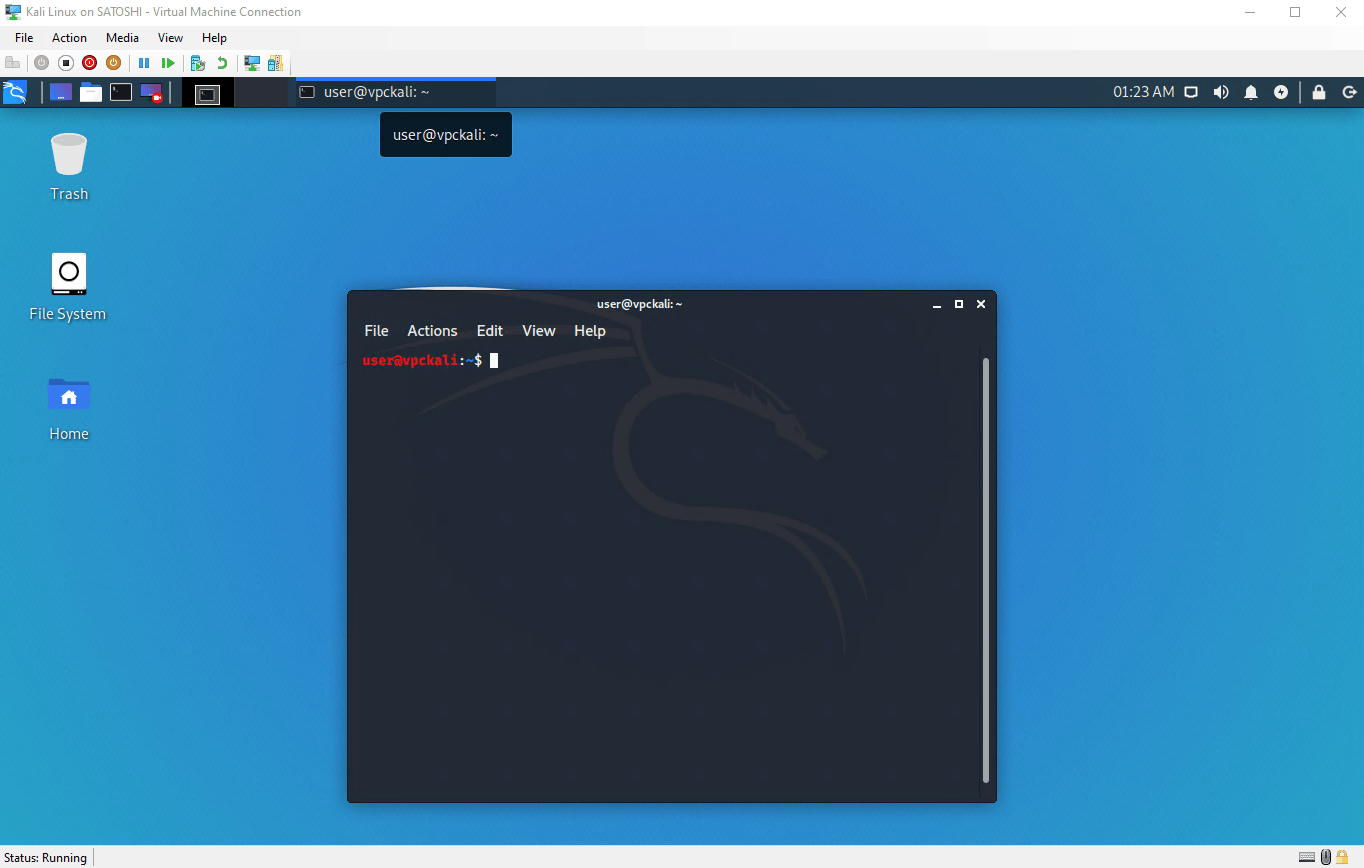
To configure Kali for Hyper-V Enhanced Session Mode, run kali-tweaks :
In the menu, select Virtualization, then Configure the system for Hyper-V enhanced session mode. And that’s all there is to do on Kali’s side.
Changing the Setting of the Virtual Machine
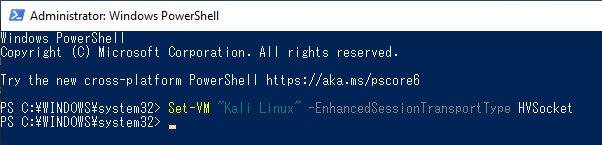
You now need to change the transport type from VMBus to HVSocket.
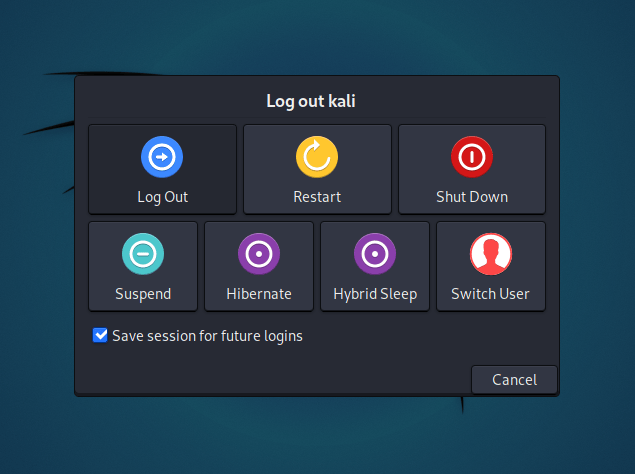
First, log out of the current Kali’s session:
On the Windows host now: disconnect the Kali VM, open a PowerShell (with Administrator privileges) and issue the following command:
Test and Troubleshooting
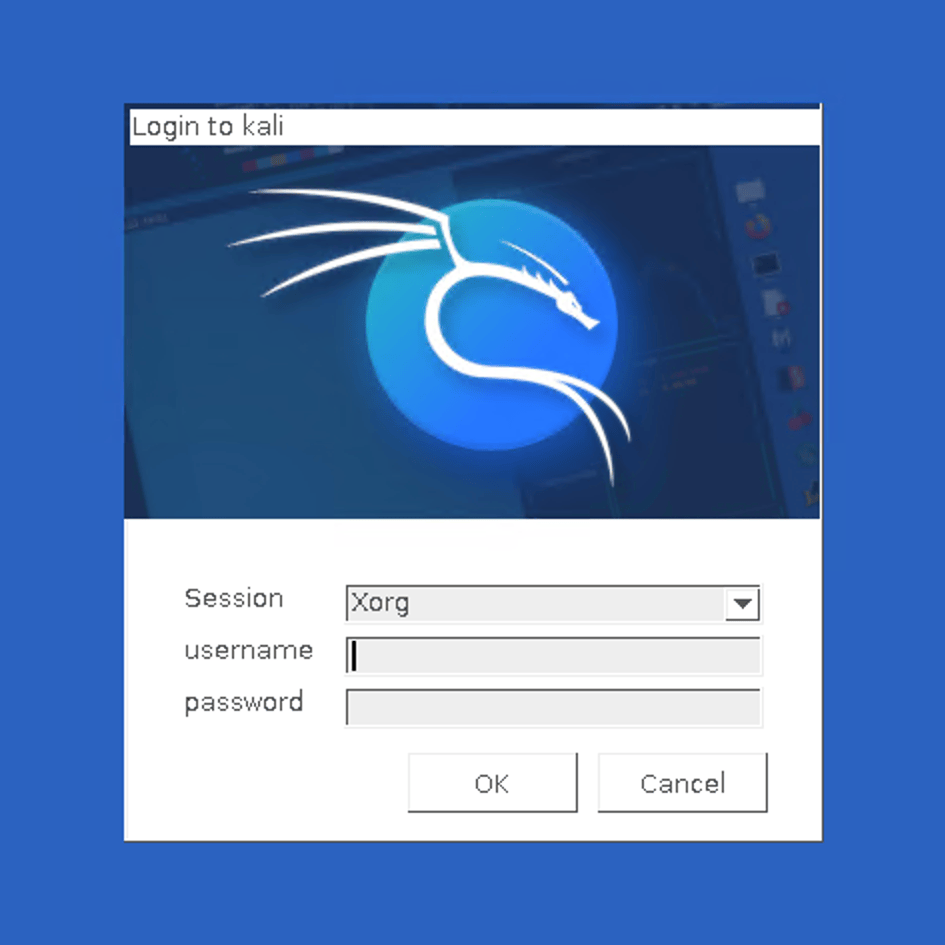
We can test to see if it’s been a success by starting the virtual machine again, and check if you can see the following screen when trying to use xrdp.
If this test doesn’t succeed, you might need to reboot, either the Kali VM, either the Windows host. Do what’s the most convenient for you, but if ever you’re using the Kali Live image, keep in mind that rebooting means loosing all your changes: you’ll have to redo the configuration step on Kali’s side.
Disabling Hyper-V Enhanced Session Mode
If ever you find out that this mode was not what you wanted, it’s possible to undo the configuration on Kali’s side. Not difficult but you need to do the steps in the right order, so let’s detail it here.
First, log out of the current Kali’s session. Then on the Windows host, disconnect the Kali VM. Then reconnect without Enhanced Session Mode, and log in Kali. Finally, open a terminal and just use kali-tweaks again:
In the Virtualization menu, you will find a setting to disabled Hyper-V Enhanced Session Mode.
Further notes
More details and troubleshooting can be found in the following conversation on GitLab.
This feature was made possible thanks to the work of Satoshi Mimura who ported the scripts (initially for Ubuntu) to Kali Linux, and Shane Bennett who helped to rework it for kali-tweaks , and provided most of the material for this documentation. Thanks!
Источник
Install Kali Linux 2.0 On Hyper-V
If you have found yourself in a scenario where you need to deploy Kali Linux on Hyper-V, you are probably aware that the ISO isn’t compatible and dies during bootup. As with almost any technology, there are multiple ways to skin this cat, however in this article we will detail the steps required to get the Kali Linux 2.0 VMware image converted and running on Hyper-V. The first thing you need to do is get the image. You can either make your own which has its benefits or you can follow the link in required software and download the pre-built VMware Image of your choice directly from Offensive Security.
Required software
- Microsoft Virtual Machine Converter 3.0 available here.
- Kali Linux 2.0 64 or 32 bit VMware Image available here.
Preparations
- Download and install Microsoft Virtual Machine Converter 3.0.
- Download and extract the Kali Linux 64 or 32 bit VMware Image referred to above.
Convert The Image
Next we will need to convert our VMware Image in order for Hyper-V to run it. This can be done using Powershell as seen below.
Using The Image
In order to use our newly created image we must first create a new Hyper-V virtual machine or edit one that has been previously created. In our example picture below we are editing a Virtual Machine we had already created. Important notes below
- When creating your new virtual machine, you must ensure you select “Generation 1” when choosing the generation of the virtual machine.
- The converted image can be moved to any location you choose.
- The default username and password for our Kali Linux 2.0 Image is root and toor .

Once you have completed all the steps above, you should have a fully working Kali Linux 2.0 installation running on Hyper-V.
24 thoughts on “ Install Kali Linux 2.0 On Hyper-V ”
Matthew, thank you for taking the time for the post and replies.
I need some help or guidance.
I cannot convert the image using W10 Pro on my personal laptop. I have full admin rights. I have not had any issues with other programs or apps.
When I try to convert the image I get following error message: The entry 4 is not a supported disk database entry for the descriptor.
Do you know what “entry 4” is referring to?
I tried searching for solutions via Google and did not come up with anything that works so far. I did learn that there are other users with same error and did not get a fix.
Text from command window:
PS C:\WINDOWS\system32> ConvertTo-MvmcVirtualHardDisk -SourceLiteralPath “C:\Kali\Kali-Linux-2016.1-vm-amd64.vmdk” -Dest
inationLiteralPath “C:Kali\Kali2.vhdx” -VhdType DynamicHardDisk -VhdFormat Vhdx
ConvertTo-MvmcVirtualHardDisk : The entry 4 is not a supported disk database entry for the descriptor.
At line:1 char:1
+ ConvertTo-MvmcVirtualHardDisk -SourceLiteralPath “C:\Kali\Kali-Linux- …
+
+ CategoryInfo : WriteError: (Microsoft.Accel…nversionService:DriveConversionService) [ConvertTo-MvmcVi
rtualHardDisk], VmdkDescriptorParseException
+ FullyQualifiedErrorId : DiskConversion,Microsoft.Accelerators.Mvmc.Cmdlet.Commands.ConvertToMvmcVirtualHardDiskC
ommand
ConvertTo-MvmcVirtualHardDisk : One or more errors occurred.
At line:1 char:1
+ ConvertTo-MvmcVirtualHardDisk -SourceLiteralPath “C:\Kali\Kali-Linux- …
+
+ CategoryInfo : WriteError: (Microsoft.Accel…nversionService:DriveConversionService) [ConvertTo-MvmcVi
rtualHardDisk], AggregateException
+ FullyQualifiedErrorId : DiskConversion,Microsoft.Accelerators.Mvmc.Cmdlet.Commands.ConvertToMvmcVirtualHardDiskC
ommand
I have tried entering only the ConvertTo as shown and get the same entry 4 not supported.:
PS C:\WINDOWS\system32> ConvertTo-MvmcVirtualHardDisk
cmdlet ConvertTo-MvmcVirtualHardDisk at command pipeline position 1
Supply values for the following parameters:
SourceLiteralPath: C:\Kali\Kali-Linux-2016.1-vm-amd64.vmdk
ConvertTo-MvmcVirtualHardDisk : The entry 4 is not a supported disk database entry for the descriptor.
At line:1 char:1
+ ConvertTo-MvmcVirtualHardDisk
+
+ CategoryInfo : WriteError: (Microsoft.Accel…nversionService:DriveConversionService) [ConvertTo-MvmcVi
rtualHardDisk], VmdkDescriptorParseException
+ FullyQualifiedErrorId : DiskConversion,Microsoft.Accelerators.Mvmc.Cmdlet.Commands.ConvertToMvmcVirtualHardDiskC
ommand
ConvertTo-MvmcVirtualHardDisk : One or more errors occurred.
At line:1 char:1
+ ConvertTo-MvmcVirtualHardDisk
+
+ CategoryInfo : WriteError: (Microsoft.Accel…nversionService:DriveConversionService) [ConvertTo-MvmcVi
rtualHardDisk], AggregateException
+ FullyQualifiedErrorId : DiskConversion,Microsoft.Accelerators.Mvmc.Cmdlet.Commands.ConvertToMvmcVirtualHardDiskC
ommand
I enter the source with double quotation marks and get file does not exist; same result if I use single ticks:
PS C:\WINDOWS\system32> ConvertTo-MvmcVirtualHardDisk
cmdlet ConvertTo-MvmcVirtualHardDisk at command pipeline position 1
Supply values for the following parameters:
SourceLiteralPath: “C:\Kali\Kali-Linux-2016.1-vm-amd64.vmdk”
ConvertTo-MvmcVirtualHardDisk : The file ‘”C:\Kali\Kali-Linux-2016.1-vm-amd64.vmdk”‘ does not exist.
At line:1 char:1
+ ConvertTo-MvmcVirtualHardDisk
+
+ CategoryInfo : WriteError: (Microsoft.Accel…nversionService:DriveConversionService) [ConvertTo-MvmcVi
rtualHardDisk], FileNotFoundMvmcException
+ FullyQualifiedErrorId : DiskConversion,Microsoft.Accelerators.Mvmc.Cmdlet.Commands.ConvertToMvmcVirtualHardDiskC
ommand
ConvertTo-MvmcVirtualHardDisk : One or more errors occurred.
At line:1 char:1
+ ConvertTo-MvmcVirtualHardDisk
+
+ CategoryInfo : WriteError: (Microsoft.Accel…nversionService:DriveConversionService) [ConvertTo-MvmcVi
rtualHardDisk], AggregateException
+ FullyQualifiedErrorId : DiskConversion,Microsoft.Accelerators.Mvmc.Cmdlet.Commands.ConvertToMvmcVirtualHardDiskC
ommand
I am running W10 Pro, Microsoft Windows Version 1511 (OS Build 10586.164) [Version 10.0.10586]
on platform ASUS N501VW, Intel i7-6700HQ, 16GB memory, 500GB SSD.
I am using copy/paste and copy path to be sure I am providing the proper source path. I have tried changing location of folders to shorten file path; and I am running as admin.
“C:\Kali\Kali-Linux-2016.1-vm-amd64.vmdk” File Permission are set to “Full” for the admin user. I also tried turning of personal Windows Firewall and Windows Defender with same results. I am not using any other malware protection.
Any help is appreciated. This is my first attempt at using Hyper-V with Kali. I am familiar with using VM’s. I normally use VMware Fusion and VMware Workstation Pro without too many issues.
Источник
How to run Kali Linux on Client Hyper-V
Save to My DOJO
Table of contents
Personally, I find Microsoft’s recent moves to improve support for Linux and its overall relationship with open source to be very exciting. I’ve taken full advantage of these new opportunities to rekindle my love for the C and C++ languages and to explore Linux anew. Since my general line of work keeps me focused on the datacenter, I’ve similarly kept tight focus on server Linux builds and within the confines of Microsoft’s support matrix. Sure, I’ve had a good time learning other distributions and comparing them to what I knew. But, I also realize that I’ve been restricting myself to the safe walled garden of enterprise-style deployments. It’s time for something new. For my first step outside the walls, I’m going to take a crack at Kali Linux.
What is Kali Linux?
The Kali Linux project focuses on security. In most of the introductory literature, you’ll find many references to “penetration testing”. With a bit of searching, you’ll find a plethora of guides on using Kali to test the strength of your Windows computers.
The distribution itself is based on Debian. Truthfully, even though I’d like to tell you that we’re going to stray far, far away from the beaten path, we won’t. Almost no one picks up a copy of the Linux kernel and builds an all-new distribution around it. Nearly every maintained distribution connects somewhere into the general distribution categories on Microsoft’s list. Anything else falls under the category of a “source-based” distribution (like Gentoo). I’d need to drastically improve my Linux knowledge to help anyone with one of those.
Why use Kali Linux?
The distributions that I tend to cover in these articles fall best under the category of “general purpose”. In that respect, they have much in common with Windows and Windows Server. You stand up the operating system first, then install whatever applications and servers you need it to operate or provide. Web, DNS, storage, games — anything goes.
Kali Linux has a purpose. You could use it as a general purpose platform, if you want. That’s not an optimal use of the distribution, though. Kali is designed to probe the strength of your environment’s computer security. During install, there won’t be any screens asking you to pick the packages you want to install. You won’t get an opportunity to tick off boxes for LAMP or DNS servers. If you want those things, look at other distributions. Kalix Linux is here to pentest, not hand out IP addresses. Err… well… I guess rogue DHCP qualifies as security testing… But, you get the idea.
A natural question, then, is, “So, Eric, what do you know about pentesting?” The answer is: very little. Where I work, we have a security team. I can notify them when I build a new system, and they’ll test it and send me a report. I accept that I will never rise to expert level, if for no other reason than because I don’t have the time. Still, I should know more than I do. Many seasoned sysadmins would be surprised at how easily an attacker can break into a system set at defaults. Since the people behind the Kali Linux project have done all the work to make a convenient entry point, I’m going to take advantage of it. I recommend that you do the same.
Why Use Client Hyper-V for Kali Linux?
I won’t tell you why you should use a Microsoft hypervisor as opposed to some other hypervisor. I use Microsoft platforms and services for almost every aspect of my home and work computing, so my natural choice is to stick with it. If your story is different, then stay with what you know.
I will tell you that Client Hyper-V makes more sense than server Hyper-V. I’ll make an exception for those of you that run Windows Server as your primary desktop. That’s not a thing that I would do, but hey, no judgment here.
Why I use Kali Linux under Client Hyper-V:
- Kali Linux is best used interactively with a desktop interface. If I were to run Kali from within my datacenter, I’d need to use VMConnect against a remote host. I’ve never liked that.
- Most attacks won’t come from within the datacenter, so why would your primary penetration testing tool live there? Put it into a user network. Run it from a computer that can access your wired and wireless networks.
- Hyper-V allows you to perform all sorts of spoofing quickly and easily. You can flip MACs and hop networks in moments. You can hide Kali behind NAT to fool many network access protection schemes and then, within seconds, drop it on the network alongside my host OS.
- I don’t want to replace my primary desktop. I don’t necessarily need to use any hypervisor; I could just install Kali right to my desktop. I could stand up a second physical machine right next to me and use Kali on that. But, this is the sort of thing that hypervisors were built for; more computers in less space. I can keep my general purpose desktop and have the special-purpose Kali running happily together.
Downloading Kali Linux
As a side effect of having a specific purpose, Kali Linux does not provide many install flavors. Start at the Kali Linux homepage. Click the Downloads header at the top of the page. Behold — the list. It looks long, but there’s really not that much there. You’re mostly picking the bitness (most are 64-bit) and the user interface experience that suits you.
This article uses the standard 64-bit distribution of Kali Linux 2017.1. If you choose something else, your experience may be different.
Verifying the ISO File Hash
Since we’re talking security, let’s start by verifying our file. On the Kali download page, next to the file link, you’ll find its SHA256 hash:
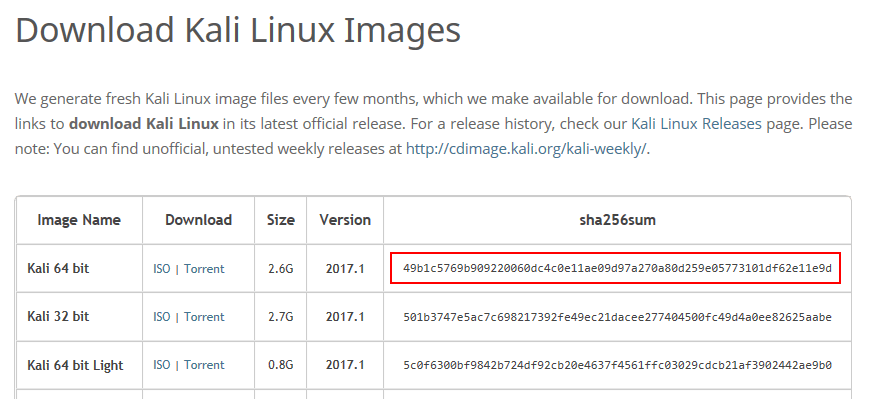 (source: https://www.kali.org/downloads/, as of June 17th, 2017)
Use PowerShell to determine the hash:
You’ll get output that looks like the following:

If you’re OK with “good enough”, you can do a quick ‘n’ dirty eye scan — basically, just visually verify that the codes look more or less the same. Even minor changes to a file will throw off the hash substantially. But, it’s not impossible to have two files with a similar hash. And, since we’re talking security, trust no one.
In your PowerShell prompt, do exactly this:
- Ensure that you are at the beginning of a new command line; no text entered, just a prompt.
- Type a single quote mark: ‘
- Use the mouse to highlight the Hash output from the previous command. Press [Enter] to put it on the clipboard. Right-click to paste. That should place the code immediately after the single quote.
- Type another single quote mark to close off the file hash.
- Enter a space, then -match , then another space.
- Type another single quote mark to start a new string.
- Highlight the corresponding hash code on the Kali download page. Switch back to the PowerShell prompt and right-click to paste it.
- Type another single quote mark to close off the published hash.
- Press [Enter].
This is what you should see (with possibly different hash values):

If you get an error, check your input. If you get False, check your input. If the input is OK, then your file does not match the expected hash. Most likely, the download corrupted. Maybe somebody hijacked it. Either way, get another.
Installing Kali Linux as a Guest in Client Hyper-V
On to the good stuff!
Creating a Hyper-V Virtual Machine for Kali Linux
I do not mean for this article to be a tutorial on creating VMs in Client Hyper-V. I assume that you know how to create a virtual machine, attach an ISO to it, start it up, and connect to its console.
I have a script that I use to create Linux VMs. The more I use it, the more deficiencies I notice. I will someday make this script better. Here’s what I currently have:
This script creates a dynamically-expanding VHDX using a 1 megabyte block size, in accordance with Microsoft’s recommendation. A commenter on another of my Linux articles pointed out that the 1MB block size does not result in significant space savings on every Linux distribution. I have not tested the difference on Kali. It uses ext4, so I suspect that you’ll want the 1MB block size.
I used the script like this:
It was necessary to pre-create the target VHDX path. That’s one of the deficiencies in the script. It’s also necessary to turn off Secure Boot after creation.
During use, I learned that Kali wants so much more memory than 2GB. These memory numbers are somewhat laughable. Be prepared to turn them up. It does seem to run well enough at 2GB, but I’m thinking that 4GB would be a more reasonable average running expectancy.
Installing Kali Linux from ISO
In case you missed it from the previous section: disable Secure Boot. Hyper-V does not include Kali’s boot signature. I did enable TPM support for it, but I don’t yet even know if Kali will make use of it.
From here, I doubt that you really need much from me. Installation of Kali is very straightforward. It shares one annoyance with Ubuntu: it has an obnoxious number of input screens broken up by long file operations, rather than cohesive input gathering followed by completion operations.
An installation walkthrough:
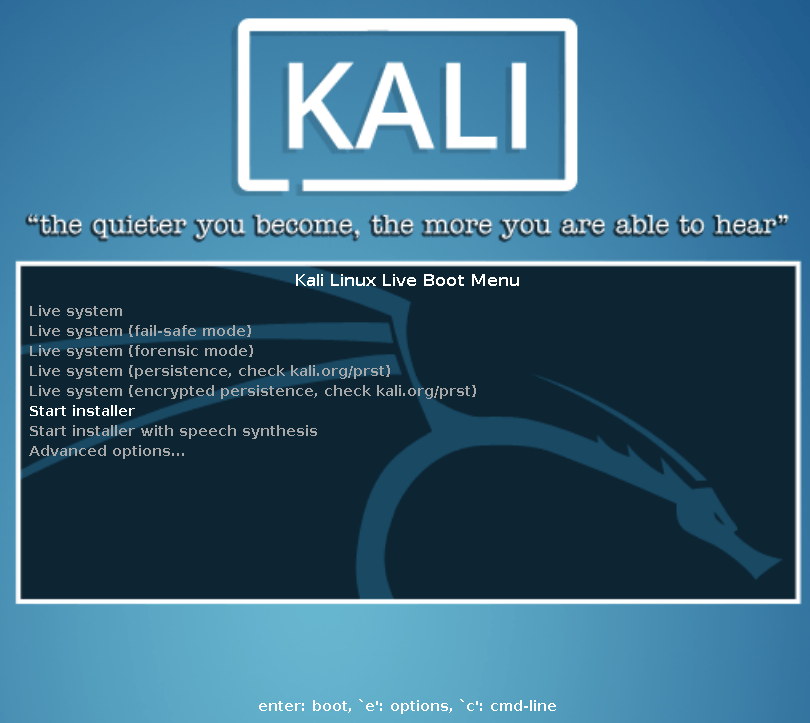
- You’re given many options right from the start. I simply chose to Start installer:
 Note that several errors regarding not being able to find anything on SDA will scroll by; don’t worry about them. That’s normal for an empty disk.
 - Choose the installation language. I also want to draw attention to the Screenshot button; This appears on every page, so you can store install images for later retrieval:
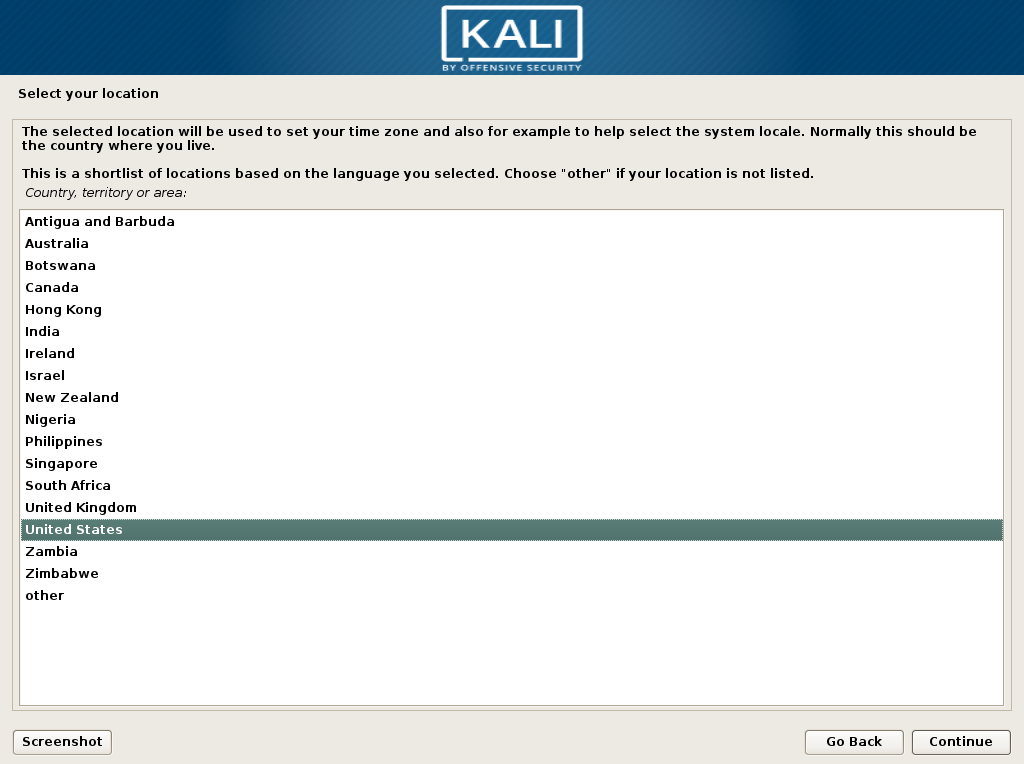
- Choose your location. Be aware that the options you see are determined by your language selection! The following two screenshots show the outcome of choosing English and French in step 2:
 Note that several errors regarding not being able to find anything on SDA will scroll by; don’t worry about them. That’s normal for an empty disk.
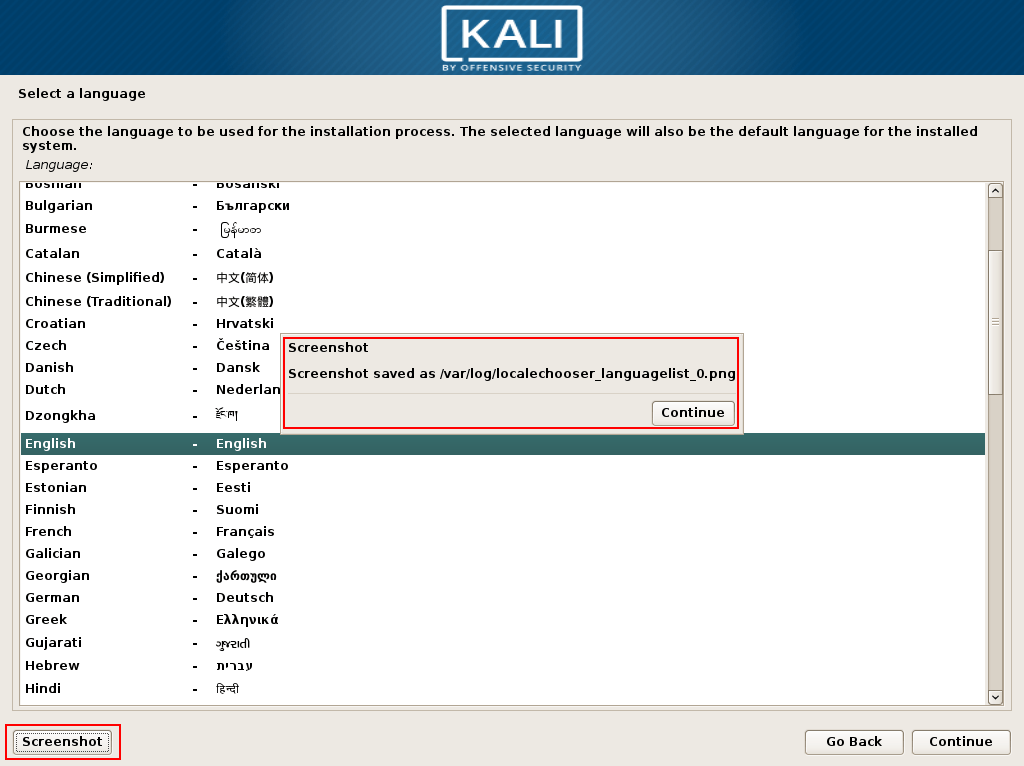

Getting Started with Kali
Here’s your login screen! Remember to use root, because you didn’t create a regular user:
And finally, your new desktop:
Post-Install Wrap-Up
I know that you’re anxious to start exploring this wonderful new environment, but we’ve got a bit of housekeeping to take care of first.
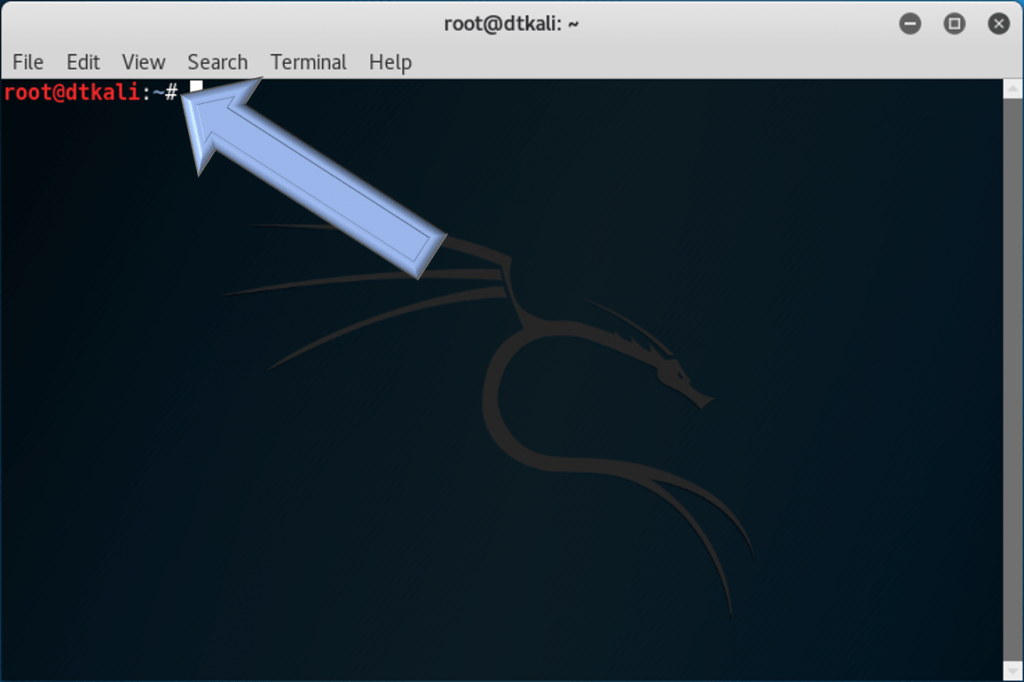
At the left, in the quick launch bar, hover over the second icon from the top. It should be a black square and the tool tip should say Terminal. Click it to launch a terminal window:

Since we’re running as root, the terminal will already be running with the highest privileges. You can tell by the # prompt as opposed to a > prompt.
Install Extra Hyper-V Services
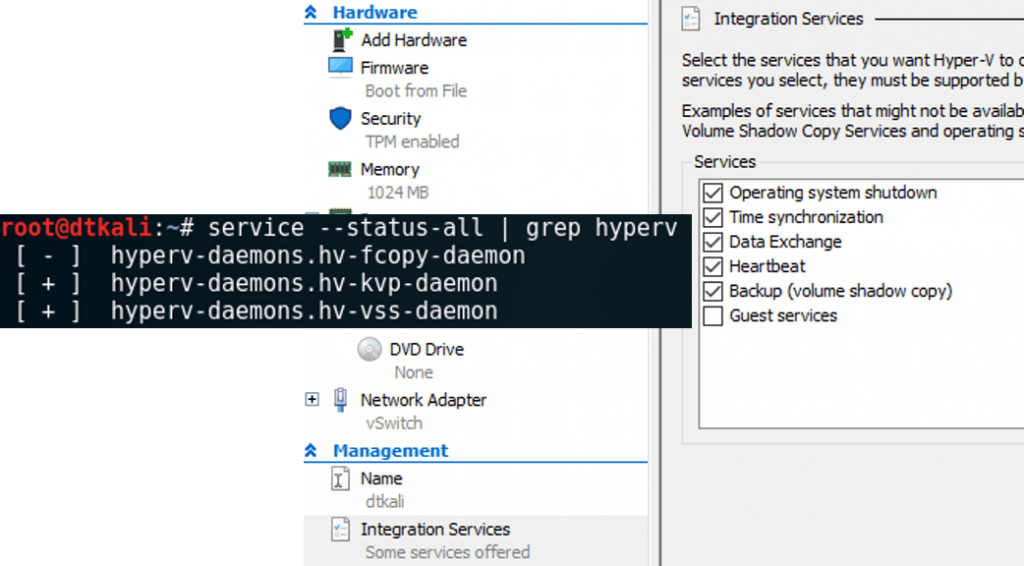
The required Hyper-V components are already enabled. Let’s add the KVP, VSS, and file copy services. Enter:
This installs the file copy, KVP, and VSS services. Whether or not they start depends on whether or not the relevant services are enabled. The default Hyper-V setting enables all except Guest Services, so all except the file copy daemon should start automatically. Use service –status-all | grep hyperv to find out:
Change the Scheduler to NOOP
Linux has an I/O scheduler, but Hyper-V has an I/O scheduler. Turn off Linux’s for the best experience.
Edit the GRUB loader:
This will load the GRUB configuration file. Find the line that says:
Press [CTRL]+[X]. You’ll then need to press [Y] to save the changes, then [Enter] to indicate that you want to save the data back to the file you found it in. That will leave you back at the prompt.
Exploring Kali Linux
You have now completed all of your installation and preparation work! It’s time to take Kali for a spin!
If I didn’t make this clear enough earlier, I’ll be crystal clear right now: I don’t know that much about penetration testing. I recognize many of the names of the tools in Kali, but the only one I have a meaningful level of experience with is Wireshark. So, don’t ask me what this stuff does. That’s why we have the Internet and search engines.
Let’s start with the boring things to get them out of the way. In the top right you’ll find some system status icons. Click and you’ll get the system menu:
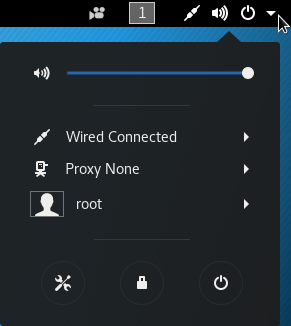
- Hyper-V doesn’t (yet?) enable audio out of Linux systems, so the volume slider does nothing.
- Where my screenshot shows Wired Connected, you’ll find your network settings. Click it to expand the menu where you can access them.
- Where my screenshot shows Proxy None, you can click to access your proxy settings.
- Where my screenshot shows root, you can click for a Log Out option and a link to your logged on user’s account settings.
- The wrench/screwdriver icon takes you to the system settings screen. It’s analogous to Windows’ Control Panel. I don’t think you’ll need me to explain those items, so I’ll just recommend that you create users aside from root if you intend to use this desktop for more than just pentesting.
- The padlock icon locks the desktop. From a lock screen, just press [Enter] to get a login prompt.
- The power button icon takes you to a cancel/restart/shutdown dialog.
Move left from the system area, and you’ll see a camera icon (it appears in the screenshot above). Click that, and you can record your screen.
Now, the fun stuff! In the top left, you’ll see Applications and Places menu items. Places includes some shortcuts to common file system locations; it’s sort of like the Quick Access section in Windows Explorer. I’ll leave that to you to play with. Click Applications. You’ll immediately see why Kali is not a garden-variety distribution:
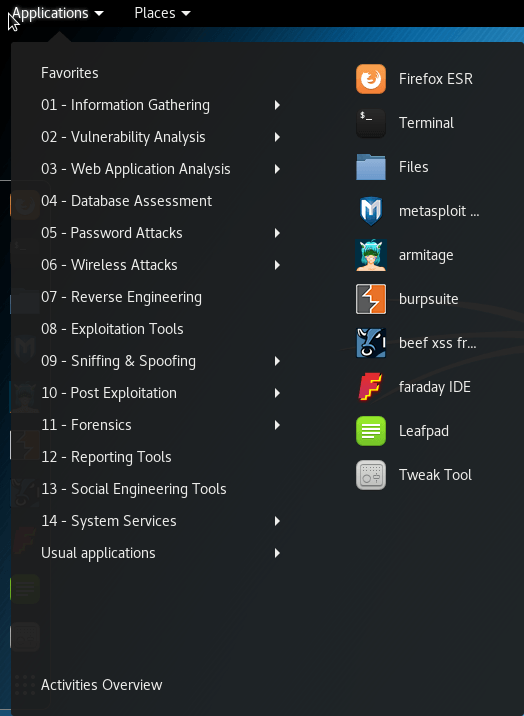
The Usual Applications group gave me a chuckle. You’ll find all the things that you’d find on a “normal” distribution there.
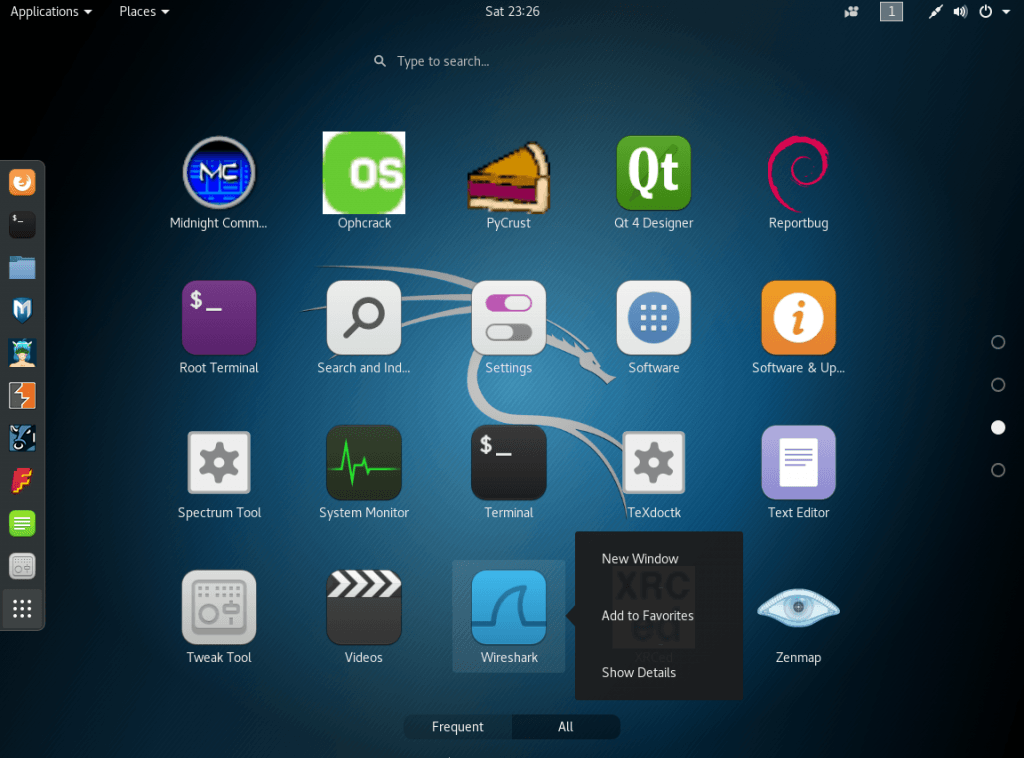
You met the quick launch dash earlier, when you started the terminal. It sits at the left of the screen and contains everything marked as a favorite. It will also include icons for running applications. The nine-dot grid at the bottom opens up Kali/Gnome’s equivalent to Windows’ Start menu. From there, you can launch any item on your system. You can also add items to the Favorites/Dash area:
Get Testing!
You’ve got your shiny new Kali install ready to roll. Kick the tires and see what you can accomplish.
Oh, and remember that we’re the good guys. Use these tools responsibly.
Источник


