- Kali linux hyper v что это
- Configurating Kali
- Changing the Setting of the Virtual Machine
- Test and Troubleshooting
- Disabling Hyper-V Enhanced Session Mode
- Further notes
- Рекомендации по запуску Linux в Hyper-V
- Настройка файловых систем Linux в динамических VHDX-файлах
- Время ожидания меню GRUB на виртуальных машинах поколения 2
- Загрузка PxE на виртуальных машинах поколения 2
- Использование статических MAC-адресов с отказоустойчивой кластеризацией
- Использование сетевых адаптеров, относящихся к Hyper-V, а не устаревших сетевых адаптеров
- Для повышения производительности дискового ввода-вывода используйте планировщик заданий (NOOP/None)
- Зарезервируйте больше памяти для кдумп
- Сжатие VHDX-файлов или расширения VHD и VHDX может привести к ошибочным таблицам разделов GPT
- How to run Kali Linux on Client Hyper-V
- Table of contents
- What is Kali Linux?
- Why use Kali Linux?
- Why Use Client Hyper-V for Kali Linux?
- Downloading Kali Linux
- Verifying the ISO File Hash
- Installing Kali Linux as a Guest in Client Hyper-V
- Creating a Hyper-V Virtual Machine for Kali Linux
- Installing Kali Linux from ISO
- Getting Started with Kali
- Post-Install Wrap-Up
- Install Extra Hyper-V Services
- Change the Scheduler to NOOP
- Exploring Kali Linux
- Get Testing!
Kali linux hyper v что это
Installing “Guest VM Packages”, gives a better user experience with VMs in general. This is why since Kali Linux 2019.3, during the setup process it should detect if Kali Linux is inside a VM. If it is, then automatically install any additional tools (in Hyper-V’s case, hyperv-daemons ). The Kali Linux Live image also comes with hyperv-daemons pre-installed since Kali Linux 2021.3.
However this is not the end of the story, and more can be done to improve the experience afterwards. This is because Hyper-V can connect to Virtual Machines using Remote Desktop Protocol (RDP).
This article will help you to enable the Enhanced Session Mode, which improves latency and opens up the possibility of clipboard sharing and windows resizing.
Configurating Kali
To configure Kali for Hyper-V Enhanced Session Mode, run kali-tweaks :
In the menu, select Virtualization, then Configure the system for Hyper-V enhanced session mode. And that’s all there is to do on Kali’s side.
Changing the Setting of the Virtual Machine
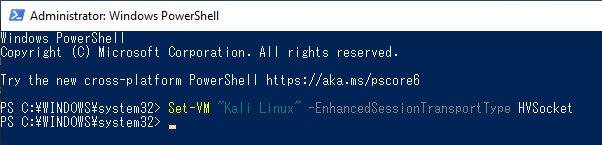
You now need to change the transport type from VMBus to HVSocket.
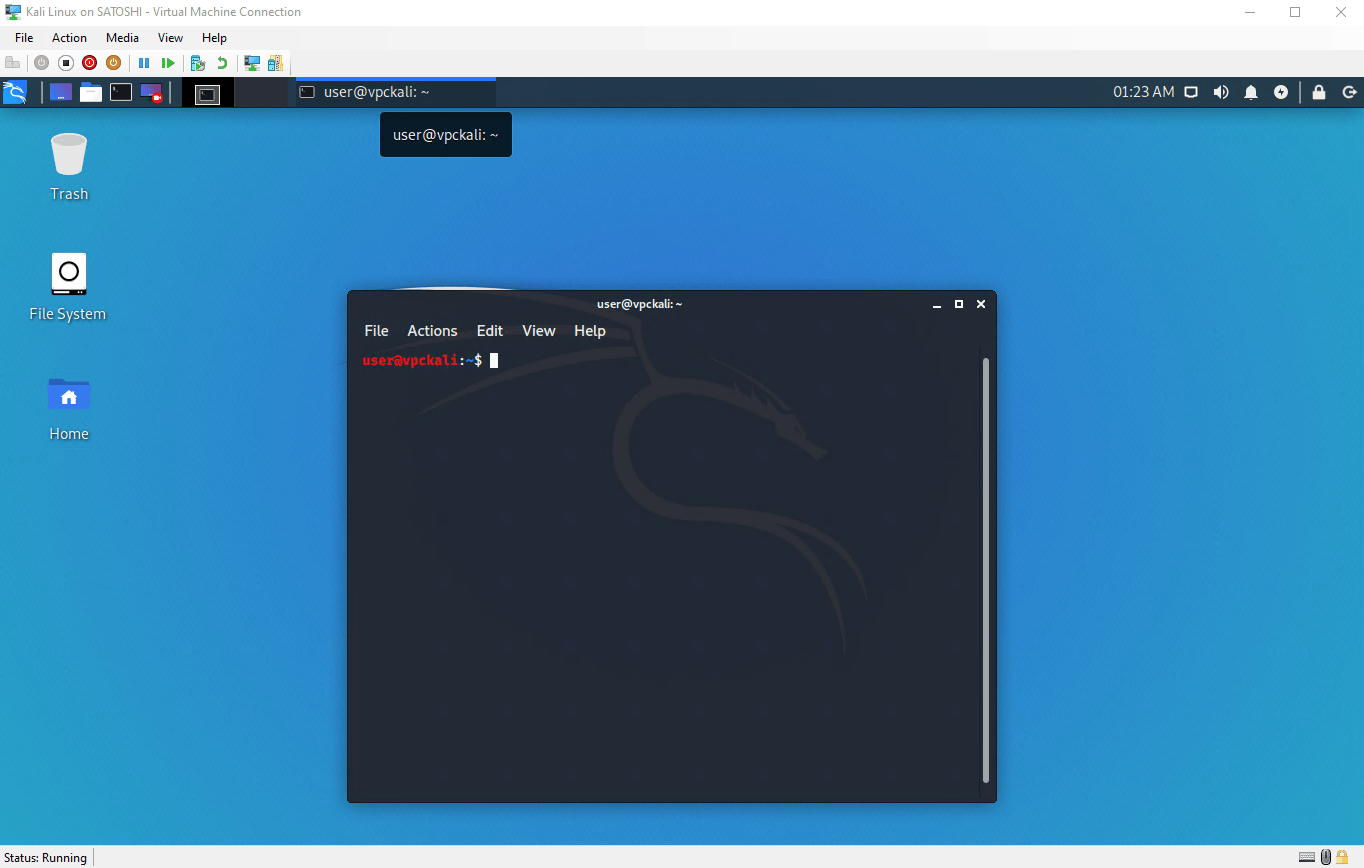
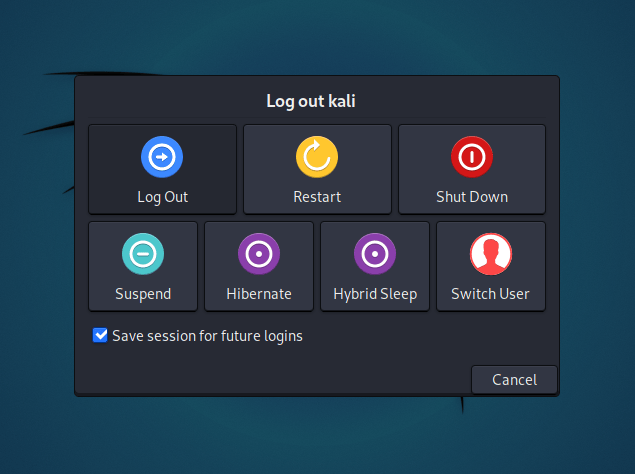
First, log out of the current Kali’s session:
On the Windows host now: disconnect the Kali VM, open a PowerShell (with Administrator privileges) and issue the following command:
Test and Troubleshooting
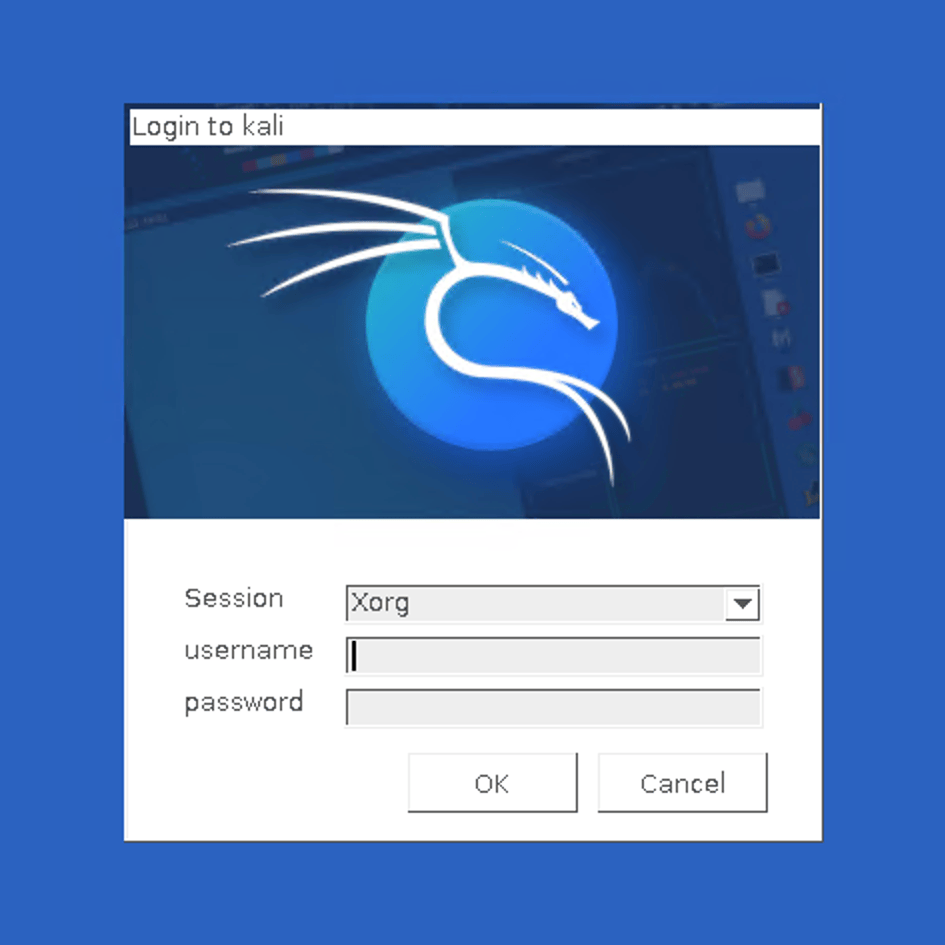
We can test to see if it’s been a success by starting the virtual machine again, and check if you can see the following screen when trying to use xrdp.
If this test doesn’t succeed, you might need to reboot, either the Kali VM, either the Windows host. Do what’s the most convenient for you, but if ever you’re using the Kali Live image, keep in mind that rebooting means loosing all your changes: you’ll have to redo the configuration step on Kali’s side.
Disabling Hyper-V Enhanced Session Mode
If ever you find out that this mode was not what you wanted, it’s possible to undo the configuration on Kali’s side. Not difficult but you need to do the steps in the right order, so let’s detail it here.
First, log out of the current Kali’s session. Then on the Windows host, disconnect the Kali VM. Then reconnect without Enhanced Session Mode, and log in Kali. Finally, open a terminal and just use kali-tweaks again:
In the Virtualization menu, you will find a setting to disabled Hyper-V Enhanced Session Mode.
Further notes
More details and troubleshooting can be found in the following conversation on GitLab.
This feature was made possible thanks to the work of Satoshi Mimura who ported the scripts (initially for Ubuntu) to Kali Linux, and Shane Bennett who helped to rework it for kali-tweaks , and provided most of the material for this documentation. Thanks!
Источник
Рекомендации по запуску Linux в Hyper-V
область применения: Windows Server 2022, Azure Stack хЦи, версия 20H2; Windows сервер 2019, Windows Server 2016, Hyper-V Server 2016, Windows Server 2012 r2, Hyper-V Server 2012 R2, Windows Server 2012, Hyper-V Server 2012, Windows Server 2008 R2, Windows 10, Windows 8.1, Windows 8, Windows 7,1, Windows 7
Этот раздел содержит список рекомендаций по запуску виртуальной машины Linux в Hyper-V.
Настройка файловых систем Linux в динамических VHDX-файлах
Некоторые файловые системы Linux могут потреблять значительный объем свободного места на диске, даже если файловая система в основном пуста. Чтобы уменьшить объем используемого дискового пространства в динамических VHDX-файлах, учитывайте следующие рекомендации.
- При создании VHDX используйте 1 МБ Блокксизебитес (из 32 МБ по умолчанию) в PowerShell, например:
- Kali Linux is best used interactively with a desktop interface. If I were to run Kali from within my datacenter, I’d need to use VMConnect against a remote host. I’ve never liked that.
- Most attacks won’t come from within the datacenter, so why would your primary penetration testing tool live there? Put it into a user network. Run it from a computer that can access your wired and wireless networks.
- Hyper-V allows you to perform all sorts of spoofing quickly and easily. You can flip MACs and hop networks in moments. You can hide Kali behind NAT to fool many network access protection schemes and then, within seconds, drop it on the network alongside my host OS.
- I don’t want to replace my primary desktop. I don’t necessarily need to use any hypervisor; I could just install Kali right to my desktop. I could stand up a second physical machine right next to me and use Kali on that. But, this is the sort of thing that hypervisors were built for; more computers in less space. I can keep my general purpose desktop and have the special-purpose Kali running happily together.
- Ensure that you are at the beginning of a new command line; no text entered, just a prompt.
- Type a single quote mark: ‘
- Use the mouse to highlight the Hash output from the previous command. Press [Enter] to put it on the clipboard. Right-click to paste. That should place the code immediately after the single quote.
- Type another single quote mark to close off the file hash.
- Enter a space, then -match , then another space.
- Type another single quote mark to start a new string.
- Highlight the corresponding hash code on the Kali download page. Switch back to the PowerShell prompt and right-click to paste it.
- Type another single quote mark to close off the published hash.
- Press [Enter].
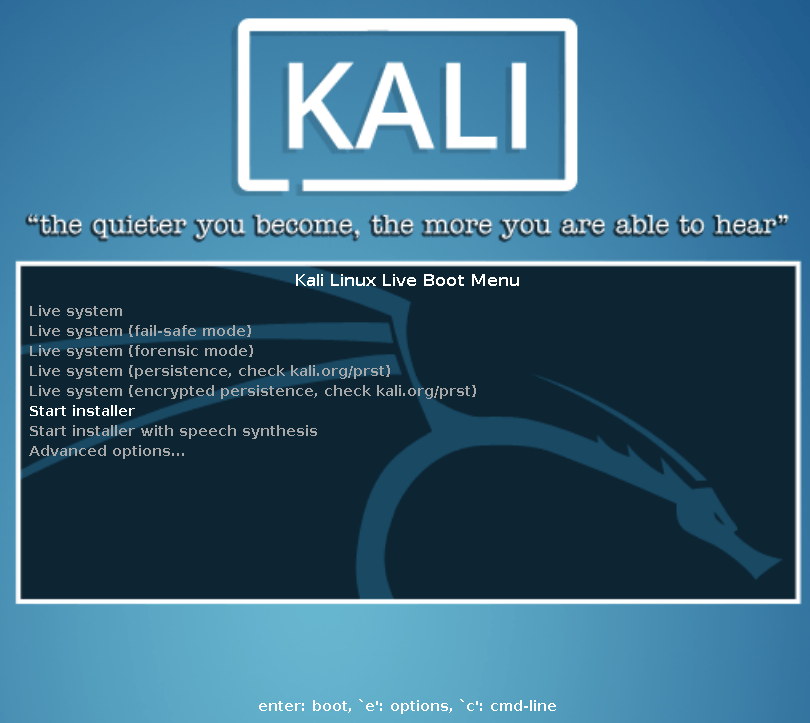
- You’re given many options right from the start. I simply chose to Start installer:
 Note that several errors regarding not being able to find anything on SDA will scroll by; don’t worry about them. That’s normal for an empty disk.
 - Choose the installation language. I also want to draw attention to the Screenshot button; This appears on every page, so you can store install images for later retrieval:
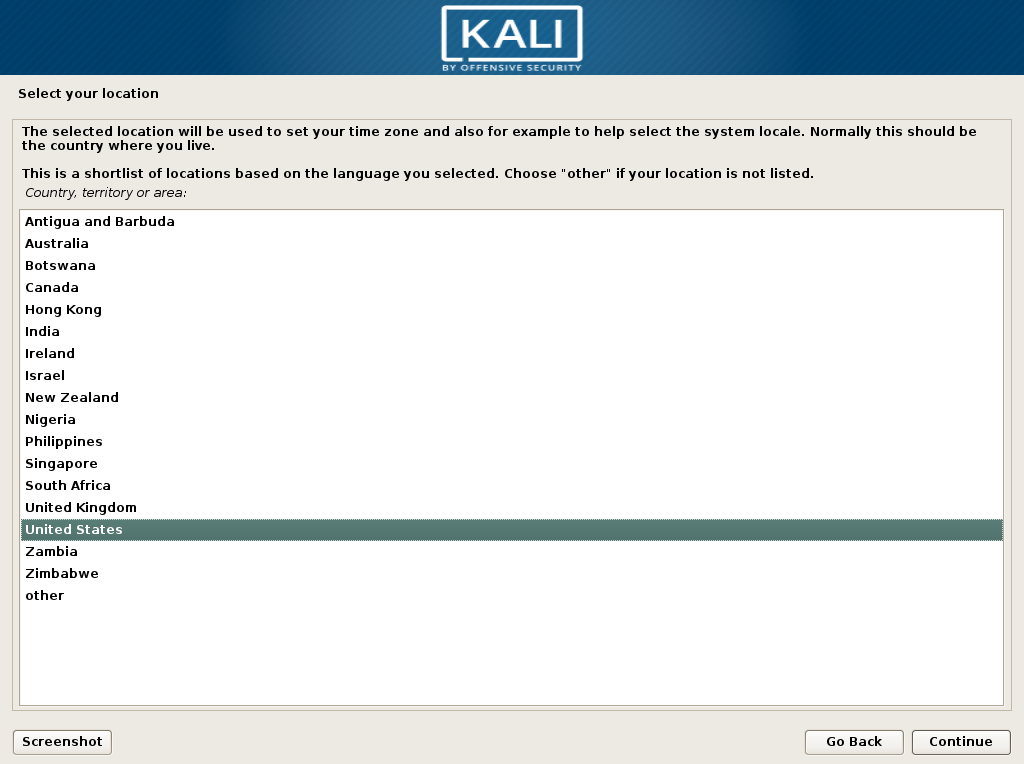
- Choose your location. Be aware that the options you see are determined by your language selection! The following two screenshots show the outcome of choosing English and French in step 2:
- Hyper-V doesn’t (yet?) enable audio out of Linux systems, so the volume slider does nothing.
- Where my screenshot shows Wired Connected, you’ll find your network settings. Click it to expand the menu where you can access them.
- Where my screenshot shows Proxy None, you can click to access your proxy settings.
- Where my screenshot shows root, you can click for a Log Out option and a link to your logged on user’s account settings.
- The wrench/screwdriver icon takes you to the system settings screen. It’s analogous to Windows’ Control Panel. I don’t think you’ll need me to explain those items, so I’ll just recommend that you create users aside from root if you intend to use this desktop for more than just pentesting.
- The padlock icon locks the desktop. From a lock screen, just press [Enter] to get a login prompt.
- The power button icon takes you to a cancel/restart/shutdown dialog.
Формат ext4 является предпочтительным для ext3, так как ext4 больше пространства, чем ext3 при использовании с динамическими VHDX-файлами.
При создании файловой системы укажите число групп 4096, например:
Время ожидания меню GRUB на виртуальных машинах поколения 2
Из-за того, что устаревшее оборудование удаляется из эмуляции на виртуальных машинах поколения 2, для отображения меню GRUB слишком быстро вычисляется таймер обратного отсчета, и сразу же загружается запись по умолчанию. Пока GRUB не будет использоваться для использования таймера, поддерживаемого EFI, измените /Бут/груб/груб.конф,/т.п./default/grub или эквивалентным параметром «Timeout = 100000» вместо значения по умолчанию «timeout = 5».
Загрузка PxE на виртуальных машинах поколения 2
Так как в виртуальных машинах поколения 2 отсутствует таймер «СМОЛой», сетевые подключения к PxE-серверу TFTP можно преждевременно завершить и предотвратить считывание конфигурации GRUB и загрузку ядра с сервера.
В дистрибутивах Linux, отличных от RHEL 6. x, можно выполнить аналогичные действия, чтобы настроить GRUB v 0.97 для загрузки ядер Linux с PxE-сервера.
Кроме того, при вводе с помощью клавиатуры и мыши RHEL/CentOS 6,6 не будет работать с предварительно установленным ядром, что не позволит указать параметры установки в меню. Чтобы разрешить выбор параметров установки, должна быть настроена последовательная консоль.
В файле ефидефаулт на PxE-сервере добавьте следующий параметр ядра «console = ttyS1» .
На виртуальной машине в Hyper-V настройте COM-порт с помощью этого командлета PowerShell:
Указание файла Kickstart для предварительно установленного ядра также позволит избежать необходимости ввода с клавиатуры и мыши во время установки.
Использование статических MAC-адресов с отказоустойчивой кластеризацией
Виртуальные машины Linux, которые будут развернуты с помощью отказоустойчивой кластеризации, должны быть настроены со статическим MAC-адресом для каждого виртуального сетевого адаптера. В некоторых версиях Linux сетевая конфигурация может быть потеряна после отработки отказа, поскольку виртуальному сетевому адаптеру назначается новый MAC-адрес. Чтобы избежать потери конфигурации сети, убедитесь, что у каждого виртуального сетевого адаптера есть статический MAC-адрес. Вы можете настроить MAC-адрес, изменив параметры виртуальной машины в диспетчере Hyper-V или диспетчер отказоустойчивости кластеров.
Использование сетевых адаптеров, относящихся к Hyper-V, а не устаревших сетевых адаптеров
Настройте и используйте виртуальный адаптер Ethernet, который является сетевой картой Hyper-V с повышенной производительностью. Если к виртуальной машине подключены как устаревшие, так и сетевые адаптеры, относящиеся к Hyper-V, сетевые имена в выходных данных команды ifconfig-a могут показывать случайные значения, такие как _tmp12000801310. Чтобы избежать этой проблемы, удалите все устаревшие сетевые адаптеры при использовании сетевых адаптеров, связанных с Hyper-V, в виртуальной машине Linux.
Для повышения производительности дискового ввода-вывода используйте планировщик заданий (NOOP/None)
Ядро Linux предлагает два набора планировщиков дискового ввода-вывода для переупорядочивания запросов. Один набор предназначен для более старой подсистемы «BLK», а один — для новой подсистемы «BLK-MQ». В любом случае с современными твердотельными дисками рекомендуется использовать планировщик, который передает решения о планировании в базовый гипервизор Hyper-V. Для ядер Linux, использующих подсистему «BLK», это планировщик «NOOP». Для ядер Linux, использующих подсистему «BLK-MQ», это планировщик «None».
Для конкретного диска доступные планировщики могут отображаться в этой папке файловой системы:/СИС/класс/блокк/ /куеуе/счедулер с выбранным планировщиком в квадратных скобках. Планировщик можно изменить, записав в это расположение файловой системы. Чтобы сохранить изменения между перезагрузками, необходимо добавить это изменение в скрипт инициализации. Дополнительные сведения см. в документации по дистрибутив Linux.
Версии ядра Linux ниже 2.6.37 не поддерживают NUMA в Hyper-V с виртуальными машинами большего размера. Эта проблема влияет в основном на дистрибутивы более ранних версий, в которых используется исходное ядро Red Hat 2.6.32, и была исправлена в Red Hat Enterprise Linux (RHEL) 6.6 (kernel-2.6.32-504). В системах под управлением модифицированных ядер старше версии 2.6.37 или ядер RHEL старше 2.6.32-504 в командной строке ядра необходимо задать параметр загрузки numa=off в файле grub.conf. Дополнительные сведения см. в статье базы знаний Red Hat 436883.
Зарезервируйте больше памяти для кдумп
Если ядро записи дампа завершается с тревогой при загрузке, зарезервируйте больше памяти для ядра. Например, измените параметр crashkernel = 384M-: 128M на crashkernel = 384M-: 256M в файле конфигурации Ubuntu GRUB.
Сжатие VHDX-файлов или расширения VHD и VHDX может привести к ошибочным таблицам разделов GPT
Hyper-V позволяет сжимать файлы виртуального диска (VHDX) без учета разделов, томов или структур данных файловой системы, которые могут существовать на диске. Если VHDX-файл сжимается до конца раздела, то данные могут быть потеряны, при этом Секция может быть повреждена, а при чтении секции могут возвращаться недопустимые данные.
После изменения размера VHD или VHDX администраторы должны использовать служебную программу, например fdisk, или частично обновить структуру разделов, томов и файловой системы, чтобы отразить изменение размера диска. Сжатие или увеличение размера VHD или VHDX с таблицей разделов GUID (GPT) вызовет предупреждение, если для проверки макета раздела используется средство управления секциями, и администратору будет выведено предупреждение об исправлении первого и дополнительного заголовков GPT. Этот ручной этап можно выполнить без потери данных.
Источник
How to run Kali Linux on Client Hyper-V
Save to My DOJO
Table of contents
Personally, I find Microsoft’s recent moves to improve support for Linux and its overall relationship with open source to be very exciting. I’ve taken full advantage of these new opportunities to rekindle my love for the C and C++ languages and to explore Linux anew. Since my general line of work keeps me focused on the datacenter, I’ve similarly kept tight focus on server Linux builds and within the confines of Microsoft’s support matrix. Sure, I’ve had a good time learning other distributions and comparing them to what I knew. But, I also realize that I’ve been restricting myself to the safe walled garden of enterprise-style deployments. It’s time for something new. For my first step outside the walls, I’m going to take a crack at Kali Linux.
What is Kali Linux?
The Kali Linux project focuses on security. In most of the introductory literature, you’ll find many references to “penetration testing”. With a bit of searching, you’ll find a plethora of guides on using Kali to test the strength of your Windows computers.
The distribution itself is based on Debian. Truthfully, even though I’d like to tell you that we’re going to stray far, far away from the beaten path, we won’t. Almost no one picks up a copy of the Linux kernel and builds an all-new distribution around it. Nearly every maintained distribution connects somewhere into the general distribution categories on Microsoft’s list. Anything else falls under the category of a “source-based” distribution (like Gentoo). I’d need to drastically improve my Linux knowledge to help anyone with one of those.
Why use Kali Linux?
The distributions that I tend to cover in these articles fall best under the category of “general purpose”. In that respect, they have much in common with Windows and Windows Server. You stand up the operating system first, then install whatever applications and servers you need it to operate or provide. Web, DNS, storage, games — anything goes.
Kali Linux has a purpose. You could use it as a general purpose platform, if you want. That’s not an optimal use of the distribution, though. Kali is designed to probe the strength of your environment’s computer security. During install, there won’t be any screens asking you to pick the packages you want to install. You won’t get an opportunity to tick off boxes for LAMP or DNS servers. If you want those things, look at other distributions. Kalix Linux is here to pentest, not hand out IP addresses. Err… well… I guess rogue DHCP qualifies as security testing… But, you get the idea.
A natural question, then, is, “So, Eric, what do you know about pentesting?” The answer is: very little. Where I work, we have a security team. I can notify them when I build a new system, and they’ll test it and send me a report. I accept that I will never rise to expert level, if for no other reason than because I don’t have the time. Still, I should know more than I do. Many seasoned sysadmins would be surprised at how easily an attacker can break into a system set at defaults. Since the people behind the Kali Linux project have done all the work to make a convenient entry point, I’m going to take advantage of it. I recommend that you do the same.
Why Use Client Hyper-V for Kali Linux?
I won’t tell you why you should use a Microsoft hypervisor as opposed to some other hypervisor. I use Microsoft platforms and services for almost every aspect of my home and work computing, so my natural choice is to stick with it. If your story is different, then stay with what you know.
I will tell you that Client Hyper-V makes more sense than server Hyper-V. I’ll make an exception for those of you that run Windows Server as your primary desktop. That’s not a thing that I would do, but hey, no judgment here.
Why I use Kali Linux under Client Hyper-V:
Downloading Kali Linux
As a side effect of having a specific purpose, Kali Linux does not provide many install flavors. Start at the Kali Linux homepage. Click the Downloads header at the top of the page. Behold — the list. It looks long, but there’s really not that much there. You’re mostly picking the bitness (most are 64-bit) and the user interface experience that suits you.
This article uses the standard 64-bit distribution of Kali Linux 2017.1. If you choose something else, your experience may be different.
Verifying the ISO File Hash
Since we’re talking security, let’s start by verifying our file. On the Kali download page, next to the file link, you’ll find its SHA256 hash:
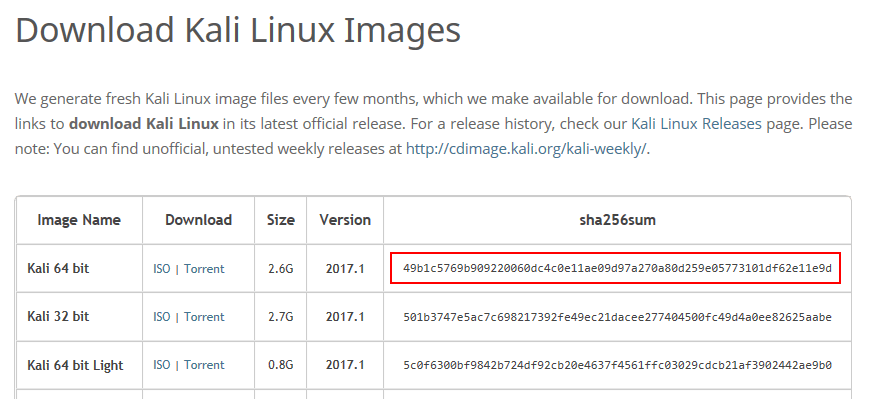 (source: https://www.kali.org/downloads/, as of June 17th, 2017)
Use PowerShell to determine the hash:
You’ll get output that looks like the following:

If you’re OK with “good enough”, you can do a quick ‘n’ dirty eye scan — basically, just visually verify that the codes look more or less the same. Even minor changes to a file will throw off the hash substantially. But, it’s not impossible to have two files with a similar hash. And, since we’re talking security, trust no one.
In your PowerShell prompt, do exactly this:
This is what you should see (with possibly different hash values):

If you get an error, check your input. If you get False, check your input. If the input is OK, then your file does not match the expected hash. Most likely, the download corrupted. Maybe somebody hijacked it. Either way, get another.
Installing Kali Linux as a Guest in Client Hyper-V
On to the good stuff!
Creating a Hyper-V Virtual Machine for Kali Linux
I do not mean for this article to be a tutorial on creating VMs in Client Hyper-V. I assume that you know how to create a virtual machine, attach an ISO to it, start it up, and connect to its console.
I have a script that I use to create Linux VMs. The more I use it, the more deficiencies I notice. I will someday make this script better. Here’s what I currently have:
This script creates a dynamically-expanding VHDX using a 1 megabyte block size, in accordance with Microsoft’s recommendation. A commenter on another of my Linux articles pointed out that the 1MB block size does not result in significant space savings on every Linux distribution. I have not tested the difference on Kali. It uses ext4, so I suspect that you’ll want the 1MB block size.
I used the script like this:
It was necessary to pre-create the target VHDX path. That’s one of the deficiencies in the script. It’s also necessary to turn off Secure Boot after creation.
During use, I learned that Kali wants so much more memory than 2GB. These memory numbers are somewhat laughable. Be prepared to turn them up. It does seem to run well enough at 2GB, but I’m thinking that 4GB would be a more reasonable average running expectancy.
Installing Kali Linux from ISO
In case you missed it from the previous section: disable Secure Boot. Hyper-V does not include Kali’s boot signature. I did enable TPM support for it, but I don’t yet even know if Kali will make use of it.
From here, I doubt that you really need much from me. Installation of Kali is very straightforward. It shares one annoyance with Ubuntu: it has an obnoxious number of input screens broken up by long file operations, rather than cohesive input gathering followed by completion operations.
An installation walkthrough:
 Note that several errors regarding not being able to find anything on SDA will scroll by; don’t worry about them. That’s normal for an empty disk.
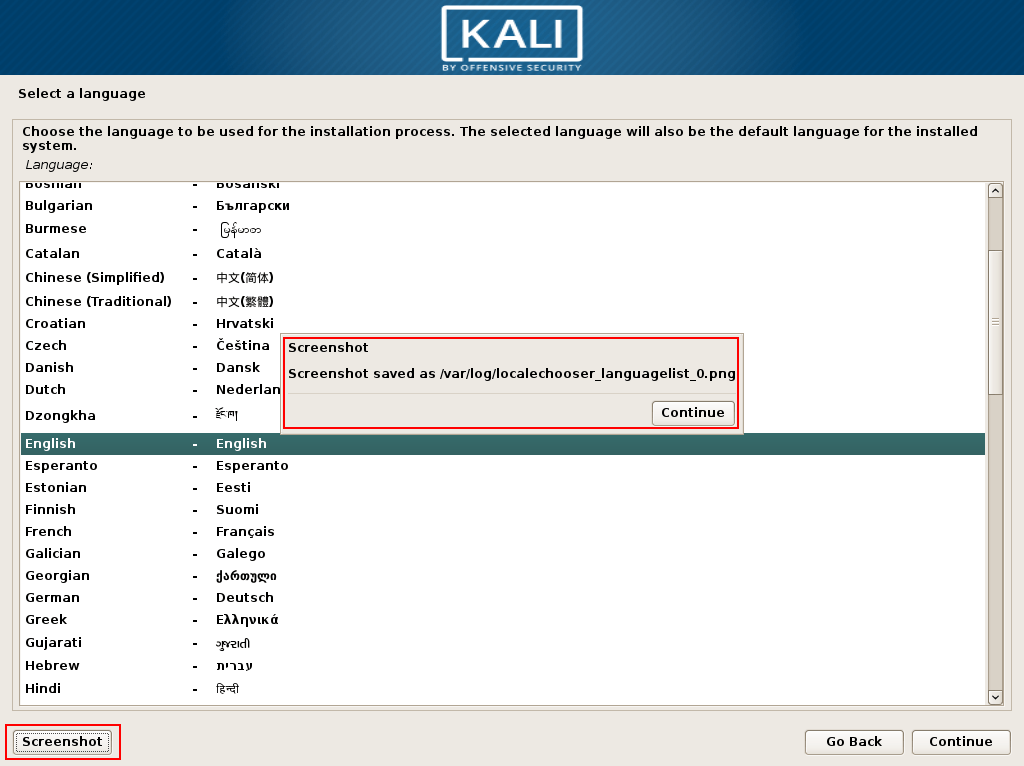

Getting Started with Kali
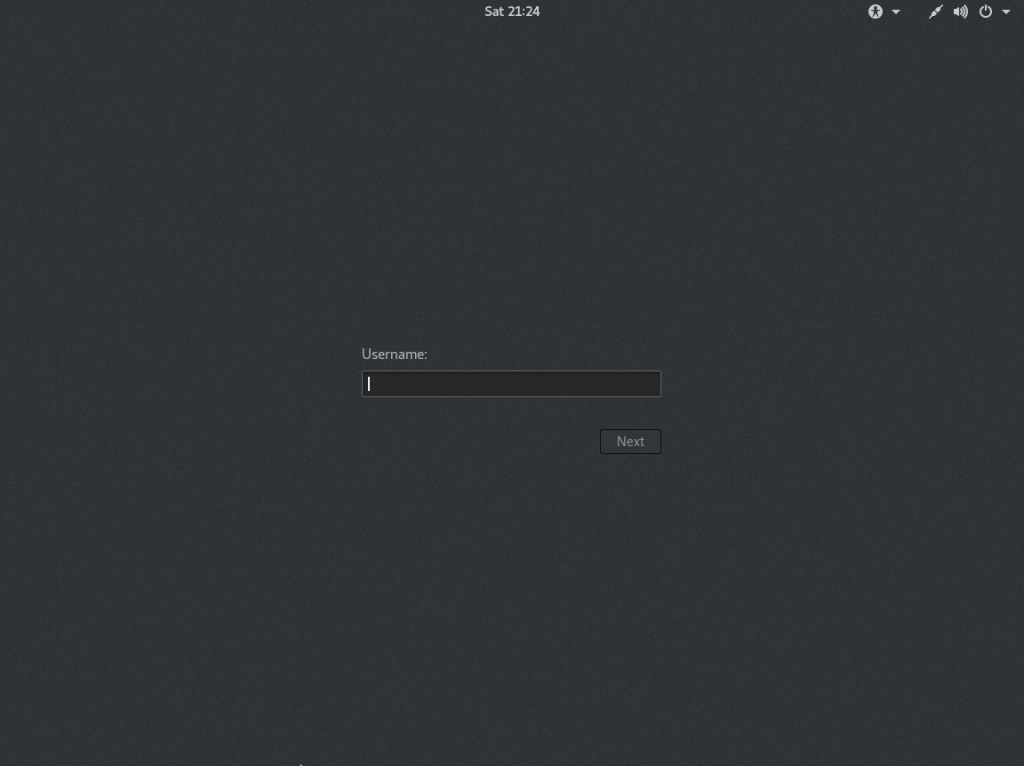
Here’s your login screen! Remember to use root, because you didn’t create a regular user:
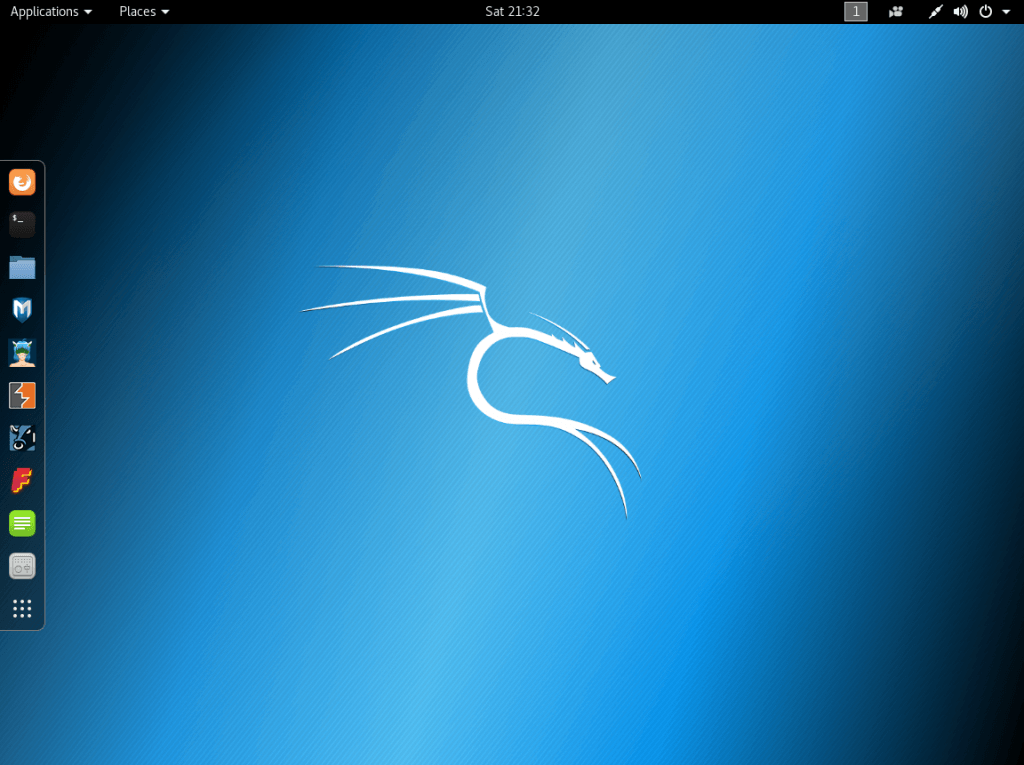
And finally, your new desktop:
Post-Install Wrap-Up
I know that you’re anxious to start exploring this wonderful new environment, but we’ve got a bit of housekeeping to take care of first.
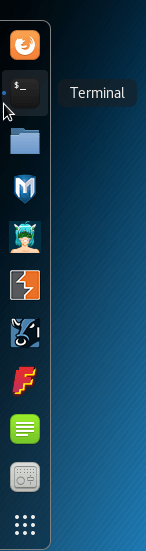
At the left, in the quick launch bar, hover over the second icon from the top. It should be a black square and the tool tip should say Terminal. Click it to launch a terminal window:
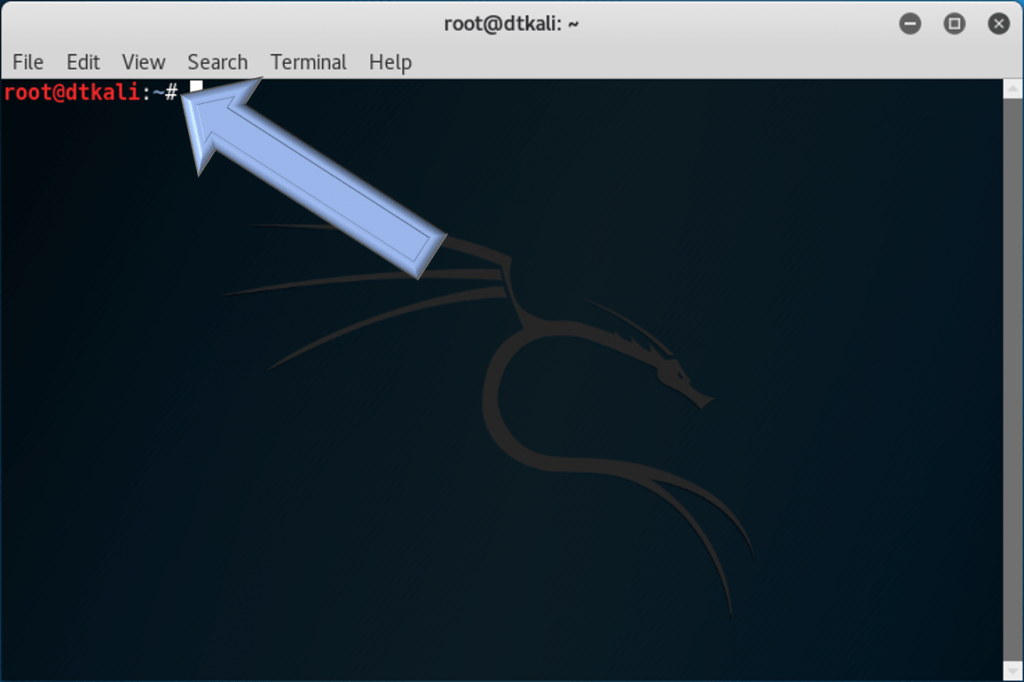
Since we’re running as root, the terminal will already be running with the highest privileges. You can tell by the # prompt as opposed to a > prompt.
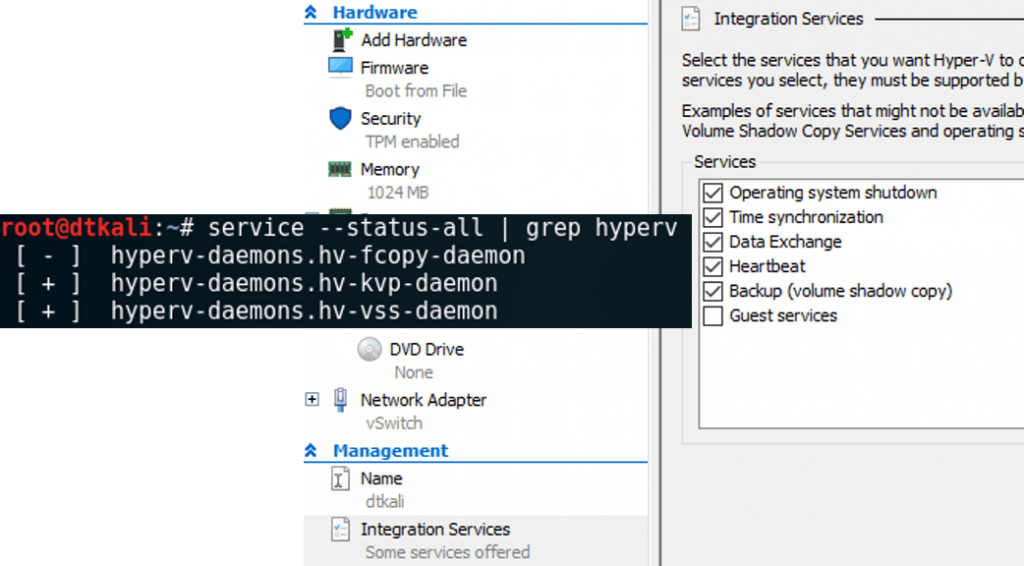
Install Extra Hyper-V Services
The required Hyper-V components are already enabled. Let’s add the KVP, VSS, and file copy services. Enter:
This installs the file copy, KVP, and VSS services. Whether or not they start depends on whether or not the relevant services are enabled. The default Hyper-V setting enables all except Guest Services, so all except the file copy daemon should start automatically. Use service –status-all | grep hyperv to find out:
Change the Scheduler to NOOP
Linux has an I/O scheduler, but Hyper-V has an I/O scheduler. Turn off Linux’s for the best experience.
Edit the GRUB loader:
This will load the GRUB configuration file. Find the line that says:
Press [CTRL]+[X]. You’ll then need to press [Y] to save the changes, then [Enter] to indicate that you want to save the data back to the file you found it in. That will leave you back at the prompt.
Exploring Kali Linux
You have now completed all of your installation and preparation work! It’s time to take Kali for a spin!
If I didn’t make this clear enough earlier, I’ll be crystal clear right now: I don’t know that much about penetration testing. I recognize many of the names of the tools in Kali, but the only one I have a meaningful level of experience with is Wireshark. So, don’t ask me what this stuff does. That’s why we have the Internet and search engines.
Let’s start with the boring things to get them out of the way. In the top right you’ll find some system status icons. Click and you’ll get the system menu:
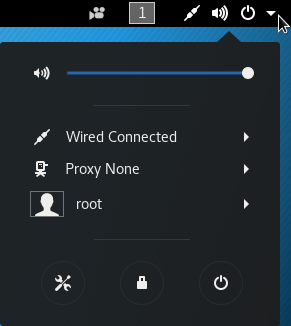
Move left from the system area, and you’ll see a camera icon (it appears in the screenshot above). Click that, and you can record your screen.
Now, the fun stuff! In the top left, you’ll see Applications and Places menu items. Places includes some shortcuts to common file system locations; it’s sort of like the Quick Access section in Windows Explorer. I’ll leave that to you to play with. Click Applications. You’ll immediately see why Kali is not a garden-variety distribution:
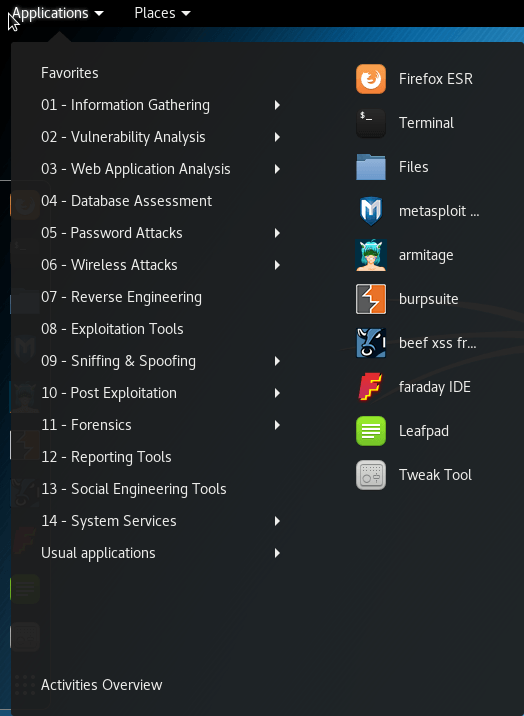
The Usual Applications group gave me a chuckle. You’ll find all the things that you’d find on a “normal” distribution there.
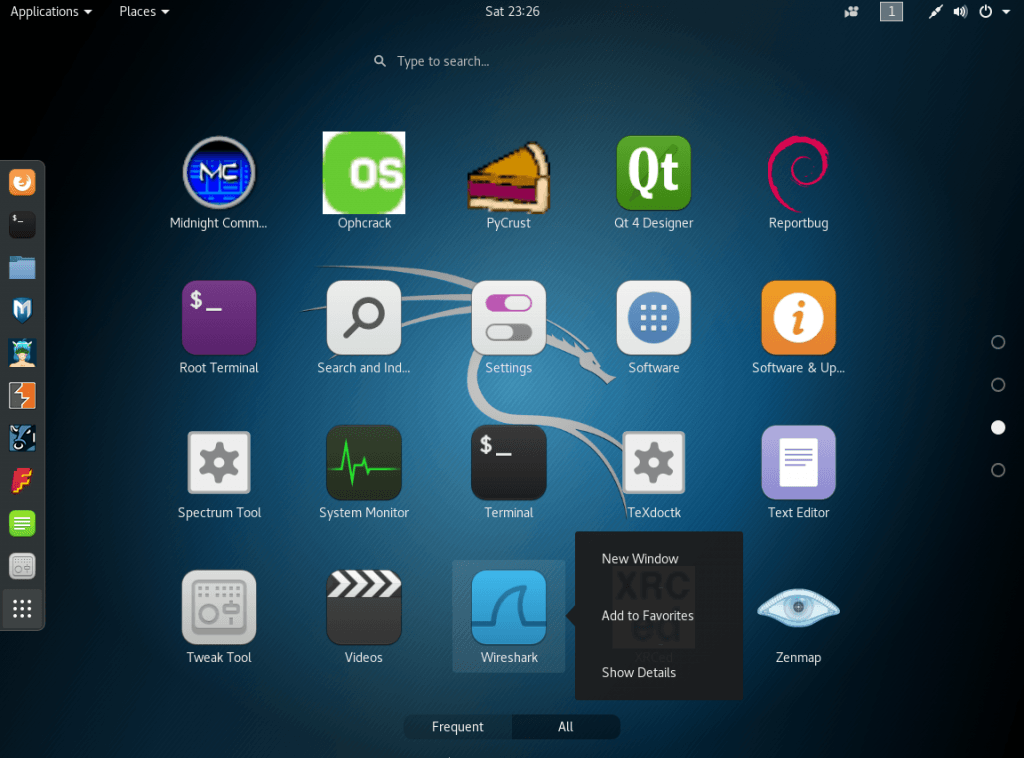
You met the quick launch dash earlier, when you started the terminal. It sits at the left of the screen and contains everything marked as a favorite. It will also include icons for running applications. The nine-dot grid at the bottom opens up Kali/Gnome’s equivalent to Windows’ Start menu. From there, you can launch any item on your system. You can also add items to the Favorites/Dash area:
Get Testing!
You’ve got your shiny new Kali install ready to roll. Kick the tires and see what you can accomplish.
Oh, and remember that we’re the good guys. Use these tools responsibly.
Источник


