- Kali linux installation fail
- Ошибка установки на VirtualBox
- ответ
- Fix the installation errors in Kali Linux 2020.1 offline installer
- Problem 1: Your installation CD-ROM couldn’t be mounted.
- Solutions
- Solution 1:
- Solution 2:
- Problem 2: Some of your hardware needs non-free firmware files to operate.
- Problem 3: No GUI after successful installation of Kali 2020.1
- Problem Description
- Reason of Problem
- Workaround
Kali linux installation fail
There can be a wide variety of reasons for a Kali Linux installation to fail. This could include issues such as a corrupt or incomplete ISO download, not enough disk space on the target machine, etc. The following article will give you some pointers on what to look for when your Kali Linux installation has failed. The following is an example of the dreaded “Red Screen”, indicating the installation encountered a problem.
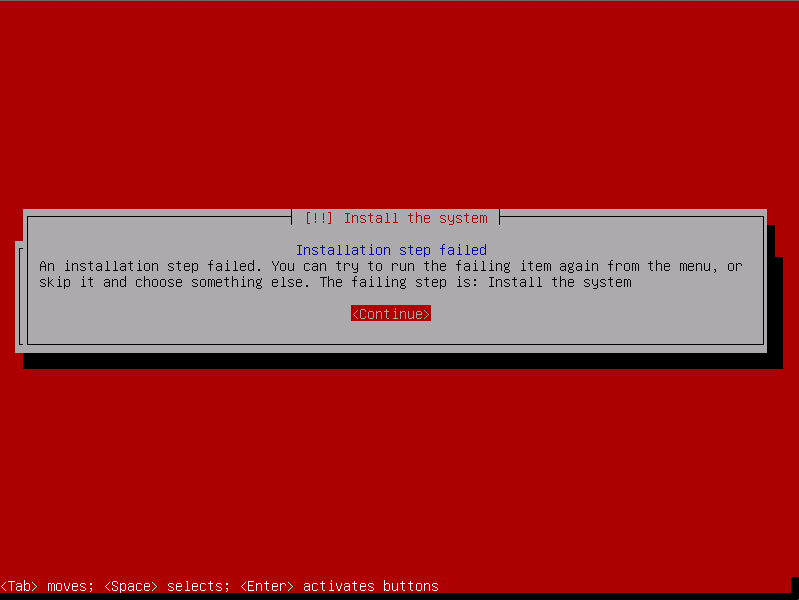
Hitting the continue button should take you to the Debian installer main menu. From that main menu, browse to the “save debug logs«:
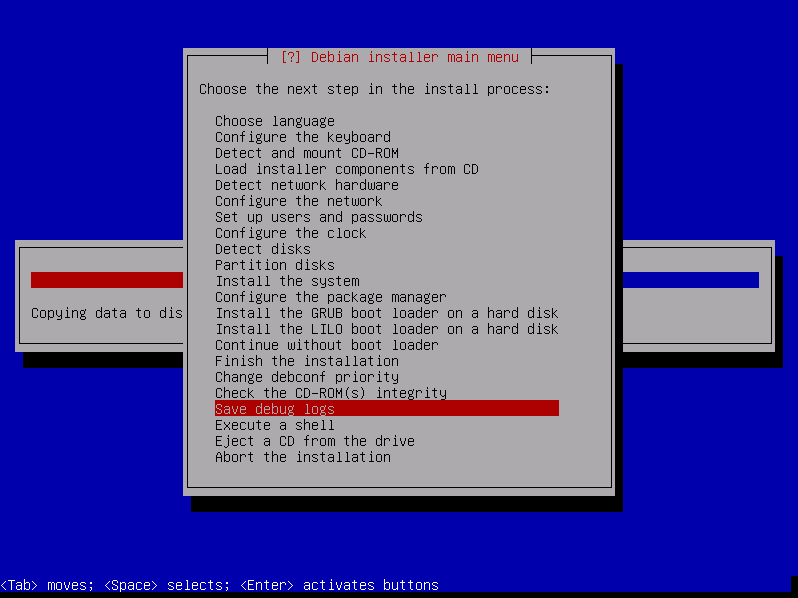
Going into the debug logs, you are presented with several ways of transferring the installation log files away from the failed installation. The most convenient way is usually to start a web server on the machine undergoing the installation.
![]()
Once you choose this option, a web server is started from which you are able to download or view several installation log files. 
Look over the logs files for anything irregular, or any error messages which look like they might be the cause of your failed installation. In this case, the target machine did not have enough disk space to install Kali Linux, as was seen towards the end of the syslinux log file
Updated on: 2021-Sep-27
Author: g0tmi1k
Источник
Ошибка установки на VirtualBox
Пробовал два варианта KaliLinux x64 и 32. В графическом режиме и обычном. Когда идет шаг копирования файлов вроде нормально потом сразу ошибка.
Install the system
Installation step failed An installation step failed. You can try to run the failing item again from the menu, or skip it and choose something else. The failing step is: Install the system
Раньше я ставил на другом компе без ошибок. Разница только в том что версия VirtualBox и Kali новее и теперь у меня две VM уже созданы с виндовс. Это могло как-то помешать?
ответ
Вот по этой инструкции все получилось. С форума Кали: How much space do you asigned to the HDD? at least it must be 15GB
In my Kali Vbox config is like, in the Kali config -> System:
Tab: Motherboard RAM 1024MB Chipset: ICH9 Enable IO APIC Enable UTC clock hardware Enable pointer device
Tab: Procesor CPUs: 2 enable PAE/NX
Tab: Accelaration The two options here are enabled
всё хорошо, но надо показывать как ставил и конфиг проги в след. раз.

Если ставишь KALI LINUX на Virtual BOX и выбираешь создать динамический виртуальный жесткий диск — то в процессе установки выбьет ошибку (примерно на 80-85%) «не удалось выполнить установку, попробуйте установить заново» ну и дальше предложит вернутся в какой то из этапов установки. Создаешь фиксированный виртуальный диск (не динамический) и все работает.
Источник
Fix the installation errors in Kali Linux 2020.1 offline installer
Since the Kali Linux 2020.1 is released on 28 th January 2020, so I thought to give it a try and install it on my HP Pavilion 15 laptop. I went over to https://www.kali.org/downloads page and downloaded the Kali Linux 64-Bit (Installer) which is about 2GB. I used Rufus on Windows to write the bootable ISO images onto my USB drive.
When I booted up and started the installation of Kali, I came across various errors, which took quite a lot of time to fix all the errors and get the new Kali 2020.1 version up and running on my laptop. I am sharing all the possible errors and how to fix them so that it can help others.
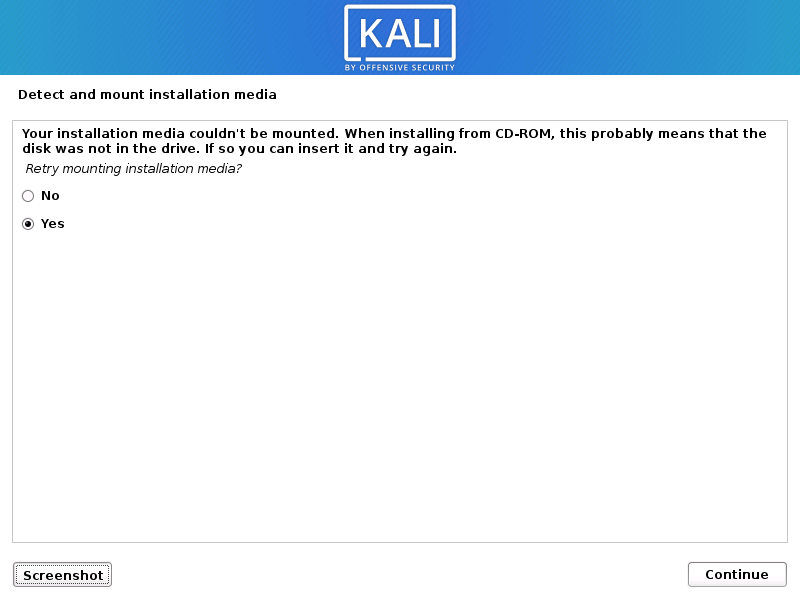
Problem 1: Your installation CD-ROM couldn’t be mounted.
Solutions
You have two options to fix this error.
Solution 1:
- On “Retry mounting the CD-ROM?” option, select the No and click Continue.

- You will see an installation step failed page but that is okay, just click on Continue.
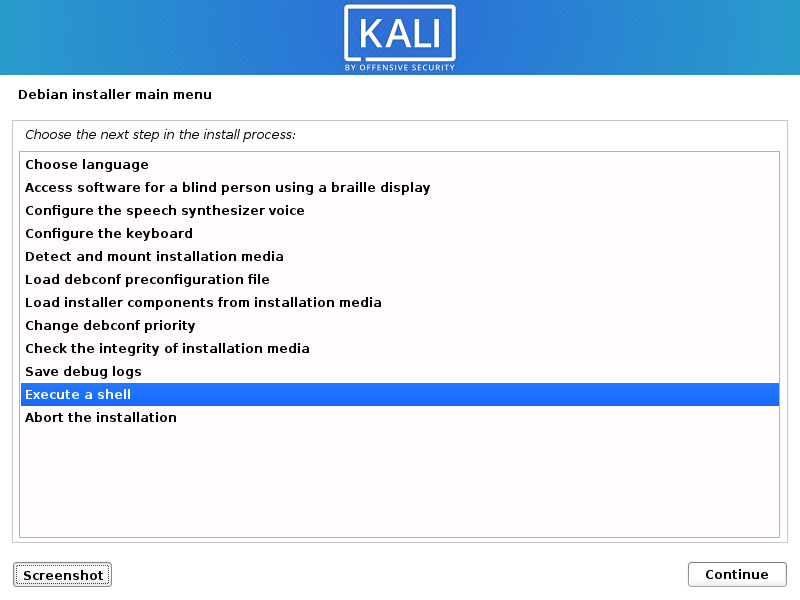
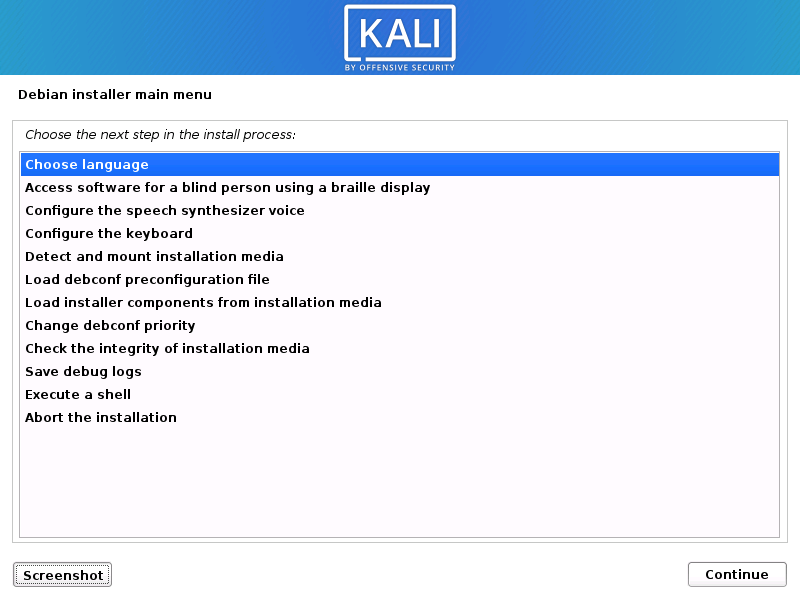
- Now you will see an installer menu with various options. Navigate and select “Execute a shell” option and click on Continue twice.
- You will get a terminal window where you can execute commands. From here, we will manually mount our bootable USB to cdrom directory so the installer can continue.
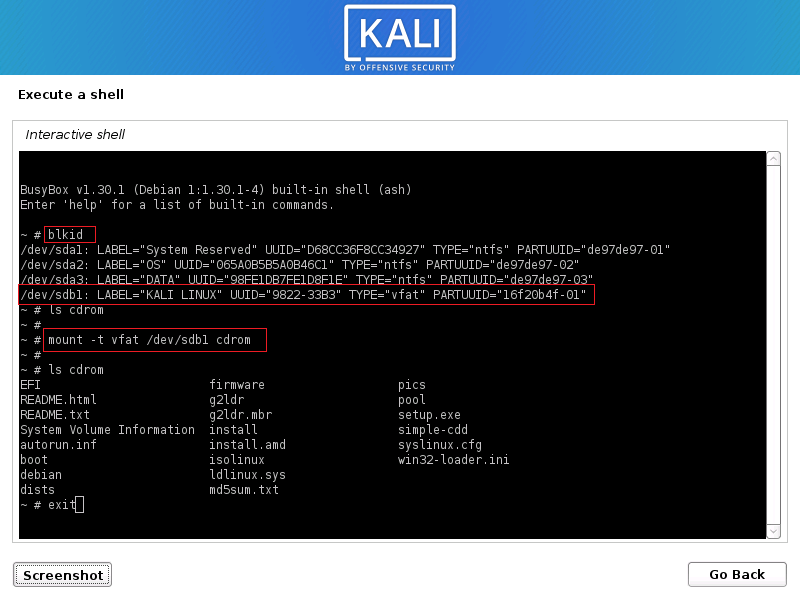
- First, to determine the block ID of USB drive, use the “blkid” command without quotes.Usually it is the last option in the list. Take a note of the device name i.e. /dev/sdb1 and file system type i.e. vfat. You will need these two things to manually mount the USB.
- Now type “ls cdrom” command without quotes. If you do not get anything, you can skip the next command but if you get an error like “No such file or directory”, continue to next command.
- Type “mkdir cdrom” command
- Type “mount -t vfat /dev/sdb1 cdrom” command. Make sure you adjust the device name noted in first step
- If above command is successful, you can verify the contents of cdrom directory using “ls cdrom” command.
- Now type exit and hit enter. (see the following image for all the commands)
- You will get back to the list of installer menu with various options. You need to start over; Just highlight the first option i.e. Choose Language and click Continue.
- Hopefully, your system will now detect and mount the CDROM since you manually mounted it this time.
If above steps do not work for you, you can follow the next solution.
Solution 2:
For this, you will need to re-format your USB device. You can download and use rufus to write the bootable kali iso image onto your USB drive.
-
- Launch rufus.
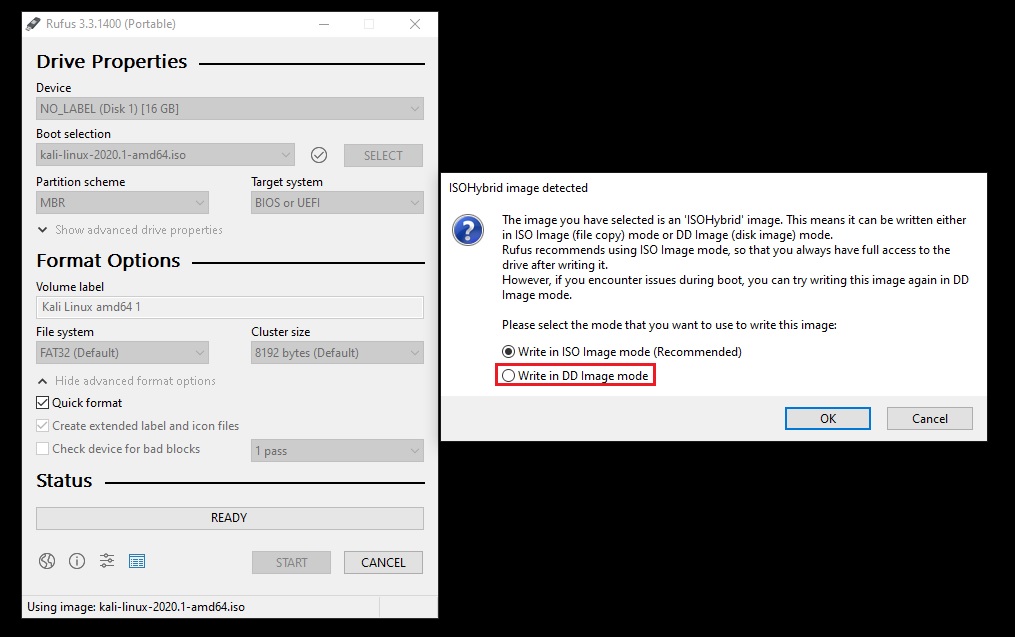
- Rufus will auto detect your USB drive, just make sure right device is selected, then select the kali iso image and click on Start button.
- As soon as you hit the Start button, rufus will detect that the selected ISO image is ISOHybrid type and gives you two ways of writing this image to USB.
- Just select the second option i.e. Write in DD image mode and click OK.
- No matter what software you use for writing the kali iso to USB, you need to do it via DD mode. Once your USB is ready, plug it in and start the installation.
- Now you will not get CD-ROM detect and mount error.
Tip: The problem with DD image mode is that you can no longer make any changes to your USB device i.e. you will not be able to add or delete any file to/from your USB device (until you re-format it). To be able to use the USB again you will have to clean it and remove the kali linux image from it.
Problem 2: Some of your hardware needs non-free firmware files to operate.
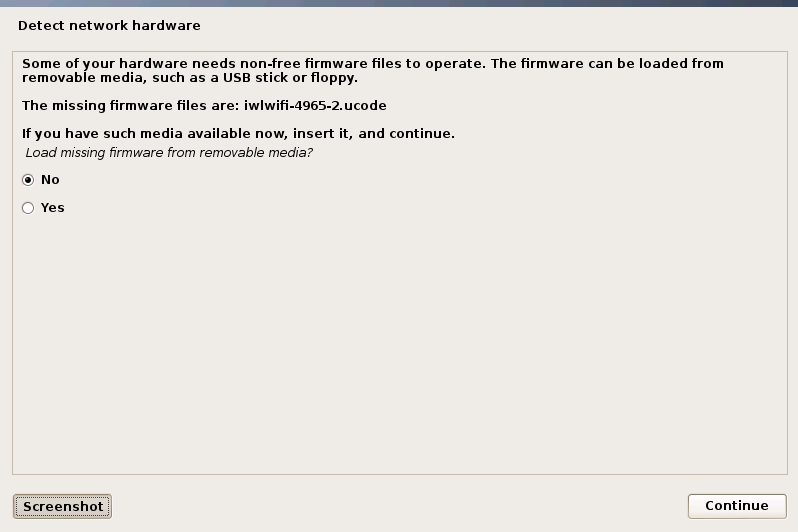
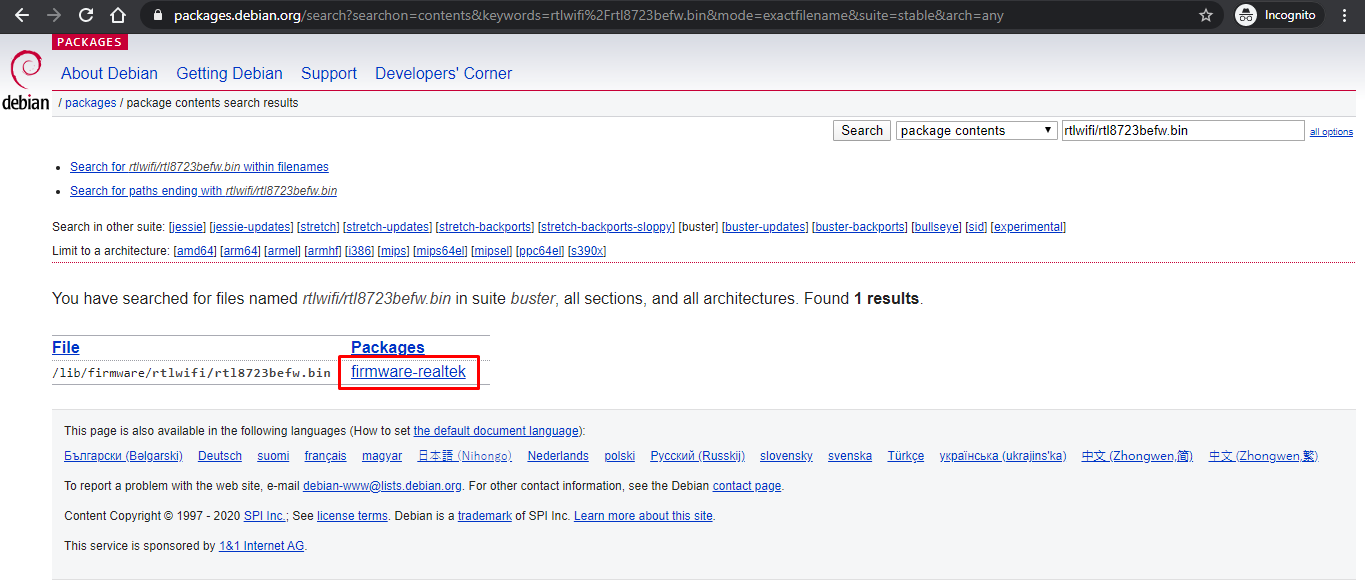
To fix this error you will need a PC with an active internet connection. Just take a note of the missing firmware file names. In my case, it is “rtlwifi/rtl8723befw.bin”.
Now follow these steps:
- Launch any web browser and open https://www.debian.org/distrib/packages#search_contents URL.
- Under keywords text box type the firmware file name noted initially, and then select “packages that contain files named like this” under display and then click on the Search button.
- If your firmware matches the search criteria, you will get a list of files. Click on the link under Packages and you will be redirected to package contents page.
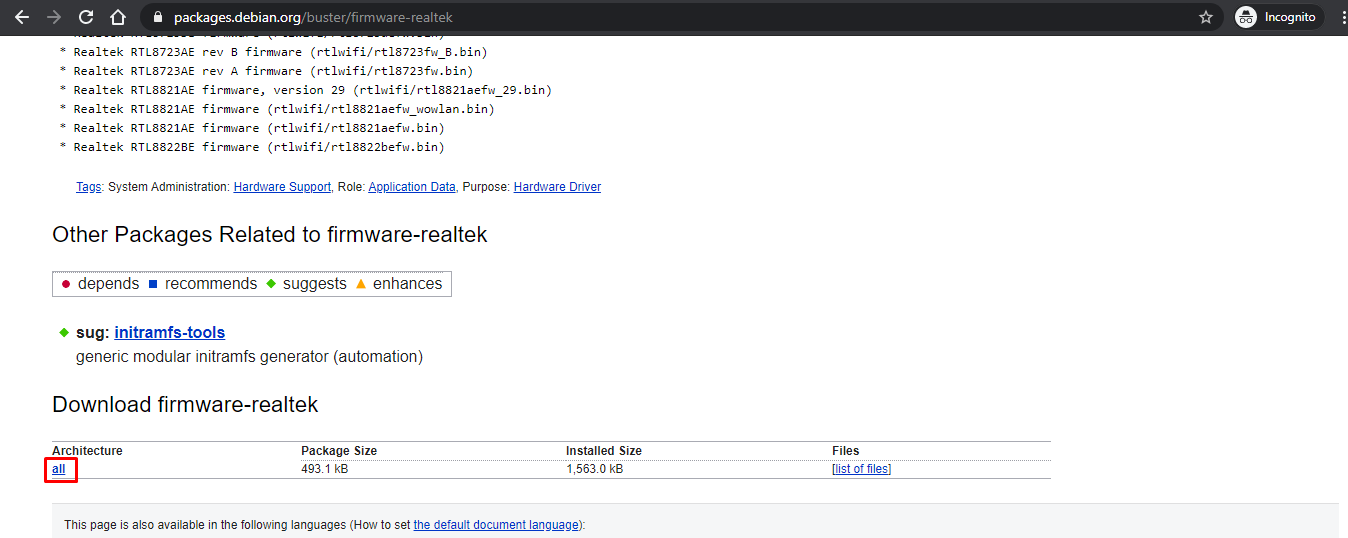
- Now, scroll down until you see download firmware section, just click on the all link under Architecture column.
- You will now see a list of servers in various geographical regions. Click on the link of sever which is nearest to you and a .deb package will be downloaded.
- You will need to repeat the steps 2 – 5 for each missing firmware file.
- Now connect the bootable USB containing kali image to your computer. Make sure your USB device is not written using DD mode. If it is in DD mode, you won’t be able to copy files across. You will need to re-format it in ISO mode.
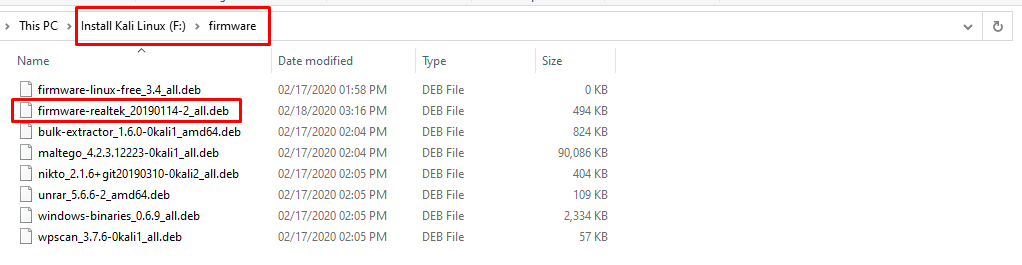
- Browse to USB device via File Explorer and navigate to F:\pool\non-free\ (USB device is mounted under F: drive, you need to adjust it accordingly)
- You will see some subdirectories in there. You need to go inside each subdirectory, copy all the files and paste them right inside F:\firmware\. If there are already some files with same name, just click replace.
- After copying all the files from F:\pool\non-free subdirectories, you also need to copy the firmware files that you downloaded earlier into same F:\firmware folder. Please see the following image for reference.
- That is it. Now plug-in your USB and start the kali installation again.
- Hopefully, you will no longer get any missing non-free firmware error. If you do get the error, just repeat the steps 2 – 5 to download the missing firmware files.

Problem 3: No GUI after successful installation of Kali 2020.1
Problem Description
After installation is successful, GRUB is installed to MBR, but when I rebooted the system there was no grub splash screen; just a text based booting menu. After kali is booted up, there was no GUI; but only a text based login option.
Reason of Problem
By spending some time on googling it, I found that there is bug in 2020.1 installer ISO and about 140+ packages are missing in offline installer. Also, there are a few packages that are missing in APT package manager. To install Kali Linux with default options (XFCE DE), installer needs Internet connection to download missing packages from Kali repository. If you try to install Kali linux offline, you will end up with text mode install.
Workaround
To remediate the situation, we can connect the kali linux to internet, convert our installation to GUI mode, and install any missing firmware and packages.
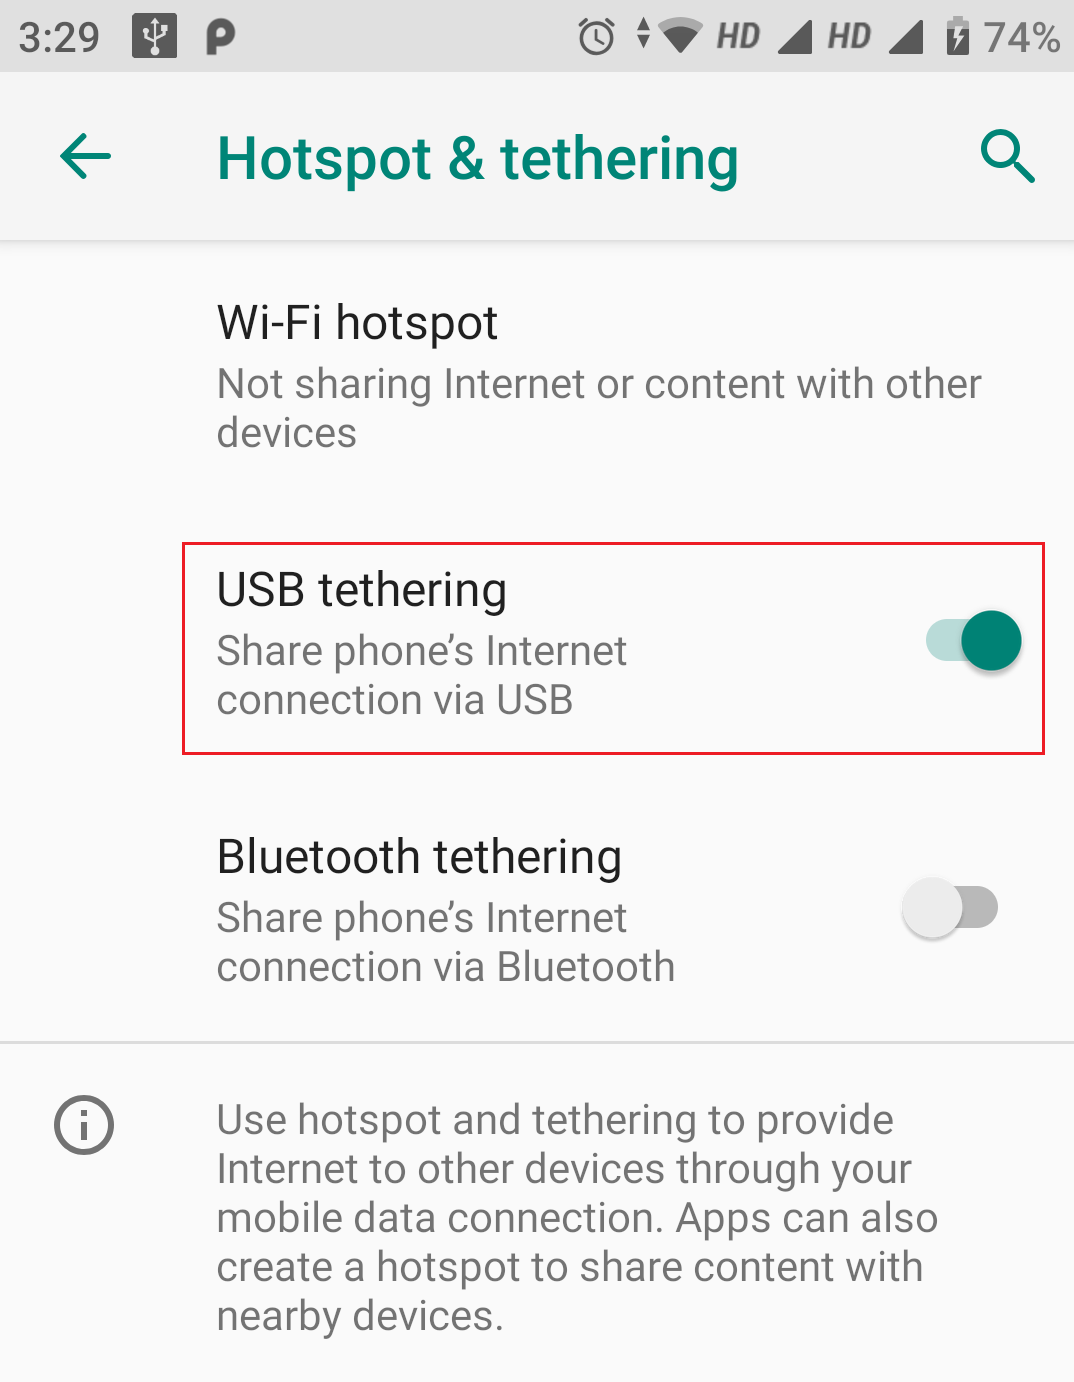
You will need an Android phone with good internet connection, USB cable that can connect your phone to PC where you just installed the kali linux. The idea is to use USB tethering option to share mobile’s internet connection on PC. Just to mention that I don’t really use an iPhone. So, I don’t know if there is any option to use USB tethering in iPhone as well. If there is, you can surely use iPhone too.
Tip: If your mobile internet is not too fast, first connect your mobile to a WiFi network which is fast enough and then follow these steps.
Since you don’t have any GUI in kali linux yet, so you will have to do everything in text mode.
-
- Login to kali linux in text mode
- Connect the USB cable to your PC and phone.
- Go to settings in your phone and enable USB tethering
- Now wait a few seconds and use the following commands in right order. We will make sure that kali linux can connect to internet using USB.
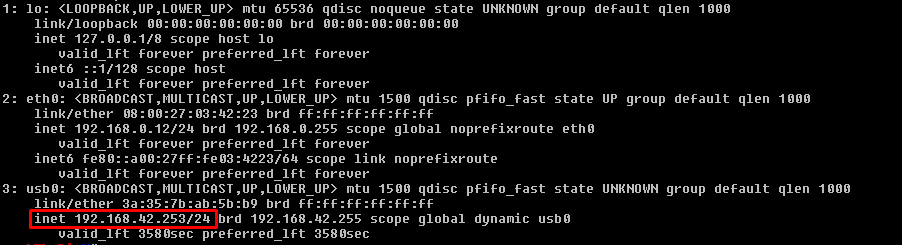
- Type “ip a” command without quotes and hit enter.This command will list all the network adapters and their IP configurations. The last device i.e. usb0 will probably be the USB network adapter created by USB tethering. If you see it, you are good to go to next step.
- Now type “sudo dhclient” command without quotes and hit enter.
- The command could take a few seconds. When completed, use “ip a” command again to verify that usb0 adapter has successfully received the IP configuration.
- If you see the IP address assigned (as highlighted in picture above), you are connected to internet.
- Now that you are connected to internet, make sure that the sources.list is updated with following information:
- If it is not, use following command to add kali-rolling repositories to sources.list:
- Use “cat /etc/apt/sources.list” command to view the file and comment out if there is any other line except above two
- Now type “sudo apt update ” command and wait for it to complete.
- Make sure your platform microcode is updated. Use following command just in case:
- Now type “sudo apt install kali-desktop-xfce -y ”. This could take a while depending upon the speed of your internet connection. Wait for it complete and then restart. This command will convert your text mode installation of kali linux into default XFCE based desktop environment.
- After reboot, you will be able to login using GUI mode but you will still notice that there is no GNOME tweaks tool, no applications menu, no Places menu. To re-activate all these, follow the next step.
- Type “sudo apt install gnome-core kali-defaults kali-root-login desktop-base -y ” command and hit enter. Wait for it to finish and then reboot.
- Now you can see the Applications menu, Places menu, and GNOME tweaks tool is also installed so that you can customize the GNOME interface.

After following this guide, you will be able to get latest version of kali linux up and running. Let me know if you still face any error that is not mentioned in this guide and I will try to get back to you with a solution as soon as possible.
Источник


