- Настройка Кали Линукс после установки: пошаговая инструкция
- Kali Linux: настройка после установки
- Настройка экрана
- Электропитание
- Настройка Wi-Fi
- Настройка сети LAN
- Настройка VPN
- Proxy-сервер
- Репозитории
- Настройка обновлений
- Прочие настройки
- Kali linux internet install
- Setup a PXE Server
- Download Kali PXE Netboot Images
- Configure Target to Boot From Network
- Post Installation
- Kali linux internet install
- System Requirements
- Installation Prerequisites
- Preparing for the Installation
- Kali Linux Installation Procedure
- Language
- Network
- User Accounts
- Clock
- Encrypted LVM
- Proxy Information
- Metapackages
- Boot Information
- Reboot
- Post Installation
Настройка Кали Линукс после установки: пошаговая инструкция

Сегодня даже в профессиональной сборке для хакеров Kali Linux базовая настройка системы доступна из графического интерфейса. А ведь когда-то альтернативными ОС могли пользоваться только джедаи командной строки. Рассмотрим, что может потребоваться после установки, но до начала работы в Kali Линукс.
Kali Linux: настройка после установки
Значительную часть параметров система определяет сама. Частично это происходит уже на этапе установки Linux: детектируется оборудование, по возможности настраивается подключение к сети и прописываются репозитории и так далее. Однако всегда остается вероятность, что какие-то настройки нужно будет изменить после установки. Сделать это несложно: базовые вещи сведены в единый инструмент.

Для доступа к нему необходимо кликнуть по выпадающему меню выключения в правом верхнем углу, далее нажать на кнопку с отверткой и ключом. Откроется окно настроек Kali Linux.

Настройка экрана
Первым делом – поправить разрешение, если после установки оно слишком маленькое. Для этого нужно открыть Устройства – Дисплеи.

Электропитание
Чтобы Kali Linux не гасил экран или не переходил в режим ожидания, надо настроить электропитание.

Настройка Wi-Fi
В подавляющем большинстве случаев, настройка интернета сводится к тривиальному подключению к беспроводной точке доступа после установки Kali.

Для этого нужно кликнуть по нужной сети и ввести пароль.

Подключенная сеть будет отмечена галочкой.

Настройка сети LAN
Проводное подключение определяется автоматически, если есть DHCP сервер (например, роутер раздает адреса). В противном случае может потребоваться вручную указать параметры после установки системы Linux. Для этого в разделе «Сеть» нужно нажать на шестеренку у проводного соединения.

Откроется окно со сводной информацией. На вкладке «Подробности» можно настроить автоматизацию, доступ для других пользователей и передачу данных в фоне (хотя для Kali Linux лучше использовать безлимит).

Вкладка «Идентификация» позволяет скорректировать название подключения, выбрать MAC-адрес, настроить MTU.

Самая важная вкладка здесь – IPv4. По умолчанию, после установки Linux, активируется автоматический режим.

Если переключиться на ручной ввод, станут доступны параметры компьютера с Kali Linux (адрес, маска подсети, шлюз), DNS-сервера и маршрутизации. Вводить нужно значения, соответствующие используемому подключению.

После установки правильных значений нужно нажать «Применить».
Протокол IPv6 также доступен для настройки.

Настройка VPN
Для настройки частной сети, нужно в разделе Сеть нажать на плюсик в соответствующем подразделе. Откроется окошко добавления настроек.

Система Kali предлагает импортировать их из файла. Сделать его можно при помощи OpenVPN или иного софта.

Proxy-сервер
Прямое подключение Kali Linux может быть рискованным, так что лучше настроить проксирующий сервер. Для этого в разделе «Сеть» нужно нажать на шестеренку в пункте «Сетевой прокси». Откроется стандартное окно настроек, где следует указать промежуточный адрес для различных протоколов.

Обратите внимание: Если указать некорректные настройки для HTTP, то браузер по умолчанию попытается их использовать и просмотр веб-страниц будет недоступен.
Репозитории
Если во время установки Kali Linux на компьютере был доступен интернет (например, через проводное подключение), то дополнительная настройка репозиториев может и не потребоваться. Инсталлятор Kali автоматически пропишет актуальное зеркало дистрибутива в системных параметрах.
Если сети на момент установки Linux не было или же требуется скорректировать параметры, после установки следует исправить файл /etc/apt/sources.list.

Можно открыть его системным редактором и добавить соответствующие строки. На рисунке ниже уже указан актуальный адрес для Kali-rolling.

Версии репозиториев Kali Linux описаны на странице https://docs.kali.org/general-use/kali-linux-sources-list-repositories. Можно взять зеркала со страницы https://docs.kali.org/community/kali-linux-mirrors.

Первая строка указывает на репозиторий с готовыми версиями софта Linux. Строка с «deb-src» в начале используется для получения исходных кодов.
Если используется предыдущая версия дистрибутива, можно настроить зеркало для Kali Sana.

Поклонникам глубокой старины пригодятся репозитории Moto.

Настройка обновлений
При корректном указании репозитория Kali Linux, можно использовать графическую оболочку для проверки обновлений. Для этого нужно перейти в раздел «Подробности».

Далее следует нажать кнопку проверки, после чего система Linux установит необходимые апдейты или сообщит об отсутствии более свежих версий.

Прочие настройки
Для удобства использования можно указать параметры доступности Kali Linux («Универсальный доступ»).

Параметры клавиатуры и региональные настройки находятся в разделе «Регион и язык».

Для комфорта можно даже ввести данные облачных аккаунтов (хотя их использование в Kali Linux выглядит достаточно странно).

В целом, настройка позволяет сделать из Kali Linux заточенный под себя инструмент, которым будет приятно пользоваться.
Источник
Kali linux internet install
Booting and installing Kali Linux over the network (PXE) can be useful from a single laptop install with no CDROM or USB ports, to enterprise deployments supporting pre-seeding of the Kali Linux installation.
Setup a PXE Server
First, we need to install dnsmasq to provide the DHCP/TFTP server and then edit the dnsmasq.conf file:
In dnsmasq.conf , enable DHCP, TFTP and PXE booting and set the dhcp-range to match your environment (we are using 192.168.101.100-200). If needed you can also define your gateway and DNS servers with the dhcp-option directive as shown below:
With the edits in place, the dnsmasq service needs to be restarted in order for the changes to take effect.
Download Kali PXE Netboot Images
Now, we need to create a directory to hold the Kali Linux Netboot image and download the image we wish to serve.
Configure Target to Boot From Network
With everything configured, you can now boot your target system and configure it to boot from the network. It should get an IP address from your PXE server and begin booting Kali Linux.
Post Installation
Now that you’ve completed installing Kali Linux, it’s time to customize your system.
The General Use section has more information and you can also find tips on how to get the most out of Kali Linux in our User Forums.
Updated on: 2021-Sep-27
Author: g0tmi1k
Источник
Kali linux internet install
Installing Kali Linux (single boot) on your computer is an easy process. This guide will cover the basic install (which can be done on bare metal or guest VM), with the option of encrypting the partition. At times, you may have sensitive data you would prefer to encrypt using Full Disk Encryption (FDE). During the setup process you can initiate an LVM encrypted install on either Hard Disk or USB drives.
First, you’ll need compatible computer hardware. Kali Linux is supported on amd64 (x86_64/64-Bit) and i386 (x86/32-Bit) platforms. Where possible, we would recommend using the amd64 images. The hardware requirements are minimal as listed in the section below, although better hardware will naturally provide better performance. You should be able to use Kali Linux on newer hardware with UEFI and older systems with BIOS.
Our i386 images, by default use a PAE kernel, so you can run them on systems with over 4 GB of RAM.
In our example, we will be installing Kali Linux in a fresh guest VM, without any existing operating systems pre-installed. We will explain other possible scenarios throughout the guide.
System Requirements
The installation requirements for Kali Linux will vary depending on what you would like to install and your setup. For system requirements:
- On the low end, you can set up Kali Linux as a basic Secure Shell (SSH) server with no desktop, using as little as 128 MB of RAM (512 MB recommended) and 2 GB of disk space.
- On the higher end, if you opt to install the default Xfce4 desktop and the kali-linux-default metapackage, you should really aim for at least 2 GB of RAM and 20 GB of disk space.
- When using resource-intensive applications, such as Burp Suite, they recommend at least 8 GB of RAM(and even more if it large web application!) or using simultaneous programs at the same time.
Installation Prerequisites
This guide will make also the following assumptions when installing Kali Linux:
- Using the amd64 installer image.
- CD/DVD drive / USB boot support.
- Single disk to install to.
- Connected to a network (with DHCP & DNS enabled) which has outbound Internet access.
We will be wiping any existing data on the hard disk, so please backup any important information on the device to an external media.
Preparing for the Installation
Download Kali Linux (We recommend the image marked Installer).
Burn The Kali Linux ISO to DVD or image Kali Linux Live to USB drive. (If you cannot, check out the Kali Linux Network Install).
Backup any important information on the device to an external media.
Ensure that your computer is set to boot from CD/DVD/USB in your BIOS/UEFI.
Kali Linux Installation Procedure
- To start your installation, boot with your chosen installation medium. You should be greeted with the Kali Linux Boot screen. Choose either Graphical install or Install (Text-Mode). In this example, we chose the Graphical install.
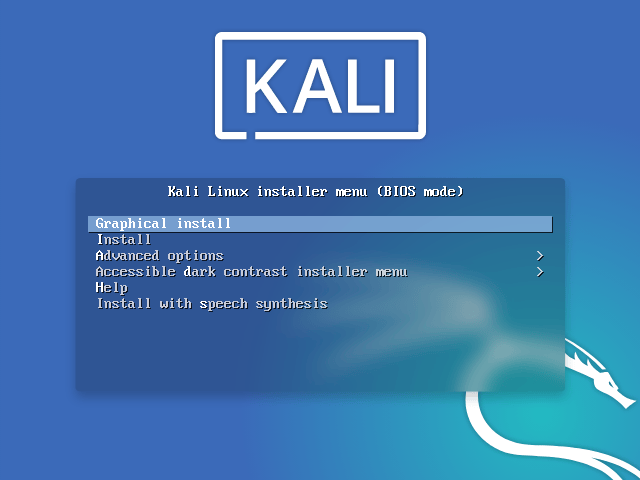
If you’re using the live image instead, you will see another mode, Live, which is also the default boot option. 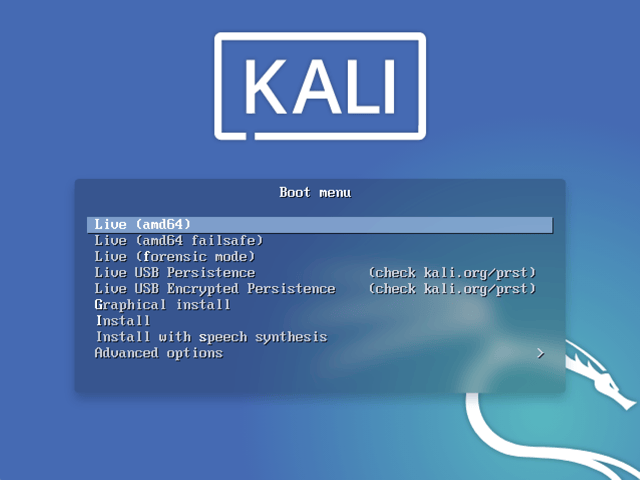
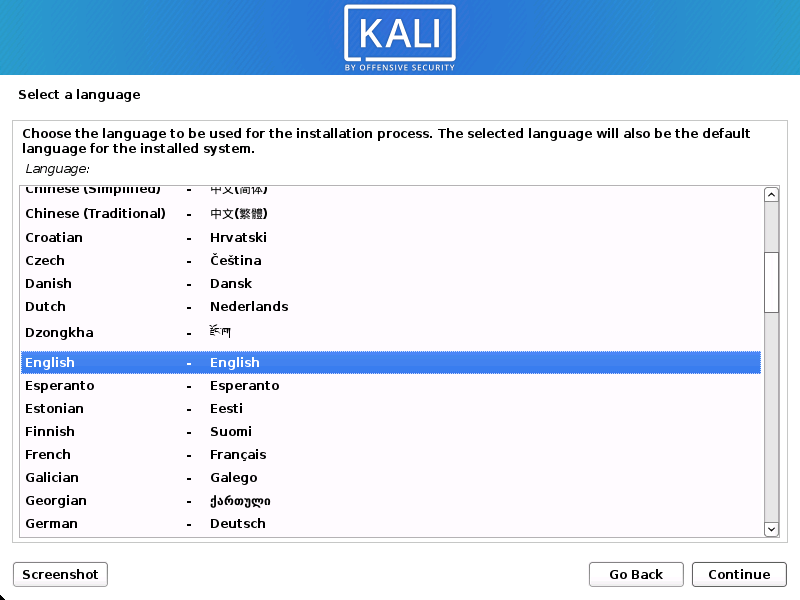
Language
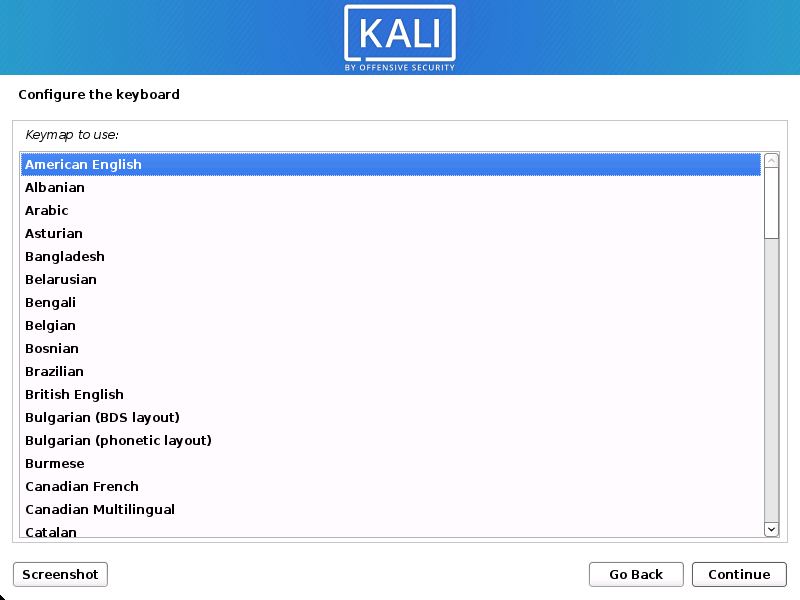
- Select your preferred language. This will be used for both the setup process and once you are using Kali Linux.
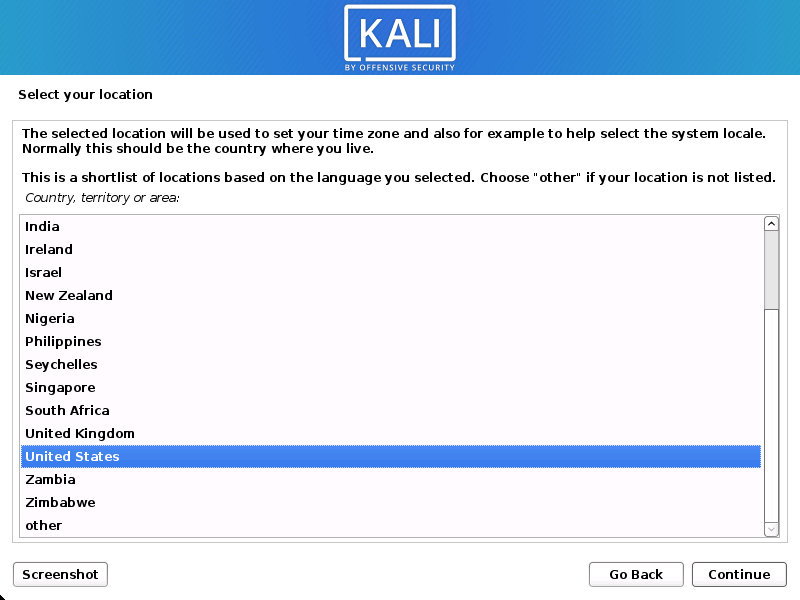
- Specify your geographic location.
- Select your keyboard layout.
Network
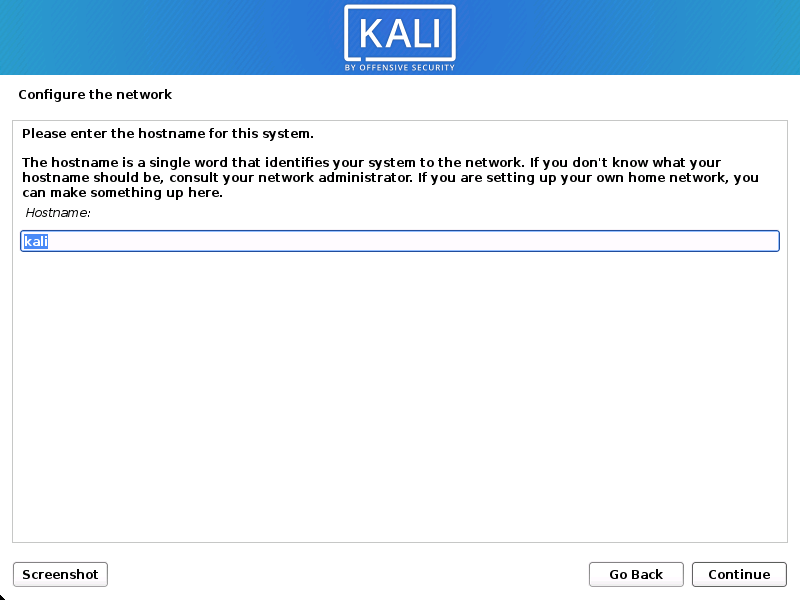
- The setup will now probe your network interfaces, looks for a DHCP service, and then prompt you to enter a hostname for your system. In the example below, we’ve entered kali as our hostname.
If there is no network access with DHCP service detected, you may need to manually configure the network information or do not configure the network at this time.
- If there isn’t a DHCP service running on the network, it will ask you to manually enter the network information after probing for network interfaces, or you can skip.
- If Kali Linux doesn’t detect your NIC, you either need to include the drivers for it when prompted, or generate a custom Kali Linux ISO with them pre-included.
- If the setup detects multiple NICs, it may prompt you which one to use for the install.
- If the chosen NIC is 802.11 based, you will be asked for your wireless network information before being prompted for a hostname.
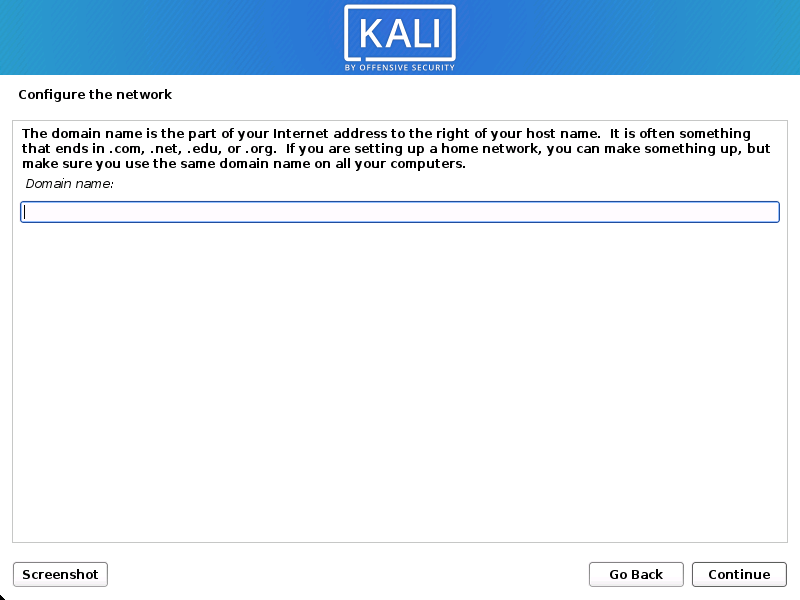
- You may optionally provide a default domain name for this system to use (values may be pulled in from DHCP or if there is an existing operating systems pre-existing).
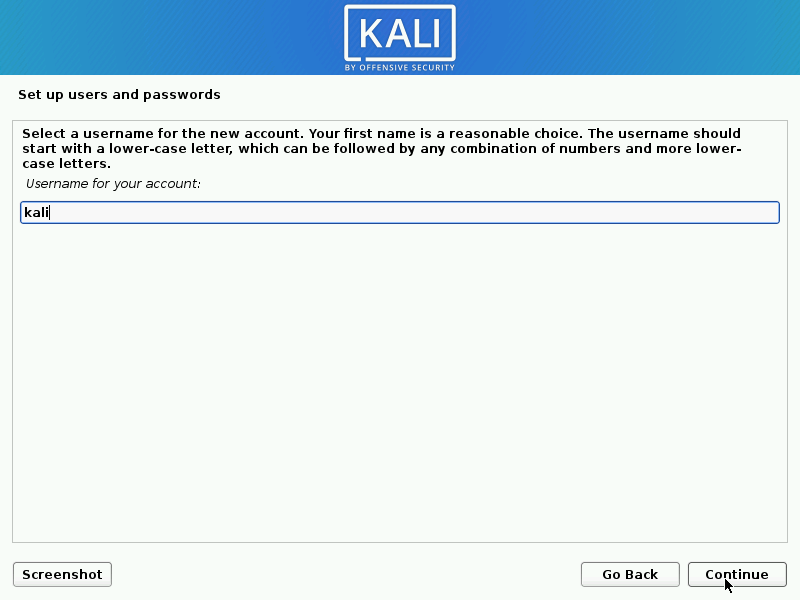
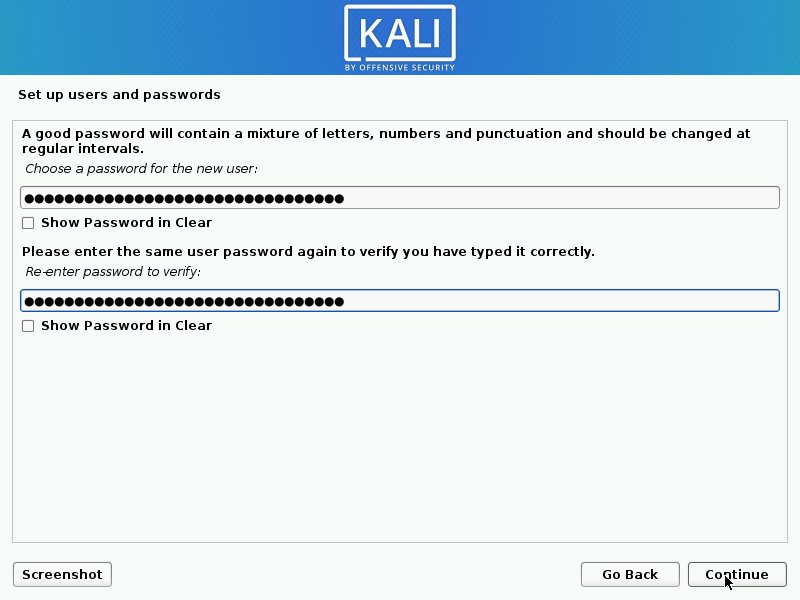
User Accounts
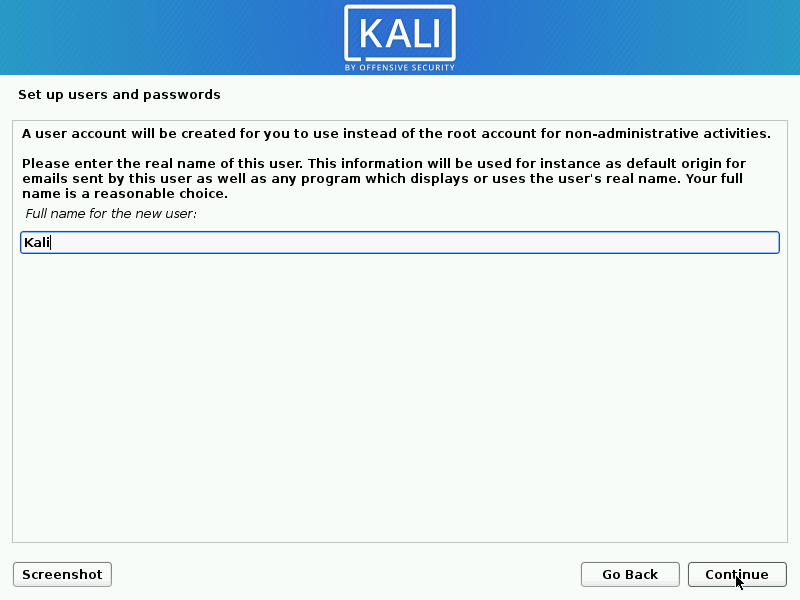
- Next, create the user account for the system (Full name, username and a strong password).
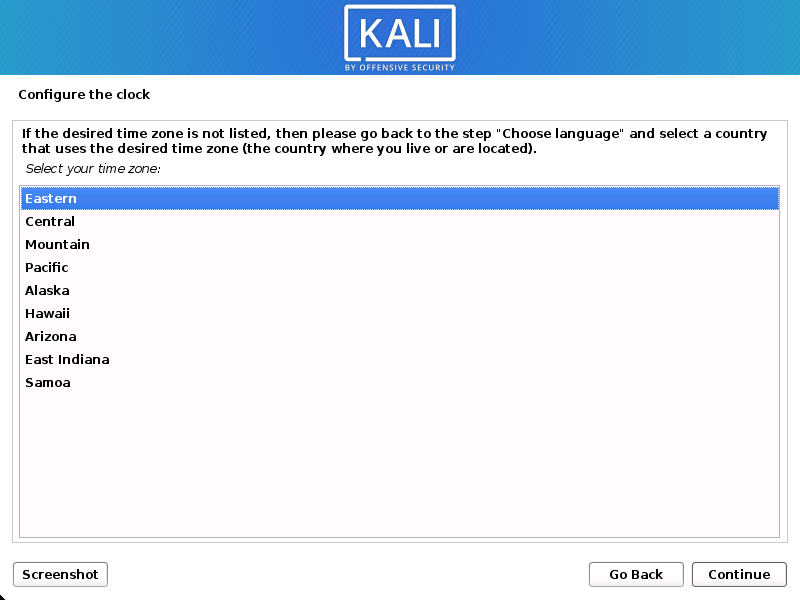
Clock
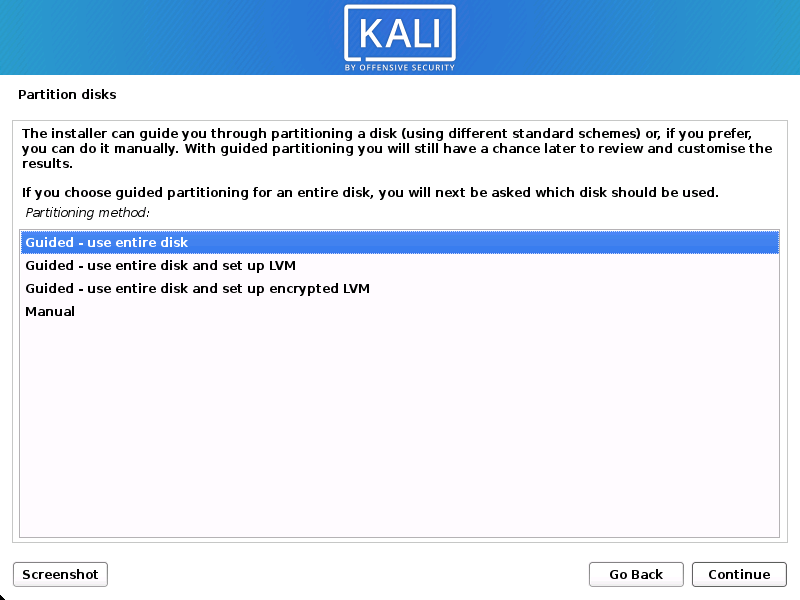
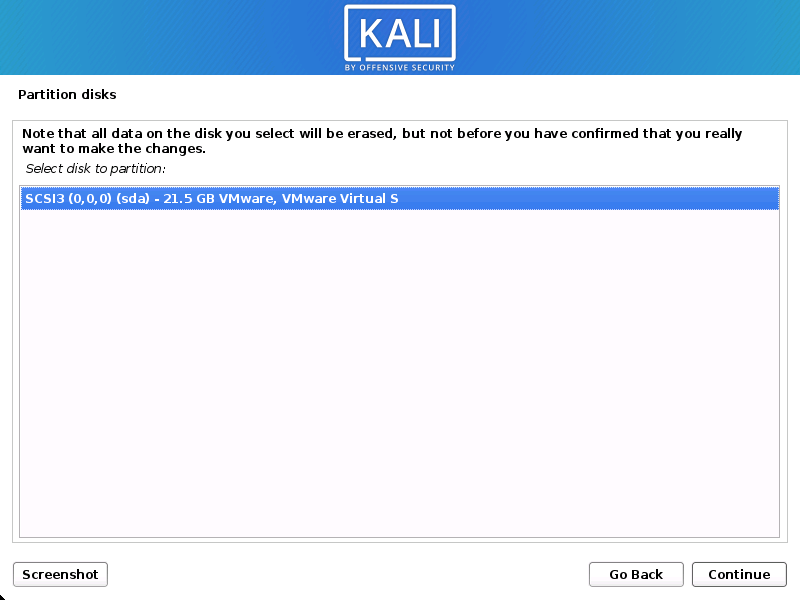
- The installer will now probe your disks and offer you various choices, depending on the setup.
In our guide, we are using a clean disk, so we have four options to pick from. We will select Guided — the entire disk, as this is the single boot installation for Kali Linux, so we do not want any other operating systems installed, so we are happy to wipe the disk.
If there is an pre-existing data on the disk, you will have have an extra option (Guided — use the largest continuous free space) than the example below. This would instruct the setup not to alter any existing data, which is perfect for for dual-booting into another operating system. As this is not the case in this example, it is not visible.
Experienced users can use the “Manual” partitioning method for more granular configuration options, which is covered more in our BTRFS guide.
If you want to encrypt Kali Linux, you can enable Full Disk Encryption (FDE), by selecting Guided — used entire disk and setup encrypted LVM. When selected, later on in the setup (not in this guide) prompt you to enter a password (twice). You will have to enter this password every time you start up Kali Linux.
- Select the disk to be partitioned.
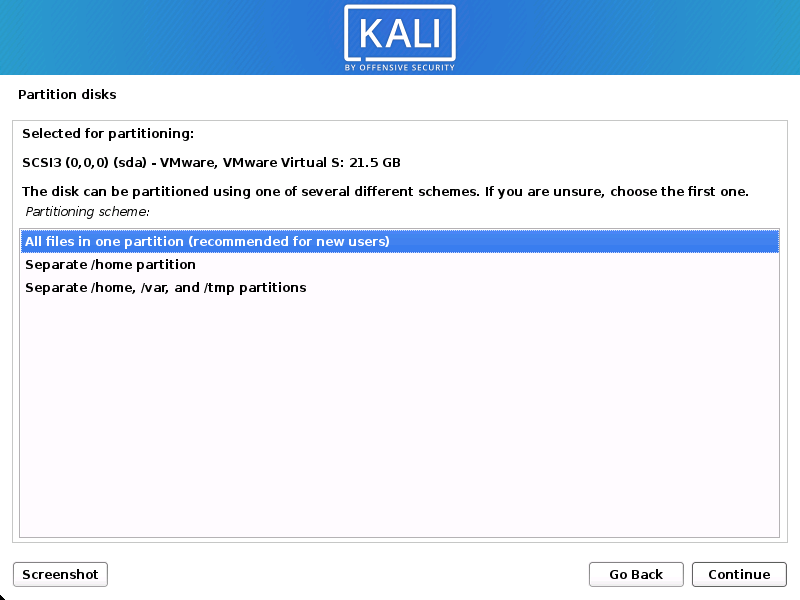
- Depending on your needs, you can choose to keep all your files in a single partition — the default — or to have separate partitions for one or more of the top-level directories.
If you’re not sure which you want, you want “All files in one partition”.
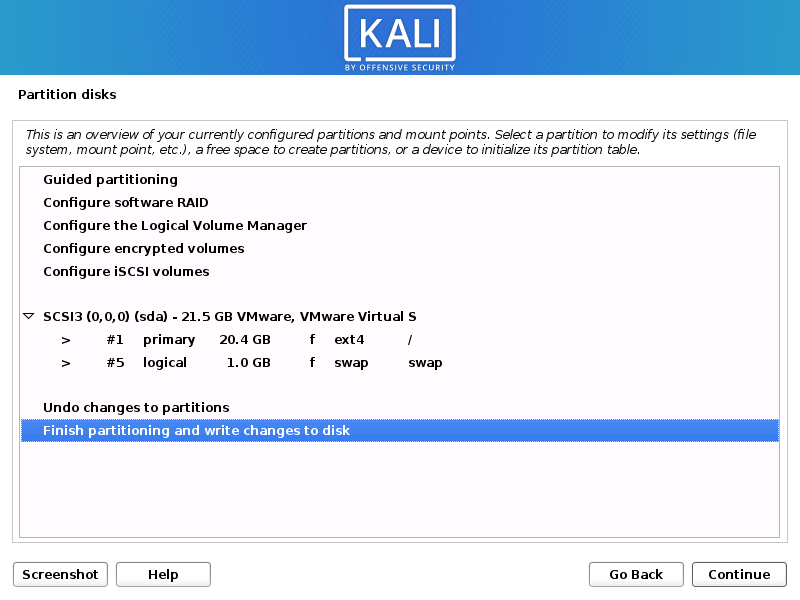
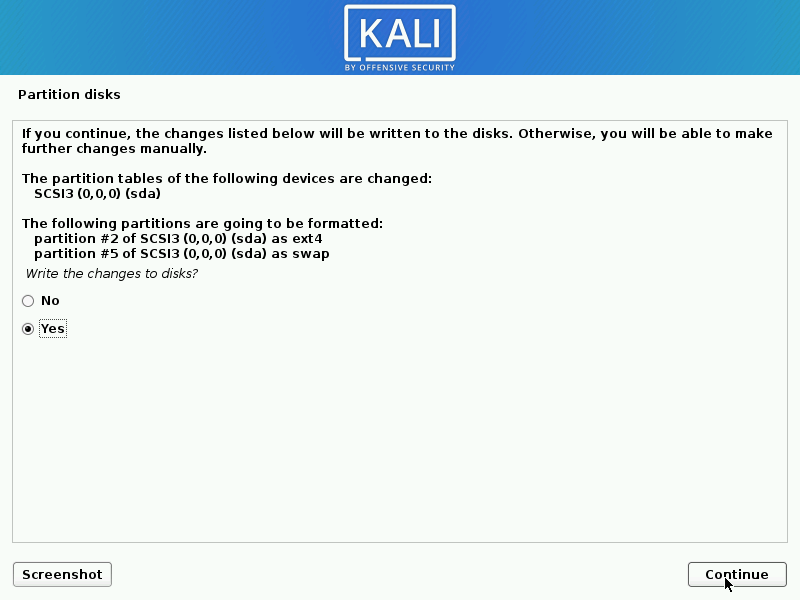
- Next, you’ll have one last chance to review your disk configuration before the installer makes irreversible changes. After you click Continue, the installer will go to work and you’ll have an almost finished installation.
Encrypted LVM
If enabled in the previous step, Kali Linux will now start to perform a secure wipe of the hard disk, before asking you for a LVM password.
Please sure a strong password, else you will have to agree to the warning about a weak passphrase.
This wipe may take “a while” (hours) depending on the size and speed of the drive.
If you wish to risk it, you can skip it.
Proxy Information
- Kali Linux uses a central repository to distribute applications. You’ll need to enter any appropriate proxy information as needed.

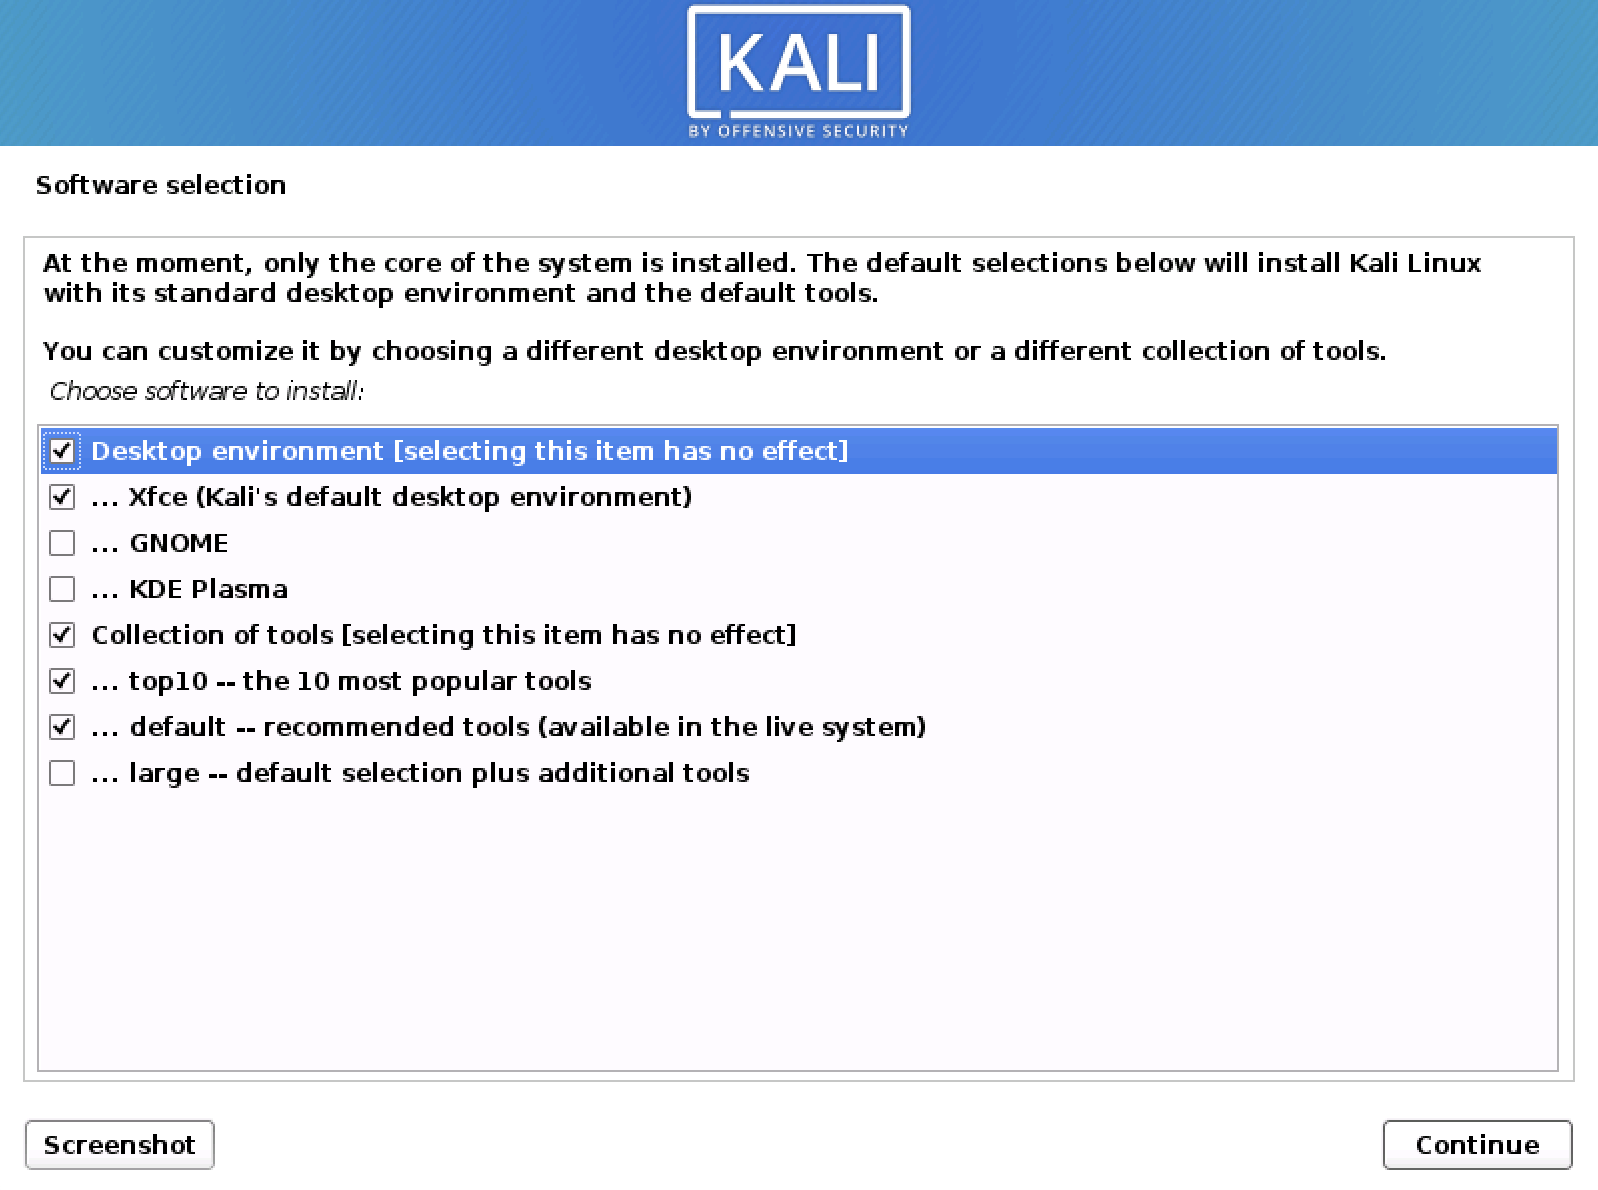
Metapackages
If network access was not setup, you will want to continue with setup when prompt.
If you are using the Live image, you will not have the following stage.
- Next you can select which metapackages you would like to install. The default selections will install a standard Kali Linux system and you don’t really have to change anything here.
Please refer to this guide if you prefer to change the default selections.
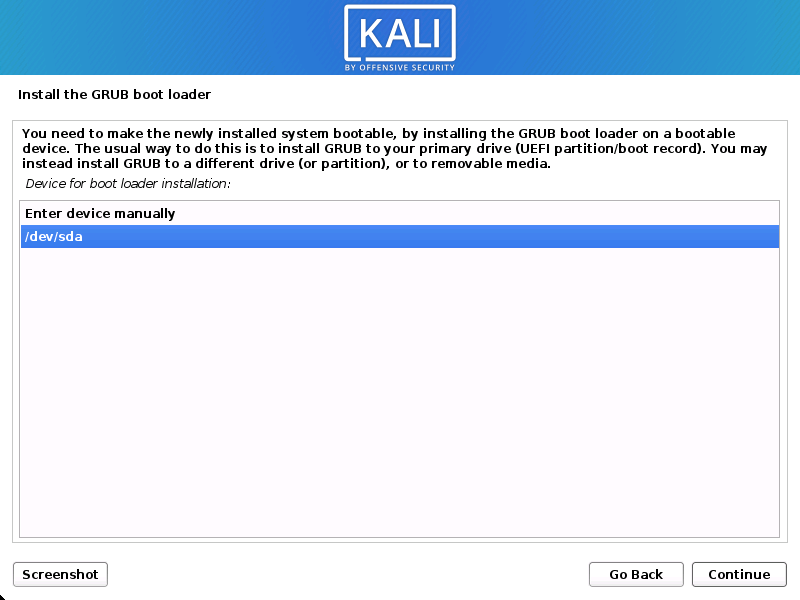
Boot Information
- Next confirm to install the GRUB boot loader.
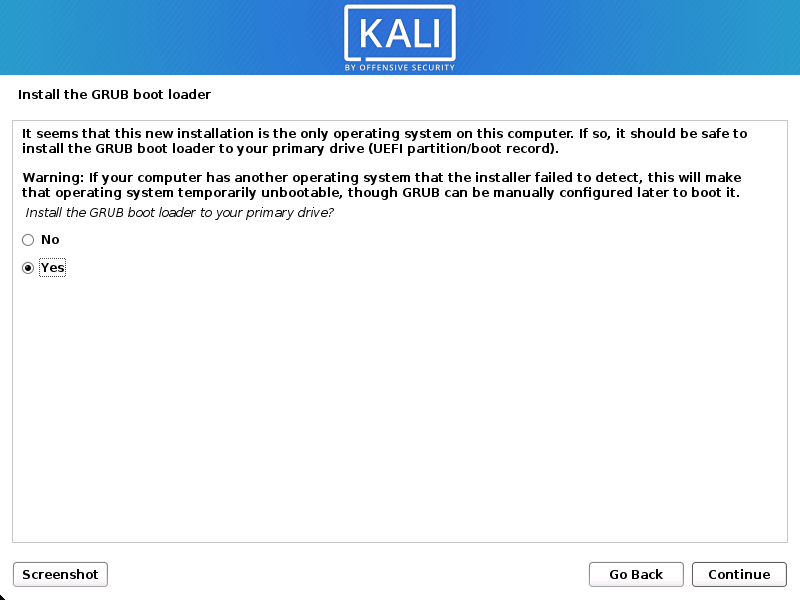
- Select the hard drive to install the GRUB bootloader in (it does not by default select any drive).
Reboot
- Finally, click Continue to reboot into your new Kali Linux installation.
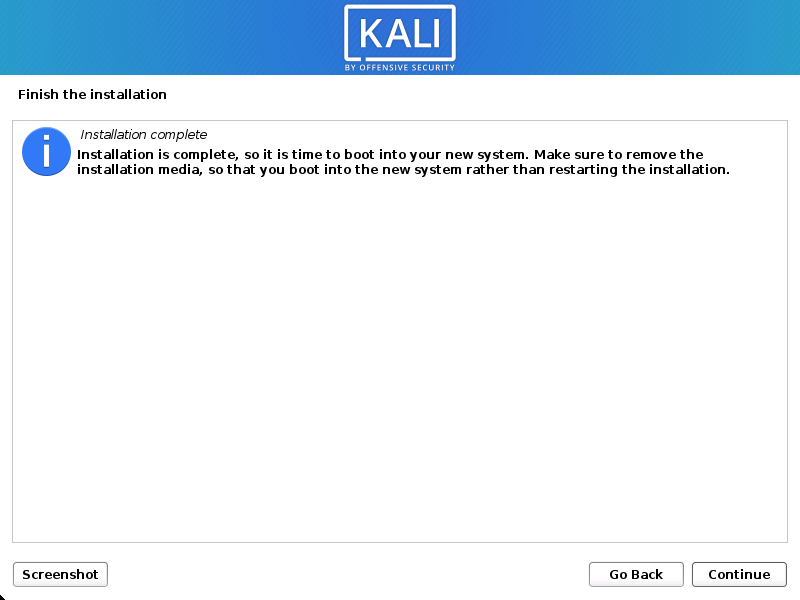
Post Installation
Now that you’ve completed installing Kali Linux, it’s time to customize your system.
The General Use section has more information and you can also find tips on how to get the most out of Kali Linux in our User Forums.
Updated on: 2021-Sep-27
Author: gamb1t
Источник


