- Kali linux lan install
- System Requirements
- Installation Prerequisites
- Preparing for the Installation
- Kali Linux Installation Procedure
- Language
- Network
- User Accounts
- Clock
- Encrypted LVM
- Proxy Information
- Metapackages
- Boot Information
- Reboot
- Post Installation
- Инструменты Kali Linux
- Список инструментов для тестирования на проникновение и их описание
- Описание LANs
- Справка по LANs
- Руководство по LANs
- Примеры запуска LANs
Kali linux lan install
Installing Kali Linux (single boot) on your computer is an easy process. This guide will cover the basic install (which can be done on bare metal or guest VM), with the option of encrypting the partition. At times, you may have sensitive data you would prefer to encrypt using Full Disk Encryption (FDE). During the setup process you can initiate an LVM encrypted install on either Hard Disk or USB drives.
First, you’ll need compatible computer hardware. Kali Linux is supported on amd64 (x86_64/64-Bit) and i386 (x86/32-Bit) platforms. Where possible, we would recommend using the amd64 images. The hardware requirements are minimal as listed in the section below, although better hardware will naturally provide better performance. You should be able to use Kali Linux on newer hardware with UEFI and older systems with BIOS.
Our i386 images, by default use a PAE kernel, so you can run them on systems with over 4 GB of RAM.
In our example, we will be installing Kali Linux in a fresh guest VM, without any existing operating systems pre-installed. We will explain other possible scenarios throughout the guide.
System Requirements
The installation requirements for Kali Linux will vary depending on what you would like to install and your setup. For system requirements:
- On the low end, you can set up Kali Linux as a basic Secure Shell (SSH) server with no desktop, using as little as 128 MB of RAM (512 MB recommended) and 2 GB of disk space.
- On the higher end, if you opt to install the default Xfce4 desktop and the kali-linux-default metapackage, you should really aim for at least 2 GB of RAM and 20 GB of disk space.
- When using resource-intensive applications, such as Burp Suite, they recommend at least 8 GB of RAM(and even more if it large web application!) or using simultaneous programs at the same time.
Installation Prerequisites
This guide will make also the following assumptions when installing Kali Linux:
- Using the amd64 installer image.
- CD/DVD drive / USB boot support.
- Single disk to install to.
- Connected to a network (with DHCP & DNS enabled) which has outbound Internet access.
We will be wiping any existing data on the hard disk, so please backup any important information on the device to an external media.
Preparing for the Installation
Download Kali Linux (We recommend the image marked Installer).
Burn The Kali Linux ISO to DVD or image Kali Linux Live to USB drive. (If you cannot, check out the Kali Linux Network Install).
Backup any important information on the device to an external media.
Ensure that your computer is set to boot from CD/DVD/USB in your BIOS/UEFI.
Kali Linux Installation Procedure
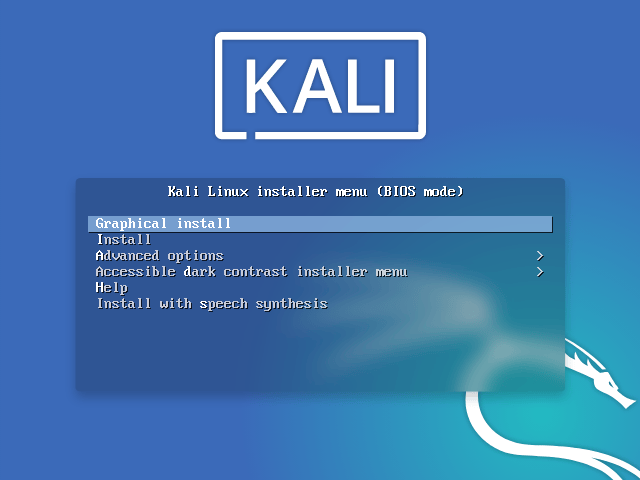
- To start your installation, boot with your chosen installation medium. You should be greeted with the Kali Linux Boot screen. Choose either Graphical install or Install (Text-Mode). In this example, we chose the Graphical install.
If you’re using the live image instead, you will see another mode, Live, which is also the default boot option. 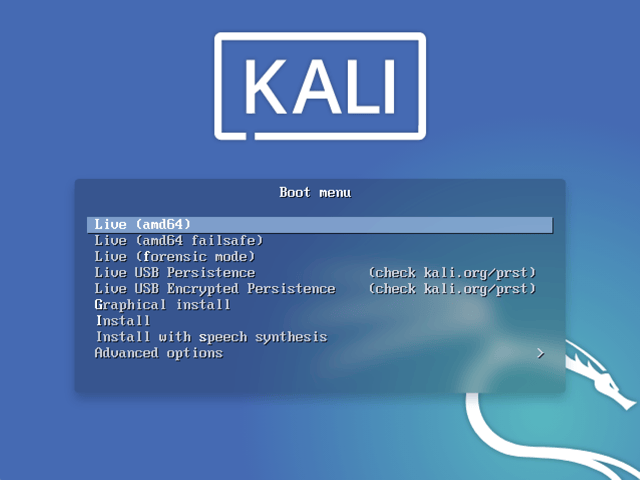
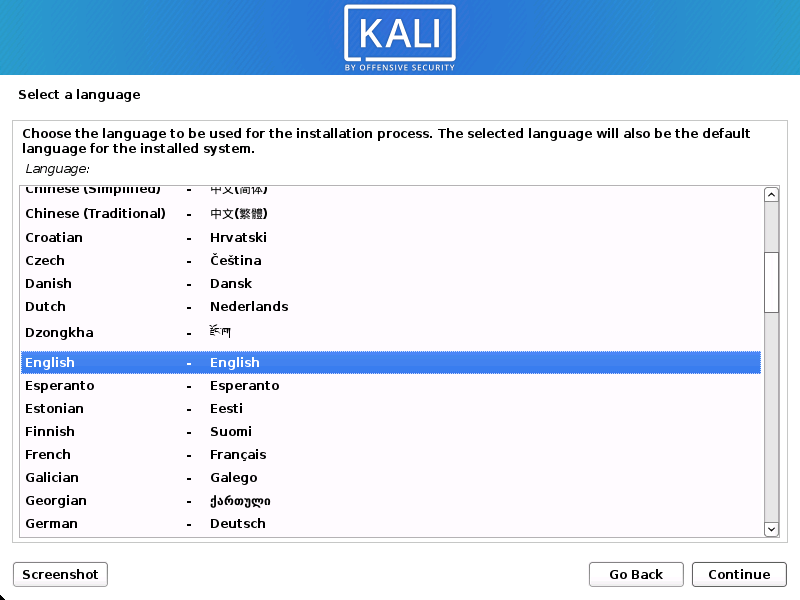
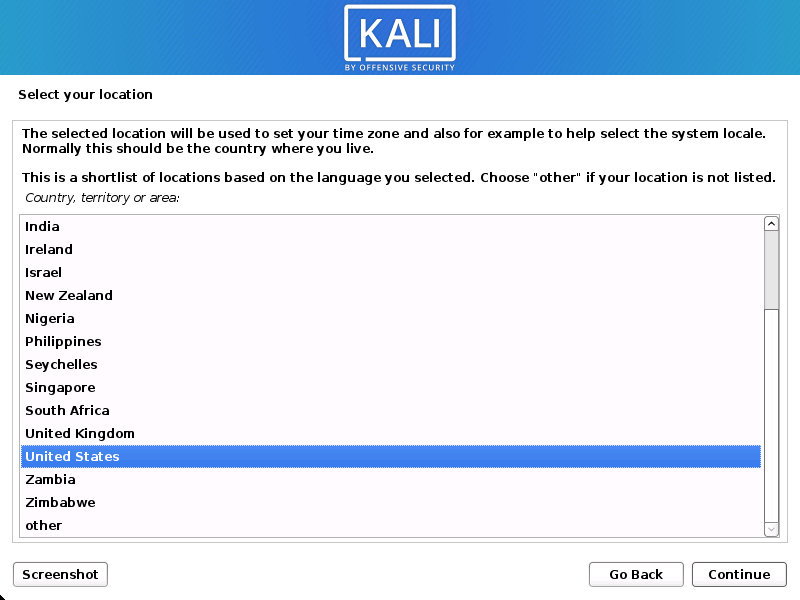
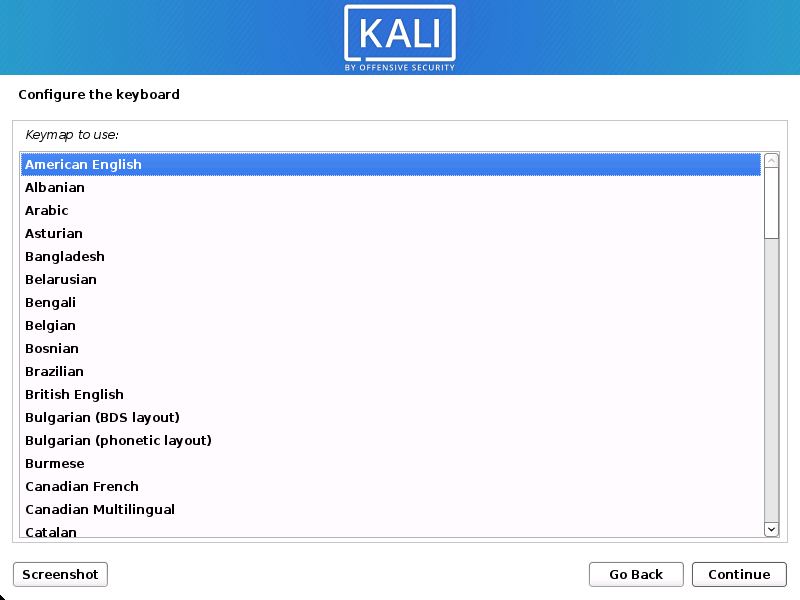
Language
- Select your preferred language. This will be used for both the setup process and once you are using Kali Linux.
- Specify your geographic location.
- Select your keyboard layout.
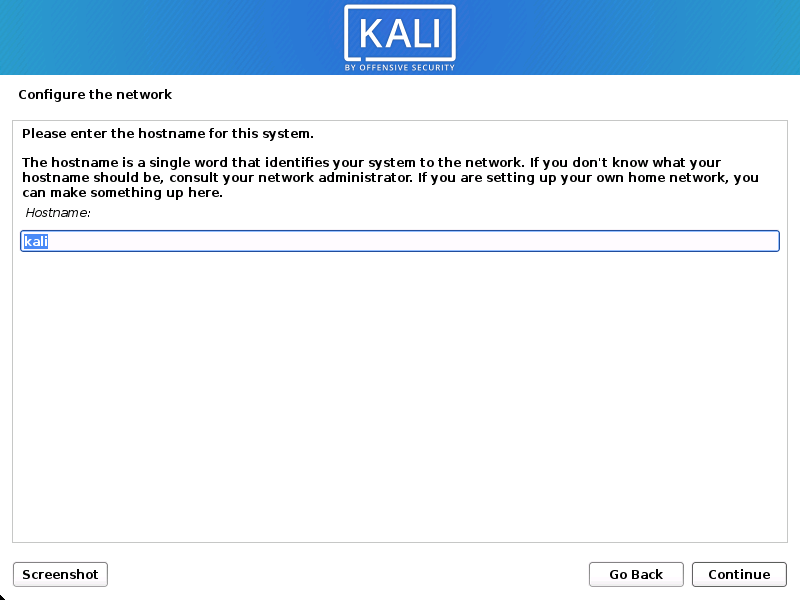
Network
- The setup will now probe your network interfaces, looks for a DHCP service, and then prompt you to enter a hostname for your system. In the example below, we’ve entered kali as our hostname.
If there is no network access with DHCP service detected, you may need to manually configure the network information or do not configure the network at this time.
- If there isn’t a DHCP service running on the network, it will ask you to manually enter the network information after probing for network interfaces, or you can skip.
- If Kali Linux doesn’t detect your NIC, you either need to include the drivers for it when prompted, or generate a custom Kali Linux ISO with them pre-included.
- If the setup detects multiple NICs, it may prompt you which one to use for the install.
- If the chosen NIC is 802.11 based, you will be asked for your wireless network information before being prompted for a hostname.
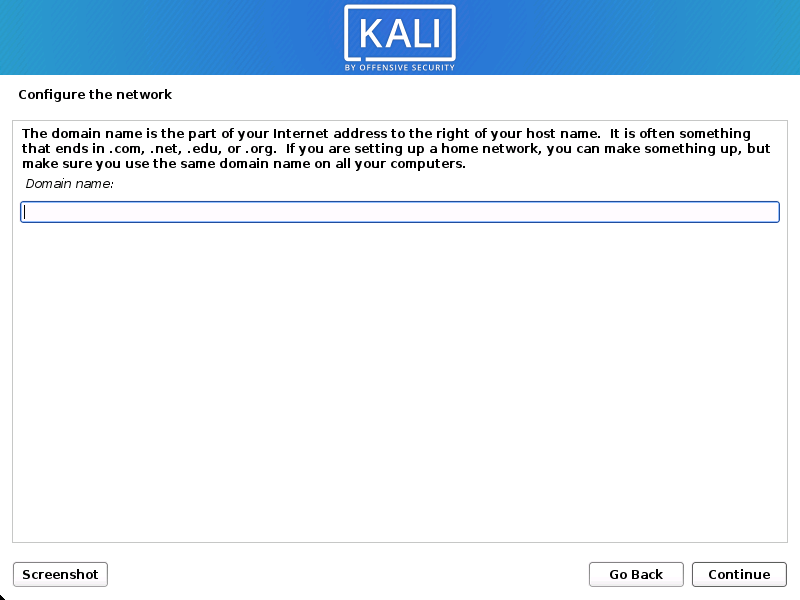
- You may optionally provide a default domain name for this system to use (values may be pulled in from DHCP or if there is an existing operating systems pre-existing).
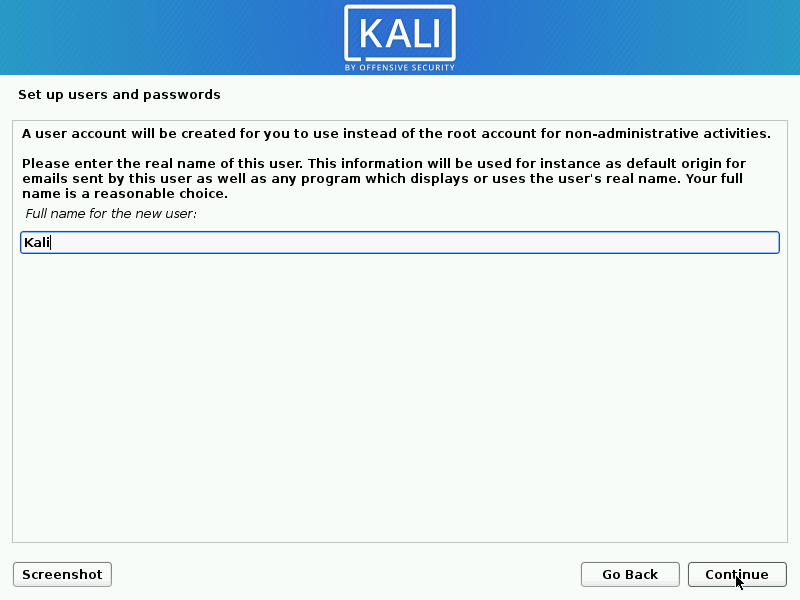
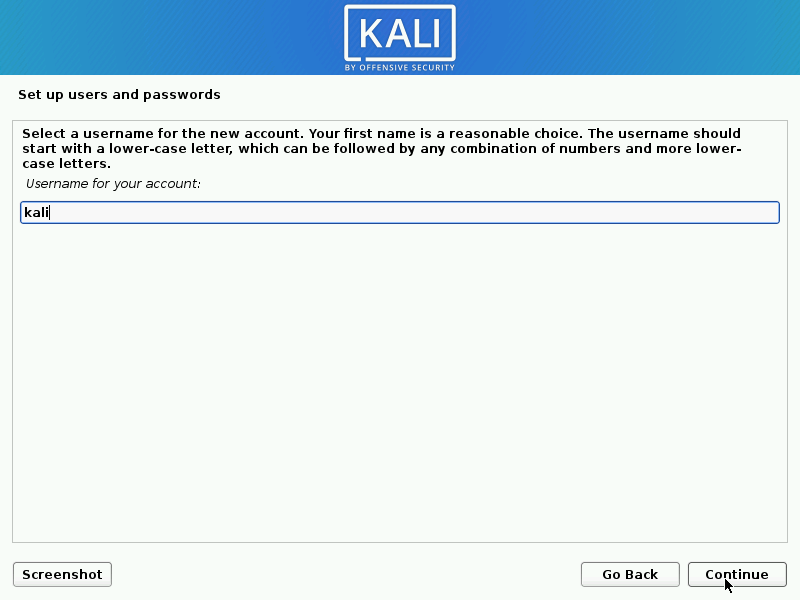
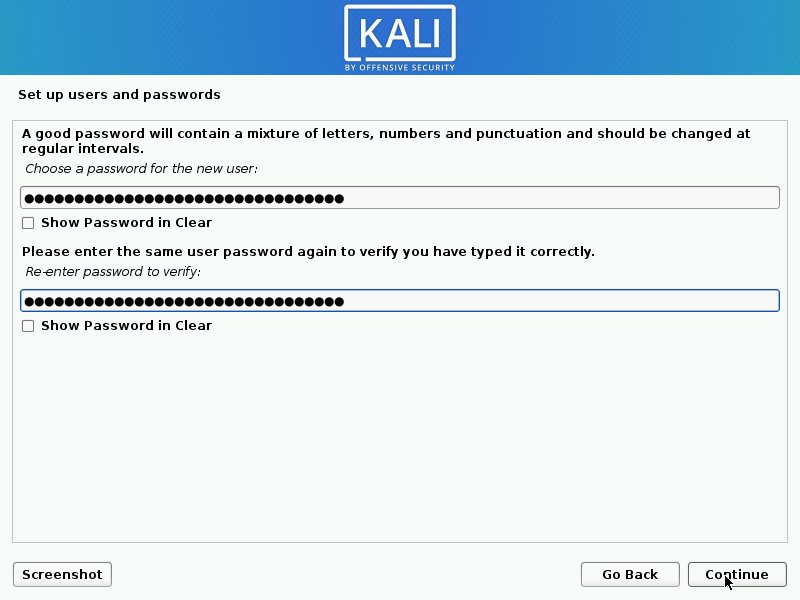
User Accounts
- Next, create the user account for the system (Full name, username and a strong password).
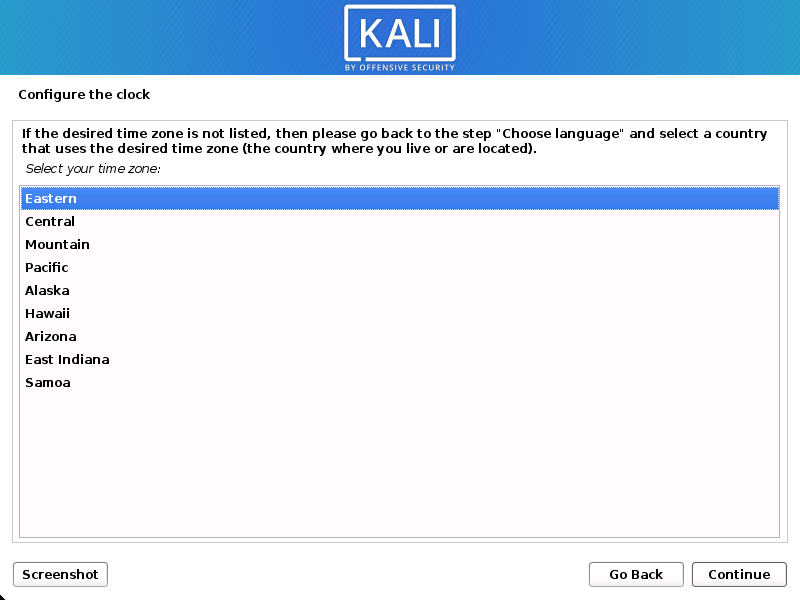
Clock
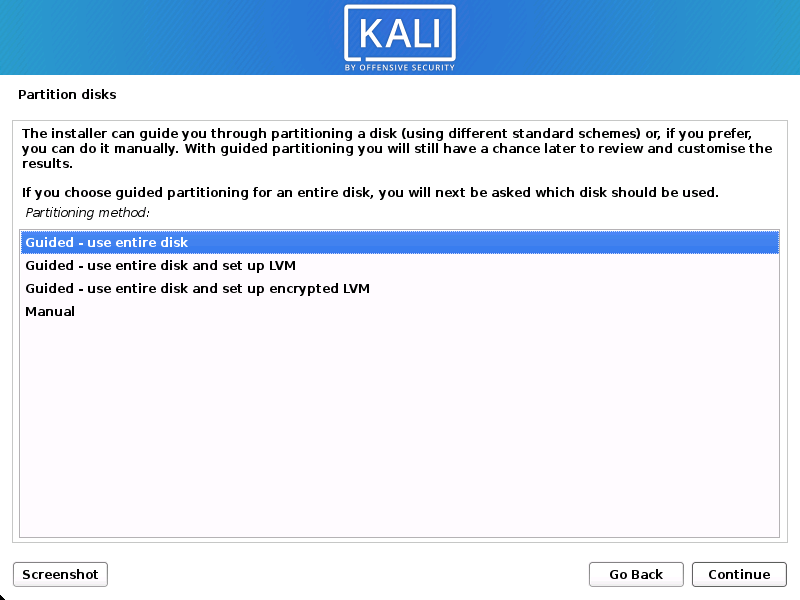
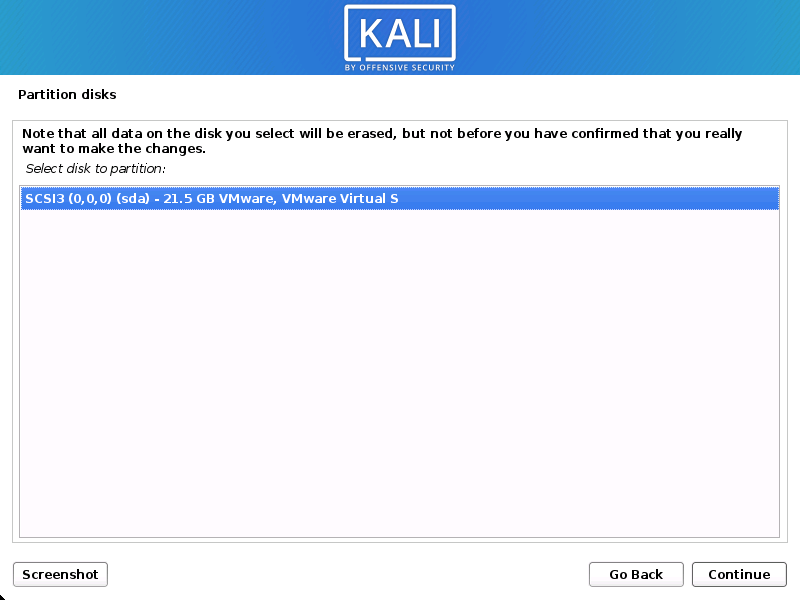
- The installer will now probe your disks and offer you various choices, depending on the setup.
In our guide, we are using a clean disk, so we have four options to pick from. We will select Guided — the entire disk, as this is the single boot installation for Kali Linux, so we do not want any other operating systems installed, so we are happy to wipe the disk.
If there is an pre-existing data on the disk, you will have have an extra option (Guided — use the largest continuous free space) than the example below. This would instruct the setup not to alter any existing data, which is perfect for for dual-booting into another operating system. As this is not the case in this example, it is not visible.
Experienced users can use the “Manual” partitioning method for more granular configuration options, which is covered more in our BTRFS guide.
If you want to encrypt Kali Linux, you can enable Full Disk Encryption (FDE), by selecting Guided — used entire disk and setup encrypted LVM. When selected, later on in the setup (not in this guide) prompt you to enter a password (twice). You will have to enter this password every time you start up Kali Linux.
- Select the disk to be partitioned.
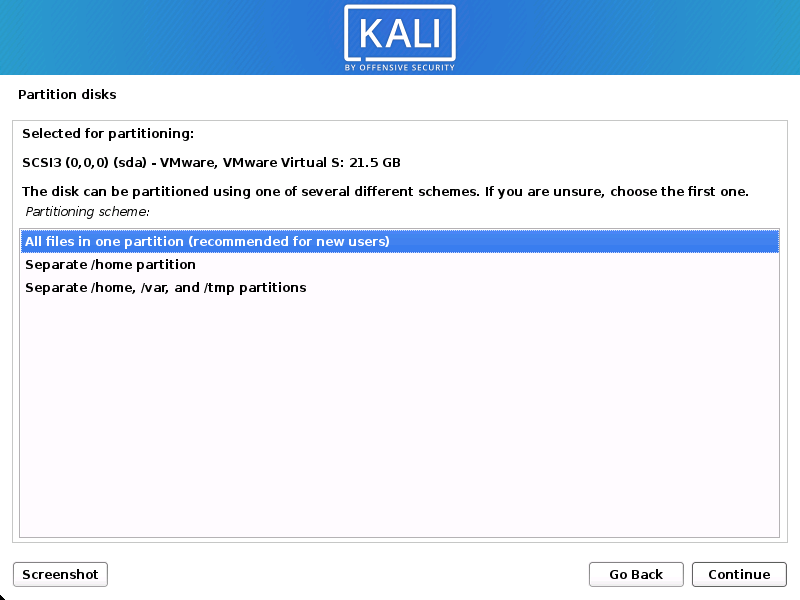
- Depending on your needs, you can choose to keep all your files in a single partition — the default — or to have separate partitions for one or more of the top-level directories.
If you’re not sure which you want, you want “All files in one partition”.
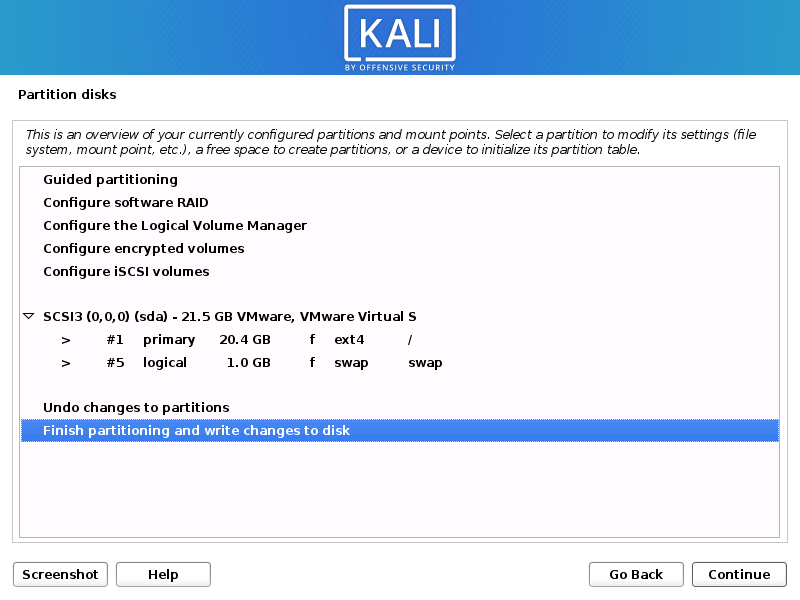
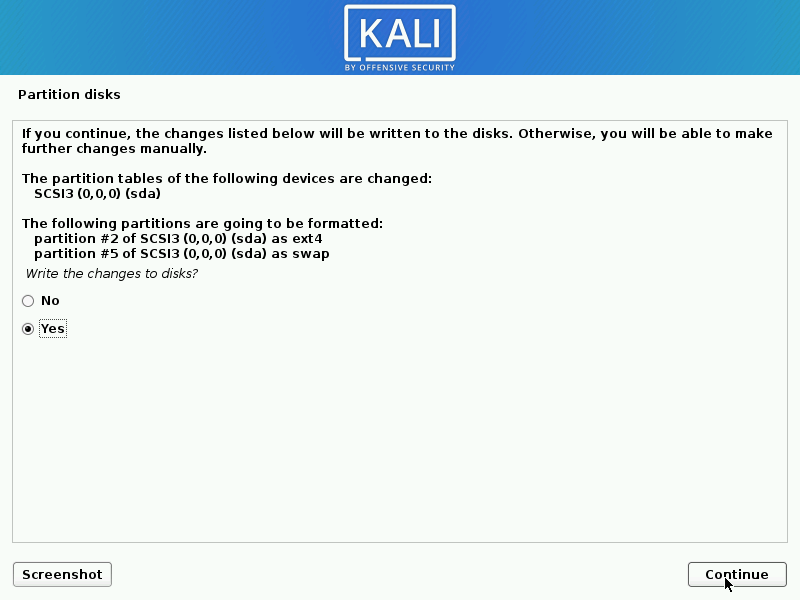
- Next, you’ll have one last chance to review your disk configuration before the installer makes irreversible changes. After you click Continue, the installer will go to work and you’ll have an almost finished installation.
Encrypted LVM
If enabled in the previous step, Kali Linux will now start to perform a secure wipe of the hard disk, before asking you for a LVM password.
Please sure a strong password, else you will have to agree to the warning about a weak passphrase.
This wipe may take “a while” (hours) depending on the size and speed of the drive.
If you wish to risk it, you can skip it.
Proxy Information
- Kali Linux uses a central repository to distribute applications. You’ll need to enter any appropriate proxy information as needed.

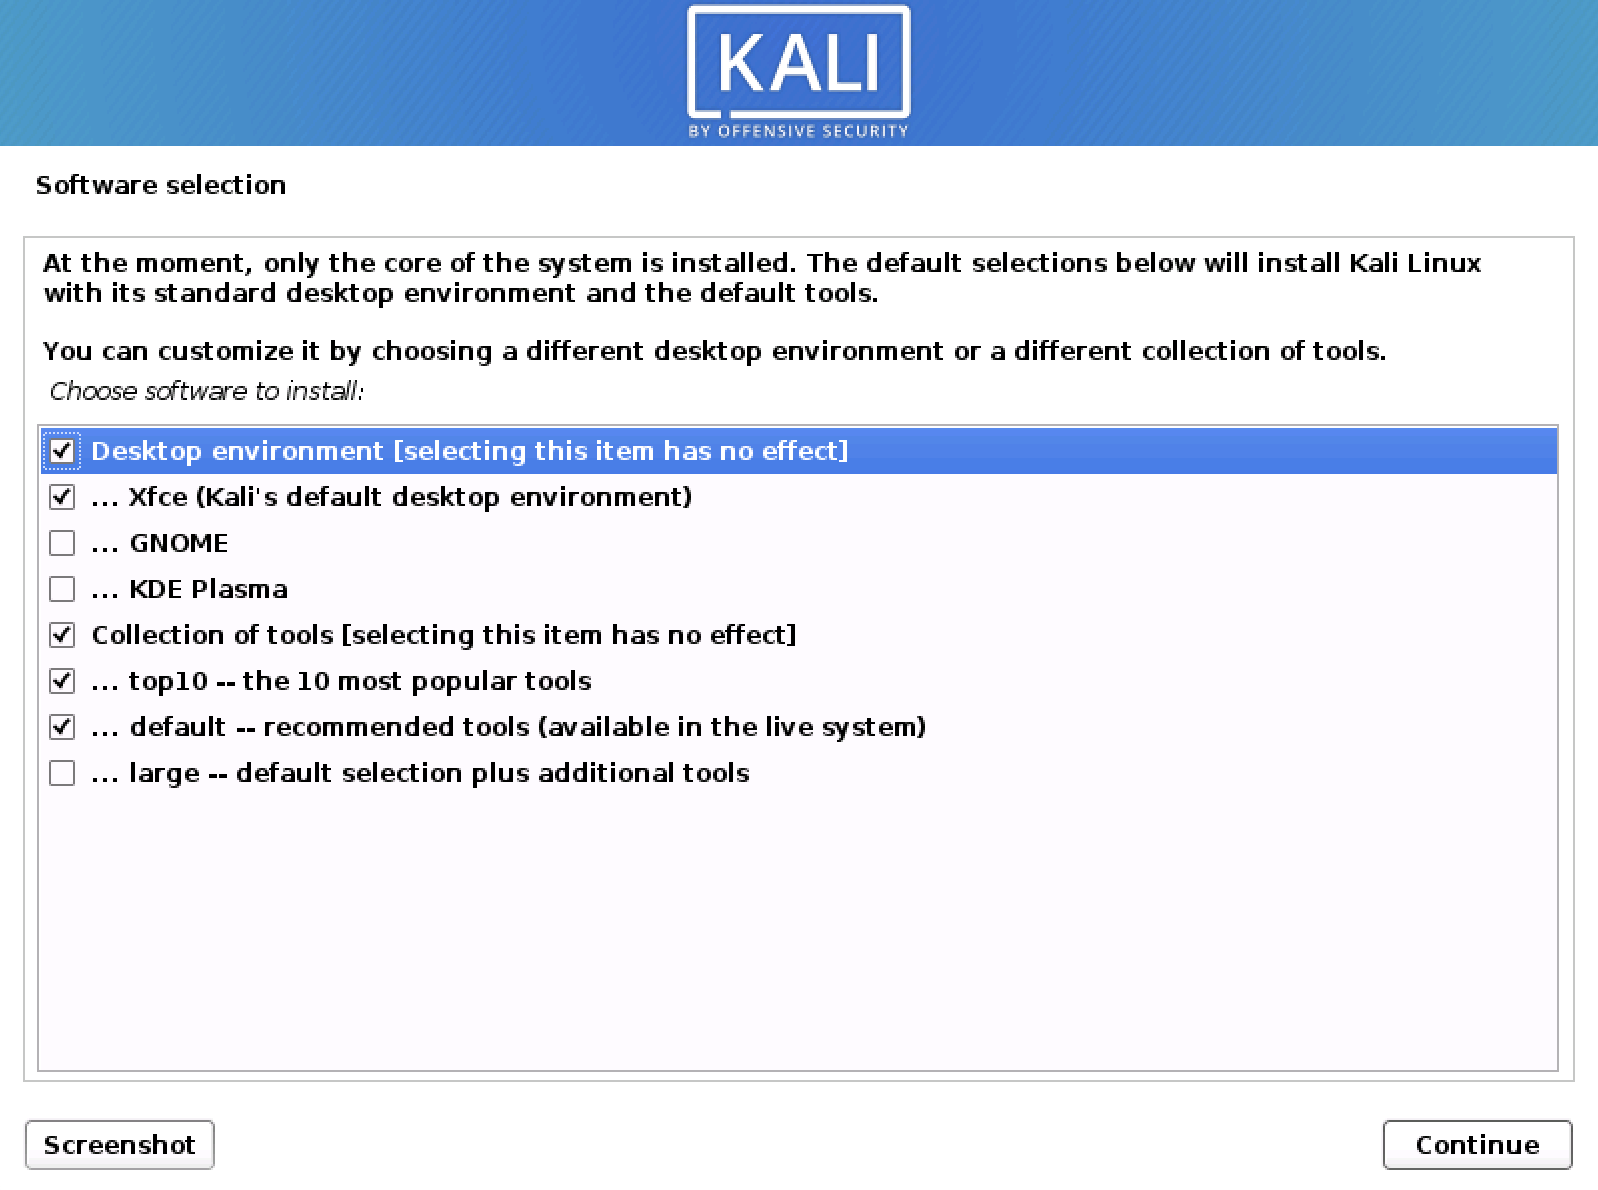
Metapackages
If network access was not setup, you will want to continue with setup when prompt.
If you are using the Live image, you will not have the following stage.
- Next you can select which metapackages you would like to install. The default selections will install a standard Kali Linux system and you don’t really have to change anything here.
Please refer to this guide if you prefer to change the default selections.
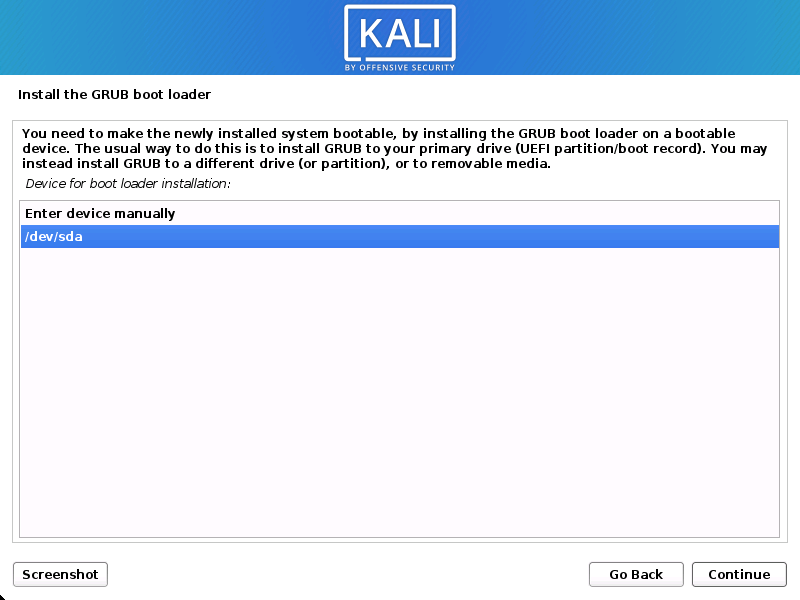
Boot Information
- Next confirm to install the GRUB boot loader.
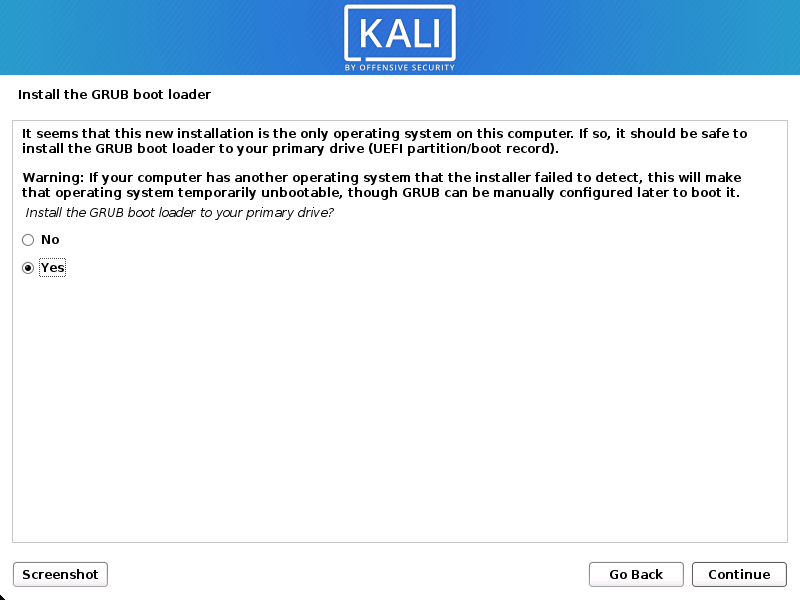
- Select the hard drive to install the GRUB bootloader in (it does not by default select any drive).
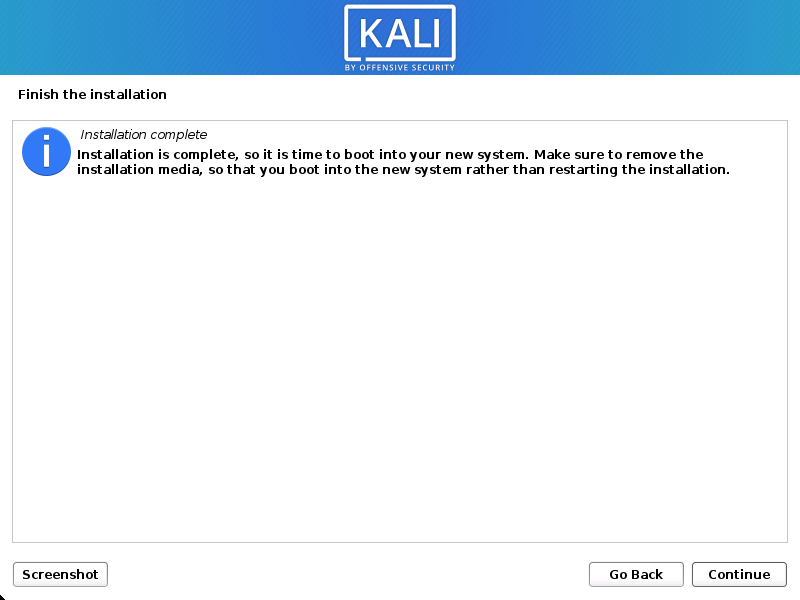
Reboot
- Finally, click Continue to reboot into your new Kali Linux installation.
Post Installation
Now that you’ve completed installing Kali Linux, it’s time to customize your system.
The General Use section has more information and you can also find tips on how to get the most out of Kali Linux in our User Forums.
Updated on: 2021-Sep-27
Author: gamb1t
Источник
Инструменты Kali Linux
Список инструментов для тестирования на проникновение и их описание
Описание LANs
LANs делает впрыск кода, глушит wifi и шпионит за wifi пользователями. Программа автоматически находит самых активных пользователей WLAN, затем шпионит за ним и/или вставляет произвольные HTML/JS в страницы, которые они посетили.
Индивидуально травит таблицы ARP целевой машины, роутера и, при необходимости, DNS сервера. Не травит кого-либо ещё в сети. Отображает самые интересные куски трафика и может делать вставку пользовательского html в страницы, который они посетили. После окончания работы проводит очистку.
Также может использоваться для постоянного глушения расположенных рядом WiFi сетей. Примерный радиус действия – 1 квартал, но сильно зависит от мощности вашей WiFi карты. Есть много настроек, которые позволяют глушить всех подряд или только одного клиента. Не может одновременно глушить WiFi и шпионить.
Зависимости: Linux, python-scapy, python-nfqueue (nfqueue-bindings 0.4-3), aircrack-ng, python-twisted, BeEF (опционально), nmap, nbtscan, tcpdump и совместимая с неразборчивым режимом беспроводная карта если вы не знаете IP вашей цели.
Автор: Dan McInerney
Справка по LANs
Нормальное использование:
- -b BEEF_HOOK_URL: копировать URL крюка BeEF для вставки в каждую страницу, которую посетит жертва, например: -b http://192.168.1.10:3000/hook.js
- -c ‘HTML CODE’: вставка произвольного HTML кода в страницы, которые посетит жертва; код HTML поместите в одиночные кавычки
- -d: открыть xterm с программой driftnet для просмотра всех изображений, который видят пользователи
- -dns ДОМЕН: спуфить (подменять) DNS ДОМЕНа. например -dns facebook.com будет делать DNS спуфинг каждого DNS запроса о facebook.com или subdomain.facebook.com
- -a: Спуфить каждый DNS запрос, который делает жертва, фактически запирая на странице портала; вместе с этой должна использоваться опция -r
- -r IP_АДРЕС: используется только с опцией -dns ДОМЕН; переправляет пользователя на этот IP_АДРЕС когда тот посещает ДОМЕН
- -u: печатает посещённые URL; обрезает до 150 символов и фильтрует url изображений/css/js/woff/svg, поскольку они загромождают вывод и неинтересны
- -i ИНТЕРФЕЙС: указать интерфейс; по умолчанию это первый интерфейс в ip route, например: -i wlan0
- -ip: нацелиться на этот IP
- -n: выполнить быстрое сканирование цели с помощью nmap
- -na: выполнить агрессивное nmap сканирование в фоне и вывести в [IP адрес жертвы].nmap.txt
- -p: печатать имя/пароли для сделанных FTP/IMAP/POP/IRC/HTTP, HTTP POST, всех сделанных поисков, входящих/исходящих писем и IRC messages sent/received
- -pcap PCAP_FILE: парсить все пакеты в файле pcap file; требуется аргумент -ip [IP адрес цели]
- -rmac MAC_РОУТЕРА: введите здесь MAC адрес роутера если у вас проблемы с автоматическим его определением скриптом
- -rip IP_РОУТЕРА: введите здесь IP роутера, если у вас проблемы при автоматическом его определении скриптом
- -v: показать URL в вербальном режиме, что означает не обрезать их до 150 символов как при -u
- —jam: глушить все или некоторые беспроводные точки 2.4GHz и клиентов в пределах досягаемости; если необходимо, то вместе с этим используйте аргументы ниже
Глушилка Wifi:
- -s MAC_адрес_для_пропуска: Задать MAC для исключения из деаутентификации. Пример: -s 00:11:BB:33:44:AA
- -ch КАНАЛ: Ограничить wifijammer одним каналом
- -m МАКСИМУМ: Максимальное число клиентов для деаутентификации. Используйте при передвижении для предотвращения деаутентификации клентов/ТД за пределами текущего диапазона.
- -no: Не очищать список деаутентификации, когда достигнуто максимальное (-m) количество комбинаций клиентов/ТД. Нужно использовать вместе с -m. Пример: -m 10 -n
- -t ИНТЕРВАЛ_ВРЕМЕНИ: Время между каждым пакетом деаутентификации. По умолчанию – максимум. Если вы видите ошибки scapy вроде ‘no buffer space’ попробуйте: -t .00001
- —packets ЧИСЛО: Количество пакетов для отправки за один приём деаутентификации. По умолчанию это 1 пакет.
- —directedonly: Не отправлять пакеты деаутентификации на широковещательные адреса ТД, а только отправлять их парам клиент/ТД
- —accesspoint ROUTER_MAC: Введите MAC адрес конкретной ТД для в качестве цели.
Руководство по LANs
Страница man отсутствует.
Очистка
При получении Ctrl-C:
- Отключает IP форвардинг
- Очищает файервол iptables
- Индивидуально восстанавливает маршрутизатор и таблицы ARP жертвы
Примеры запуска LANs
Протестировано на Kali. В следующих примерах атакующей машиной будет 192.168.0.5, а 192.168.0.10 будет жертвой.
Популярное использование:
Активное обнаружение цели для ARP спуфинга и вывода всех интересных не-HTTPS данных, которые они отправляют или запрашивают. Поскольку нет опции -ip, то будет сделано ARP сканирование сети, сравнение его с живым неразборчивым захватом и составлен список всех клиентов сети. Пробует присвоить тэг целям по Windows именам netbios и печатает, как много пакетов данных они отправляют/получают. Возможность захватывать пакеты с данными, которые они отправляют, очень зависит от физической близости и мощности вашей сетевой карты. Нажмите Ctrl-C, когда вы готовы и выбрали цель, которую будете ARP спуфить.
Поддерживается перехват и сбор данных из следующих протоколов: HTTP, FTP, IMAP, POP3, IRC. Напечатает первые 135 символов URL и проигнорирует URL, оканчивающиеся на .jpg, .jpeg, .gif, .css, .ico, .js, .svg и .woff. Также напечатает для всех протоколов введённые имена/пароли, сделанные поиски на любом сайте, отправленные/полученные имейлы и отправленные/полученные сообщения IRC.
Запуск LANs.py без аргументов даст вам список активных целей, а при выборе одной из них, программа будет работать как простой ARP спуфер.
Ещё пример популярного использования:
- -d: открыть xterm с driftnet для просмотра всех изображений, которые видят на атакуемых машинах
- -ip: IP адрес цели и пропуск активного выбора цели в начале
HTML инъекция:
Вставка URL ловушки BeEF в страницы, которые посещает жертва. Это просто оборачивает аргумент в тэг
Источник


