- Kali linux live kde
- Where Should You Build Your ISO?
- Kali Environment
- Getting Ready — Setting Up The build-script Kali System
- Building an Updated Live Image
- Building an Updated Installer Image
- Non-Kali Debian-Based Environment
- Setting Up The build-script Non-Kali Debian-Based System
- Configuring The Kali ISO Build (Optional)
- Building Kali Live With Different Desktop Environments
- Controlling The Packages Included In Your Build
- Overlaying Files In Your Build
- Build Hooks, Binary and Chroot
- Building a Kali Linux ISO for Different Architectures (Optional)
- Building a Kali Linux ISO for Older i386 Architectures
- Using A Custom Network Mirror For Building (Optional)
- Testing Built Image
- Установка KDE в Kali Linux
- Устанавливаем KDE в Kali Linux
- Шаг 1: Загрузка компонентов
- Шаг 2: Настройка менеджера дисплеев
- Шаг 3: Вход и настройка
- Шаг 4: Удаление старой оболочки
- Решение неполадок с установкой KDE в Kali Linux
Kali linux live kde
Building a customized Kali Linux image is not as complex as you may be thinking. It is easy, fun, and rewarding! Kali Linux traditionally, has been a Live Image, but since Kali 2020.1 an Installer Image was introduced. Both these images have different functions, and are also built in different ways.
- Live Image — allows you to try Kali, without altering the system (making it create for USB). It is created using live-build
- Installer Image — allows for you to customize Kali by picking packaging during installation, such as picking the desktop environment as well as what metapackages get installed. This image is powered by simple-cdd(which uses debian-cd to make Debian-Installer ).
You can configure virtually any aspect of your Kali ISO build, such as adding packages from outside of Kali network repositories, unattended installations to changing the default wallpaper. Our build-scripts provides a framework that uses a configuration set to automate and customize all aspects of building the images. The Kali Linux development team use the same build-scripts to produce the official Kali ISO releases.
Where Should You Build Your ISO?
Ideally, you should build your custom Kali ISO from within a pre-existing Kali environment, as there is less chance of items going wrong. However, it is possible to generate the images on a Non-Kali but still a Debian-Based system.
Kali Environment
Getting Ready — Setting Up The build-script Kali System
We first need to prepare the Kali ISO build environment by installing and setting up the required packages with the following commands:
Building an Updated Live Image
Now you can simply build an updated Kali ISO (with our default configuration) by entering the live-build-config/ directory and running our build.sh wrapper script, as follows:
The build.sh script will take a while to complete, as it downloads all of the required packages needed to create your ISO. Good time for a drink.
Building an Updated Installer Image
By default, it will generate a Live Image. If you want an Installer Image, add —installer :
We are using the —verbose to output more on the screen rather than it being captured in just the build.log output. If you want even more output, you can use —debug instead, which will then give more information.
Non-Kali Debian-Based Environment
Setting Up The build-script Non-Kali Debian-Based System
You can build an Kali ISO on a Debian-based systems other than Kali Linux. The instructions below have been tested to work with both Debian and Ubuntu.
First, we prepare the system by ensuring it is fully updated, then proceed to download the Kali archive keyring and packages:
Note: You may need to check that kali-archive-keyring_20YY.X_all.deb & live-build_20YYMMDD_all.deb are the latest files.
With that completed, we install some additional dependencies and the previously downloaded files:
With the environment all prepared, we start the process by setting up the build-script profile and clone out the build config:
At this point, depending on the host OS and its version, we may need to edit build.sh to bypass a version check for debootstrap. We do this by commenting out the exit 1 below:
With the above change made, build.sh should look similar:
At this point, we can build our ISO as normal
Configuring The Kali ISO Build (Optional)
If you want to customize your Kali Linux ISO, this section will explain some of the details. Through the kali-config/ directory, there are a wide range of customization options, which are well-documented for live-build page. Simple-CD is a little more limited with options. For the impatient, here are some of the highlights.
Building Kali Live With Different Desktop Environments
Since Kali 2.0, we now support built in configurations for various desktop environments, including Xfce (default), Gnome, KDE, E17, I3WM, LXDE, MATE. To build any of these, you would use syntax similar to the following:
This is not required with the installer images, as it includes Xfce, Gnome and KDE by default. You can add others by including their packages as explained in the section below.
Controlling The Packages Included In Your Build
The list of packages included in your build will be present in the the respective kali-config/ directory. For example, if you’re wanting to edit:
- The default Installer ISO, you would use the following package lists file — kali-config/installer-default/packages
- The default Live ISO, you would use the following package lists file — kali-config/variant-default/package-lists/kali.list.chroot
- A non-default Live ISO desktop environment, such as Gnome — kali-config/variant-gnome/package-lists/kali.list.chroot (You can replace Gnome with any supported desktop environments)
By default, these lists will includes the kali-linux-default metapackage, as well as some others. These can be commented out and replaced with a manual list of packages to include in the ISO for greater granularity.
Overlaying Files In Your Build
With Live images, you have the option to include additional files or scripts in your build by overlaying them on the existing file-system, inside the includes.
For example, if we wanted to include our own custom script into the /root/ directory of the ISO (this would correspond to the chroot stage), then we would drop this script file in the kali-config/common/includes.chroot/ directory before building the ISO.
For more information see the live-build documentation.
Build Hooks, Binary and Chroot
For live images, live-build supports hooks allows us to “hook scripts” in various stages of the Kali ISO live image. For more detailed information about hooks and how to use them, refer to the live-build manual.
As an example, we recommend you check out the existing hooks in kali-config/common/hooks/ .
Building a Kali Linux ISO for Different Architectures (Optional)
By default, the build-script will generate the Kali image based on the architectures of the current operating system. If you wish to alter this:
- x64: ./build.sh —verbose —arch amd64
- x86: ./build.sh —verbose —arch i386
Building a Kali Linux ISO for Older i386 Architectures
The Kali Linux i386 ISO has PAE enabled. If you require a default kernel for older hardware with PAE disabled, you will need to rebuild a Kali Linux ISO. The rebuilding process is much the same as described above, except that the 686-pae parameter needs to be changed to 686 in auto/config before building:
Using A Custom Network Mirror For Building (Optional)
If you build multiple images, you will find you are often waiting on build.sh to finish. There are a few ways to speed up the build process, such as:
- Building Installer images as they often build quicker than Live images
- Have less packages included (such as switching kali-linux-default to kali-linux-top10 )
- Improve access to packages
You often find that you are waiting on packages to be pulled down. You can either setup a local proxy on the same machine (such as apt-cacher or apt-cacher-ng ). Alternatively, you can setup a local network mirror.
We can instruct the build-script to use a different mirror, by doing the following (assuming our network mirror is located at http://192.168.0.101/kali ):
Testing Built Image
After producing the issue, you can treat it like any Kali base image, so you can install it (either on bare metal or virtually), or copy to a CD/DVD/USB.
If you are wanting to quickly test the image before putting it “in production”, we can use qemu (and ovmf for UEFI). First we install the packages:
Next we produce a hard disk to use:
Afterwards, to boot from the image produced (we will be using the Live image on x64):
The above will be a “BIOS” boot. For a “UEFI” boot:
Note: We have set UEFI configuration file to be read only
Updated on: 2021-Sep-27
Author: g0tmi1k
Источник
Установка KDE в Kali Linux

Активные пользователи дистрибутивов операционной системы Linux иногда ставят перед собой задачу смены среды рабочего стола по разным причинам. Обладатели Kali Linux не стали исключением, ведь функциональность этой сборки позволяет поставить практически любое из доступных окружений. В рамках сегодняшней статьи мы бы хотели продемонстрировать процедуру смены графической оболочки на известную KDE.
Устанавливаем KDE в Kali Linux
KDE — одна из самых популярных графических оболочек, которая является стандартной во многих дистрибутивах. На официальном сайте Kali присутствует возможность загрузить сборку с этой средой, поэтому если вы еще не установили ОС и желаете иметь KDE, настоятельно рекомендуем сразу скачивать подходящую версию. Детальные инструкции по инсталляции платформы вы найдете в другом нашем материале по следующей ссылке, а мы же переходим непосредственно к установке оболочки.
Шаг 1: Загрузка компонентов
Вместе с изменениями внешнего вида рабочего стола пользователи получают ряд дополнительных функций — стандартные программы, расширенные настройки интерфейса и многое другое. Все это тоже нужно скачать и установить. Благо вся процедура производится через стандартную консоль с помощью одной команды.
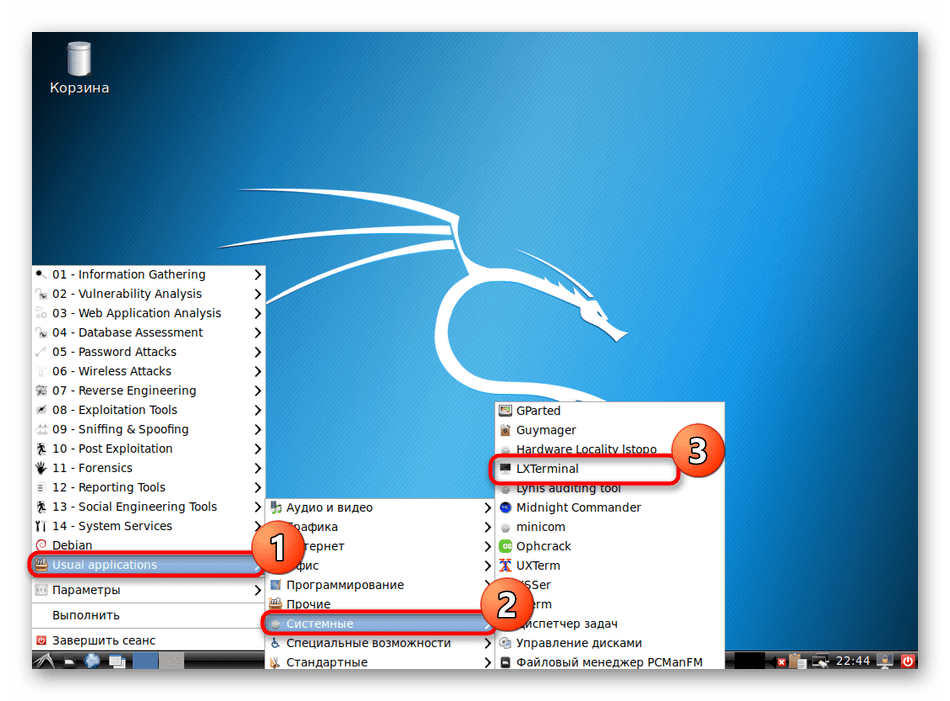
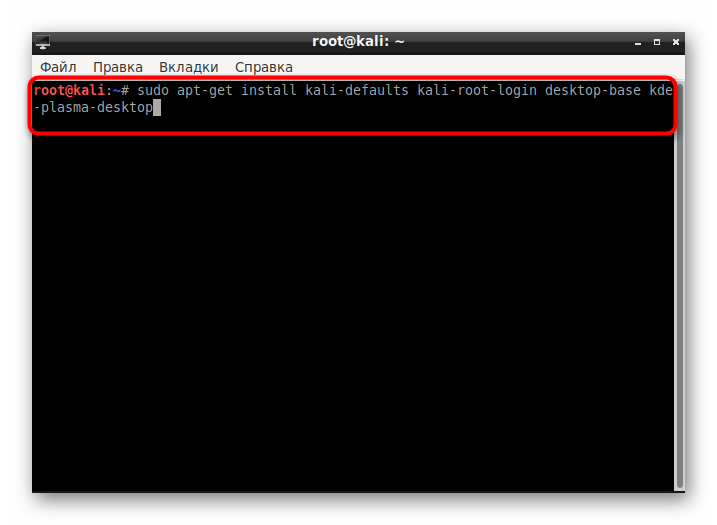
- Откройте меню, перейдите в раздел «Usual applications», выберите раздел «System» или «Системные» и отыщите там приложение «Терминал».
Напишите команду apt-get install kali-defaults kali-root-login desktop-base kde-plasma-desktop , если хотите установить KDE Plasma, затем нажмите на клавишу Enter.
Юзерам, которые желают установить только набор стандартных компонентов, версию для нетбуков или полный пакет KDE, советуем обратить на три отдельные команды, представленные далее.
apt-get install kali-defaults kali-root-login desktop-base kde-plasma-netbook
apt-get install kali-defaults kali-root-login desktop-base kde-standard
apt-get install kali-defaults kali-root-login desktop-base kde-full
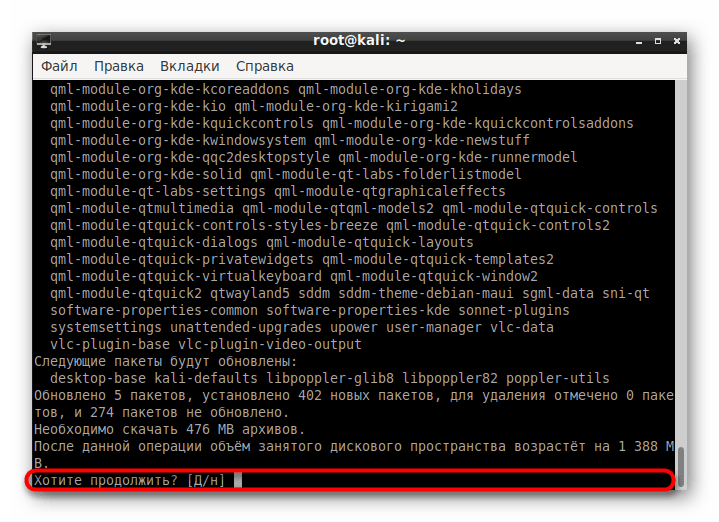
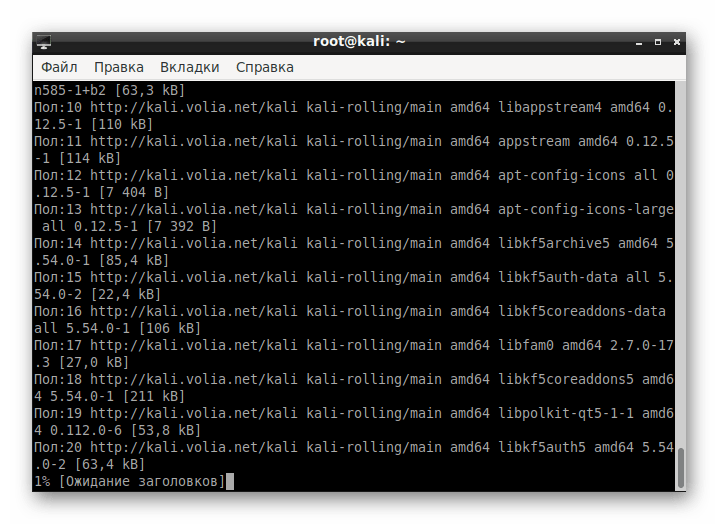
Ожидайте скачивания и установки пакетов. Скорость выполнения этого этапа зависит от стабильности интернет-соединения и мощности компьютера.
Шаг 2: Настройка менеджера дисплеев
За работоспособность графической оболочки отвечает Менеджер дисплеев. Для Линукс их было разработано несколько, чтобы обеспечить корректное функционирование самых разных сред рабочего стола. Во время установки KDE также будет добавлен новый Менеджер, его потребуется настроить:
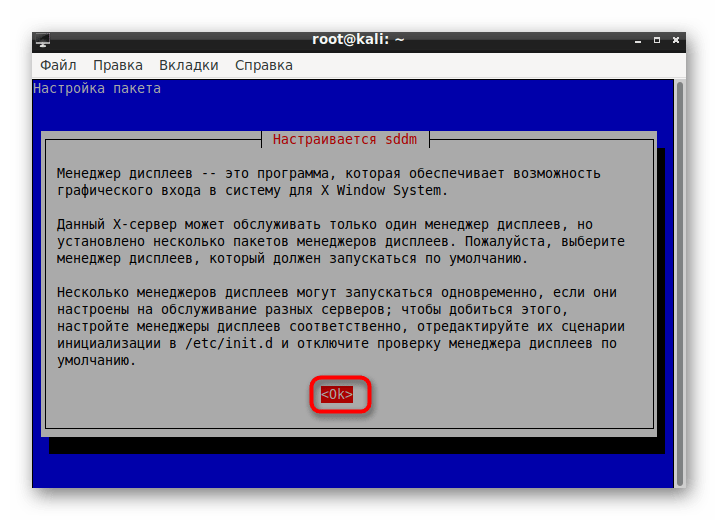
- После определенного момента во время загрузки пакетов в консоли всплывет отдельное окно с уведомлением о настройке Менеджера дисплеев. Подтвердите переход к конфигурации, выбрав «ОК».
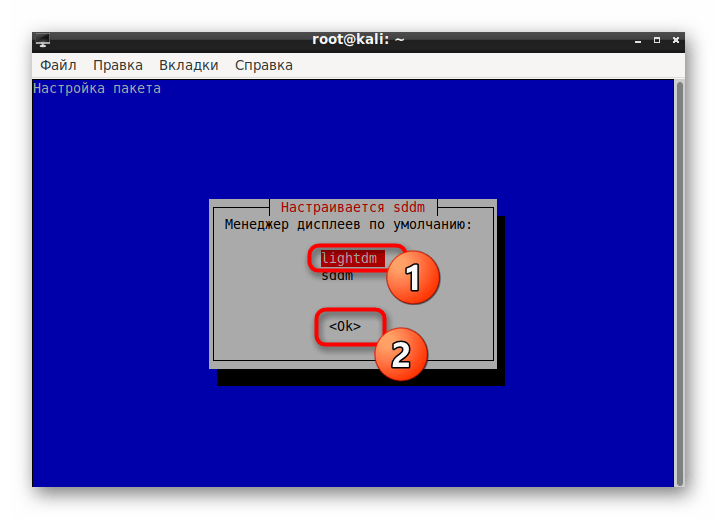
С помощью стрелочек на клавиатуре переключите стандартный Менеджер на lightdm, затем щелкните на «ОК».
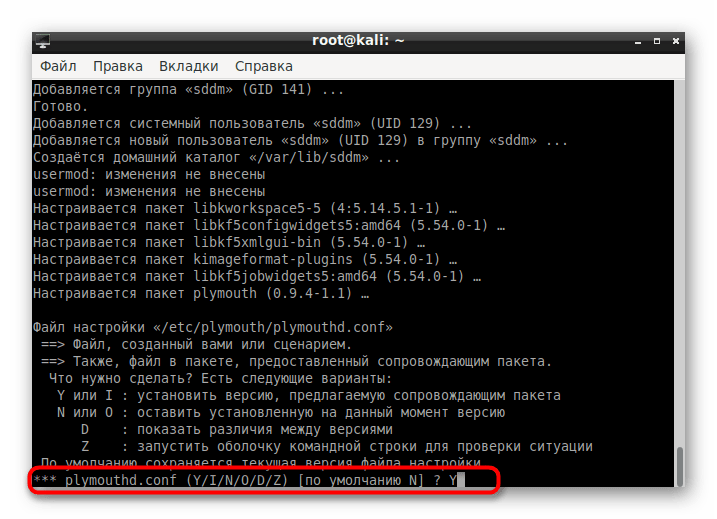
В «Терминале» подтвердите внесение изменений в системные файлы вариантом Y.
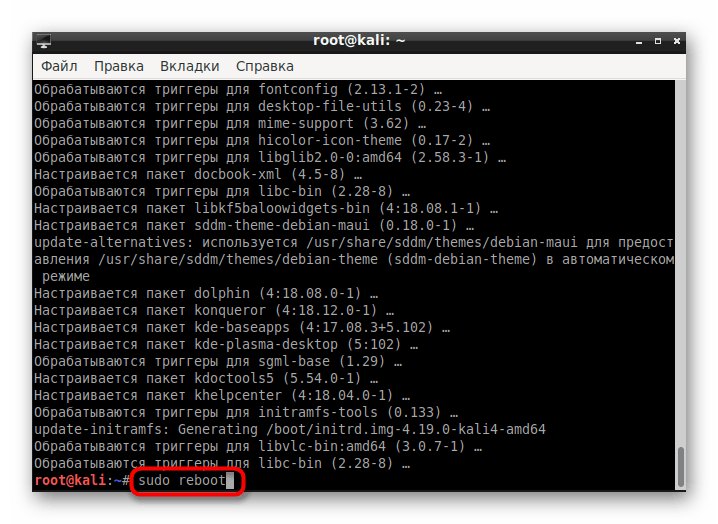
По завершении инсталляции перезагрузите операционную систему через sudo reboot .
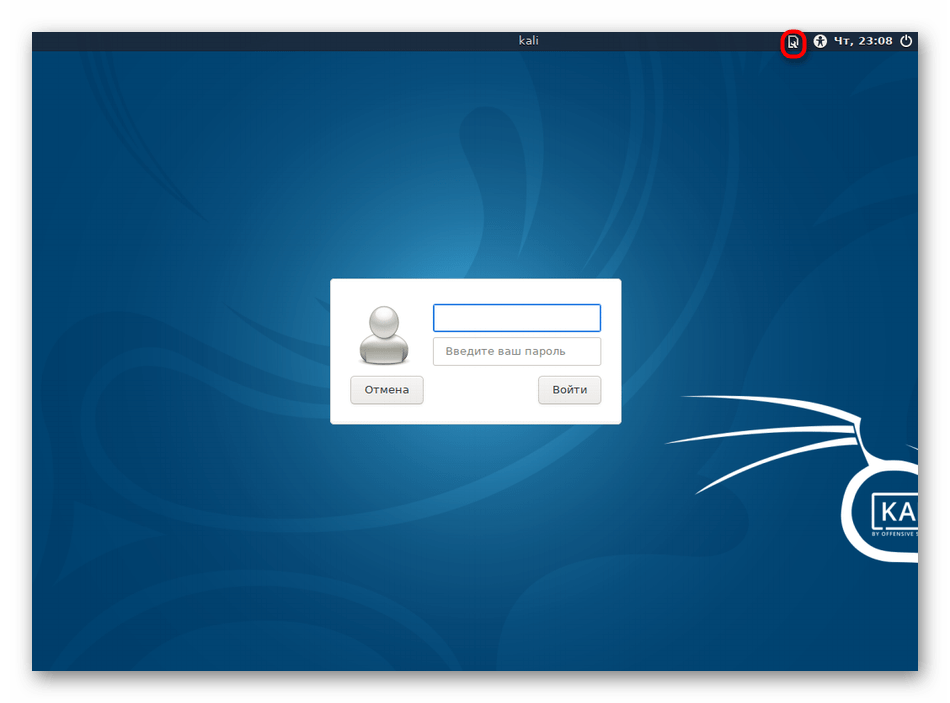
Шаг 3: Вход и настройка
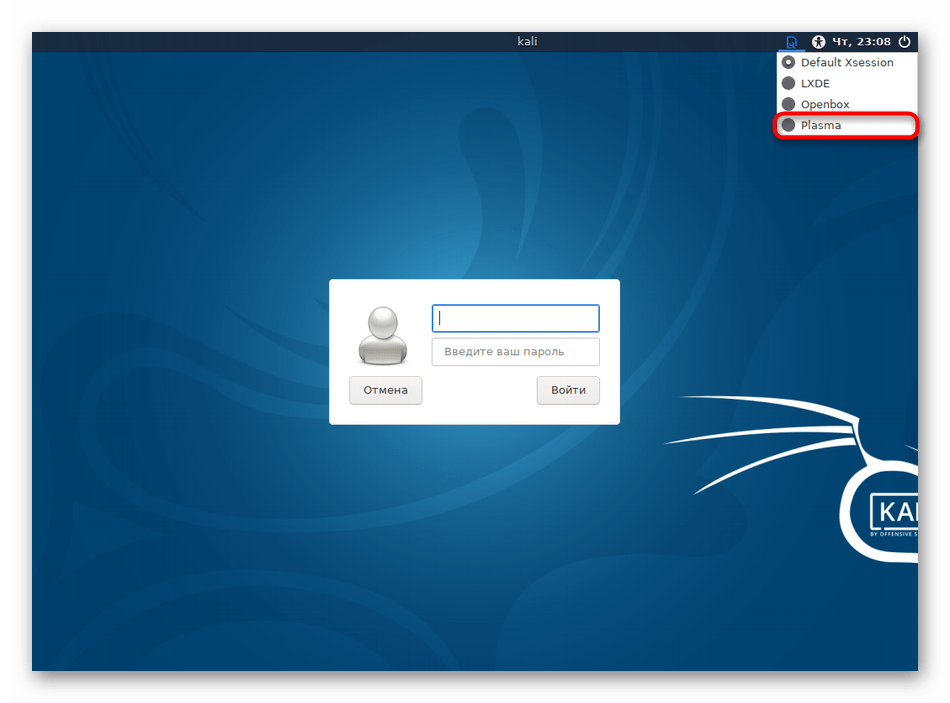
Если до этого у вас не стояло никаких сред рабочего стола, после перезагрузки можно сразу приступить к настройке. В противном случае придется в стартовом окне производить выбор оболочки, что осуществляется так:
- В правом верхнем углу выберите значок настроек.
Откроется всплывающее меню, где следует отметить маркером пункт «Plasma».
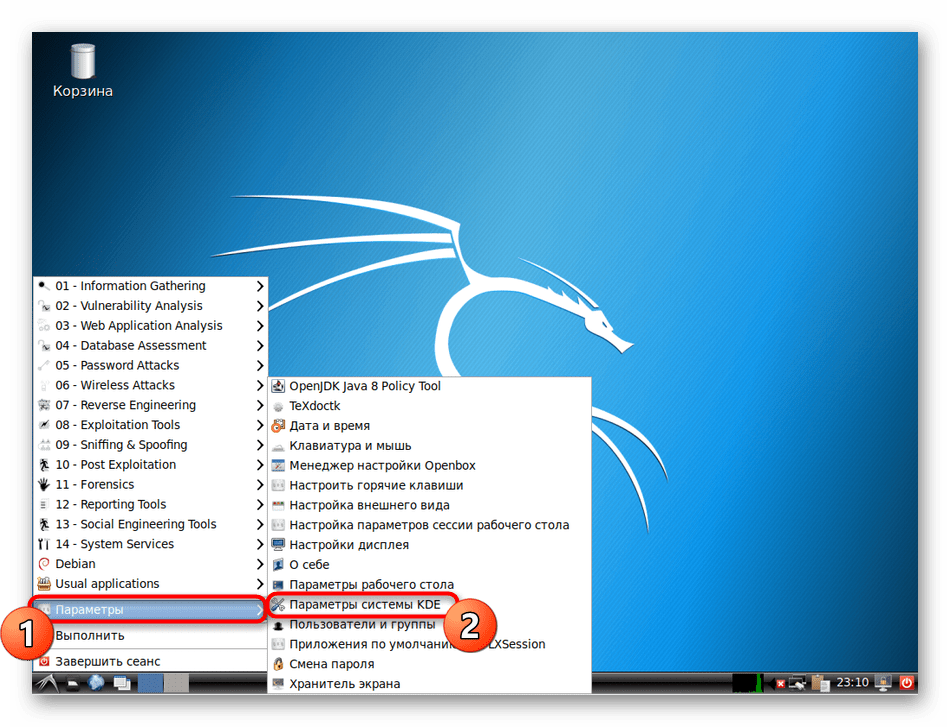
После входа через меню перейдите в «Параметры» > «Параметры системы KDE».
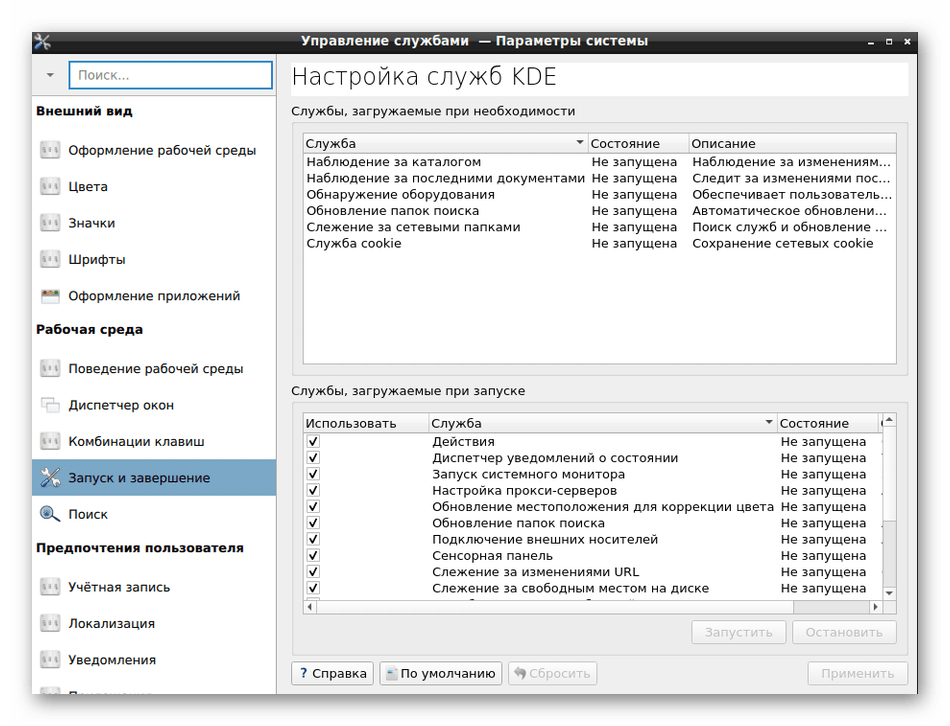
Настройте компоненты KDE на свое усмотрение. Пунктов здесь достаточно много, что позволит создать гибкую конфигурацию.
Отдельно бы хотелось отметить и консольную команду update-alternatives —config x-session-manager . Она позволяет изменить текущую оболочку через консоль.
Шаг 4: Удаление старой оболочки
Некоторым пользователям не хочется иметь на компьютере две оболочки. В таком случае старую можно удалить всего за пару минут, оставив только KDE. Давайте рассмотрим удаление на примере известной LXDE:
- Откройте консоль и пропишите команду apt-get remove lxde-core lxde .
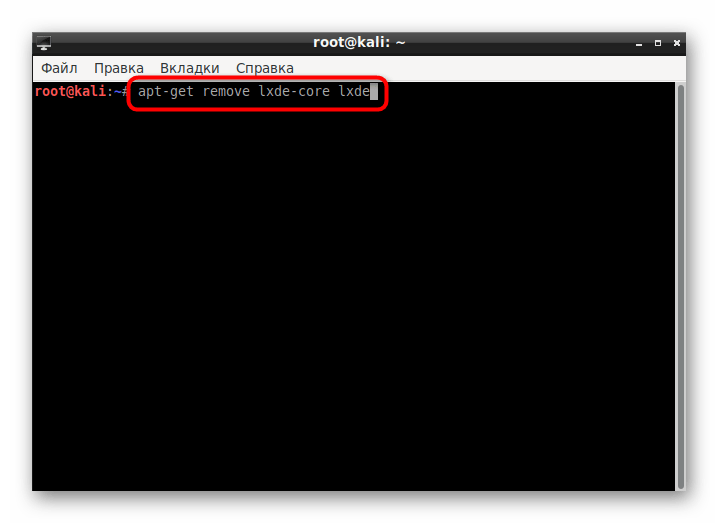
Подтвердите выполняемое действие.
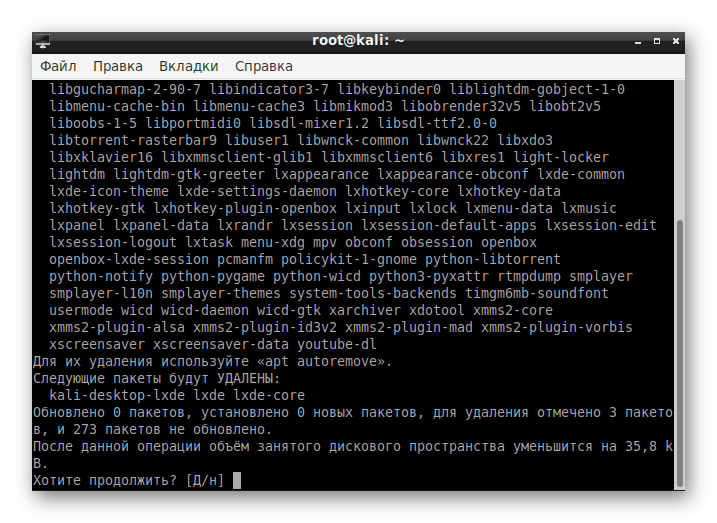
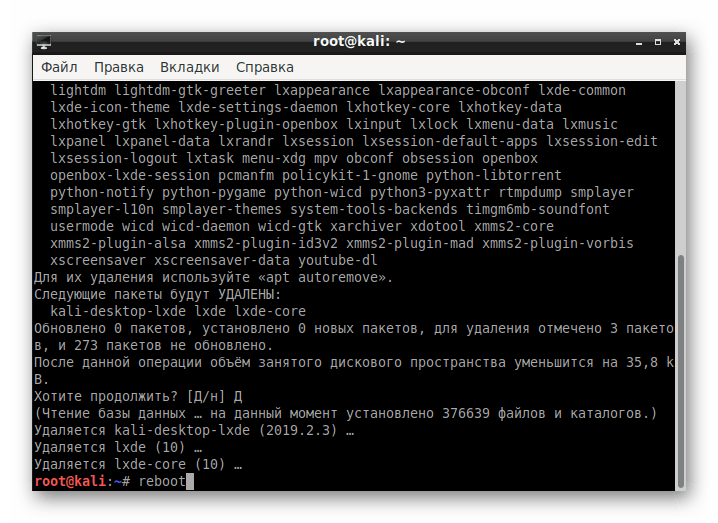
Ожидайте окончания процедуры.
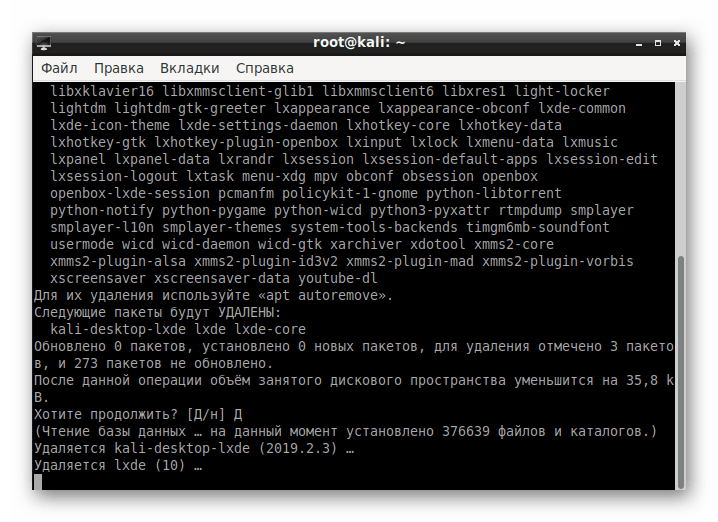
После деинсталляции перезагрузите ПК через команду reboot .
После на экране появится значок KDE и начнется загрузка.
Теперь можно переходить к работе с новой оболочкой.
Обладателям других окружений придется вводить команды немного иного содержания:
- Cinnamon — apt-get remove cinnamon
- Xfce — apt-get remove xfce4 xfce4-places-plugin xfce4-goodies
- Gnome — apt-get remove gnome-core
- MATE — apt-get remove mate-core
Если в этом списке вы не нашли своего окружения, обратитесь к официальной документации, чтобы отыскать там необходимую информацию.
Решение неполадок с установкой KDE в Kali Linux
В некоторых случаях юзеры сталкиваются с различного рода проблемами при попытке загрузки KDE. В большинстве ситуаций после запуска команды появляется уведомление «Unable to locate package kde-plasma-desktop», что свидетельствует о невозможности нахождения пакета. Если вы столкнулись с такой проблемой, советуем выполнить следующую инструкцию.
- Для начала установите текстовый редактор gedit, чтобы упростить дальнейшую работу с конфигурационным файлом. Для этого введите команду apt-get install gedit .

Подтвердите добавление новых файлов в систему.
По окончании инсталляции запустите конфигурационный файл, введя gedit /etc/apt/sources.list .
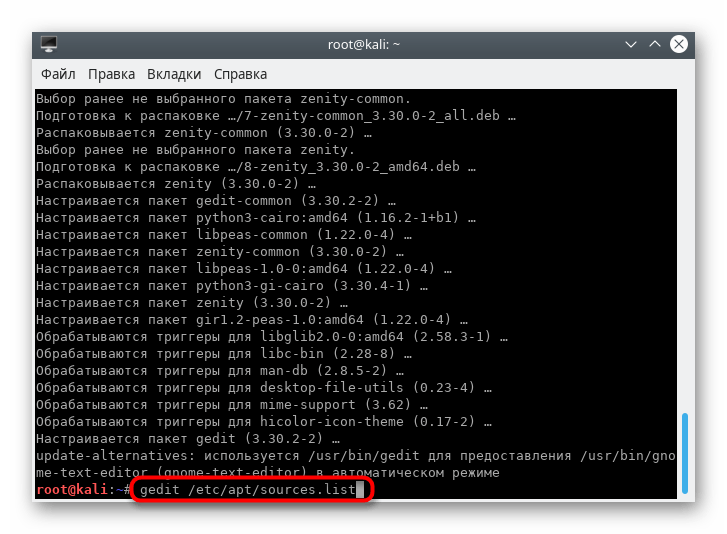
Вставьте в конец файла следующее содержимое:
# deb cdrom:[Debian GNU/Linux 7.0 _Kali_ — Official Snapshot amd64 LIVE/INSTALL Binary 20130315-11:02]/ kali contrib main non-free
# deb cdrom:[Debian GNU/Linux 7.0 _Kali_ — Official Snapshot amd64 LIVE/INSTALL Binary 20130315-11:02]/ kali contrib main non-free
deb http://http.kali.org/kali kali main non-free contrib
deb-src http://http.kali.org/kali kali main non-free contrib
## Security updates
deb http://security.kali.org/kali-security kali/updates main contrib non-free
deb-src http://security.kali.org/kali-security kali/updates main contrib non-free
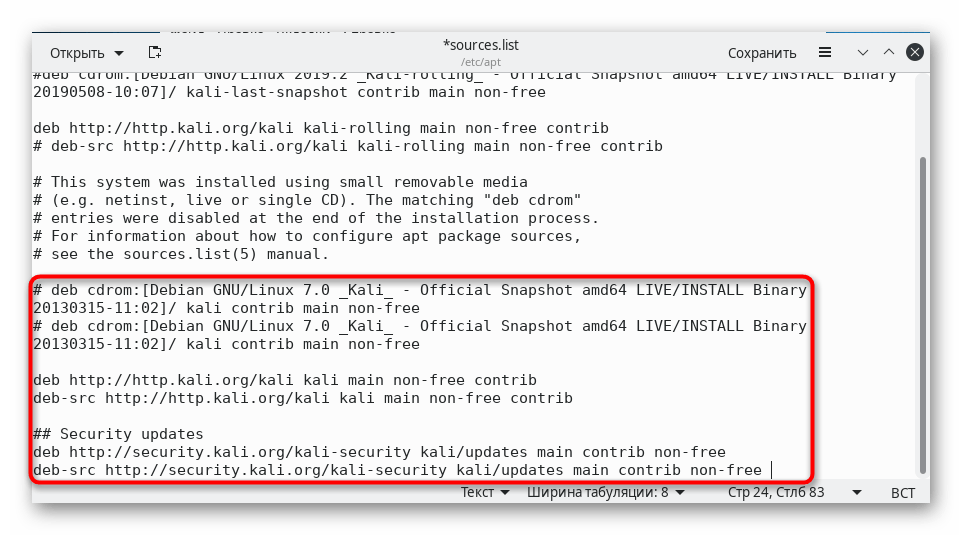
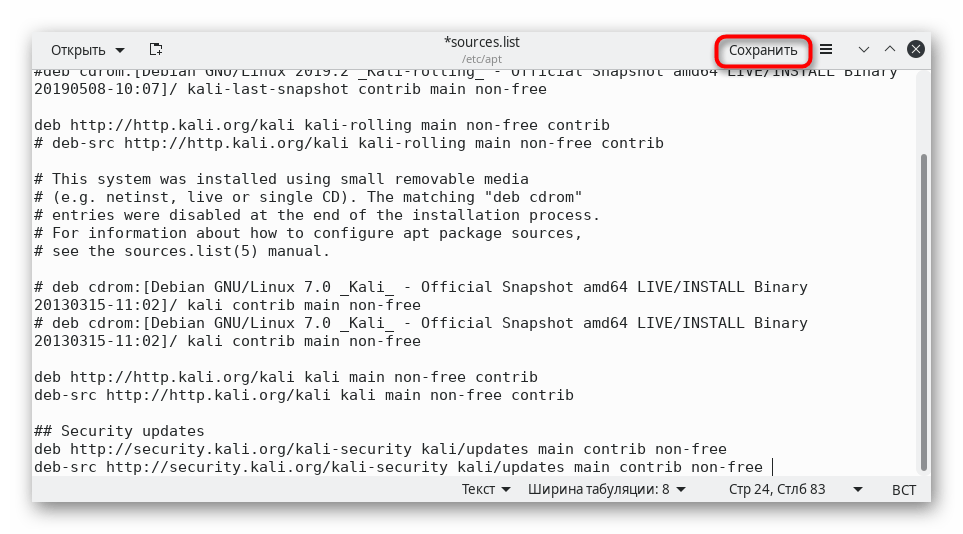
Сохраните изменения, нажав на соответствующую кнопку.
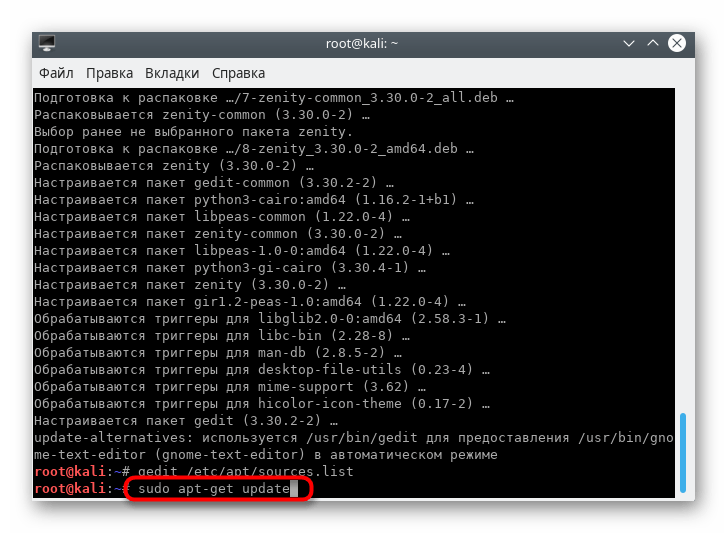
Введите sudo apt-get update , активируйте ее, а после появления новой строки ввода повторите попытку инсталляции.
Другие проблемы возникают достаточно редко, а связаны они в основном с невнимательностью самих пользователей. Например, где-то была пропущена буква или после слова нет пробела. При появлении уведомлений всегда сначала читайте их, возможно, они решаются просто. В других ситуациях рекомендуем обращаться к официальной документации дистрибутива и окружения рабочего стола.
Теперь вы знакомы с процедурой инсталляции KDE в Kali Linux. Примерно по такому же принципу устанавливаются и другие среды. Узнать информацию о самых популярных из них мы предлагаем в другом нашем руководстве по ссылке ниже.
Помимо этой статьи, на сайте еще 12315 инструкций.
Добавьте сайт Lumpics.ru в закладки (CTRL+D) и мы точно еще пригодимся вам.
Отблагодарите автора, поделитесь статьей в социальных сетях.
Источник


