- Kali linux live usb download
- What You’ll Need
- Kali Linux Live USB Install Procedure
- Creating a Bootable Kali USB Drive on Linux (DD)
- Creating a Bootable Kali USB Drive on Linux (DD with status)
- Creating a Bootable Kali USB Drive on Linux (Etcher)
- Kali linux live usb download
- Where to Get Official Kali Linux Images
- Verifying Your Downloaded Kali Image
- How Do I Verify My Downloaded Image?
Kali linux live usb download
Our favourite way, and the fastest method, for getting up and running with Kali Linux is to run it “live” from a USB drive. This method has several advantages:
- It’s non-destructive — it makes no changes to the host system’s hard drive or installed OS, and to go back to normal operations, you simply remove the “Kali Live” USB drive and restart the system.
- It’s portable — you can carry Kali Linux in your pocket and have it running in minutes on an available system
- It’s customizable — you can roll your own custom Kali Linux ISO image and put it onto a USB drive using the same procedures
- It’s potentially persistent — with a bit of extra effort, you can configure your Kali Linux “live” USB drive to have persistent storage, so the data you collect is saved across reboots
In order to do this, we first need to create a bootable USB drive which has been set up from an ISO image of Kali Linux.
What You’ll Need
A verified copy of the appropriate ISO image of the latest Kali build image for the system you’ll be running it on: see the details on downloading official Kali Linux images.
If you’re running under Linux, you can use the dd command, which is pre-installed, or use Etcher.
A USB thumb drive, 4GB or larger. (Systems with a direct SD card slot can use an SD card with similar capacity. The procedure is identical.)
Kali Linux Live USB Install Procedure
The specifics of this procedure will vary depending on whether you’re doing it on a Windows, Linux, or macOS/OS X system.
Creating a Bootable Kali USB Drive on Linux (DD)
Creating a bootable Kali Linux USB drive in a Linux environment is easy. Once you’ve downloaded and verified your Kali ISO file, you can use the dd command to copy it over to your USB drive using the following procedure. Note that you’ll need to be running as root, or to execute the dd command with sudo. The following example assumes a Linux Mint 17.1 desktop — depending on the distro you’re using, a few specifics may vary slightly, but the general idea should be very similar. If you would prefer to use Etcher, then follow the same directions as a Windows user. Note that the USB drive will have a path similar to /dev/sdb.
WARNING: Although the process of imaging Kali Linux onto a USB drive is very easy, you can just as easily overwrite a disk drive you didn’t intend to with dd if you do not understand what you are doing, or if you specify an incorrect output path. Double-check what you’re doing before you do it, it’ll be too late afterwards.
Consider yourself warned.
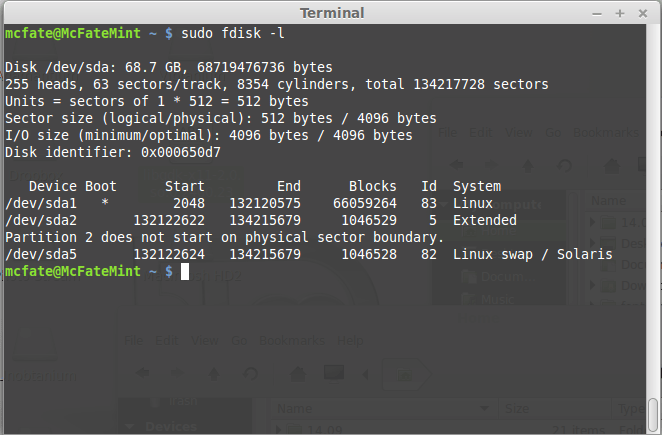
- First, you’ll need to identify the device path to use to write the image to your USB drive. Without the USB drive inserted into a port, execute the command sudo fdisk -l at a command prompt in a terminal window (if you don’t use elevated privileges with fdisk, you won’t get any output). You’ll get output that will look something (not exactly) like this, showing a single drive — “/dev/sda” — containing three partitions (/dev/sda1, /dev/sda2, and /dev/sda5):
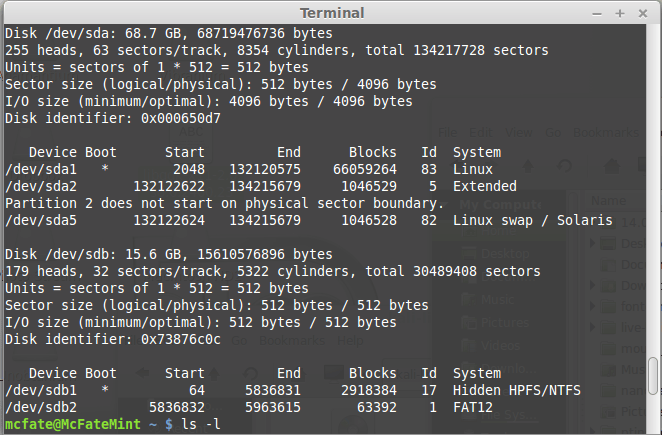
 2. Now, plug your USB drive into an available USB port on your system, and run the same command, “sudo fdisk -l” a second time. Now, the output will look something (again, not exactly) like this, showing an additional device which wasn’t there previously, in this example “/dev/sdb”, a 16GB USB drive:
 3. Proceed to (carefully!) image the Kali ISO file on the USB device. The example command below assumes that the ISO image you’re writing is named “kali-linux-2021.3-live-amd64.iso” and is in your current working directory. The blocksize parameter can be increased, and while it may speed up the operation of the dd command, it can occasionally produce unbootable USB drives, depending on your system and a lot of different factors. The recommended value, “bs=4M”, is conservative and reliable.
Imaging the USB drive can take a good amount of time, over ten minutes or more is not unusual, as the sample output below shows. Be patient!
The dd command provides no feedback until it’s completed, but if your drive has an access indicator, you’ll probably see it flickering from time to time. The time to dd the image across will depend on the speed of the system used, USB drive itself, and USB port it’s inserted into. Once dd has finished imaging the drive, it will output something that looks like this:
That’s it, really!
Creating a Bootable Kali USB Drive on Linux (DD with status)
Alternatively there are a few other options available for imaging.
The first option is dd with a status indicator. This is only available on newer systems however. To do this, we simply add the status flag.
Another option is to use pv . We can also use the size flag here to get an approximate timer. Change the size depending on the image being used.
Creating a Bootable Kali USB Drive on Linux (Etcher)
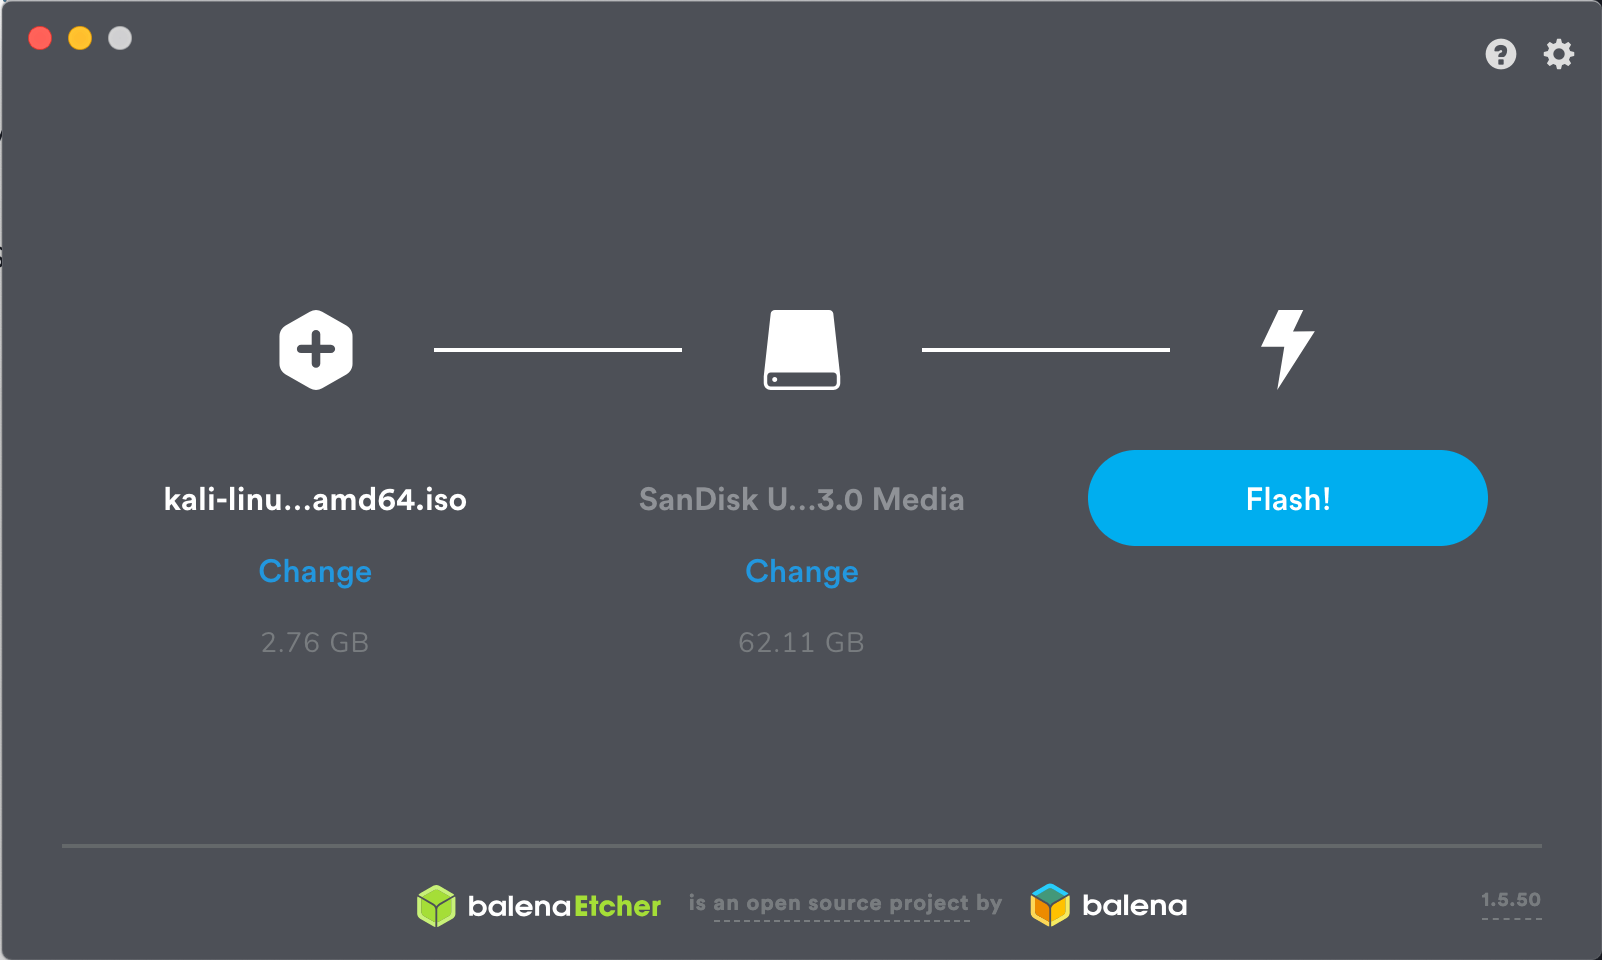
Download and run Etcher.
Choose the Kali Linux ISO file to be imaged with “select image” and verify that the USB drive to be overwritten is the correct one. Click the “Flash!” button once ready.
 3. Once Etcher alerts you that the image has been flashed, you can safely remove the USB drive.
You can now boot into a Kali Live / Installer environment using the USB device.
Updated on: 2021-Sep-27
Author: g0tmi1k
Источник
Kali linux live usb download
IMPORTANT! Never download Kali Linux images from anywhere other than the official sources.
Always be sure to verify the SHA256 checksums of the file you’ve downloaded against our official values.
It would be easy for a malicious entity to modify a Kali installation to contain exploits or malware and host it unofficially.
Where to Get Official Kali Linux Images
ISO Files for Intel-based PCs
In order to run Kali “Live” from a USB drive on standard Windows and Apple PCs, you’ll need a Kali Linux bootable ISO image, in either 32-bit or 64-bit format.
If you’re not sure of the architecture of the system you want to run Kali on, on Linux or macOS, you can run the command uname -m at the command line. If you get the response, “x86_64”, use the 64-bit ISO image (the one containing “amd64” in the file name); if you get “i386”, use the 32-bit image (the one containing “i386” in the file name). If you’re on a Windows system, the procedure for determining whether your architecture is detailed on Microsoft’s website.
The Kali Linux images are available both as directly downloadable “.iso/.img” files or via “.torrent” files.
Building your own Kali Linux ISO, standard or customized, is a very simple process.
Virtual Machines Images
If you want to run Kali Linux as a “guest” under VMware or VirtualBox, Kali Linux is available as a pre-built virtual machines with any guest tools already installed. These image are available in a 64-bit (amd64), and 32-bit PAE (i*86) formats.
ARM Images
The hardware architectures of ARM-based devices vary considerably, so it is not possible to have a single image that will work across all of them. Pre-built Kali Linux images for the ARM architecture are available for a wide range of devices.
Scripts for building your own ARM images locally are also available on GitLab. For more details, see the articles on setting up an ARM cross-compilation environment and building a custom Kali Linux ARM chroot.
Verifying Your Downloaded Kali Image
Why do I need to do this?
Before you run Kali Linux Live, or install it to your hard disk, you want to be very sure that what you’ve got actually is Kali Linux, and not an imposter. Kali Linux is a professional penetration testing and forensics toolkit. As a professional penetration tester, having absolute confidence in the integrity of your tools is critical: if your tools are not trustworthy, your investigations will not be trustworthy, either.
Moreover, as the leading penetration testing distribution, Kali’s strengths mean that a bogus version of Kali Linux could do a tremendous amount of damage if it were deployed unwittingly. There are plenty of people with plenty of reason to want to stick very sketchy stuff into something that looks like Kali, and you absolutely do not want to find yourself running something like that.
Avoiding this is simple:
- Only download Kali Linux via the official download pages at kali.org/downloads/ or offensive-security.com/kali-linux-vmware-arm-image-download/ — you will not be able to browse to these pages without SSL; encrypting the connection makes it much harder for an attacker to use a “man-in-the-middle” attack to modify your download. There are a few potential weaknesses to even these sources — see the sections on verifying the download with the SHA256SUMS file and its signature against the official Kali Development team private key for something much closer to absolute assurance.
- Once you’ve downloaded an image, and before you run it, always validate that it really is what it’s supposed to be by verifying its checksum using one of the procedures detailed below.
There are several methods for verifying your download. Each provides a certain level of assurance, and involves a corresponding level of effort on your part.
- You can download an ISO image from an official Kali Linux “Downloads” mirror, calculate the ISO’s SHA256 hash and compare it by inspection with the value listed on the Kali Linux site. This is quick and easy, but potentially susceptible to subversion via a DNS poisoning: it assumes that the site to which, for example, the domain “kali.org” resolves is in fact the actual Kali Linux site. If it somehow were not, an attacker could present a “loaded” image and a matching SHA256 signature on the fake web page. See the section “Manually Verify the Signature on the ISO (Direct Download)”, below.
- You can download an ISO image through the torrents, and it will also pull down a file — unsigned — containing the calculated SHA256 signature. You can then use the shasum command (on Linux and macOS) or a utility (on Windows) to automatically verify that the file’s computed signature matches the signature in the secondary file. This is even easier than the “manual” method, but suffers from the same weakness: if the torrent you pulled down is not really Kali Linux, it could still have a good signature. See the section “Verify the Signature on the ISO Using the Included Signature File (Torrent Download)”, below.
- To be as close to absolutely certain as possible that the Kali Linux download you’ve obtained is the real thing, you can download both a cleartext signature file and and version of the same file that has been signed with the official Kali Linux private key and use GNU Privacy Guard (GPG) to first, verify that the computed SHA256 signature and the signature in the cleartext file match and second, verify that the signed version of the file containing the SHA256 hash has been correctly signed with the official key.
If you use this more complicated process and successfully validate your downloaded ISO, you can proceed with pretty complete assurance that what you’ve got is the official image and that it has not been tampered with in any way. This method, while the most complex, has the advantage of providing independent assurance of the integrity of the image. The only way this method can fail is if the official Kali Linux private key is not only subverted by an attacker, but also not subsequently revoked by the Kali Linux development team. For this method, see the section on verification using the SHA256SUMS file.
What do I need to do this?
If you’re running on Linux, you probably already have GPG (GNU Privacy Guard) installed. If you’re on Windows or macOS, you’ll need to install the appropriate version for your platform.
- If you’re on a PC running Windows, download and install GPG4Win from here. Certain versions of Windows do not have the native ability to calculate SHA256 checksums. To check this, you can open the command prompt and run certutil -? . If you do have this installed, you can run certutil -hashfile kali-linux-2021.3-live-amd64.iso sha256 to verify your download. If you do not have certutil installed, you will also need a utility such as Microsoft File Checksum Integrity Verifier or Hashtab to verify your download.
- If you’re on a Macintosh running macOS, download and install GPGTools from here. Alternatively, if you have Homebrew installed, just run brew install gnupg
Once you’ve installed GPG, you’ll need to download and import a copy of the Kali Linux official key. Do this with the following command:
Your output should look like this:
Verify that the key is properly installed with the command:
The output will look like this:
You’re now set up to validate your Kali Linux download.
How Do I Verify My Downloaded Image?
Manually Verify the Signature on the ISO (Direct Download)
If you downloaded the ISO directly from the downloads page, verify it using the following procedure.
On Linux, or macOS, you can generate the SHA256 checksum from the ISO image you’ve downloaded with the following command (assuming that the ISO image is named “kali-linux-2021.3-live-amd64.iso”, and is in your current directory):
The output should look like this:
The resulting SHA256 signature, “e316b27025922e9f6bca0cacee6dde83dbfd4a549ad18026526f5824af639fc1”, can be seen to match the signature displayed in the “sha256sum” column on the official download page for the 64-bit Intel architecture Kali Linux 2021.3 ISO image:

Verify the Signature on the ISO Using the Included Signature File (Torrent Download)
If you downloaded your copy of the Kali Linux ISO image via the torrents, in addition to the ISO file (e.g. kali-linux-2021.3-live-amd64.iso), there will be a second file containing the computed SHA256 signature for the ISO, with the extension “.txt.sha256sum” (e.g. kali-linux-2021.3-live-amd64.txt.sha256sum). You can use this file to verify the authenticity of your download on Linux or macOS with the following command:
If the image is successfully authenticated, the response will look like this:
IMPORTANT! If you are unable to verify the authenticity of the Kali Linux image you have downloaded as described in the preceding section, do NOT use it! Using it could endanger not only your own system, but any network you connect to as well as the other systems on that network. Stop, and ensure that you have downloaded the images from a legitimate Kali Linux mirror.
Verify the ISO Using the SHA256SUMS File
This is a more complex procedure, but offers a much higher level of validation: it does not rely on the integrity of the web site you downloaded the image from, only the official Kali Linux development team key that you install independently. To verify your image this way for an Intel architecture version of Kali, you will need to download three files from the Kali “Live CD Image” site for the current release (v2021.3, as of this writing):
- The ISO image itself (e.g. kali-linux-2021.3-live-amd64.iso)
- The file containing the calculated SHA256 hash for the ISO, SHA256SUMS
- The signed version of that file, SHA256SUMS.gpg
Before verifying the checksums of the image, you must ensure that the SHA256SUMS file is the one generated by Kali Linux. That’s why the file is signed by Kali’s official key with a detached signature in SHA256SUMS.gpg. If you have not already done so, Kali’s official key can be downloaded and imported into your keychain with this command:
or this command
Your output should look like this:
You should verify that the key is properly installed with the command:
The output will look like this:
Once you have downloaded both SHA256SUMS and SHA256SUMS.gpg, you can verify the signature as follows:
If you do not get that “Good signature” message or if the key ID does not match, then you should stop and review whether you downloaded the images from a legitimate Kali Linux mirror. The failed verification strongly suggests that the image you have may have been tampered with.
If you did get the “Good signature” response, you can now be assured that the checksum in the SHA256SUMS file was actually provided by the Kali Linux development team. All that remains to be done to complete the verification is to validate that the signature you compute from the ISO you’ve downloaded matches the one in the SHA256SUMS file. You can do that on Linux or macOS with the following command (assuming that the ISO is named “kali-linux-2021.3-live-amd64.iso” and is in your working directory):
If the image is successfully authenticated, the response will look like this:
If you do not get “OK” in response, then stop and review what’s happened: the Kali image you have has apparently been tampered with. Do NOT use it.
Once you’ve downloaded and verified your image, you can proceed to create a bootable “Kali Linux Live” USB drive.
Updated on: 2021-Sep-27
Authors: g0tmi1k , gamb1t
Источник


