- Ethical hacking and penetration testing
- InfoSec, IT, Kali Linux, BlackArch
- How to configure Kali Linux to use a static IP address
- Table of contents
- What are advantages of a static IP address usage?
- Manually assigning IP addresses bypassing DHCP in the router
- What are Address, Netmask, Gateway and DNS server when setting up a static address
- Setting up a static IP address in Kali Linux (in Xfce)
- Configuring a Static IP Address in Network Manager in Kali Linux (GNOME)
- Setting up a static IP address in Kali Linux (in Cinnamon)
- Configuring a Static IP Address in the Kali Linux Command Line
- Kali linux network setting
- Setup a PXE Server
- Download Kali PXE Netboot Images
- Configure Target to Boot From Network
- Post Installation
- Kali Linux configure network manually a Complete Guide for beginners
- Kali Linux Network Configuration for Ethernet Connection
- How do you check the Kali Linux network configuration?
- Enable/Disable network interface cards
- Assign IP Address for the network (eth0 or wlan0)
- Kali Linux network configuration with IP address and Netmask
- Add default gateway
- Add dns-namesevers
- Kali Linux network configuration from DHCP
- How to Configure Network Manually in Kali Linux Video Guide
Ethical hacking and penetration testing
InfoSec, IT, Kali Linux, BlackArch
How to configure Kali Linux to use a static IP address
Table of contents
What are advantages of a static IP address usage?
On a local network, a static IP address allows you to use the Web server, SSH, FTP and other network services without having to get to know IP of a system on which these services are running each time. If you do not use these services, then there is no need to configure a static IP.
A static address for a particular computer or other device can be set in several ways:
- in the settings of your router, bind the MAC address to the IP address: in different routers the configuration process may be slightly different, but usually these functions are located in the Local network (LAN settings) -> DHCP server -> The list of manually assigned IP addresses bypassing DHCP.
- setting up a static IP address in Network Manager
- setting up a static IP address in the command line
Manually assigning IP addresses bypassing DHCP in the router
A static IP address can be configured on the router. The router uses a MAC address to identify devices, so you can save pairs of MAC and IP addresses in the router settings (see also “How to find the MAC address and How to find the manufacturer by MAC address”).
The specific steps for binding the MAC address to the IP address in the router depend on the device model. Therefore, if you have any questions or you can not find the desired setting in your router, then refer to its manuals. In this case, the actions do not depend on the device to which you want to assign a permanent IP address, since all the configuration is performed in the router. Also, after resetting the settings on the device to which the permanent IP address was assigned (for example, when reinstalling the OS on the computer or Factory Reset of the phone), then the binding of the IP address to the device is preserved, since the MAC address is always unchanged.
This method is not suitable for virtual machines, even if a network connection of the Bridge type is used.
What are Address, Netmask, Gateway and DNS server when setting up a static address
Whichever method of setting a static IP address you choose, and in whatever graphical environment you set a static IP address, you will need to enter values for the following fields:
Address is a static IP address that you want to assign to this computer. Typically, home routers have addresses like 192.168.0.* or 192.168.1.*, where instead of an asterisk there is a number from 2 to 254. An IP address ending in one is usually the router itself, and an IP address ending in 255 is broadcast.
Netmask – If you are setting up a home router, then usually the netmask is 255.255.255.0, this same value in another notation is written as “/24”.
Gateway is the IP address of the router. This is usually 192.168.0.1 or 192.168.1.1
DNS is a DNS server, if you do not know what to specify, you can use the following IP addresses as DNS servers: 8.8.8.8 and 8.8.4.4.
When done, click the Apply button.
By the way, if you are already connected to the local network, to find out the gateway (IP address of the router), run the command:
The following will be displayed:
After the ‘default via’ line, the IP router will follow, in my case it is 192.168.0.1.
To apply made changes enter:
Check your current local IP with the command:
Setting up a static IP address in Kali Linux (in Xfce)
Xfce is the default graphical desktop environment in Kali Linux.
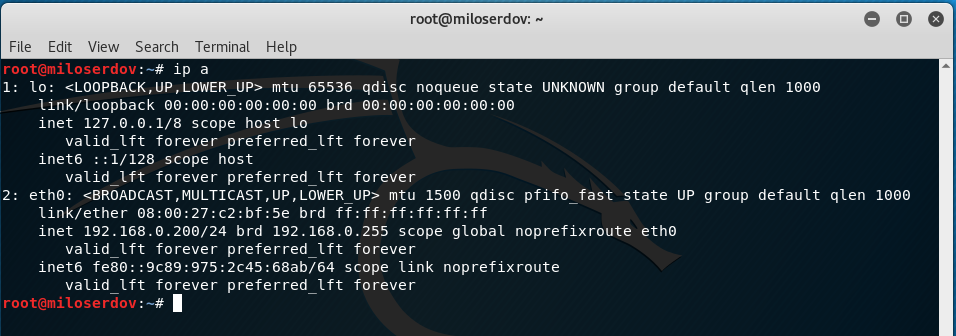
Since the computer is already connected to the network and it received network settings (IP address, gateway address, etc.), then to see the current values, run the command:

Pay attention to the line
It means that the IP address 192.168.1.51 is assigned to the eth0 network interface, the subnet mask is /24. To find out the gateway address, replace the last digit in the IP address with “1”, that is, in this case, the gateway address is 192.168.1.1.
Suppose I want the computer to be configured to have a static IP address of 192.168.1.101.
Next to the clock, right-click on the network connections icon.

In the context menu that opens, click on “Edit Connections…”.
Select the network for which you want to configure a static IP address and click the gear icon.

In the window that opens, go to the “IPv4 Settings” tab. Select “Manual” for the “Method”. Then click the Add button and enter the values you want.

When everything is ready, click the “Save” button.

Changes will take effect after reconnecting to the network.
Using the command
make sure that the IP address that was assigned to the computer is actually used:

Configuring a Static IP Address in Network Manager in Kali Linux (GNOME)
GNOME is the default graphical desktop environment in previous versions of Kali Linux. Currently, you can still select GNOME (or any other graphical desktop environment) when installing the OS.
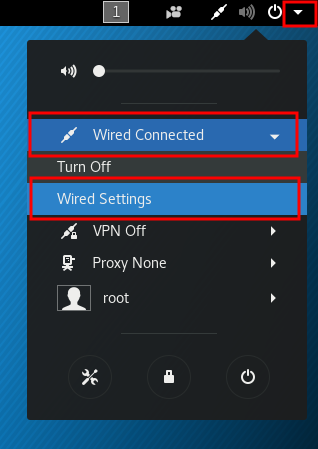
In Linux, a static address in a graphical environment can be set in the Network Manager settings. To do this, click on the arrow in the upper right corner of the screen, in the menu that appears, click on ‘Wired Connected’, and then on ‘Wired Settings’:
A new window will open, in it click on the gear icon:
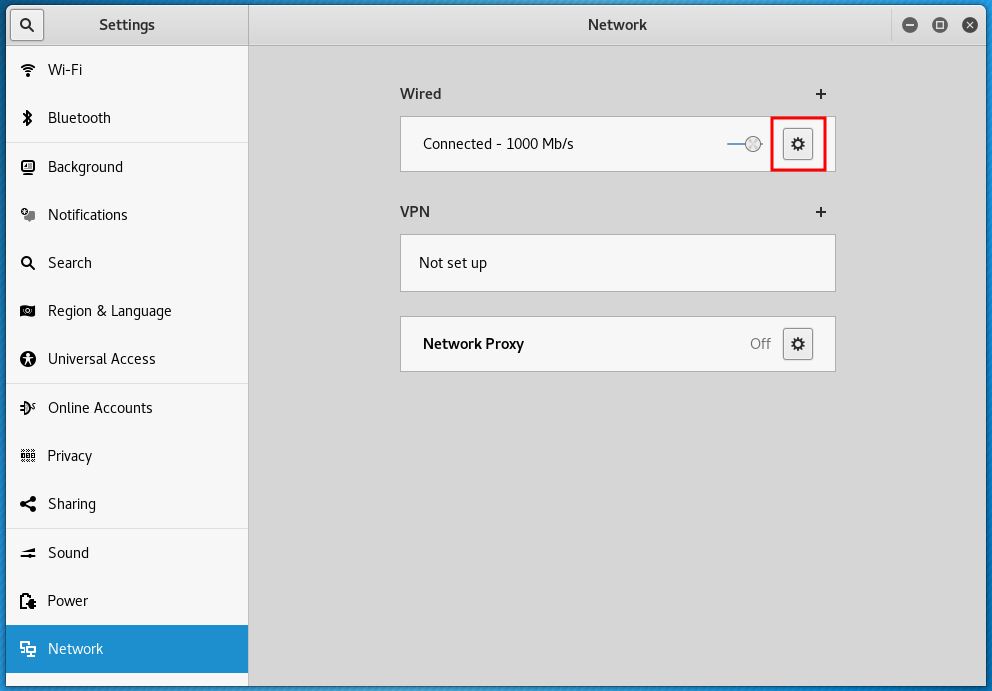
Another window will open, in which go to the IPv4 tab:

select ‘Manual’:
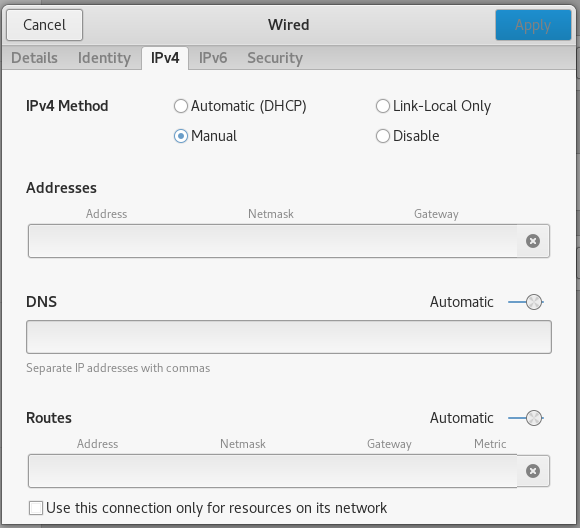
then enter the desired static IP in the ‘Addresses’ field, it should match your network, for example, if the router (default gateway) has the address 192.168.0.1, then the selected address should be 192.168.0.*, if the router has the address 192.168.1.1, then the selected IP should be of the form 192.168.1.* etc. Next, write down the ‘Netmask’, for most tasks 255.255.255.0 is suitable, also write the ‘Gateway’, which is the IP router, an example:
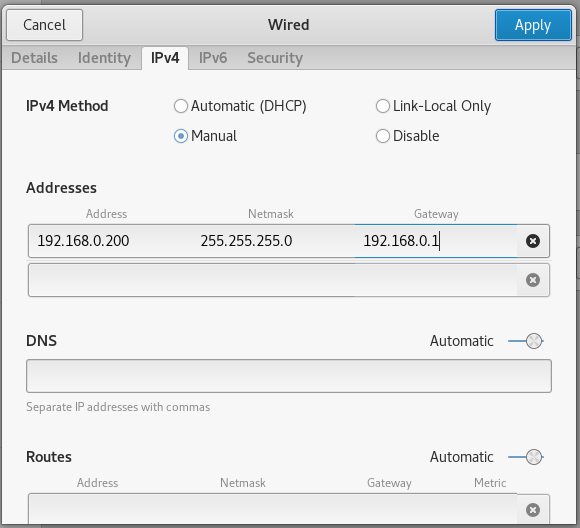
If you wish, you can also set the DNS server settings, but this is not mandatory.
Setting up a static IP address in Kali Linux (in Cinnamon)
Cinnamon is a graphical desktop environment that, although not included by default in Kali Linux, is quite popular among users. Optionally, Cinnamon can be installed on Kali Linux.
To configure a static IP address in Cinnamon, click on the network connection icon and select “Network Settings”.

Select the network adapter for which you want to configure, then select the network and click the gear icon next to it.

Select the “IPv4” tab, switch “Addresses” to “Manual”, enter the information you need and click the “Apply” button.

Changes will take effect after reconnecting to the network.
Configuring a Static IP Address in the Kali Linux Command Line
If for some reason you do not use Network Manager (for example, if you use Linux without a desktop graphical environment), you can configure a static IP address on the command line.
To do this, open the /etc/network/interfaces file with any text editor:
Only four lines should be added to this file. Example strings:

Let us examine them in more detail. eth0 is the name of the network interface. If there is only one network card, then in Debian (i.e., in Kali Linux too), this interface is called eth0. The second network interface is named eth1, etc.
If you are not sure, you can find the name of the wired network interface with the command:
In the second line, you need to use the same interface name (eth0).
Further in the third line, 192.168.0.100 is the IP that we want our system to always have. And /24 is an alternative way to set netmask. These characters correspond to 255.255.255.0.
As you might guess, in the last, fourth line, 192.168.0.1 means a gateway.
All these data need to be changed to fit your needs.
For the changes to take effect, issue the command:
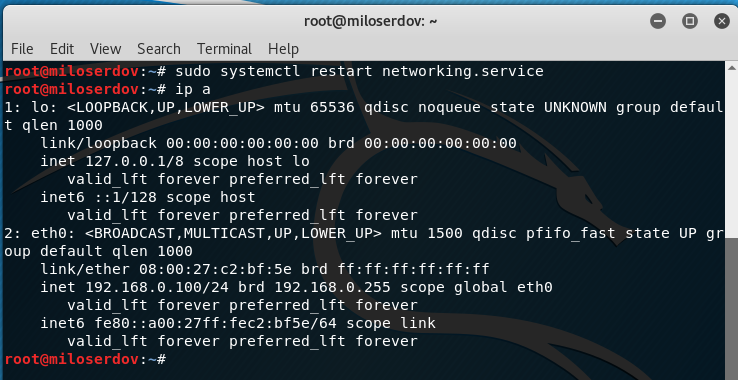
As you can see, the interface is really assigned the required IP and now it will be saved after each reboot.
Источник
Kali linux network setting
Booting and installing Kali Linux over the network (PXE) can be useful from a single laptop install with no CDROM or USB ports, to enterprise deployments supporting pre-seeding of the Kali Linux installation.
Setup a PXE Server
First, we need to install dnsmasq to provide the DHCP/TFTP server and then edit the dnsmasq.conf file:
In dnsmasq.conf , enable DHCP, TFTP and PXE booting and set the dhcp-range to match your environment (we are using 192.168.101.100-200). If needed you can also define your gateway and DNS servers with the dhcp-option directive as shown below:
With the edits in place, the dnsmasq service needs to be restarted in order for the changes to take effect.
Download Kali PXE Netboot Images
Now, we need to create a directory to hold the Kali Linux Netboot image and download the image we wish to serve.
Configure Target to Boot From Network
With everything configured, you can now boot your target system and configure it to boot from the network. It should get an IP address from your PXE server and begin booting Kali Linux.
Post Installation
Now that you’ve completed installing Kali Linux, it’s time to customize your system.
The General Use section has more information and you can also find tips on how to get the most out of Kali Linux in our User Forums.
Updated on: 2021-Sep-27
Author: g0tmi1k
Источник
Kali Linux configure network manually a Complete Guide for beginners
Hello and welcome on my blog, there Vijay Kumar,
This article about the ” Kali Linux configure network manually ” In this topic, I will cover all about the Kali Linux network configuration of LAN (Ethernet) and Wireless LAN adapter as well. After reading this article you will able to assign IP manually and by DHCP server as well.
Kali Linux Network Configuration for Ethernet Connection
Network interfaces (LAN adapter, wireless adapter, usb adapter, fast Ethernet) are responsible to connect and make communication between two or more computers in a network.
If the network card is not configured properly, then you are out of network and configuration is important for network security. The network should have proper IP Address, subnet mask, Default gateway, domain name server, etc.
So configure the network and get into the network. but the most important question:
How do you check the Kali Linux network configuration?
There are different methods for windows and Linux operating systems. Here we are discussing Kali Linux, I will explain tasks used in Linux. Following command is used to check the status of the networking cards in Kali Linux:
Before run command makes sure, you are working as root. I mean “You must be root to make changes in network configuration.
If you are checking only network configuration then you don’t have a need to be root.
You have seen the result of ifconfig command, You can see assigned IP address, MAC address, Netmask, for IPv4, etc.
You can run this command as a normal user, sudo user, or root user. If you didn’t create a normal user in Kali Linux then you are using the system by the root user.
Enable/Disable network interface cards
Sometimes you find that network interface is not responding properly, you will have to enable and disable.
You have more than 1 interface, and you want to use only 1 adapter, then disable other adapters.
You can use Ifconfig command followed by up option and interface name to start the network interface and for stopping it use the down option.
You can use the following syntax to enable and disable network interface cards.
#ifconfig eth0 down
#ifconfig eth0 up
Assign IP Address for the network (eth0 or wlan0)
Eth0 is the number of a wired network interface card. if you want to assign IP address for wireless adapter replace eth0 by wlan0. The current configuration of this adapter can be changed by using the following command and this command will assign new IP address for your computer interface
$sudo ifconfig eth0 192.168.1.10
Kali Linux network configuration with IP address and Netmask
Netmask is used to indentify the network address. It can be configured by using given command. This will set the ip address 192.168.1.10 and set the subnet mask 255.255.255.0
$sudo ifconfig eth0 192.168.1.10 netmask 255.255.255.0
Add default gateway
Default gateway is added or changed, by using following command. It will set the default gateway 192.168.1.1
#route add default gw 192.168.1.1
OR
$sudo route add default gw 192.168.1.1

Add dns-namesevers
In Linux Domain Name Server or DNS can be set or modifying the resolv.conf in the /etc directory. It can be changed by editing this file. add the following sytex in terminal
#echo nameserver 8.8.8.8 > /etc/resolv.conf
This command will remove the current nameserver and set 8.8.8.8. It can be added alternate nameserver by using following syntax
#echo nameserver 4.4.4.4 >> /etc/resolv.conf
Kali Linux network configuration from DHCP
DHCP services are one of the easiest ways to configure an Ethernet. A free DHCP server provides all required configuration settings for the network cards. Use the following method:
make these entries
iface eth0 inet static
Save the file and exit to complete the modification. It is required to take down the network and again bring up Ethernet interfaces to applying this configuration.
Use the following command to configure the network adapter
#dhclient eth0
This will configure the network adapter using the settings provided by the DHCP Server.
How to Configure Network Manually in Kali Linux Video Guide
Источник


