- Installing xRDP on Kali Linux
- Install xRDP
- “Authentication is required to create a color managed device”
- Open your Firewall
- Connecting via an SSH tunnel
- Install PuTTY & Set Up
- Create a Private Key file with PuTTYGen
- Connect the tunnel
- Last bits of security
- Set SSH to accept Certificates only
- Set xRDP to require SSH tunnels
- How to Connect to Kali Linux in Windows With RDP
- Remote Desktop Into Kali Linux from an External Network
- Background
- Hardware Requirements
- Enable Wake-on-LAN on Kali Desktop
- Configure Raspberry Pi as a Wake-on-LAN Server
- Configure Remote Desktop Protocol
- Configure the OpenVPN Server
- Accessing Your Remote Desktop from a Public Network — FINALLY!
- Final Thoughts
Installing xRDP on Kali Linux
13 October 2019
There are a lot of complicated tutorials on how to get xRDP working on Kali Linux. I suspect the tutorials have become complicated as they address a variety of bugs that xRDP and connecting software has had over time, but there isn’t much you actually need to do.
Note that if you are using Gnome, you’ll run into issues. I have got RDP working with Gnome before, but I haven’t been able to create a reliable set of steps to replicate it, as it usually starts working after several hours of messing around. If this is you, then you can try the below, but it may just be your starting point.
Install xRDP
The only package you need is xrdp, which you should enable after installation.
“Authentication is required to create a color managed device”
If you get this message there are a few potential fixes. The one I use is to add the following file to policy kit, and restart it:
Open your Firewall
If you are using UFW, you’ll need to open up a port.
Then in Windows, you’ll need to lower your color depth in the RDP settings when you make a connection:
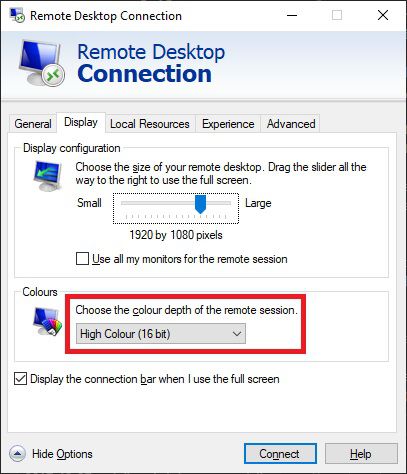
And it should work from this point.
Connecting via an SSH tunnel
xRDP transport is encrypted using TLS by default, and should be as secure as RDP is on windows, but if you open it up to the internet you can expect to be subject to ongoing brute force attacks. If a vulnerability is found, you can expect it to be used against you pretty soon. A safer option is to connect using an SSH tunnel, and secure that using certificates instead of passwords.
Install PuTTY & Set Up
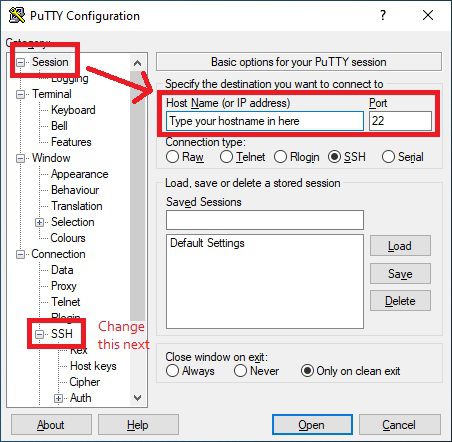
I’m assuming you know how to set up port forwarding on your router, and how to install puTTY. If not, Google is your friend. First step is just to put in your IP address (take a look at duckdns.org if you need a static one) and the external port that you’ve chosen into puTTY.
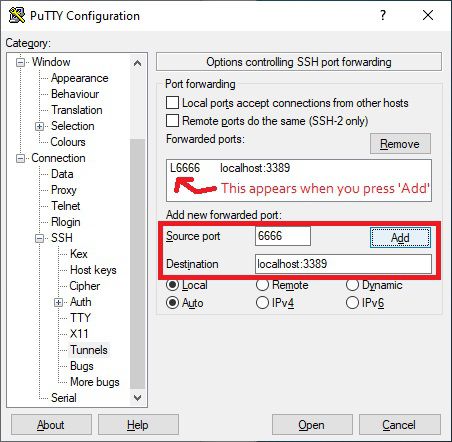
Next, you need to go into Tunnel under SSH. Here you need to add a Source port, which can be any port you have available on Windows. I’ve used 6666 in this example. Then under destination, add localhost:3389 .
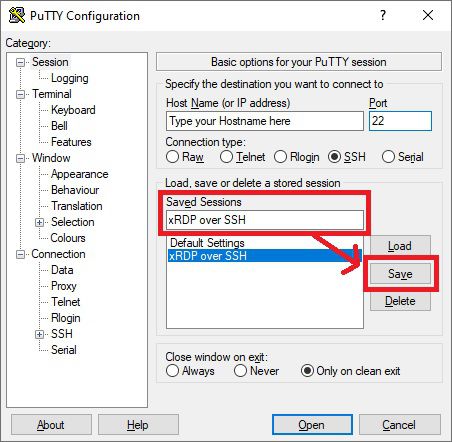
Under Session, you will probably want to save these settings so that you don’t need to do the setup every time.
Create a Private Key file with PuTTYGen
Press the Windows key and type in ‘PuttyGen’, which should open up the following program:
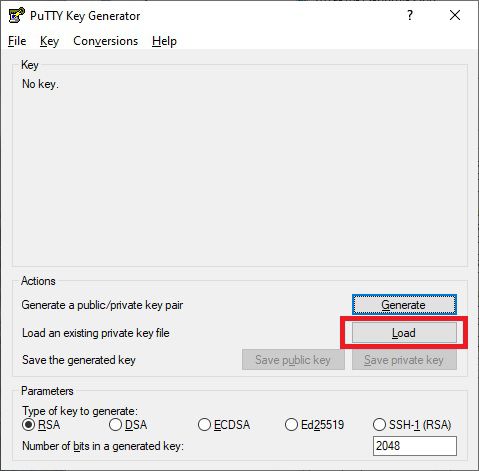
Click on Load, and select your private ‘id_rsa’ key that you normally use for logging in via SSH. You can then save this as a .ppk file. Once you have this, under SSH and Auth, add the .ppk key file.
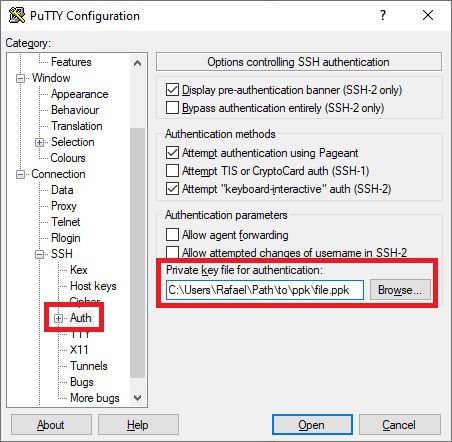
Again, you’ll want to go back to Session and save this.
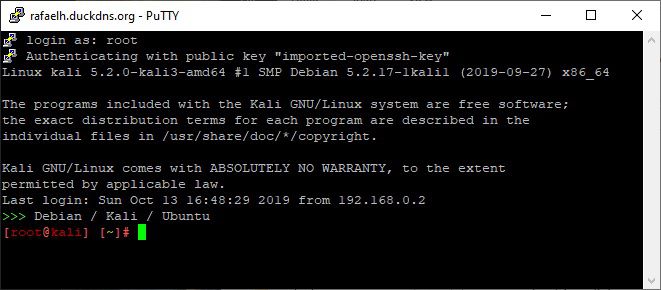
Connect the tunnel
Now that this is set up, connect using puTTY by pressing ‘Open’. You’ll get a black window, asking you for the username, which will probably be ‘root’ for Kali.
Now that the connection is established, go into RDP and use localhost and the port you configured in puTTY to connect:
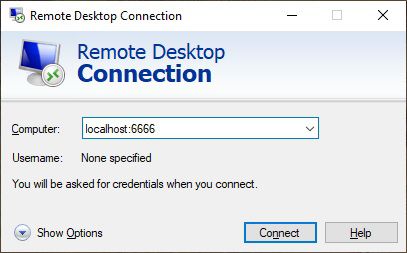
And all being well, you should successfully connect to xRDP via an SSH tunnel at this point
Last bits of security
Set SSH to accept Certificates only
You will need to edit the SSH daemon config and restart it. Make sure you have certificates set up and can authenticate without a password before you turn this off.
Set xRDP to require SSH tunnels
The last bit of security you can apply is to force xRDP to require a tunnel by constraining it to accept local connections only.
Hopefully that’s all you’ll need to connect in a reasonably secure fashion to your Kali box over the internet.
Источник
How to Connect to Kali Linux in Windows With RDP
This tutorial will show how to install and run the graphical environment of Kali Linux in Windows.

Using Kali Linux graphical environment (GUI) in Windows.
After installing Kali Linux on Windows, you will have the Kali Linux terminal (command environment). For using the graphical environment you have to make some adjustments.
- Open Kali through CMD or from the start menu.
- Enter the following command to install wget.
sudo apt-get install wget
- Enter the following command to access the graphical environment.
The above command will download a script from the Kali site.
- Entering the command below will run that script.
Note that the entered command includes downloading the graphics package and installing Xrdp and it may take some time.
sudo /etc/init.d/xrdp start
- Now you can start XRDP service by this command.
sudo /etc/init.d/xrdp start
By running the above command and running Xrdp service, the port number will be shown.

- Open Remote Desktop(RDP)
- After opening Remote Desktop window, enter 127.0.0.1 with given port number as address then click on connect button.

8. After opening Kali Linux, enter username and password and click on OK

9. Now you are connected to Kali Linux via Xrdp.

- After completing your work, enter the following command to stop the Xrdp
Источник
Remote Desktop Into Kali Linux from an External Network

Jul 25 · 7 min read
The following tutorial details the steps and hardware required to allow remote access to a local machine while connected to an external network. All requirements are based upon the tools used to conduct the setup contained herein. There are likely other methods to achieve similar results (without relying upon third-party tools such as TeamViewer or Chrome Remote Desktop ), but they are unknown to me at the time of this writing.
Background
Tired of seeing an old, but pe r fectly capable, gaming computer collect dust in my closet I started thinking about repurposing it. After briefly considering turning it into a FreeNAS based home server, I settled upon converting it into a dedicated Kali machine from which I could further explore the world of cyber security and ethical hacking.
As a minimalist who despises a cluttered desk I had no desire to add an additional mouse, keyboard, nor monitor to my work area. This issue was quickly solved by accessing the Kali machine via Remote Desktop Protocol (RDP) and FreeRDP.
A few weeks after the initial RDP setup, I came across a term previously unknown to me while reading through the CISSP Exam Guide. That term was Wake-on-LAN (WoL). Without getting into the technical details, WoL is a standard protocol that allows you to send a network message referred to as a ‘magic packet’ to wake a computer from a low power state. The caveat to WoL as the name implies, is that the computer sending the magic packet must be connected to the same local area network as the computer receiving it.
Enjoying the ability to use my laptop to turn on and access my Kali workstation from anywhere while connected to my home network, I began to research the possibility of performing the same actions from anywhere- regardless of the network I am connected to. After several days of research it turns out that it is totally possible!
Hardware Requirements
- Internet facing Kali Linux desktop with a hardwired Ethernet connection to your home router.
- Laptop with Linux OS (referred to herein as the client).
- Raspberry Pi 4.
Enable Wake-on-LAN on Kali Desktop
The following steps should be considered a general outline as the exact steps will vary depending on the device’s motherboard.
- As you boot your computer press the correct key to access the BIOS (F2, ESC, Delete, or other).
- Navigate to the Advanced or Power Management tab of your BIOS.
- Look for the correct option to enable Wake-on-LAN or “Power On By PCIE/PCI”.

Configure Raspberry Pi as a Wake-on-LAN Server
Setting up your Raspberry Pi server is a simple process thanks to detailed guides created by the Raspberry Pi Foundation. It is very important to set up the Pi correctly as the configuration described in this tutorial directly exposes the device to the internet. Further, the set up requires the device to be accessed via SSH protocol which will inherently expose the device to potential risks.
As the initial setup of the SSH server is thoroughly covered by the Raspberry Pi Foundation I will not reiterate their instructions which can be found on their website here.
IMPORTANT NOTE: When completing the “Using key-based authentication” section of the Raspberry Pi Foundation guide any references to the client device will be completed on your laptop, not your Kali workstation.
- Install ‘wakeonlan’ on your Raspberry Pi server using the following terminal command:
2. Get the MAC address of your Kali desktop using the following terminal command:

Test Wake-on-LAN Server
- SSH into Raspberry Pi from the client laptop.
Where is the IP address of your Pi device.
2. From the Raspberry Pi send a magic packet to the Kali workstation.
Where is the MAC address of the Kali workstation found using ifconfig.
Configure Remote Desktop Protocol
Enable Remote Desktop on Kali Linux
From the Kali terminal run the following commands:
- Install the Xrdp server (an open-source version of Microsoft’s RDP server).
2. Start the Xrdp server.
3. Start the Xrdp session manager.
FreeRDP is a free Remote Desktop Protocol client that will allow you to interact with your Kali workstation through a GUI as if you were sitting at the machine itself. Check out FreeRDP’s wiki here for more information and detailed configuration options.
Install FreeRDP on the client laptop using the following command(s):
Test FreeRDP to Kali from Client
Before completing the following steps make sure the Kali user is logged off or you may receive a ‘login failed’ error.
From the client terminal run the command:
Where is the IP address of the Kali desktop and is the username to be access on the Kali workstation.
When the xrdp window opens before pressing ‘OK’:
- Change the session type to Xorg.
- Confirm that the username is correct.
- Enter the appropriate password.

If you were to stop here everything would appear to work correctly while connected to your local network, BUT as soon as you connect to a different network you would find that you are unable to access the home devices! In order to connect to your home network from an external/public network a few more steps are required.
Configure the OpenVPN Server
Home Router Setup
This process will be different depending on your router model, so I will only provide an overview of the steps required.
Using your favorite search provider look up how to enable an OpenVPN server on your home network. A good place to start this search is on your device manufacturer’s website. In general you will want to:
1. Configure a Dynamic DNS service.
This is important because internet service providers use dynamically assigned IP addresses, meaning they can be changed at any time. It would be a shame to spend the time enabling remote access to your workstation, only to find it inaccessible because your IP address had changed. The Dynamic DNS Service allows you to connect to your home network using the domain name while automatically finding your network’s current IP address.
2. Set up an OpenVPN server on your router.
3. Export the OpenVPN ( .ovpn) configuration file from your router to the client laptop that will be used to access both the Raspberry Pi SSH server, and Kali workstation.
Client Laptop Setup
To access your home network from an external network requires the use of OpenVPN in conjunction with the OpenVPN server set up on your home router above.
To install OpenVPN on the client laptop enter the following command in the terminal:
To establish a connection to the OpenVPN server established on the home router enter the following command in the terminal:
Where /path/to/file.ovpn is the file exported in step 3 of Home Router Setup above.
Accessing Your Remote Desktop from a Public Network — FINALLY!
While not absolutely necessary, it is a good idea to test that everything works in a controlled setting before relying upon your configuration.
One way to simulate accessing your home network from an external device is disconnecting the client laptop from your home WiFi, and then using your mobile phone as a WiFi hot spot.
Once connected to an external network, enter the following commands in the client terminal to access the Kali workstation remotely:
- Connect to the OpenVPN server.
2. SSH into the Raspberry Pi server
3. (From the Pi SSH server) Wake the Kali workstation
Be sure to wait a few seconds before attempting to access the remote desktop. The length of time required will vary depending upon the time it takes for your remote machine to boot.
4. (From the client laptop) RDP into the Kali workstation.
If everything works as it should, you will now be connected to your local Kali workstation on your home network!
Final Thoughts
The Kali workstation referenced in this guide can be replaced with any other Linux based operating system you may wish to connect- just change the terminal commands accordingly. It’s also possible to streamline your final connection work flow using a combination of bash functions and aliases depending on personal preference, but that’s beyond the scope of this guide.
Please feel free to leave any thoughts, concerns, or constructive criticism in the comments!
Источник


