- Системные требования Kali Linux
- Минимальные системные требования
- Информация
- Kali Linux. Системные требования.
- Kali linux системные требования x32
- System Requirements
- Installation Prerequisites
- Preparing for the Installation
- Kali Linux Installation Procedure
- Language
- Network
- User Accounts
- Clock
- Encrypted LVM
- Proxy Information
- Metapackages
- Boot Information
- Reboot
- Post Installation
Системные требования Kali Linux
Минимальные системные требования
- Разрядность: x86 (32-bit) или x64 (64-bit)
- ЦП [CPU]: Pentium IV
- Видеоадаптер [GPU]: 3D адаптер
- Видеопамять [VRAM]: 128 Mb
- Винчестер [HDD]: 20 Gb
- Оперативная память [RAM]: 0.5 Gb
- Аудиокарта [AUDIO]: Любая
- Контроллер: Клавиатура, Мышь
- Интернет: Широкополосный доступ
- Разрешение экрана: SVGA 800×600
- Дополнительно: DVD/CD привод или USB

Информация
- Название: Kali Linux
- Тип приложения: Операционная система
- Для устройств:
 PC
PC - Дата выхода: 2014 г.
- Разработчик: Offensive Security Ltd.
 PC
PCЧтобы нужная нам ОС Кали Линукс благополучно запустилась ПК, его характеристики должны удовлетворять таким условиям: CPU обязан обладать 32 (x86) или 64 разрядность и тактовую частоту 1 ГГц. ОЗУ желаемым количеством будет 0.5 гигабайт, это позволит гулять по всемирной сети и выполнять несколько процессов. Свободное пространство жёсткого диска должно составлять не менее 10 Gb. Видеокарта с памятью 128 Мб или больше.
Источник
Kali Linux. Системные требования.
вчера по случаю приобрёл туториал по сабжу. полистал. в системных требованиях сказано, что для него нужно 6 гиг оперативы. с другой стороны это те же яйца но сбоку. тот же правоверный Демьян но с фичами. так откуда 6 гиг?

На гном с свистоперделками конечно же.

на 2020 иметь меньше озу на компе это идиотизм

Идиотизм оценивать требуемые ресурсы по году.
это не «требуемые ресурсы» а «массово доступные за копейки»
Да никто и не спорит. Но если он реально стартануть с меньшей памятью не может это кря кек.
вангую у разработчиков просто нет компа с меньшим обьёмом озу и искать проверять другой они не парились
RAM for i386 and amd64 architectures, minimum: 1GB, recommended: 2GB or more.
хера ты норкоман. я сейчас милицию вызову !!
это понятно. а без гнума никак?
На гном с свистоперделками конечно же.
В Kali дефолтом XFCE
а зачем тебе КАЛи если без гнума?

для приложух типа бурпа
о это ближе к телу
там нужен именно гнум или только либы гнума? разница существенная
ниже пишут что там дефолт крыска.
PS я не в курсе, хочу потыкать палочкой

Мы уже здесь. Вот думаю прописать тебе целебного временного бана.
Вангую, что некоторые софтины, требуемые для пентестов, хотят много рамы.
не нужно я хороший 😀
2 гига или 1. Где ты 6 увидел?
я пентестил вендой, там 4 рамы. умвр. а откуда тут 6? есть больная идея поизвращаться на каком-нибудь атоме
в книжке же. вечером или на выхах скину фотачку страницы
Дык и почитай там дальше, зачем оно нужно, не? На сайте указано другое.
Он просто попой читает, я даже книжку нашёл.
Там автор рассказывает про установку в Virtualbox, и говорит, что на машине требуется 6 ГБ.

В книжке опечатка, требуется 64 Гб.
Быстро заказывай новые планки)
Это точно. Нормальную систему надо ставить. и уметь ее настроить. И можно стопицтот вкладок в хромиуме даже на четырех гигах открыть.
Ну и в книжке написано, что требуется 500 ГБ на компе.
Это типа для хостовой ОС (Windows по скринам). Виртуалка с Kali, а так же ещё виртуалка с Windows 10 для пенетрации.
А, то есть для всего виртуального зоопарка?
Боюсь, что у твоего ПК слотов не хватит.
С удовольствием (вместе с 100500 мильонов пользователей хрома и файрфокса во всём мире) почитаю о волшебной таблетке.
Может, вырубить все плагины и полностью отключить все возможные кеши? Конечно, это реально, только нужно инет иметь не только быстрый, но и качественный.
вместе с 100500 мильонов пользователей хрома и файрфокса во всём мире
В том-то и дело, что зделать что-либо с современным вэбом нельзя (перестрелять всех вэб-макак?). Но можно оптимизировать саму систему. Это поможет (в определенной степени). Я смог заставить нормально работать мамин компьютер с 4 гигами памяти на борту под нагрузкой в виде одновременно работающих хромиума с туевой хучей вкладок, нескольких экземпляров либры и скайпа. На машине стоит арч с кедами. Я настроил zram, жмется вся память в 4 потока алгоритмом lzo. Параллельно существует свап на диске. Потюнинговал swappiness, также кеши (уже не помню точно, что я там дергал, по-моему dirty.cache.ratio, background.cache.ratio и dirty.expire.centicecs). Теперь никаких тормозов не наблюдается. Можно, по идее, настроить cache.pressure. Этот параметр говорит ядру, насколько интенсивно нужно выгружать кеш из памяти. Но в принципе, все и так работает довольно шустро. Еще можно пользовать огнелис вместо хромиума. В фаерфоксе можно настроить количество потоков обработки контента для уменьшения потребления памяти. Это все, конечно, не очень глубокий тюнинг, но он достаточно эффективен. В моем случае он сработал.
я вообще большой любитель решать глобальные проблемы сверхмалыми силами 😀 ну типо хобби такое. дома кучу железок, домашних они раздражают хоть и лежат аккуратно. но они не понимают что железки это часть моей работы. или даже стиля жизни. железки лежат аккуратно, но всёравно раздражают. и не объяснишь их полезность. любое объяснение будет за гранью. руки чешутся испробовать какой нибудь атом с 2 гигами и на emc. правда ли что на нём жизни нет или просто маркетологи впихивают что подороже, на рязанях или седьмых корах.
по поводу вэб-макак. они не совсем свободны в выборе. над ними корпорации которые навязывают платформы. вэбня на 90% завязана на коммерцию. даже политота сейчас коммерческая. а там где коммерция там скорость. вот и клепают чтобы побыстрее. получается жручее и тяжёлое.
по поводу темки топика. я не занимаюсь тестами на проникновение. проникновением тоже не занимаюсь. но как оно всё работает довольно интересно. буду пользовать кали или нет не знаю, но книжечку почитаю. для того и куплена.
Да, оптимизировать систему под старые железки интересно. Хотя, не всегда в этом есть практическая польза. Так или иначе, можно получить опыт и знания. Ну и приятно видеть, как прежде свистопердящий агрегат нормально справляется с возложенной на него нагрузкой.
ну, совсем хлам я не храню. зачем? я ж не сумасшедший плюшкин. храню только перспективное что может быть использовано
Источник
Kali linux системные требования x32
Installing Kali Linux (single boot) on your computer is an easy process. This guide will cover the basic install (which can be done on bare metal or guest VM), with the option of encrypting the partition. At times, you may have sensitive data you would prefer to encrypt using Full Disk Encryption (FDE). During the setup process you can initiate an LVM encrypted install on either Hard Disk or USB drives.
First, you’ll need compatible computer hardware. Kali Linux is supported on amd64 (x86_64/64-Bit) and i386 (x86/32-Bit) platforms. Where possible, we would recommend using the amd64 images. The hardware requirements are minimal as listed in the section below, although better hardware will naturally provide better performance. You should be able to use Kali Linux on newer hardware with UEFI and older systems with BIOS.
Our i386 images, by default use a PAE kernel, so you can run them on systems with over 4 GB of RAM.
In our example, we will be installing Kali Linux in a fresh guest VM, without any existing operating systems pre-installed. We will explain other possible scenarios throughout the guide.
System Requirements
The installation requirements for Kali Linux will vary depending on what you would like to install and your setup. For system requirements:
- On the low end, you can set up Kali Linux as a basic Secure Shell (SSH) server with no desktop, using as little as 128 MB of RAM (512 MB recommended) and 2 GB of disk space.
- On the higher end, if you opt to install the default Xfce4 desktop and the kali-linux-default metapackage, you should really aim for at least 2 GB of RAM and 20 GB of disk space.
- When using resource-intensive applications, such as Burp Suite, they recommend at least 8 GB of RAM(and even more if it large web application!) or using simultaneous programs at the same time.
Installation Prerequisites
This guide will make also the following assumptions when installing Kali Linux:
- Using the amd64 installer image.
- CD/DVD drive / USB boot support.
- Single disk to install to.
- Connected to a network (with DHCP & DNS enabled) which has outbound Internet access.
We will be wiping any existing data on the hard disk, so please backup any important information on the device to an external media.
Preparing for the Installation
Download Kali Linux (We recommend the image marked Installer).
Burn The Kali Linux ISO to DVD or image Kali Linux Live to USB drive. (If you cannot, check out the Kali Linux Network Install).
Backup any important information on the device to an external media.
Ensure that your computer is set to boot from CD/DVD/USB in your BIOS/UEFI.
Kali Linux Installation Procedure
- To start your installation, boot with your chosen installation medium. You should be greeted with the Kali Linux Boot screen. Choose either Graphical install or Install (Text-Mode). In this example, we chose the Graphical install.
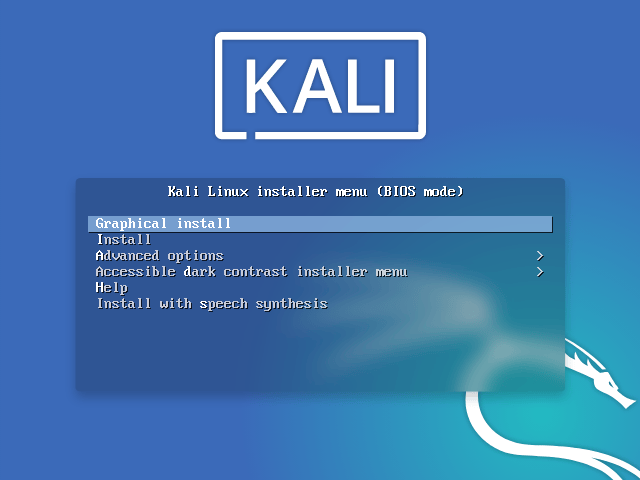
If you’re using the live image instead, you will see another mode, Live, which is also the default boot option. 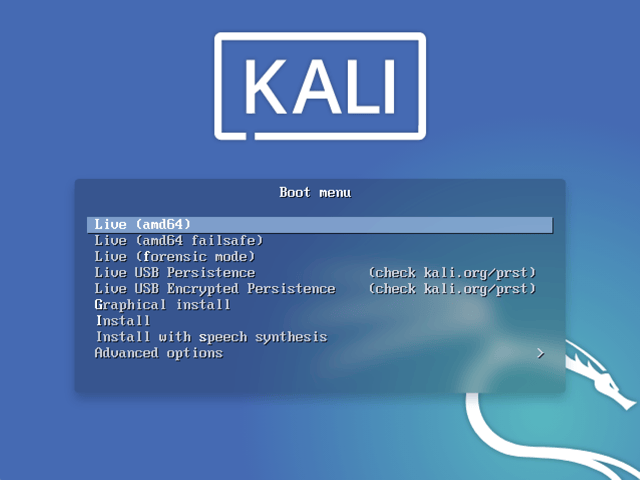
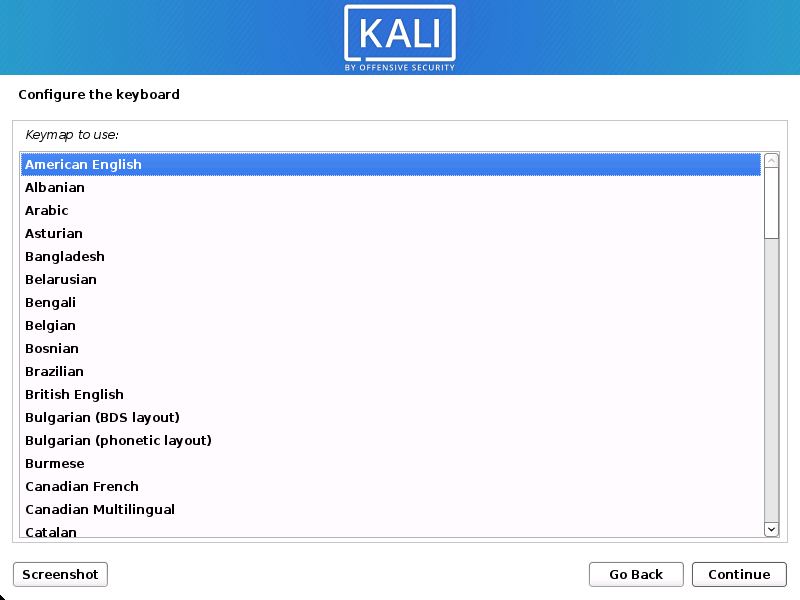
Language
- Select your preferred language. This will be used for both the setup process and once you are using Kali Linux.
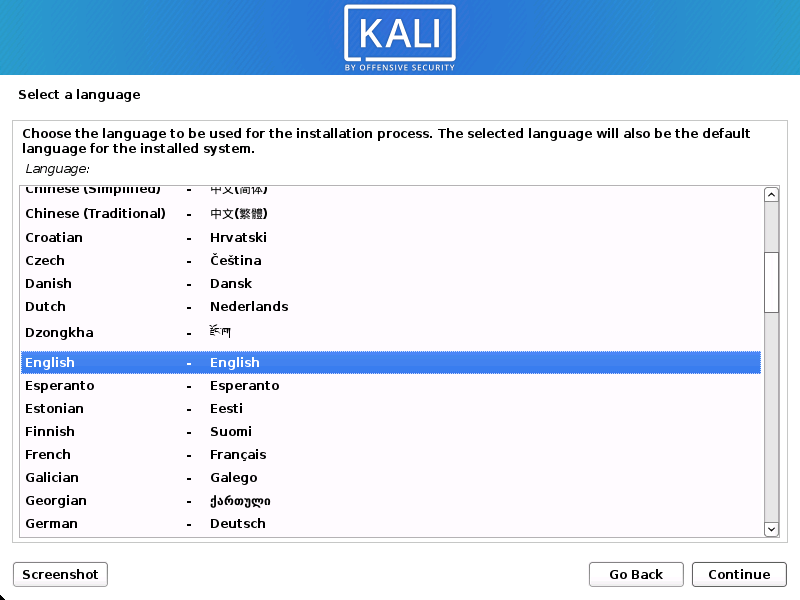
- Specify your geographic location.
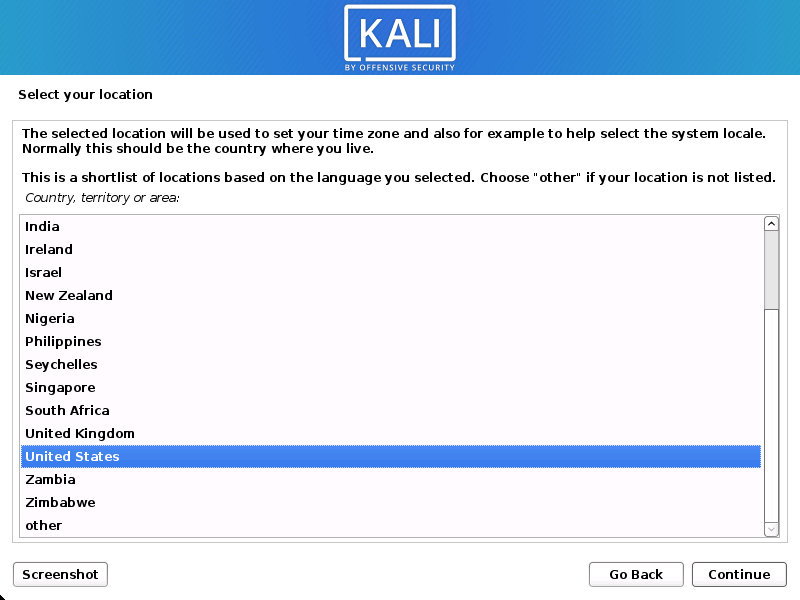
- Select your keyboard layout.
Network
- The setup will now probe your network interfaces, looks for a DHCP service, and then prompt you to enter a hostname for your system. In the example below, we’ve entered kali as our hostname.
If there is no network access with DHCP service detected, you may need to manually configure the network information or do not configure the network at this time.
- If there isn’t a DHCP service running on the network, it will ask you to manually enter the network information after probing for network interfaces, or you can skip.
- If Kali Linux doesn’t detect your NIC, you either need to include the drivers for it when prompted, or generate a custom Kali Linux ISO with them pre-included.
- If the setup detects multiple NICs, it may prompt you which one to use for the install.
- If the chosen NIC is 802.11 based, you will be asked for your wireless network information before being prompted for a hostname.
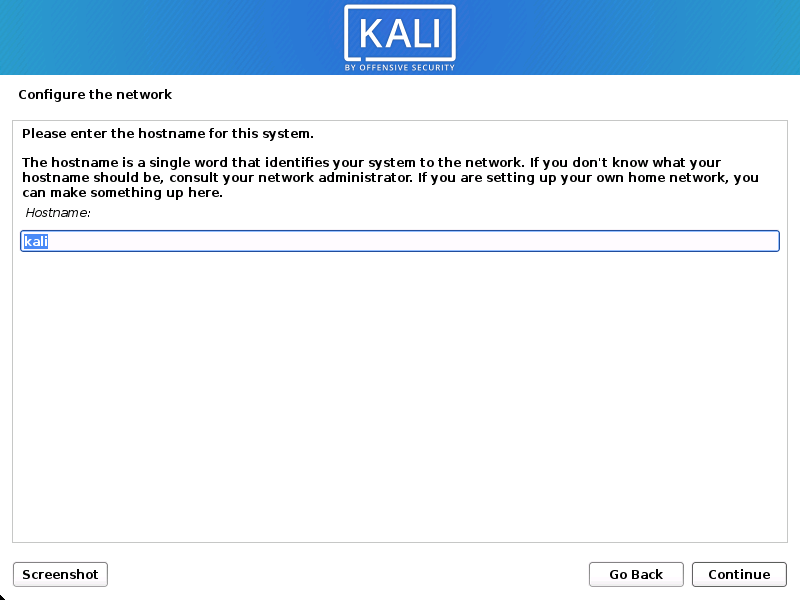
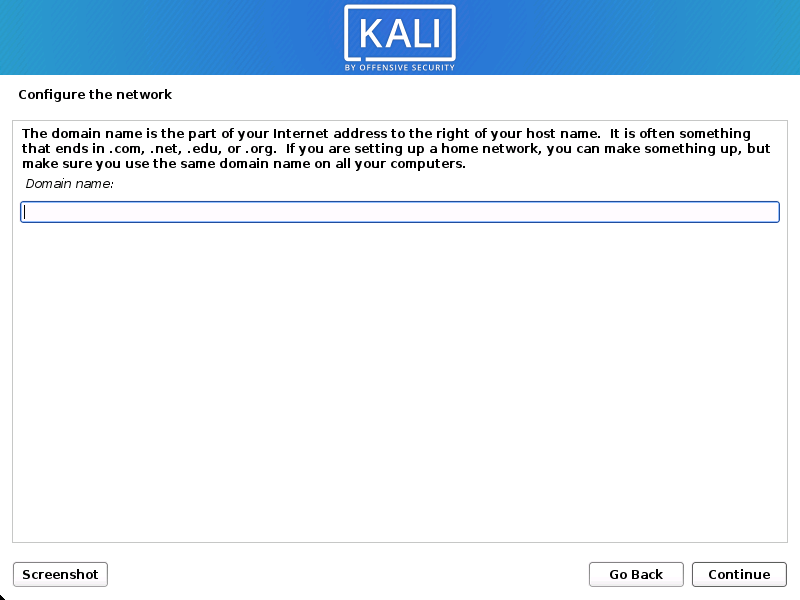
- You may optionally provide a default domain name for this system to use (values may be pulled in from DHCP or if there is an existing operating systems pre-existing).
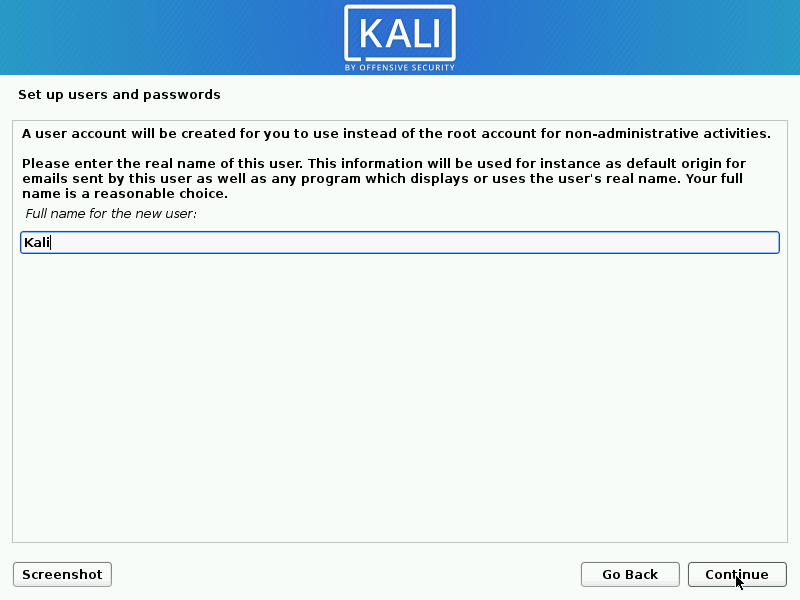
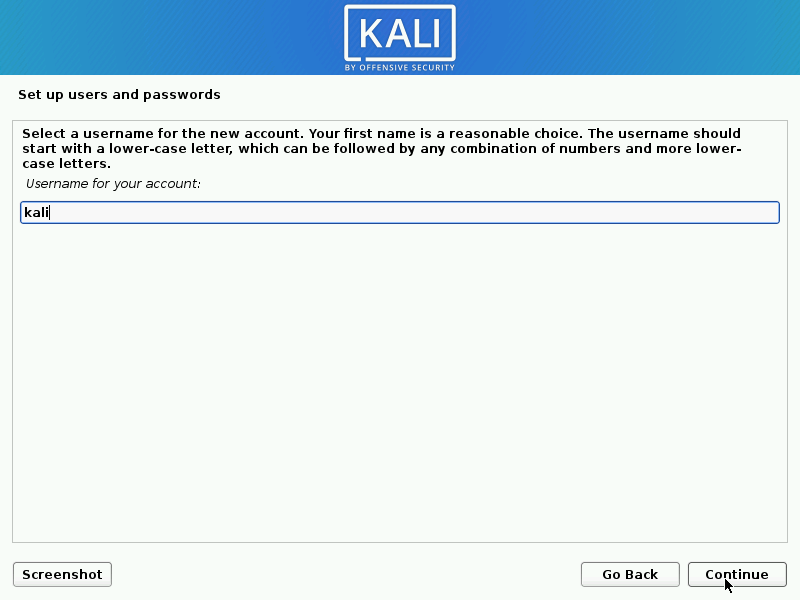
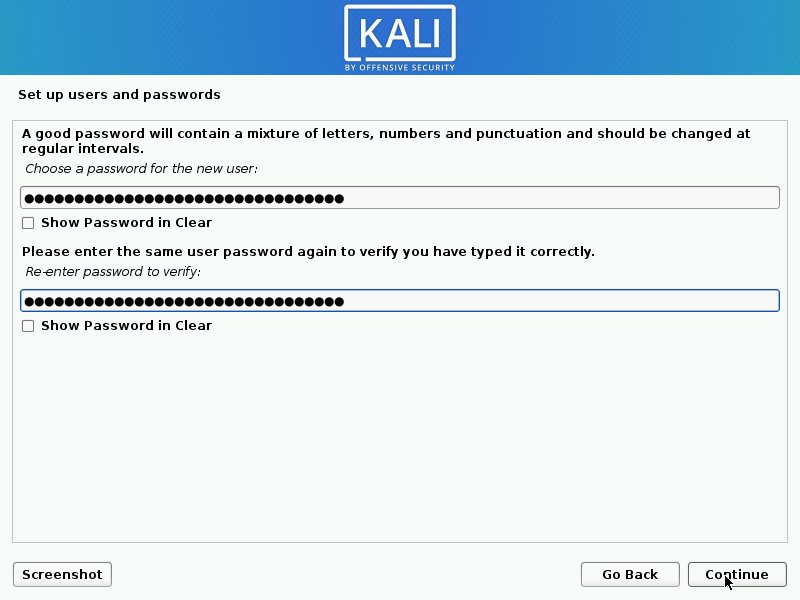
User Accounts
- Next, create the user account for the system (Full name, username and a strong password).
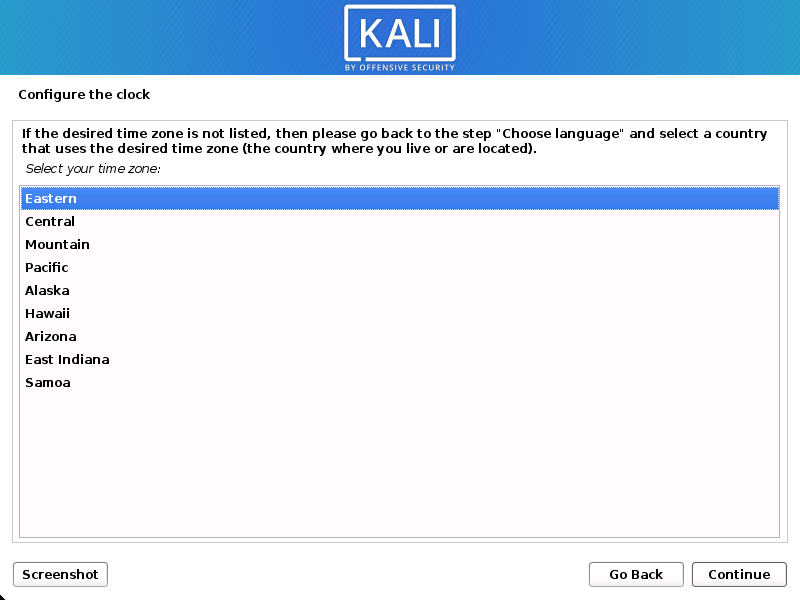
Clock
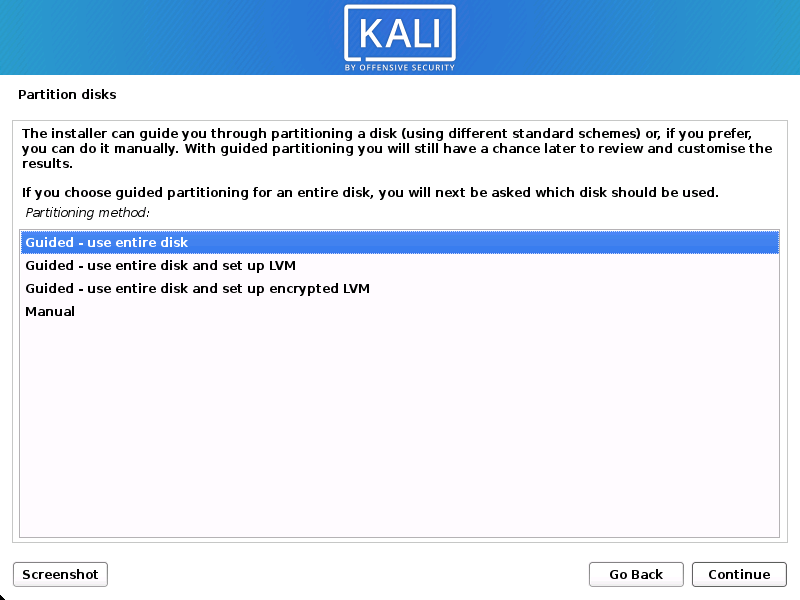
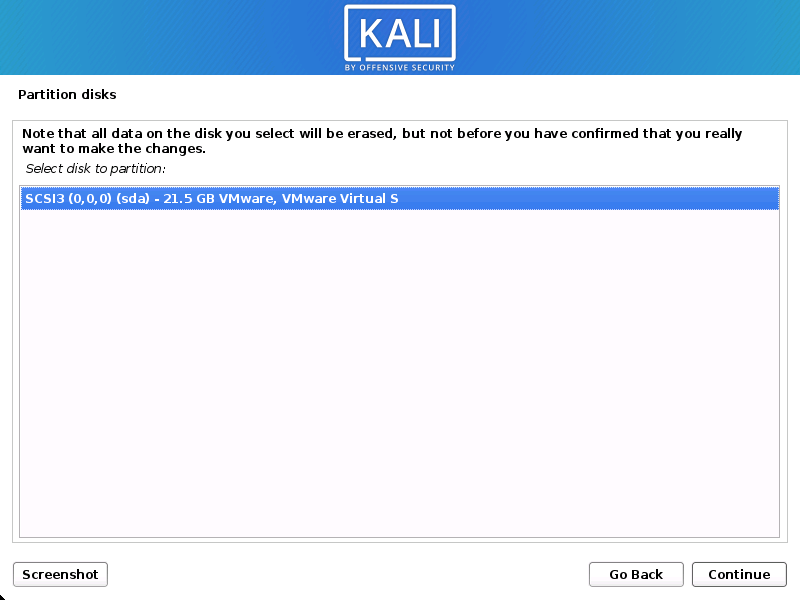
- The installer will now probe your disks and offer you various choices, depending on the setup.
In our guide, we are using a clean disk, so we have four options to pick from. We will select Guided — the entire disk, as this is the single boot installation for Kali Linux, so we do not want any other operating systems installed, so we are happy to wipe the disk.
If there is an pre-existing data on the disk, you will have have an extra option (Guided — use the largest continuous free space) than the example below. This would instruct the setup not to alter any existing data, which is perfect for for dual-booting into another operating system. As this is not the case in this example, it is not visible.
Experienced users can use the “Manual” partitioning method for more granular configuration options, which is covered more in our BTRFS guide.
If you want to encrypt Kali Linux, you can enable Full Disk Encryption (FDE), by selecting Guided — used entire disk and setup encrypted LVM. When selected, later on in the setup (not in this guide) prompt you to enter a password (twice). You will have to enter this password every time you start up Kali Linux.
- Select the disk to be partitioned.
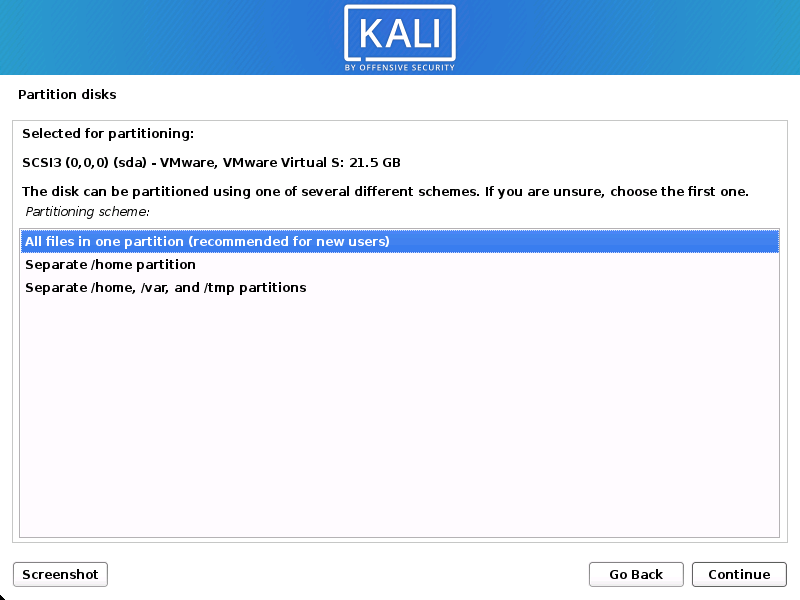
- Depending on your needs, you can choose to keep all your files in a single partition — the default — or to have separate partitions for one or more of the top-level directories.
If you’re not sure which you want, you want “All files in one partition”.
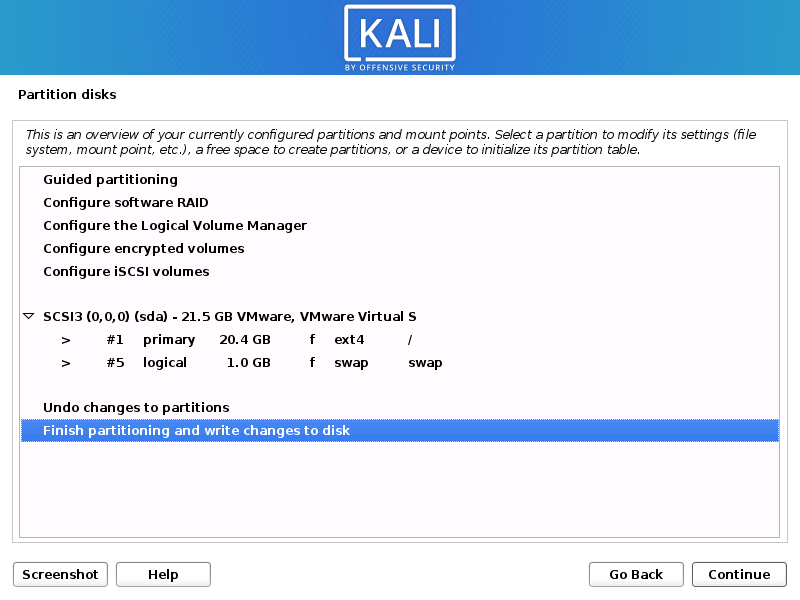
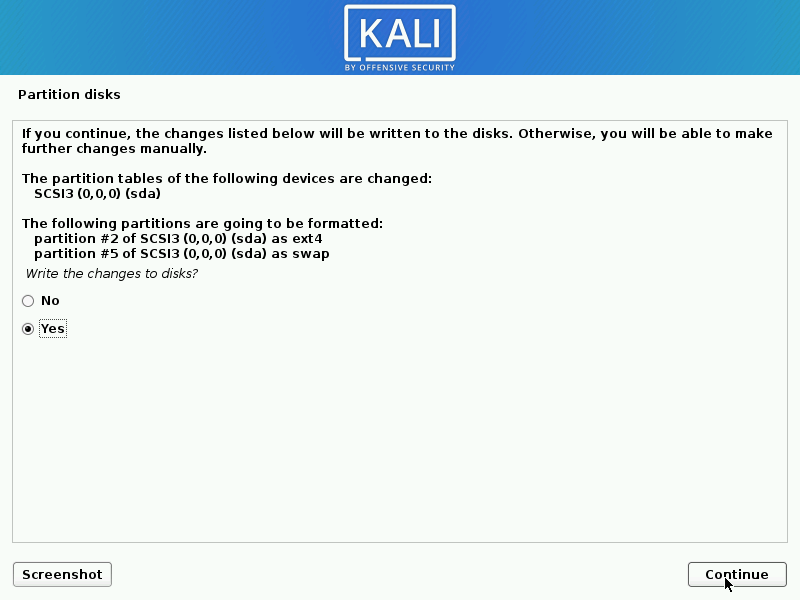
- Next, you’ll have one last chance to review your disk configuration before the installer makes irreversible changes. After you click Continue, the installer will go to work and you’ll have an almost finished installation.
Encrypted LVM
If enabled in the previous step, Kali Linux will now start to perform a secure wipe of the hard disk, before asking you for a LVM password.
Please sure a strong password, else you will have to agree to the warning about a weak passphrase.
This wipe may take “a while” (hours) depending on the size and speed of the drive.
If you wish to risk it, you can skip it.
Proxy Information
- Kali Linux uses a central repository to distribute applications. You’ll need to enter any appropriate proxy information as needed.

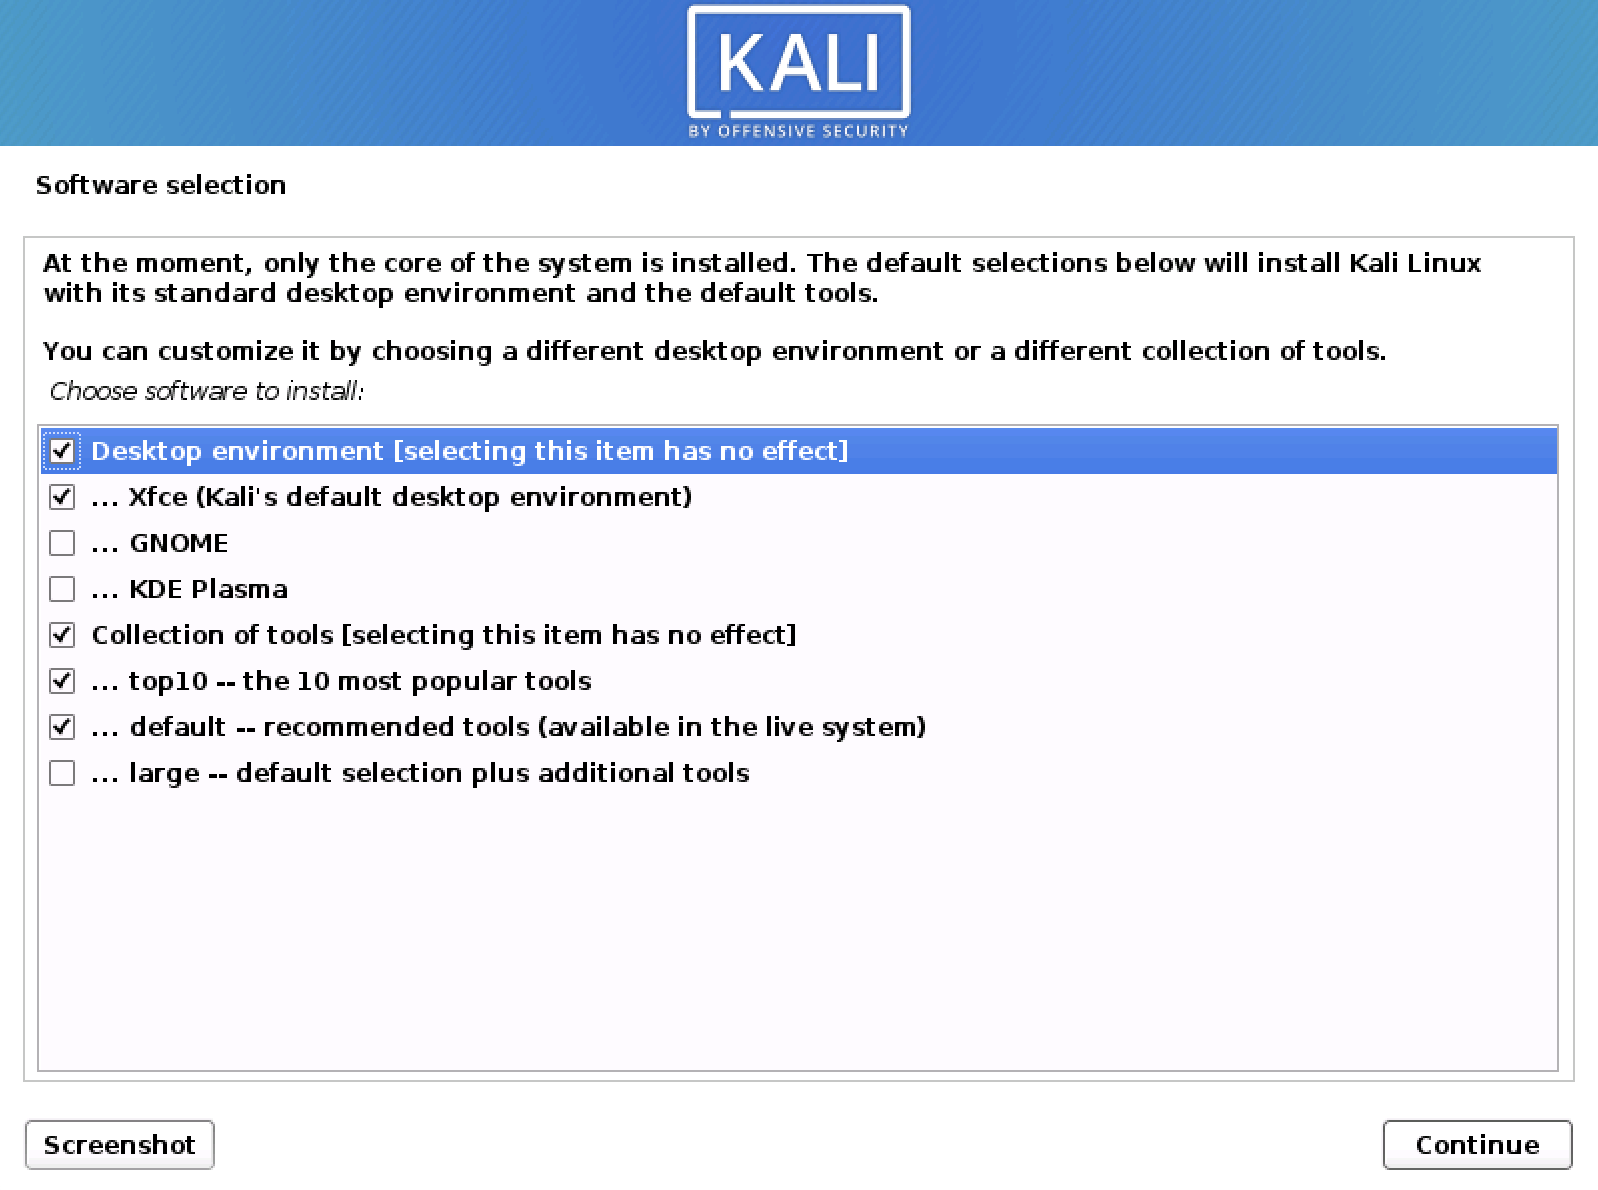
Metapackages
If network access was not setup, you will want to continue with setup when prompt.
If you are using the Live image, you will not have the following stage.
- Next you can select which metapackages you would like to install. The default selections will install a standard Kali Linux system and you don’t really have to change anything here.
Please refer to this guide if you prefer to change the default selections.
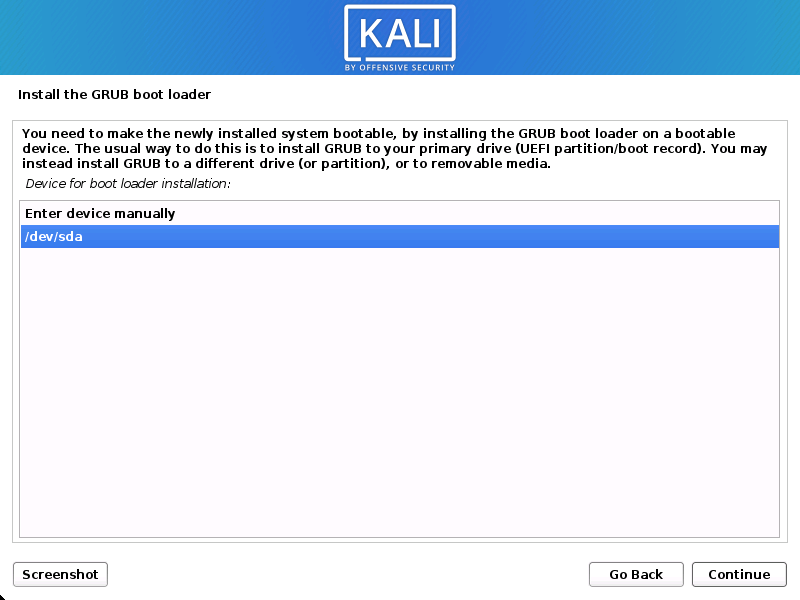
Boot Information
- Next confirm to install the GRUB boot loader.
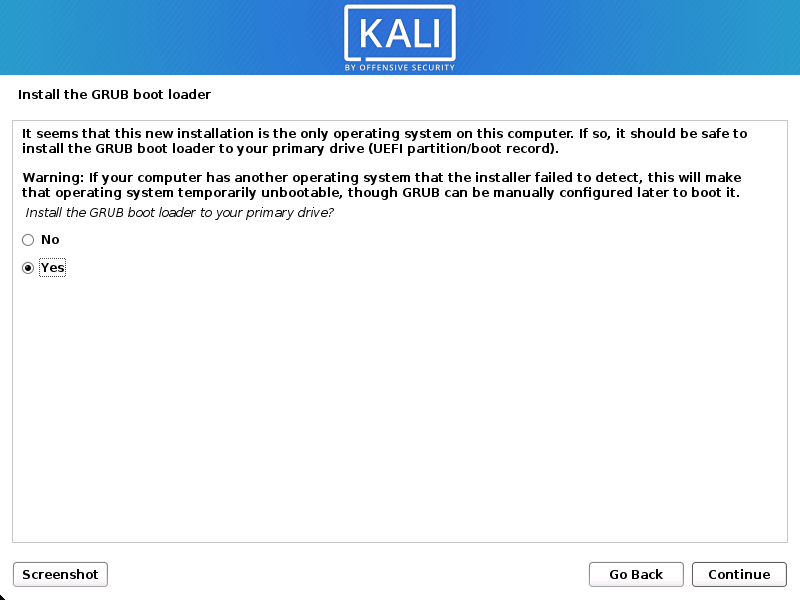
- Select the hard drive to install the GRUB bootloader in (it does not by default select any drive).
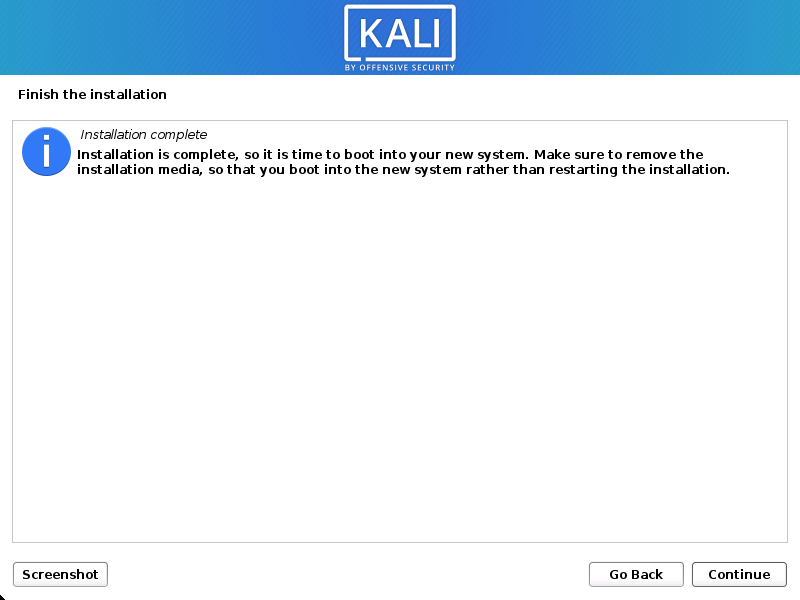
Reboot
- Finally, click Continue to reboot into your new Kali Linux installation.
Post Installation
Now that you’ve completed installing Kali Linux, it’s time to customize your system.
The General Use section has more information and you can also find tips on how to get the most out of Kali Linux in our User Forums.
Updated on: 2021-Sep-27
Author: gamb1t
Источник


