- Kali linux sticky fingers
- Kali-Pi: Sticky Fingers Kali Pi
- Kali-Pi Launcher
- Installation
- Usage
- Layout
- Start Screen
- menu-pin.py
- Screensaver
- Run menu at startup
- Fix Pygame on Debian Jessie
- Re4son-Pi-Kernel
- Re4son “ current stable ” kernel highlights:
- Re4son “ old stable ” kernel highlights:
- Re4son “ next ” experimental kernel highlights:
- Installation using the Re4son-Kernel apt repository:
- Manual Installation:
- Bluetooth
- Kernel Headers
- Nexmon Drivers (included in “current stable” & “old stable”)
- No need to do anything with the latest “current” and “next” kernels
- For older kernel versions:
- Images with Re4son Kernel (Best to use Chrome for download)
- Bluetooth
- Ethernet Gadget
- Setting up wifi via the command line
- Re4son
- Kali Linux on Raspberry Pi 1/2/3(+)/4/Zero(W) with touch optimized interface in a ready-to-go image (Refreshed 03-June-2019 with full RasPi 4 support)
- Sticky Finger’s Quick Start Guide:
- Installation
- TIP: How to mount the img file in linux
Kali linux sticky fingers
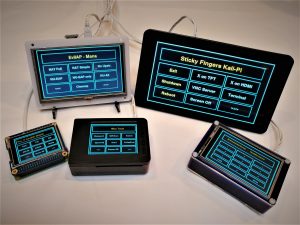
Simple touch menu for Raspberry Pi projects using a 3.5″ (480×320) or 2.8″ (320×240) touch screen based on garthvh’s original project.
Thanks to JPearn for porting it to 2.8″ and to ArmyGuy255a for cleaning up the code and improving the layout.
It runs as a python script in the framebuffer without needing a desktop environment.
This menu is the default launcher in Sticky Finger’s Kali Pi 
I was after an easy way to launch X Window on either the TFT screen or through HDMI without the need for massive reconfigurations. I came accross garthvh’s project featured on Adafruit and used it as basis for this project
Important: Pygame is broken on on Debian Jessie. I’ll explain below how to fix it.

All functions are self explainatory. After exiting and application, the screen returns back to the last menu.
The «Screen Off» function launches the python script «menu_screenoff.py», which uses the RPi.GPIO module to turn the screen off. You can turn it back on by pressing anywhere on the screen.
Using the «>>>» button, we can scroll to the next screen, namely «menu_kali-2.py»
The buttons allow us to stop and start services
The button changes to green when the service is running Press the button again to stop the service.
The variable «KPPIN» in the file
/menu can be set to «1» to enable PIN authentication to hide the menus from spying eyes:

The screensaver can be enabled by setting the variable KPTIMEOUT in the file «./menu». Set it to the number of minutes after which the screensaver should kick in (very approximate value). Use 1 for 1 min, 0.5 for 30sec, etc. Touch anywhere on the screen to wake the system up. When KPPIN is set, the screen will return to the PIN menu after waking up.
Run menu at startup
The preferred method to run this script on startup is to add it to the end of «.profile»
And add the following line to the bottom of the file
Fix Pygame on Debian Jessie
The package «libsdl1.2-15-10», which ships with Debian Jessie, breaks pygame. To make it work we have to revert back to «libsdl1.2-15-5» from Wheezy.
The quickest way is to comment everything out in your /etc/apt/sources.list and temporarily add:
Import the corresponding keys:
Remove the offending package and replace it with the working one:
Источник
Kali-Pi: Sticky Fingers Kali Pi
by do son · December 11, 2017
Kali-Pi Launcher
Simple touch menu for Raspberry Pi projects using a 3.5″ (480×320) or 2.8″ (320×240) touchscreen based on garthvh’s original project.
Thanks to JPearn for porting it to 2.8″ and to ArmyGuy255a for cleaning up the code and improving the layout.
It runs as a python script in the framebuffer without needing a desktop environment.
This menu is the default launcher in Sticky Finger’s Kali Pi
I was an easy way to launch X Window on either the TFT screen or through HDMI without the need for massive reconfigurations. I came across garthvh’s project featured on Adafruit and used it as basis for this project
Installation
customise the file “menu” to match the path, define the screen size, etc. cusomise the scripts to suit your needs
Usage
Layout
Start Screen
All functions are self-explanatory. After exiting an application, the screen returns back to the last menu.
The “Screen Off” function launches the python script “menu_screenoff.py”, which uses the RPi.GPIO module to turn the screen off. You can turn it back on by pressing anywhere on the screen.
Using the “>>>” button, we can scroll to the next screen, namely “menu_kali-2.py”
The buttons allow us to stop and start services
The button changes to green when the service is running Press the button again to stop the service.
menu-pin.py
The variable “KPPIN” in the file
/menu can be set to “1” to enable PIN authentication to hide the menus from spying eyes:
Screensaver
The screensaver can be enabled by setting the variable KPTIMEOUT in the file “./menu”. Set it to the number of minutes after which the screensaver should kick in (very approximate value). Use 1 for 1 min, 0.5 for 30sec, etc. Touch anywhere on the screen to wake the system up. When KPPIN is set, the screen will return to the PIN menu after waking up.
Run menu at startup
The preferred method to run this script on startup is to add it to the end of “.profile”
And add the following line to the bottom of the file
Fix Pygame on Debian Jessie
The package “libsdl1.2-15-10”, which ships with Debian Jessie, breaks pygame. To make it work we have to revert back to “libsdl1.2-15-5” from Wheezy.
The quickest way is to comment everything out on your /etc/apt/sources.list and temporarily add:
deb http://archive.raspbian.org/raspbian wheezy main contrib non-free
Import the corresponding keys:
deb http://archive.raspbian.org/raspbian wheezy main contrib non-free
gpg -a –export 9165938D90FDDD2E | sudo apt-key add –
Remove the offending package and replace it with the working one:
sudo apt-get update
sudo apt-get remove libsdl1.2debian python-pygame
apt-get install libsdl-image1.2 libsdl-mixer1.2 libsdl-ttf2.0-0 libsdl1.2debian libsmpeg0 python-pygame
sudo apt-mark hold libsdl1.2debian
Источник
Re4son-Pi-Kernel

- Raspberry Pi 0/0W/1/2/3 A/B(+) support
- Experimental 64bit support (kernel8-alt.img)
- Natively compiled full of pure goodness
- Includes kernel headers
- Support for all common TFT screens
- Latest Nexmon drivers
Re4son “ current stable ” kernel highlights:
- Raspberry Pi 3 A+ support
- Raspberry Pi PoE HAT support
- Supports armel (Pi 1, Zero, Zero W) and armhf (Pi 2, 3)
- Linux kernel 4.14.93
- Natively compiled for perfect out of tree module compilations in kali linux
- Ethernet gadget support to ssh into raspberry pi via USB connection
- “kalipi-config” tool to set up the raspberry pi, enable auto-logon, etc.
- “kalipi-tft-config” tool to setup tft displays
- Support for all common displays
- Includes latest nexmon drivers in “nexmon” directory (with support for -m6 and -m7)
- “swap brcmfmac firmware” function in “kalipi-config”
- Includes xinput-calibrator in “tools” directory
- RTL8188EU driver (TL-WN722N v2) with monitor mode support
- RTL8812AU & RTL8811 & RTL8814AU with monitor & injection support
- Kimocoders brand new rtl8192eu driver with injection support
- Wifi injection support for Alfa AWUS051NH v2
- Bluetooth package upgraded to Bluez 5.39 makes it faster and more stable
- Any questions or poblems? Post in the forums
Download the “current stable” Re4son Kernel here
(sha256sum: 208FBDAD9AD0EE7E52A4641F46156028B1F564839210D22A1E490ABE3D2B3BA5)
Re4son “ old stable ” kernel highlights:
- Previous stable kernel, based on Linux kernel 4.9
- Safer alternative if the “current stable” doesn’t support your hardware
Download the “old stable” Re4son Kernel here
(sha256sum: be47769c6c6943b08e28eeb0d86f9304cd2ea234a3bead0369bd9c9c32f2fe1e)
Re4son “ next ” experimental kernel highlights:
- Linux kernel 4.19.15
- Kimocoders brand new rtl8192eu driver with injection support
- Mediatek wifi drivers mt76x0u & mt76x2u
- Warning: No nexmon drivers yet for this kernel!
- Warning: Bluetooth is not working
Download the “next” Re4son Kernel here
(sha256sum: 23643AA85B1215DDE205ACF4FEDF10754E1FA397B4EE301069C1964990A92C7E)
Installation using the Re4son-Kernel apt repository:
Manual Installation:
For Raspberry Pi 3 and Pi Zero W:
– Press “Y” when prompted to install bluetooth and wifi drivers (not required on Raspbian)
– Say “Y” when prompted to enable bluetooth services (you can still disable it later)
– reboot
Bluetooth
There aren’t any issues with Bluetooth but if you want to de-install or re-install the drivers just type:
Kernel Headers
You will be offered to install the headers during the kernel installation.
To install them later manually , run the installer again like this:
shell]cd /usr/local/src/re4son-kernel_4*
./install.sh -e[/shell]
Nexmon Drivers (included in “current stable” & “old stable”)
No need to do anything with the latest “current” and “next” kernels
The nexmon drivers are fully stable and now compiled in the kernel tree.
For older kernel versions:
The nexmon drivers enable monitor mode and frame injection for the build in wifi chips of the Pi3B and Pi0W.
The re4son kernel includes the compiled nexmon drivers and firmware with -m6 and -m7 support.
To install, reboot after installing a new kernel and run:
If you have any problems with the drivers and wish to rollback to the original ones, just run:
Head over to the nexmon project for details:
https://github.com/seemoo-lab/nexmon
Images with Re4son Kernel
(Best to use Chrome for download)
Important: These images use the smallest possible partition size, run “kalipi-config” and extend your partition first thing when you boot up or you run out of space very quickly:
Note: Unofficial Kali images have been retired.
Official Kali Linux images ship with the latest re4son-kernel and kalipi-tft-config already.
- PI-Tail with Re4son-Kernel:
Kali-Pi 2018.2 for RasPi 0W on the go. For full info check this page.
| Architecture | Link |
| ARMEL (Pi 1/0/0W) | https://re4son.com/re4son/download/pi-tail/ (SHA256: 5bae6ffe9ab5b99f1da242b5350b9c02e9a2f565d0efa9c7cbd6dd282d64c825) |
Sticky Finger’s Kali-Pi images with Re4son Kernel (Use these for best TFT support):
Kali-Pi images with Sticky Fingers goodies. For step by step setup guide check this page.
| Architecture | Link |
| ARMHF (Pi 2/3 B/B+) | https://re4son.com/re4son/download/sticky-fingers-kali-pi/ (SHA256: 2af864c01fea28ec78530583604bde4cd7093496f8a0cc88c6f15b3d72924695) |
| ARMEL (Pi 1/0/0W) | https://re4son.com/re4son/download/sticky-fingers-kali-pi-0/ (SHA256: 270044dd0d8decba4e5710182a3b9974e951c5da012ac3925b18319b91270615) |
Bluetooth
Make sure the bluetooth service is enabled and started, via:
You are now ready to pair your devices, just like this:
Voila – there it is, Bluetooth device connected.
Ethernet Gadget
The Re4son-Kernel supports ethernet gadget mode and both Pi zero armel images on this page have the usb0 interface enabled out of the box to allow the initial setup without any additional hardware except a micro usb cable.
Below the steps to get it working:
- Image a micro SD card
- Leave the card in your computer and edit the following two files in the /boot partition:
– cmdline.txt: Add “modules-load=dwc2,g_ether” after “rootwait“
– config.txt: Add “dtoverlay=dwc2“ - Insert the card into your Raspberry Pi zero
- Insert the micro USB cable into the usb port of the Pi (not the power port) and your computer
- Wait for the Pi to boot up and enable ICS for the newly created adapter on your PC or MAC (Don’t have VM’s running at this point)
- Wait a minute and ssh into “kali.mshome.net” from you PC (not sure about Mac).
– If the name resolution doesn’t work, find the IP address of your Pi via:
Sticky Fingers Kali-Pi images come with a nifty bonjour treat that allows you to connect to kali-pi.local – More about this in the forum
Voila – there it is, ssh connection via usb cable.
Setting up wifi via the command line
UPDATE: No need to do these steps, r un “kalipi-config” instead to set up wifi
Old-Skool way:
To configure a wifi network, disable network-manager, configure /etc/wpa_supplicant.conf and /etc/network/interfaces:
Edit “/etc/network/interfaces” and add the following stanza:
Источник
Re4son
Kali Linux on Raspberry Pi 1/2/3(+)/4/Zero(W) with touch optimized interface in a ready-to-go image
(Refreshed 03-June-2019 with full RasPi 4 support)
Sticky Finger’s Kali-Pi – The pocket size, finger friendly, lean mean hacking machine
Need practice targets? Checkout Sticky Finger’s DV-Pi
Sticky Finger’s Quick Start Guide:
Sticky Finger’s Kali-Pi image comes with the following features out of the box:
- 2GB image ready to go with all common touch screens.
- Kali Linux Rolling edition with MSF meta package and all other essential tools
- Re4son Kali-Pi Kernel 4.14 with bluetooth, touch screen support and wifi injection patch
- “re4son-pi-tft-setup” tool to set up all common touch screens, enable auto-logon, etc.
- “kalipi-config” tool to set up the raspberry pi (improved raspi-config for kali)
- Apache, Pure-FTP, SDR-Scanner, Screenshot Tool, ntop, darkstats, mana-toolkit,
Kismet classic, Kismet development, Remote Access AP, Sticky Finger’s Kali-Pi Launcher - Boots into vanilla kali gui but comes with user “pi” pre-configured to launch
the “Sticky Finger’s Kali-Pi Launcher” (touch screen interface) after login - Just run “re4son-pi-tft-setup” tool for your particular screen and you are up and running.
- Out of the box support for on-board Bluetooth & wifi with nexmon patches
Installation
- Download the Sticky Finger’s Kali-Pi image here:
Architecture Link armhf (Pi 2/3/4 B/B+) https://whitedome.com.au/re4son/download/sticky-fingers-kali-pi/
SHA256: 41fa0a79f51d6d7c774f1cfb30c0ac3a3aee32569ee7f08ce887786a54de2c6farmel (Pi 1/Zero/Zero W) https://whitedome.com.au/re4son/download/sticky-fingers-kali-pi-0/
SHA256: 270044dd0d8decba4e5710182a3b9974e951c5da012ac3925b18319b91270615 - write it to your microSD card (Windows=Win32 Disk Imager, Linux=dd):
Minimum recommended card sizes:
- 8GB for Kali-Pi MSF – basic Kali MSF package (this image)
- 16GB for Kali-Pi Full – install kali-linux-full and OpenVAS (very tight)
- 32GB for Kali-Pi Complete – Install the above plus Snort and other goodies
- Boot up your Pi and ssh into it with user root and password toor
- Change passwords (default: root=toor, pi=raspberry, ftp/pi=raspberry, vnc/root=toortoor)
- Set up the screen with the kalipi-tft-config tool:
- Optional: setup wifi and enable “Automatic boot into Sticky Finger’s Touch Interface”:
- Edit “/home/pi/Kali-Pi/menu” to define your screensize, enable/disable screensaver and PIN:
Reboot and enjoy 🙂
To pair Bluetooth devices, just start the bluetooth services:
You are now ready to pair your devices, just like this:
[bluetooth]# agent on
Agent registered
[bluetooth]# default-agent
Default agent request successful
[bluetooth]# scan on
Discovery started
[bluetooth]# pair 00:1F:xx:xx:xx:xx
Attempting to pair with 00:1F:xx:xx:xx:xx
…snip…
Pairing successful
[bluetooth]# trust 00:1F:xx:xx:xx:xx
[CHG] Device 00:1F:xx:xx:xx:xx Trusted: yes
[bluetooth]# connect 00:1F:xx:xx:xx:xx
Attempting to connect to 00:1F:xx:xx:xx:xx
Connection successful
Voila – there it is, Bluetooth device connected.
TIP: How to mount the img file in linux
If you are curious to see what’s in the image file before you write it to the SD card, here is how you can mount it in linux:
- Check the file system table with fdisk:
- Create a mount point for each image
- Mount each image
Источник


