- Kali linux tools installer
- Content
- Which Image to Choose
- Which Desktop Environment and (Meta)Packages to Choose During Installation:
- Kali linux tools installer
- About
- Resources
- License
- Releases
- Packages 0
- Contributors 5
- Languages
- How to Auto Install All Kali Linux Tools Using “Katoolin” on Debian/Ubuntu
- Major Features of Katoolin
- Requirements
- Installing Katoolin
- How do I use Katoolin?
- Conclusion
- If You Appreciate What We Do Here On TecMint, You Should Consider:
- Как установить инструменты Kali Linux с помощью Katoolin в Ubuntu 18.04 LTS
- Установка Katoolin в Ubuntu 18.04 LTS
- Установите инструменты Kali Linux с помощью Katoolin
Kali linux tools installer
In this section, we will describe the process of installing Kali Linux on 32-bit and 64-bit hardware using the images published on the Kali Linux download page.
Content
Which Image to Choose
The Kali Linux download page offers three different image types (Installer, NetInstaller and Live) for download, each available for both 32-bit and 64-bit architectures.
If in doubt, use the “Installer” image. You will need to check your system architecture to know whether to get 32-bit or 64-bit. If you don’t know it, you’re best to research how to find out (As a rule of thumb, if your machine’s newer than 2005 you should be okay with amd64/x64/64-bit)
Installer
This is the recommended image to install Kali Linux. It contains a local copy of the (meta)packages listed (top10, default & large) so it can be used for complete offline installations without the need of a network connection.
This image cannot be used to boot a live system (such as directly running Kali from a USB). It is only an installer image.
NetInstaller
This image can be used if you want the latest package every time you install Kali Linux or the standard installer image is too big to download. This image is very small because it does not contain a local copy of (meta)packages to install. They will all be downloaded during installation, so as a result this requires a network connection which will slow down the installation time.
Only use this image if you have reasons not to use the standard installer image above.
This image cannot be used to boot a live system (such as directly running Kali from a USB). It is only an installer image.
This image is for running Kali Linux without installing it first so it is perfect for running off a USB drive (or a CD/DVD).
You are able to install Kali Linux in its default configuration from this image but you will not be able to choose between desktop environments or to specify additional (meta)packages to install.
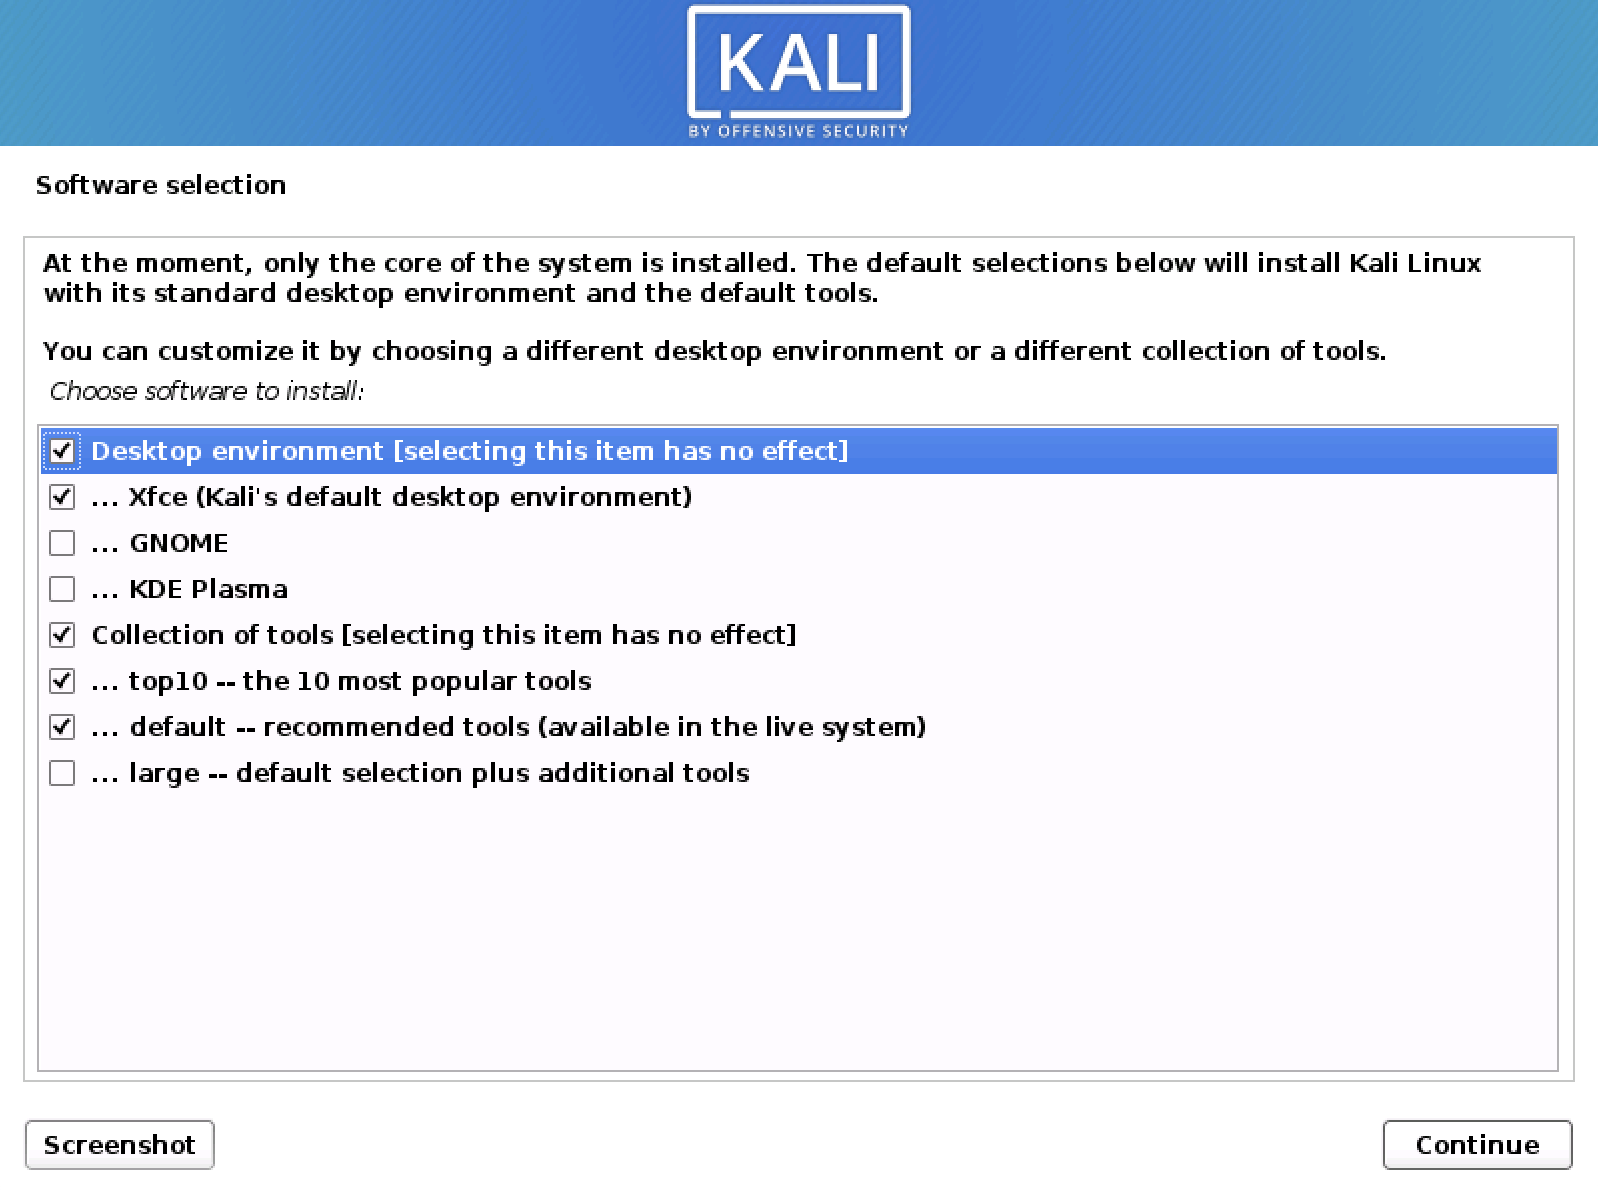
Which Desktop Environment and (Meta)Packages to Choose During Installation:
Each Kali Linux installer image (not live) allows the user to select the preferred “Desktop Environment (DE)” and software collection (metapackages) to be installed with operating system (Kali Linux).
We recommend sticking with the default selections and add further packages after the installation as required. Xfce is the default desktop environment, and kali-linux-top10 and kali-linux-default are the tools which get installed at the same time.
At this screen, you may wish to not install a desktop environment, then Kali Linux becomes “headless” (no graphic interface) which uses less system resources up and commonly found on servers, dropboxes, low powered ARM devices, and the cloud. This is meant for people who are completely comfortable with the command line. You are able to install multiple Desktop Environments, allowing you to switch, we wouldn’t recommend it. You may change your mind and switch desktop environments at a later date.
May wish to not to install any of the pre-defined software packages/bundles/collections (metapackages), giving you a finer degree of control of manually installing exactly what software you want. Alternatively you may want to be more prepared and install more than the default toolset. Please be aware, that there are more tools available in Kali which has be manually installed after the setup (as they all cannot be stored in the setup image).
Overall, these extra choices are for a more efficient installation experience, meant for advanced users. Please be aware of their pitfalls.
The following sections in the “Kali Documentation Installation” of this documentation, will be using the “Installer” image for the guides unless stated otherwise.
Updated on: 2021-Sep-27
Author: Re4son
Источник
Kali linux tools installer
Automatically install all Kali linux tools
- Add Kali linux repositories
- Remove kali linux repositories
- Install Kali linux tools
- Python 2.7
- An operating system (tested on Ubuntu)
- sudo su
- git clone https://github.com/LionSec/katoolin.git && cp katoolin/katoolin.py /usr/bin/katoolin
- chmod +x /usr/bin/katoolin
- sudo katoolin
- Typing the number of a tool will install it
- Typing 0 will install all Kali Linux tools
- back : Go back
- gohome : Go to the main menu
- By installing armitage , you will install metasploit
Before updating your system , please remove all Kali-linux repositories to avoid any kind of problem .
I have some questions!
- Website : https://neodrix.com
- Youtube : https://youtube.com/inf98es
- Facebook : https://facebook.com/in98
- Twitter: @LionSec1
- Email : informatica98es@gmail.com
About
Automatically install all Kali linux tools
Resources
License
Releases
Packages 0
Contributors 5
Languages
You can’t perform that action at this time.
You signed in with another tab or window. Reload to refresh your session. You signed out in another tab or window. Reload to refresh your session.
Источник
How to Auto Install All Kali Linux Tools Using “Katoolin” on Debian/Ubuntu
Katoolin is a script that helps to install Kali Linux tools on your Linux distribution of choice. For those of us who like to use penetration testing tools provided by Kali Linux development team can effectively do that on their preferred Linux distribution by using Katoolin.
![]() Katoolin – Install Kali Linux Tools
Katoolin – Install Kali Linux Tools
In this tutorial we are going to look at steps to install Katoolin on Debian based derivatives.
Major Features of Katoolin
- Adding Kali Linux repositories.
- Removing Kali Linux repositories.
- Installing Kali Linux tools.
Requirements
Requirements for installing and using Katoolin.
- An operating system for this case we are using Ubuntu 14.04 64-bit.
- Python 2.7
Installing Katoolin
To install Katoolin run the following commands.
Sample Output
Then make /usr/bin/katoolin executable by running the command below.
Now you can run Katoolin as follows.
The output below shows the interface of Katoolin when you run the command.
Sample Output
As you can see it provides a menu from which you can make selections of what you want to do.
Incase the above way of installation fails, you also can try the following steps.
Go to https://github.com/LionSec/katoolin.git page download the zip file and extract it.
After extracting, you should be able to find katoolin.py script. Run katoolin.py command, you will be able to view the output similar to above.
How do I use Katoolin?
To add Kali Linux repositories and update repositories, select option 1 from the Menu.
Sample Output
Then you can select option 2 from the interface above to update the repositories. From the output below, I have only captured a portion where Kali Linux repositories are being updated so that one can install Kali Linux tools in Ubuntu.
If you want to delete the Kali Linux repositories you added, then select option 3.
As part of its operation, the Apt package uses a /etc/apt/sources.list that lists the ‘sources‘ from which you can obtain and install other packages.
To view contents of /etc/apt/sources.list file, select of 4.
To go back you can simply type back and press [Enter] key.
To go back to the main menu, simply type gohome and press [Enter] key.
There are different categories of Kali Linux tools you can install on your Ubuntu using Katoolin.
To view the available categories, select option 2 from the main menu.
You can select a category of choice or install all available Kali Linux tools by selecting option (0) and press [Enter] to install.
You can also install a ClassicMenu indicator using Katoolin.
- ClassicMenu Indicator is a application indicator for the top panel of Ubuntu’s Unity desktop environment.
- ClassicMenu Indicator provides a simple way for you to get a classic GNOME-style application menu for those who prefer this over the default Unity dash menu.
To install classicmenu indicator, press y and press [Enter] .
You can also install Kali menu in Ubuntu by select option 4 and press y and then press [Enter].
To quit Katoolin, simply press Control+C.
Conclusion
These installation steps are easy to follow and using Katoolin is also easy too. Hope you find this article helpful. If you have any additional ideas then post a comment. Remember stay connected to TecMint to find out more guides such as this on.
If You Appreciate What We Do Here On TecMint, You Should Consider:
TecMint is the fastest growing and most trusted community site for any kind of Linux Articles, Guides and Books on the web. Millions of people visit TecMint! to search or browse the thousands of published articles available FREELY to all.
If you like what you are reading, please consider buying us a coffee ( or 2 ) as a token of appreciation.

We are thankful for your never ending support.
Источник
Как установить инструменты Kali Linux с помощью Katoolin в Ubuntu 18.04 LTS
В продолжении статьи Как установить Kali Linux tools на Ubuntu 16 теперь пробежимся по свеженькой ОС Ubuntu.
В этом учебном руководстве вы можете установить инструменты Kali Linux с помощью Katoolin в Ubuntu.
Для тех, кто не знает, Katoolin – это скрипт Python, который используется для установки всех инструментов Kali Linux сразу или вручную один за другим.
Kali Linux имеет более 300 инструментов тестирования на проникновение.
Вместо установки всех инструментов вы можете установить только инструменты по вашему выбору в вашем Linux-окне с помощью Katoolin.
Если вы когда-либо хотели попробовать инструменты Kali Linux на Ubuntu или любых других системах на основе DEB, вы должны попробовать Katoolin.
Он добавит репозитории Kali Linux в вашу систему Ubuntu, чтобы вы могли либо сразу установить все инструменты пентеста, либо установить только то, что необходимо.
Katoolin полностью бесплатна, с открытым исходным кодом и официально протестирована в системах на базе Debian.
Установка Katoolin в Ubuntu 18.04 LTS
Я тестировал Katoolin в версии Ubuntu 18.04 LTS. Тем не менее, он должен работать с другими версиями Ubuntu и производными.
Убедитесь, что в вашей системе Ubuntu установлены следующие предварительные условия.
Эти пакеты доступны в репозиториях Ubuntu по умолчанию, поэтому их можно установить с помощью диспетчера пакетов apt.
После установки необходимых компонентов установите Katoolin, как показано ниже:
Вышеприведенная команда будет клонировать репозиторий katoolin в папке с именем «katoolin» вашего текущего рабочего каталога.
Затем скопируйте двоичный файл Katoolin на ваш путь, например /usr/bin/, как показано ниже.
Наконец, сделайте бинарный файл Katoolin исполняемым:
Теперь мы установили Katoolin. Давайте продолжим и посмотрим, как его использовать.
Установите инструменты Kali Linux с помощью Katoolin
Все команды должны выполняться как пользователь root или с привилегиями sudo.
Чтобы запустить Katoolin, выполните следующую команду:
Так выглядит интерфейс командной строки katoolin.

Как вы видите выше, основной интерфейс Katoolin имеет четыре варианта.
Введите номер, чтобы открыть соответствующее подменю. Давайте посмотрим один за другим.
1. Add Kali repositories & update
Этот параметр позволит вам добавить репозитории kali Linux в вашу систему Linux. Для этого введите 1 (номер 1), чтобы добавить репозитории.
Откроется подменю. Опять же, введите 1, чтобы добавить репозитории Kali-linux.
Затем введите 2 для обновления репозиториев:
Введите 3, если вы хотите удалить добавленные репозитории kali-linux, и введите 4, чтобы просмотреть содержимое файла sources.list.
Чтобы вернуться в предыдущее меню, введите обратно и нажмите ENTER.
Чтобы вернуться в главное меню, введите gohome и нажмите ENTER.
2. Categories
Чтобы просмотреть весь список доступных категорий, введите 2 из главного меню.
Как вы видите в приведенном выше выводе, доступно 14 категорий.
Вы можете либо установить их все сразу, либо установить какую-либо конкретную категорию, указав соответствующий номер категории.
Чтобы установить все инструменты kali Linux, введите 0 (ноль) и нажмите клавишу ENTER. Это позволит установить все инструменты.
Это займет некоторое время в зависимости от скорости интернета. Кроме того, убедитесь, что у вас достаточно свободного места на жестком диске.
Установка всего Kali Linux может потреблять много дискового пространства.
Если вам не нужны все инструменты, просто установите только то, что вы хотите использовать.
Скажем, например, чтобы установить инструменты под категорию «Exploitation tools,», введите 8 и нажмите ENTER.
Он отобразит подменю и перечислит все доступные пакеты в этой категории.
Вы можете установить все инструменты в этой категории, набрав 0 (ноль) или ввести любой конкретный номер для установки конкретного инструмента в категории «Exploitation tools».
Чтобы вернуться в предыдущее меню, введите back и вернитесь в главное меню, введите gohome.
3. Install ClassicMenu indicator
Индикатор ClassicMenu – это апплет области уведомлений для верхней панели среды рабочего стола Ubuntu.
Он предоставляет простой способ получить классическое меню приложений в стиле GNOME для тех, кто предпочитает это в меню типа Unity.
Как и классическое меню GNOME, оно включает в себя игры и приложения для игр, если у вас есть установленные.
Чтобы установить его, введите 3 и нажмите ENTER, а затем введите y, чтобы подтвердить и установить его.
4. Install Kali menu
Чтобы установить меню Kali, введите 4 и введите y, чтобы подтвердить установку.
Как только вы закончите с Katoolin, нажмите «Ctrl + C», чтобы выйти из него.
Источник


