- Kali linux usb persistence 2020
- Adding USB Persistence with LUKS Encryption
- Kali linux usb persistence 2020
- Multiple Persistence Stores
- Emergency Self Destruction of Data in Kali
- Статья Добавление возможности постоянного сохранения (Persistence) к вашим Kali Live USB
- Создание зашифрованной флешки Kali Linux Encrypted Persistence
- 1. Создание загрузочной флешки
- 2. Создание зашифрованного раздела и установка его параметров
- 3. Проверка работоспособности
Kali linux usb persistence 2020
Kali Linux “Live” has two options in the default boot menu which enable persistence — the preservation of data on the “Kali Live” USB drive — across reboots of “Kali Live”. This can be an extremely useful enhancement, and enables you to retain documents, collected testing results, configurations, etc., when running Kali Linux “Live” from the USB drive, even across different systems. The persistent data is stored in its own partition on the USB drive, which can also be optionally LUKS-encrypted.
To make use of the USB persistence options at boot time, you’ll need to do some additional setup on your “Kali Linux Live” USB drive; this article will show you how.
This guide assumes that you have already created a Kali Linux “Live” USB drive as described in the doc page for that subject. For the purposes of this article, we’ll assume you’re working on a Linux-based system.
You’ll need to have root privileges to do this procedure, or the ability to escalate your privileges with the command “sudo su”.
In this example, we assume:
- you are running as the root user. As of Kali Linux 2020.1, we do not use root user by default. You can switch to root using the command “sudo bash”
- your USB drive is /dev/sdb
- your USB drive has a capacity of at least 8GB — the Kali Linux image takes over 3GB, and for this guide, we’ll be creating a new partition of about 4GB to store our persistent data in
- you are running on a separate Linux system (cannot be Live Boot Kali)
In this example, we’ll create a new partition to store our persistent data into, starting right above the second Kali Live partition and ending at 7GB, put an ext3 file system onto it, and create a persistence.conf file on the new partition.
First, begin by imaging the latest Kali Linux ISO (currently 2021.3) to your USB drive as described in this article. We’re going to assume that the two partitions created by the imaging are /dev/sdb1 and /dev/sdb2 . This can be verified with the command fdisk -l .
Create and format an additional partition on the USB drive. First, let’s create the new partition in the empty space above our Kali Live partitions. We have to do this from the command line as gparted will read the imaged ISO as a large block. The following command will, as a short explanation, shrink that block to only be the Kali Live partition.
The parted command may advise you that it can’t use the exact start values you specified; if so, accept the suggested value instead. If advised that the partition isn’t placed at an optimal location, “ignore” it. When parted completes, the new partition should have been created at /dev/sdb3 ; again, this can be verified with the command fdisk -l .
- Next, create an ext3 file system in the partition and label it persistence .
- Create a mount point, mount the new partition there, and then create the configuration file to enable persistence. Finally, unmount the partition.
Adding USB Persistence with LUKS Encryption
Alternatively, you can create a LUKS-encrypted persistent storage area. This adds an extra layer of security to your sensitive files when traveling with Kali Live on USB devices. In the following example, we’ll create a new partition to store our persistent data into, starting right above the second Kali Live partition and ending at 7GB, set up LUKS encryption on the new partition, put an ext3 file system onto it, and create a persistence.conf file on it.
- Image the latest Kali Linux ISO (currently 2021.3) to your USB drive as described in this article.
- Create the new partition in the empty space above our Kali Live partitions.
The parted command may advise you that it can’t use the exact start value you specified; if so, accept the suggested value instead. If advised that the partition isn’t placed at an optimal location, “ignore” it. When parted completes, the new partition should have been created at /dev/sdb3 ; again, this can be verified with the command fdisk -l .
- Initialize the LUKS encryption on the newly-created partition. You’ll be warned that this will overwrite any data on the partition. When prompted whether you want to proceed, type “YES” (all upper case). Enter your selected passphrase twice when asked to do so, and be sure to pick a passphrase you’re going to remember: if you forget it, your data will still be persistent, just irretrievable (and unusable).
- Create the ext3 filesystem, and label it “persistence”.
- Create a mount point, mount our new encrypted partition there, set up the persistence.conf file, and unmount the partition.
- Close the encrypted channel to our persistence partition.
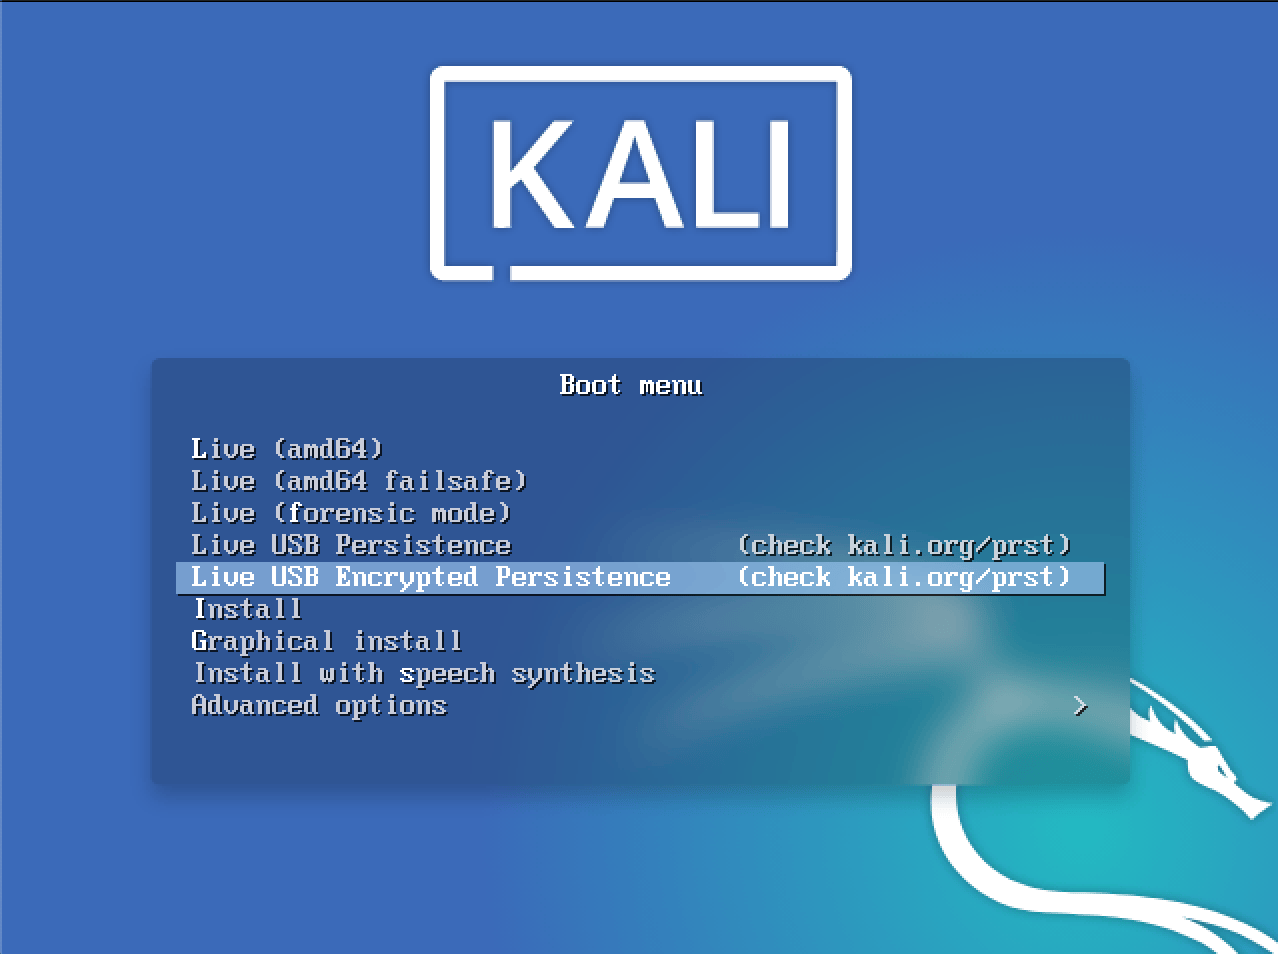
That’s really all there is to it! To use the persistent data features, simply plug your USB drive into the computer you want to boot up Kali Live on — make sure your BIOS is set to boot from your USB device — and fire it up. When the Kali Linux boot screen is displayed, choose the persistent option you set up on your USB drive, either normal or encrypted.
Updated on: 2021-Sep-27
Author: g0tmi1k
Источник
Kali linux usb persistence 2020
In this workshop, we will examine the various features available to us when booting Kali Linux from USB devices. We will explore features such as persistence, creating LUKS encrypted persistence stores, and even dabble in “LUKS Nuking” our USB drive. The default Kali Linux ISOs (from 1.0.7 onwards) support USB encrypted persistence.
0x01 — Start by imaging the Kali ISO onto your USB drive (ours was /dev/sdb). Once done, you can inspect the USB partition structure using parted /dev/sdb print:
For ease of use, please use a root account. This can be done with “sudo su”.
0x02 — Create and format an additional partition on the USB drive. In our example, we create a persistent partition of about 7 GB in size:
0x04 — Encrypt the partition with LUKS:
0x05 — Open the encrypted partition:
0x06 — Create an ext3 filesystem and label it:
0x07 — Mount the partition and create your persistence.conf so changes persist across reboots:
Now your USB drive is ready to plug in and reboot into Live USB Encrypted Persistence mode.
Multiple Persistence Stores
At this point we should have the following partition structure:
We can add additional persistence stores to the USB drive, both encrypted or not…and choose which persistence store we want to load, at boot time. Let’s create one more additional non-encrypted store. We’ll label and call it “work”.
0x01 — Create an additional, 4th partition which will hold the “work” data. We’ll give it another 5GB of space:
0x02 — Format the fourth partition, label it “work”:
0x03 — Mount this new partition and create a persistence.conf in it:
Boot the computer, and set it to boot from USB. When the boot menu appears, edit the persistence-label parameter to point to your preferred persistence store!
Emergency Self Destruction of Data in Kali
As penetration testers, we often need to travel with sensitive data stored on our laptops. Of course, we use full disk encryption wherever possible, including our Kali Linux machines, which tend to contain the most sensitive materials. Let’s configure a nuke password as a safety measure:
The configured nuke password will be stored in the initrd and will be usable with all encrypted partitions that you can unlock at boot time.
Backup you LUKS keyslots and encrypt them:
Now boot into your encrypted store, and give the Nuke password, rather than the real decryption password. This will render any info on the encrypted store useless. Once this is done, verify that the data is indeed inacessible.
Lets restore the data now. We’ll decrypt our backup of the LUKS keyslots, and restore them to the encrypted partition:
Our slots are now restored. All we have to do is simply reboot and provide our normal LUKS password and the system is back to its original state.
Updated on: 2021-Sep-27
Author: g0tmi1k
Источник
Статья Добавление возможности постоянного сохранения (Persistence) к вашим Kali Live USB
- Ваша текущая схема разбиения диска должна выглядеть примерно так:

- Если вы хотите загрузиться, вставьте флэш в компьютер. Убедитесь, что BIOS настроен на загрузку с USB устройства. Когда отобразится загрузочный экран Kali Linux, выберите “Live” в меню загрузки (не нажимайте Enter), и нажмите на клавишу tab. Это позволит вам изменить параметры загрузки. Добавляйте слово “persistence” в конце строки параметров загрузки каждый раз, когда вы хотите смонтировать ваше persistent устройство.
DEVILBY
06.09.2015 в 21:36
Спасибо сработало!
АЛЕКСАНДР
07.03.2016 в 01:23
Не получается, все как написано делаю. У меня правда одно НО, у вас там 2 раздела приформатировании, а у меня 3. У меня есть еще /dev/sdb2 fat32 /media/root/Kali Live. Я как только не загружался. Может теам когда выходишь надо сохранять это все? Как то?
ДМИТРИЙ
30.03.2016 в 10:11
тоже не работает, такая же ситуация как пост выше. че делать подскажите пжл
АВРЕЛИЙ
16.05.2016 в 14:31
Так вы посмотрите fdisk -l – какие у вас разделы то есть? И подставьте нужный в при использовании команд.
НИКОЛАЙ
24.05.2016 в 21:04
Спасибо, всё сохраняется кроме пароля, он меняется, но после перезагрузки снова сбрасывается на toor, в чем может быть причина?
0101011
01.06.2016 в 22:35
Будут ли сохраняться установленные обновления и программы? На ранней версии Kali не сохранялась даже настройка репозиториев.
Источник
Создание зашифрованной флешки Kali Linux Encrypted Persistence
В данной статье описывается метод создания загрузочной флешки с системой Kali Linux, функционал которой позволяет создать зашифрованный раздел, где будут храниться все её параметры, установленные программы и данные. Шифрование производится посредством алгоритма aes c ключом 256 бит (настроить шифрование вы можете на свой вкус, изучив команду cryptsetup).
1. Создание загрузочной флешки
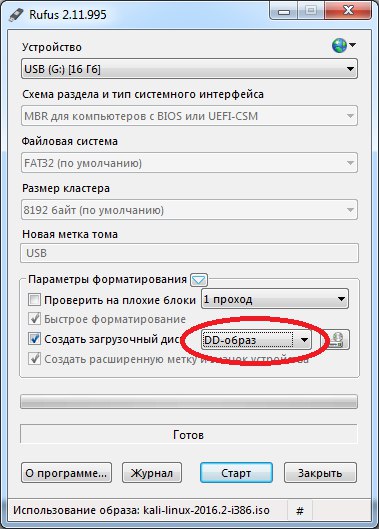
Для записи образа используйте программу Rufus. Выберите устройство, на которое будет распакован образ, далее выберите iso-образ системы и из выпадающего списка выберите DD-образ.
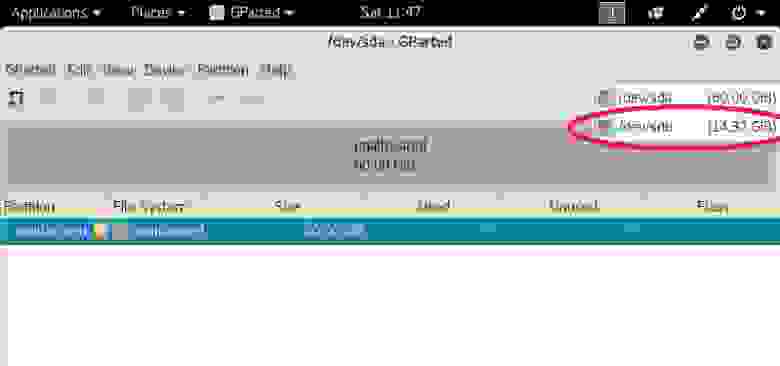
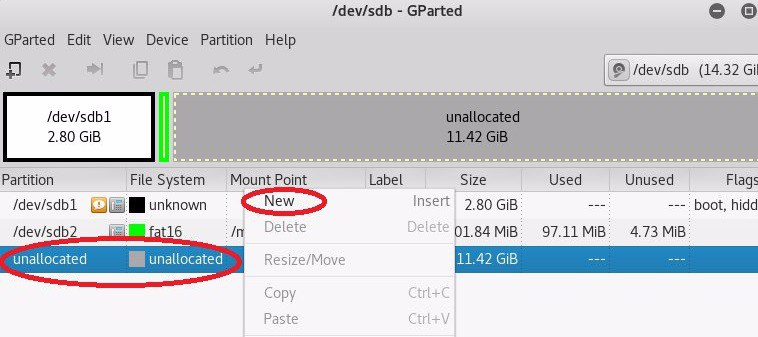
После развертывания образа структура разделов флешки примет следующий вид:

Структура разделов:
— 2.80 ГБ – образ системы Kali Linux;
— 102 Мб – загрузчик;
— 11,42 Гб – нераспределённая область, которая будет использоваться для шифрования.
2. Создание зашифрованного раздела и установка его параметров
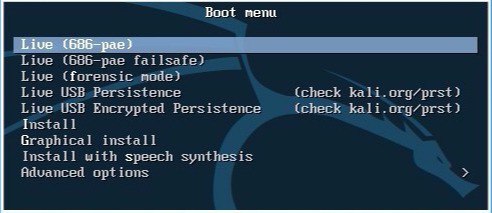
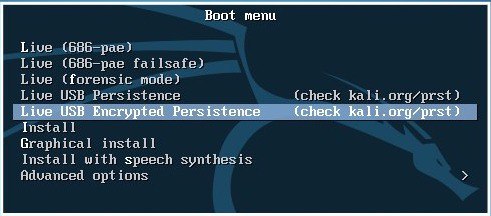
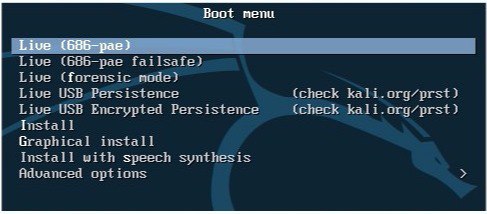
Выполните загрузку с флешки и выберите пункт меню Live(686-pae).
Запустите терминал и выполните команду gparted для запуска редактора разделов.

В открывшемся окне из выпадающего списка выберите флешку, с которой вы загрузились.
Далее выберите нераспределённое место на диске и создайте новый раздел(ext4).
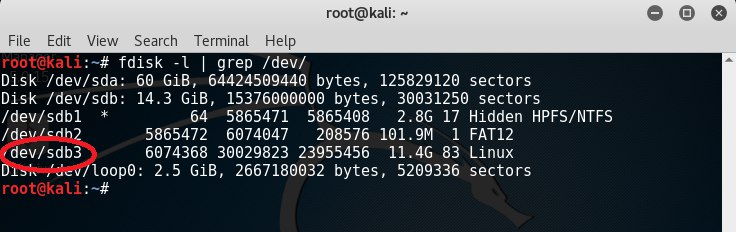
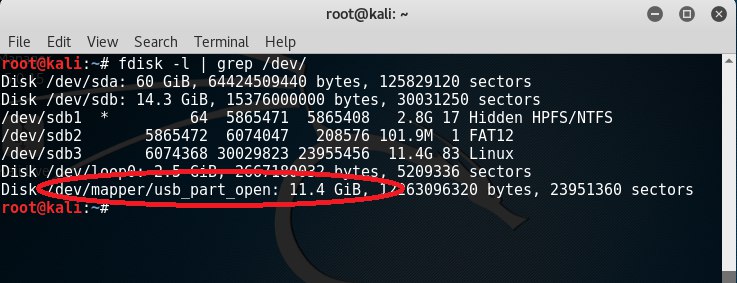
После создания раздела откройте терминал и выполните команду fdisk –l | grep /dev/ для отображения доступных устройств. Нас интересует устройство /dev/sdb3.
Для шифрования раздела введите команду cryptsetup —verbose —verify-passphrase luksFormat /dev/sdb3, далее введите YES.
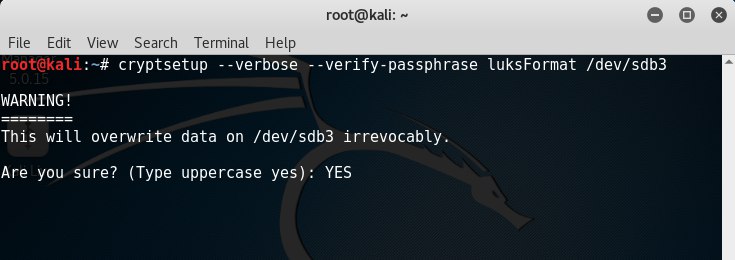
После этого программа потребует ввести пароль, под которым осуществится шифрование раздела и предложит его подтвердить.
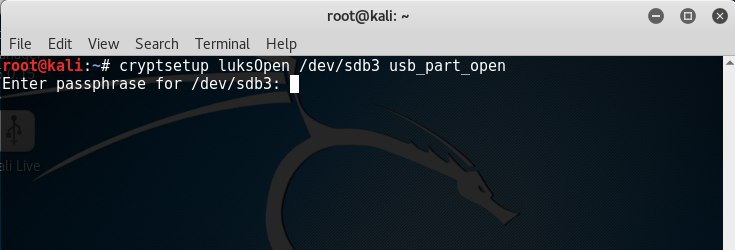
Подключите зашифрованный раздел командой cryptsetup luksOpen /dev/sdb3 usb_part_open, введите пароль. Раздел инициализируется, как устройство с именем usb_part_open.
Выполните команду fdisk –l | grep /dev/ и убедитесь, что устройство /dev/mapper/usb_part_open подключено.
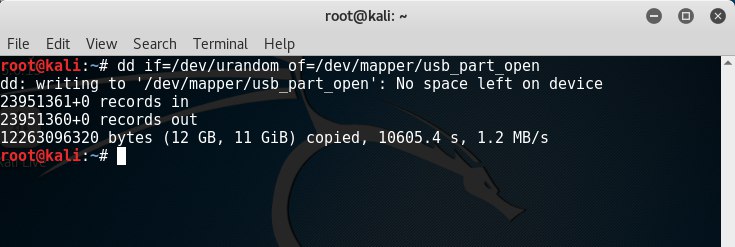
Заполните устройство случайными, псевдослучайными числами либо нулями выполнив одну из команд на ваше усмотрение:
— dd if=/dev/random of=/dev/mapper/usb_part_open — данная команда заполнит устройство случайными числами. Операция будет выполняться продолжительное время(считать в днях);
— dd if=/dev/urandom of=/dev/mapper/usb_part_open — данная команда заполнит устройство псевдослучайными числами. Операция будет выполняться продолжительное время(считать в часах);
— dd if=/dev/zero of=/dev/mapper/usb_part_open — заполнение нулями.
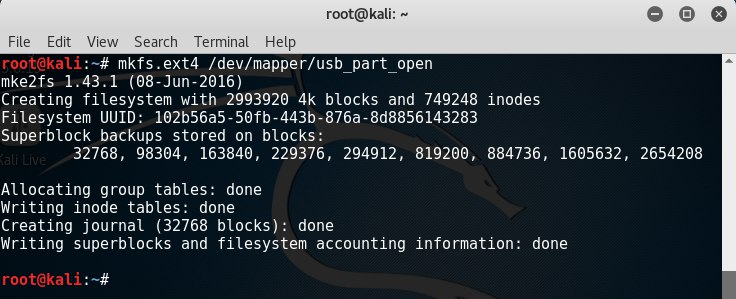
Выполните форматирование заполненного случайными числами раздела командой mkfs.ext4 /dev/mapper/usb_part_open.
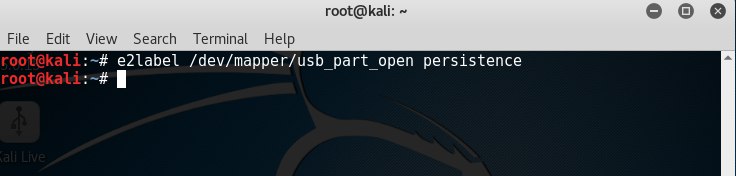
Присвойте разделу название “persistence” командой e2label /dev/mapper/usb_part_open persistence.
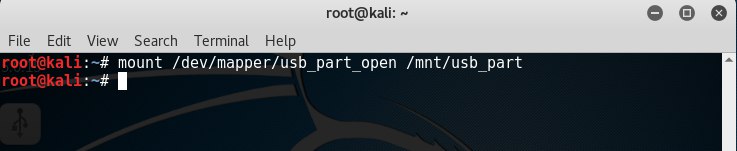
Монтируйте данный раздел к заранее созданной папке, к примеру, /mnt/usb_part командой mount /dev/mapper/usb_part_open /mnt/usb_part (обычно в новых версиях системы данная команда не требуется, раздел автоматически подключается после форматирования и определяется в проводнике).
Создайте конфигурационный файл в корне зашифрованного раздела командой echo “/ union” > /mnt/usb_part/persistence.conf.

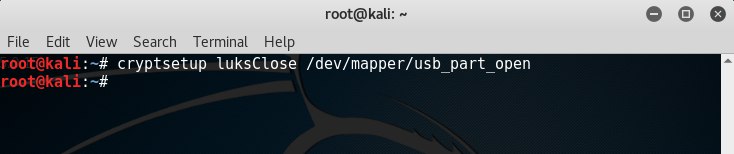
Закройте зашифрованный раздел командой cryptsetup luksClose /dev/mapper/usb_part_open.
Перезагрузите систему и выполните вход под Live USB Encrypted Persistence.
При загрузке потребуется ввести пароль от зашифрованного раздела (при вводе пароля символы не отображаются).
Создание зашифрованной системы завершено.
3. Проверка работоспособности
При первой загрузке ОС в режиме Encrypted Persistence на зашифрованном разделе создаются системные файлы и папки, для их просмотра выполните следующие действия:
— Перезагрузите систему в незашифрованном режиме Live(686-pae).
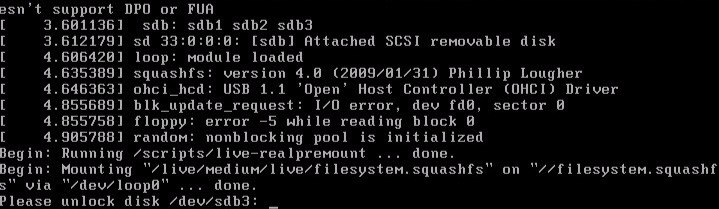
— подключите зашифрованный раздел как устройство командой cryptsetup luksOpen /dev/sdb3 usb_part_open.

— Откройте проводник и выберите подключенное устройство persistence. Вы увидите созданный ранее конфигурационный файл persistence.conf и системные папки. В папке rw находится наша зашифрованная система, под которой мы загружаемся. Следовательно, в папке rw сохраняются все изменения произведённые в системе загруженной в зашифрованном режиме.
Если вы загружаетесь в обычном(незашифрованном) режиме, то после перезагрузки все изменения и файлы удаляются.
Источник


