- Kali linux установка mac
- Installation Prerequisites
- Kali Linux Installation Procedure
- Kali Linux Installation Procedure
- Troubleshooting macOS/OS X
- Post Installation
- Статья Руководство по установке и двойной загрузке Kali + Mac OS на Macbook Pro и руководство по WiFi
- Kali linux установка mac
- Installation Prerequisites
- Resize macOS/OS X Procedure
- HFS+/GParted
- APFS/Recovery
- Kali Linux Installation Procedure
- Installing rEFInd
- Installing rEFInd using macOS/OS X
- Installing rEFInd using Kali Linux
- Configuring rEFInd
- refind.conf
- macOS/OS X El Capitan
- macOS/OS X Yosemite
- Kali Linux
- Post Installation
Kali linux установка mac
IMPORTANT! Newer Mac hardware (e.g. T2/M1 chips) do not run Linux well, or at all. This is true for Linux in general, not just Kali Linux.
The model & year of the device will determine how successful your experience will be.
Installing Kali Linux (Single boot) on Apple Mac hardware (such as MacBook/MacBook Pro/MacBook Airs/iMacs/iMacs Pros/Mac Pro/Mac Minis), can be a straight forward, if the hardware is supported. Most of the time, there are a few issues that come up, so there is a bit of trial and error.
This guide will show you to replace macOS/OS X with Kali Linux. However, if you wish to keep macOS/OS X, you will want to refer to our dual-boot guide instead.
In our example, we will be installing Kali Linux on a Mac Mini (Mid 2011) using macOS High Sierra (10.13). The same procedure has also been tested on a Mac Book Air (Early 2014) using macOS Catalina (10.15).
Installation Prerequisites
This guide will make the following assumptions:
- You have read our single boot Kali Linux install guide, as this has the same Installation Prerequisites (System requirements, setup assumptions and install media).
- Currently running macOS/OS X 10.7 or higher (later versions are more preferred) as this means the hardware is Intel (and not a PowerPC CPU).
- Depending on the Mac hardware model & year, you may find:
- Different results when trying to boot by using either a CD/DVD or a USB drive.
- You may be able to increase the chances of booting (especially older hardware and non-EFI) from a USB drive by having rEFInd pre-installed.
- When using the graphical installer, you may notice the tracepad does not function (but will after Kali Linux is installed).
- In-built wireless may not work, as firmware-b43-installer is not included in the default images.
- Different results when trying to boot by using either a CD/DVD or a USB drive.
We will be wiping any existing data on the hard disk, so please backup any important information on the device to an external media.
Kali Linux Installation Procedure
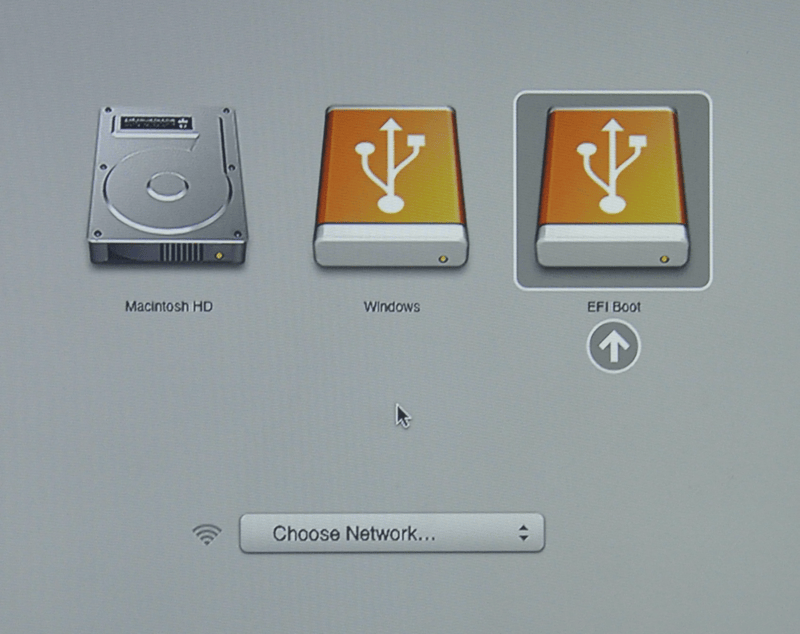
- To start your installation, make sure you insert your Kali Linux installation medium and power on the device. Immediately press and hold the Option (or Alt) ⌥ key until you see the boot menu (rEFInd if installed, else the default macOS/OS X). You may or may not have a Recovery HD depending on your macOS/OS X setup.
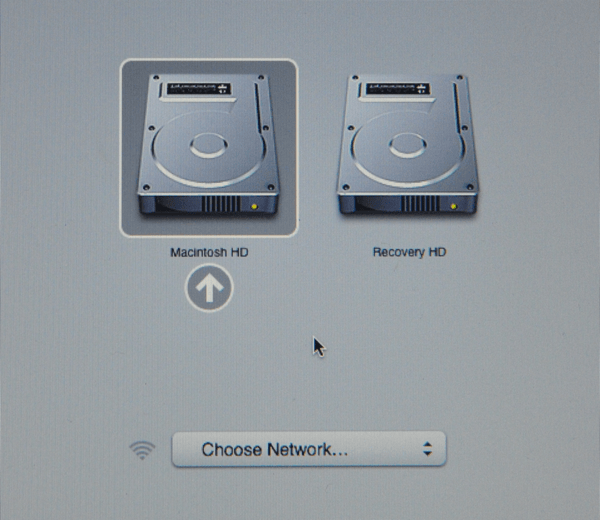
- When the boot menu appears, if everything works as expected, you should see two volumes:
- EFI Boot — Newer hardware which support UEFI. It is common for GUID Partition Table (GPT) partitions to be used.
- Windows — “Non-EFI” boot. This use on older hardware which uses BIOS. You often see Master Boot Record (MBR) partition tables here.
If you only see one volume (EFI Boot), then the installation media is not supported for this device. This could be because the age of the firmware on the device.
You may wish to install rEFInd, as it is a boot manager, and try again.
Even though Kali Linux is based on Debian, macOS/OS X always detects non-EFI boot media as Windows. We suggest that you select the EFI Boot volume to continue. However, if the installation hangs at this point, power cycle and select Windows (Being Kali Linux non-EFI/BIOS). The success depends on the Mac hardware’s model & year.

Kali Linux Installation Procedure
The installation procedure from this point onwards is the same as our Kali Linux Hard Disk install guide.
After that is complete, all that is left is to reboot, take out the installation media, and enjoy Kali Linux.
Troubleshooting macOS/OS X
If you have issues installing Kali Linux on macOS/OS X, there are a few options you can try:
- Install the latest version of macOS/OS X (App store, Recovery or USB) and applying any updates as this may upgrade the firmware.
- Install rEFInd boot manager to replace the default boot manager.
- If you’re using a DVD, refresh rEFInd once the drive has stop spinning by pressing ESC .
- Switch from EFI to BIOS boot when trying to boot Kali Linux.
- Switch from GPT drive to Hybrid MRB drive (using the Live image may help).
Post Installation
Now that you’ve completed installing Kali Linux, it’s time to customize your system.
The General Use section has more information and you can also find tips on how to get the most out of Kali Linux in our User Forums.
Updated on: 2021-Sep-27
Author: g0tmi1k
Источник
Статья Руководство по установке и двойной загрузке Kali + Mac OS на Macbook Pro и руководство по WiFi
У меня, наконец, получилось запустить Kali на своём Macbook Pro после обновления до Mac OS 10.9, поэтому я решил написать это руководство для всех остальных владельцев Macbook Pro. Надеюсь, оно вам пригодится. Ниже я указал, какой именно моделью Macbook Pro пользовался, но данный метод, скорее всего, будет работать и для других моделей.
Обновление: Последняя версия USB загрузчика Linux для Mac делает это руководство ненужным, но если у вас возникают с ним проблемы, вы всегда можете вернуться к моей статье. Свежую версию можно найти здесь: https://sevenbits.github.io/Mac-Linux-USB-Loader/
Нижеприведённое руководство демонстрирует, как установить и запустить Kali Linux и Mac OS 10.9.5 со следующей конфигурацией аппаратного и программного обеспечения:
- Macbook Pro 5,3 (середина 2009)
- Mac OS 10.9.5
- Kali 1.1.0a (образ Amd64)
- Refind 0.8.7
- Mac Linux USB Loader 3.0.2
Также тестировалось на:
- Macbook Pro 11,1 (середина 2014, конец 2013) под управлением Mac OS 10.9.5
Примечания:
- Руководство по настройке Wifi вы найдёте ниже. В нём упоминается BCM4322, но, вероятно, оно применимо и для других беспроводных устройств «Airport» от Broadcom.
- При написании этого руководства я старался использовать понятные термины, поскольку у многих пользователей отсутствует опыт работы с подобными вещами. Если они вас раздражают, уж извините.
- Разработчик USB загрузчика Linux для Mac сообщил, что Kali будет полностью поддерживаться в версии 3.1, поэтому, вам больше не потребуются мои инструкции.
- Похоже, причиной всех моих проблем с Linux на ноутбуках Apple стала Mac OS 10.9, поскольку до выхода этой версии у меня не возникало трудностей с установкой Kali и её двойной загрузкой наряду с OS 10.8. Ещё раньше я спокойно устанавливал Backtrack Linux на тот же ноутбук и загружал его вместе с Mac OS 10.6.
- Учитывая всё вышесказанное, если вы работаете с Mac OS 10.10 или старой версией Mac OS (старше 10.9), этот метод может для вас не работать, поскольку у меня была возможность протестировать его только на версии 10.9. Если моё руководство вам не помогает, попробуйте следующее:
Если не помогает ни то, ни другое, обратитесь к форумам Kali. Там вы найдёте множество методов для других Macbook Pro и компьютеров Apple. Они просто не сработали для моей модели ноутбука и версии операционной системы.
Чтобы установить Kali на Macbook Pro:
1) Во-первых, скачайте образ Kali, подходящий для вашего аппаратного обеспечения. Данный ноутбук и все другие модели Macbook Pro (если я не ошибаюсь) являются 64-разрядными. Поэтому я воспользовался образом Amd64. Затем скачайте USB загрузчик Linux для Mac и установите его в папку Приложения.
2) В Mac OS используйте Дисковую утилиту, чтобы отформатировать свой USB-накопитель в формате MsDOS/FAT (не ExFAT) и в опциях выберите пункт «таблица разделов MBR».
3) Откройте USB загрузчик Linux для Mac и следуйте инструкциям разработчика отсюда: https://github.com/SevenBits/Mac-Lin…l-Instructions
- В пункте «Выберите пункт назначения» укажите USB-накопитель, который вы только что отформатировали.
- В пункте «Выберите источник» укажите «Входит в состав приложения».
- На следующей странице, в качестве «Семейства дистрибутива» выберите Debian.
- Теперь нажмите «Начать установку» и подождите.
4) После завершения установки скачайте файлы «boot.efi» и «bootX64.efi» по ссылке ниже (чтобы сделать это, нажмите на каждый файл, а затем выберите «Посмотреть исходный код»)
5) Скопируйте оба этих файла в папку «boot» на своём USB-накопителе, заменив файлы с теми же названиями, которые там уже присутствуют. Папка «boot» находится в директории: «ваш_usb_накопитель/efi/boot»
6) Теперь установите Refind. Скачать его можно отсюда: http://sourceforge.net/projects/refind/
- Распакуйте загруженный файл и откройте окно терминала.
- Введите «cd» с пробелом, а затем перетащите извлечённую папку в окно терминала (строка должна выглядеть подобным образом: «ИмяКомпьютера:
Me$ cd /что-то/что-то_ещё/refind_0.8.7»).
7) Перезагрузите свой компьютер, и на экране должен появиться загрузчик Refind (если ничего не произошло, повторите процесс установки Refind). Вы увидите значок Apple и несколько других иконок с небольшими символами USB на них. Выберите иконку с названием «Запасной загрузчик».
На данном этапе важно, чтобы ваш ноутбук был подключён к интернету по ethernet кабелю, поскольку беспроводная сетевая карта не будет работать, пока мы не установим драйвер, воспользовавшись руководством ниже.
8) Теперь нажмите «1», чтобы загрузить образ Kali и подождите, пока загрузка завершится. Система сообщит, что входит в слепой режим. Через некоторое время на экране появится прокручивающийся текст. Если этого не произошло в промежутке от 30 секунд до 1 минуты (показывая, что Kali загружается), выполните принудительное отключение. Снова включите компьютер и повторите шаги, поскольку иногда на то, чтобы загрузка Kali началась, требуется несколько попыток.
9) После загрузки Kali вы сможете войти в систему (пользователь: root и пароль: toor). Пройдите в Приложения>Системные инструменты>Установка Kali Linux. После того как вы пройдёте несколько шагов, на экране появятся две ошибки: «Не удаётся получить файл предварительной конфигурации» и «Не удалось завершить этап установки».
10) Вы вернётесь на экран со списком этапов установки в левой части и кнопкой «Отменить установку» внизу. Выберите из списка пункт «Загрузить компоненты установки с CD» и в появившемся списке пакетов отметьте «загрузка с носителя». В его описании должно быть написано «Загрузка компонентов программы установки со сменного носителя». Теперь нажмите «Продолжить». Начнётся загрузка пакетов, сопровождающаяся индикатором выполнения.
11) Затем программа установки спросит, хотите ли вы загрузить драйверы со сменного носителя. Нажмите «Нет» и «Продолжить». После этого, вы вновь увидите ошибки, о которых мы говорили выше: «Не удаётся получить файл предварительной конфигурации» и «Не удалось завершить этап установки». Вы вновь окажетесь на странице со списком этапов установки, который теперь стал длиннее, чем раньше. Из этого списка выберите пункт «Определение сетевого аппаратного обеспечения» (если вы ещё этого не сделали, подключите своей компьютер к интернету с помощью ethernet кабеля). Укажите «eth0» в качестве своего сетевого устройства и нажмите «Продолжить».
12) Теперь продолжите процесс установки. Если вам нужна помощь в работе с разделами, ознакомьтесь с руководством по загрузке Kali на сайте Kali Docs: http://docs.kali.org/installation/ka…n-mac-hardware
(Если вам необходимо изменить размер раздела Mac OS, я не рекомендую делать это с помощью gparted, как написано в руководстве, а советую воспользоваться Дисковой утилитой в Mac OS)
13) После завершения установки, загрузите Mac OS X и выполните шаги 6B и 6C выше, чтобы переустановить Refind. Это необходимо, чтобы Refind увидел новую установку Kali Linux, а также нужно для установки драйвера файловой системы ext4, чтобы вы могли загружать эту систему.
14) Теперь просто перезагрузите свой компьютер и выберите иконку с пингвином в меню Refind, чтобы войти в Kali Linux. Если ваше wifi подключение не будет работать в Kali, следуйте инструкциям ниже.
Как заставить беспроводное устройство BCM4322 Broadcom (Airport) работать:
(Чтобы узнать, какая именно карта Broadcom у вас установлена, запустите терминал в Kali, выполните команду «lspci» и в списке аппаратного обеспечения найдите строку, в конце которой написано «802.11a/b/g/n». Модель вашей карты – это аббревиатура BCM и 4-5 цифр за ней.)
1) Войдите в Kali и пройдите по адресу Приложения>Системные инструменты>Установка/удаление программ. Выполните поиск по слову Broadcom и снимите галочки со всех пакетов КРОМЕ тех, которые называются «NetXtreme» и «различные драйверы». Нажмите «Применить».
–Остальная часть данного руководства повторяет содержимое ссылки на Debian Wiki, которую я дал выше–
2) Откройте окно терминала.
- Введите «apt-get update» и нажмите Enter.
- После этого скопируйте строку «apt-get install linux-headers-$(uname -r|sed ‘s,[^-]*-[^-]*-,,’) broadcom-sta-dkms» и вставьте её в терминал без кавычек в начале и конце.
- Скопируйте строку «modprobe -r b44 b43 b43legacy ssb brcmsmac» и вставьте её в терминал, как только выполнение предыдущей команды завершится.
- Ну и наконец, введите или скопируйте команду «modprobe wl».
3) Теперь wifi должен нормально работать и больше не будет постоянно запрашивать пароль к сети. Если этого не произошло, перезагрузите Kali.
Единственным недостатком рабочей wifi карты является то, что вы не сможете подделать MAC адрес, что меня вполне устраивает, поскольку у меня есть несколько портативных беспроводных карт. Сожалею, если вам такой вариант не подходит. Мне говорили, что существуют сложные обходные пути, которые исправляют драйвер b43 (подделываемый драйвер) и он начинает работать в Kali. В этом случае вам уже не понадобится «wl» драйвер (который нельзя подделать).
Источник
Kali linux установка mac
IMPORTANT! Newer Mac hardware (e.g. T2/M1 chips) do not run Linux well, or at all. This is true for Linux in general, not just Kali Linux.
The model & year of the device will determine how successful your experience will be.
This guide will show you to dual-boot macOS/OS X with Kali Linux using rEFInd boot manager. If you wish to replace macOS/OS X completely, please refer to our single boot Kali on Mac hardware guide.
By using using the 3rd party boot manager rEFInd (a fork of rEFIt) we are able to increase our control when booting over macOS/OS X OS’s default option. This makes it perfect for dual booting, as a keyboard shortcut does not need to be used every time the device is powered on to boot Kali Linux. rEFInd also has the advantage of helping older hardware to boot from USB devices that would not be able to otherwise (e.g. non-EFI). Once Kali Linux has been installed, rEFInd can be customized to be hidden during boot or removed completely.
In our example, we will be installing Kali Linux on a Mac Mini (Mid 2011) using macOS High Sierra (10.13). The same procedure has also been tested on a Mac Book Air (Early 2014) using macOS Catalina (10.15).
Installation Prerequisites
This guide will make the following assumptions:
- You have read our single boot Kali Linux install guide, as this has the same Installation Prerequisites (System requirements & setup assumptions).
- When downloading Kali Linux, pick the live image, rather than the installer option.
- A single disk to install to (rather than a dedicated disk per operating system).
- Currently running macOS/OS X 10.7 or higher (later versions are more preferred) as this means the hardware is Intel (and not a PowerPC CPU).
- Depending on the Mac hardware model & year, you may find:
- Different results when trying to boot by using either a CD/DVD or a USB drive.
- You may be able to increase the chances of booting (especially older hardware and non-EFI) from a USB drive by having rEFInd pre-installed.
- When using the graphical installer, you may notice the tracepad does not function (but will after Kali Linux is installed).
- In-built wireless may not work, as firmware-b43-installer is not included in the default images.
- Different results when trying to boot by using either a CD/DVD or a USB drive.
We need to use a different image from the single boot Kali Linux install guide, as we need the live image. This is because we need to edit the disk structure without mounting any partitions (otherwise they would be in-use). After we have finished altering the disk layout, we can still install Kali Linux using the live image, but there will be a few differences such as:
Both of these can be addressed post installation, as it saves swapping to the installer image (as you will need either multiple CD/DVD/USBs or to re-image half way though).
This installation has the potential to go wrong very easily as it involves editing existing partitions. Be aware of what partitions you are modifying and where you are installing Kali Linux to.
Having a backup of your macOS/OS X files available is a good idea in the event something goes wrong.
Resize macOS/OS X Procedure
Before we can install Kali Linux, there needs to be room on the hard disk. Depending on the format of the macOS/OS X partition, will depend on what method you need todo.
- If macOS/OS X Sierra (10.12) and earlier, it will be Mac OS Extended (HFS+).
- You can resize using GParted in from a Kali Linux live session
- Since macOS/OS X High Sierra (10.13) and later, the default will be Apple File System (APFS).
- You can resize in a normal macOS/OS X session, or in recovery mode (recommended).
HFS+/GParted
- To start resizing, make sure you insert your Kali Linux installation medium and power on the device. Immediately press and hold the Option (or Alt) ⌥ key until you see the boot menu (rEFInd if installed, else the default macOS/OS X). You may or may not have a Recovery HD depending on your macOS/OS X setup.

- When the boot menu appears, if everything works as expected, you should see two volumes:
- EFI Boot — Newer hardware which support UEFI. It is common for GUID Partition Table (GPT) partitions to be used.
- Windows — “Non-EFI” boot. This use on older hardware which uses BIOS. You often see Master Boot Record (MBR) partition tables here.
If you only see one volume (EFI Boot), then the installation media is not supported for this device. This could be because the age of the firmware on the device.
You may wish to install rEFInd, as it is a boot manager, and try again.
Even though Kali Linux is based on Debian, macOS/OS X always detects non-EFI boot media as Windows. We suggest that you select the EFI Boot volume to continue. However, if the installation hangs at this point, power cycle and select Windows (Being Kali Linux non-EFI/BIOS). The success depends on the Mac hardware’s model & year.
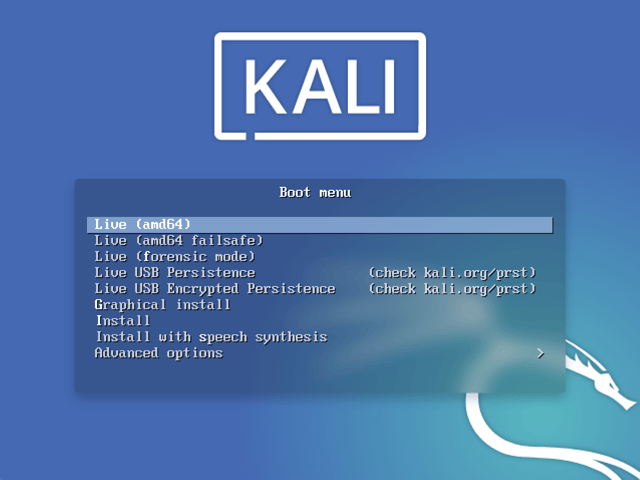
- You should be greeted with the Kali Linux boot screen. Select Live, and you should be booted into the Kali Linux default desktop.
- Now launch GParted, which we’ll use to shrink the existing macOS/OS X partition to give us enough room to install Kali Linux in the free space.
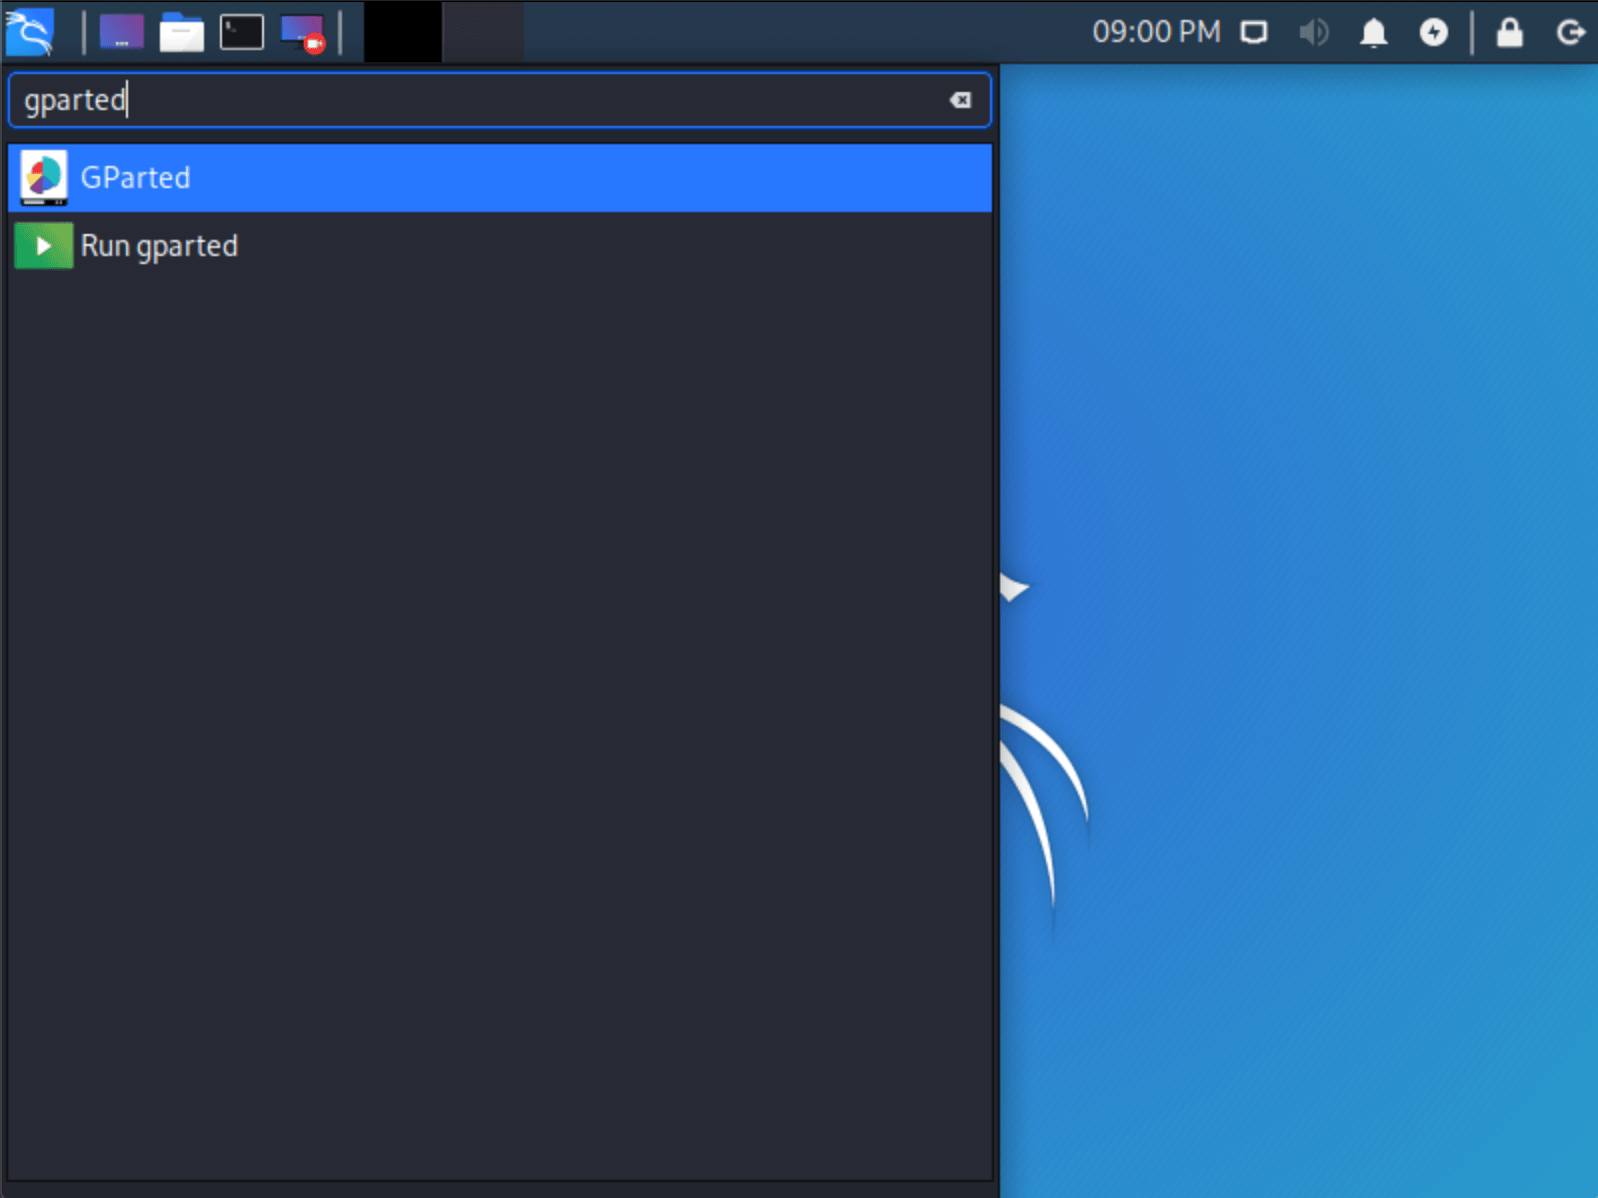
- Once GParted has opened, select your macOS/OS X partition & resize it leaving enough space (we recommend at least 20 GB) for the Kali Linux installation.
Depending on your setup, it is often the second option (the largest partition). In our example, there are three partitions:
- The EFI upgrade partition ( /dev/sda1 )
- macOS/OS X’s main operating system ( /dev/sda2 )
- System Recovery ( /dev/sda3 )
If you are moving past into any non-white in the partition then you are editing a section that is in use.
Only remove from the area of the partition that is not in use.
It is alright to leave the third partition ( /dev/sda3 ), and only shrink the actual install ( /dev/sda2 ).
If you wish to organize the partition to group all the macOS/OS X partitions together, placing the free space at the end, you may do so.
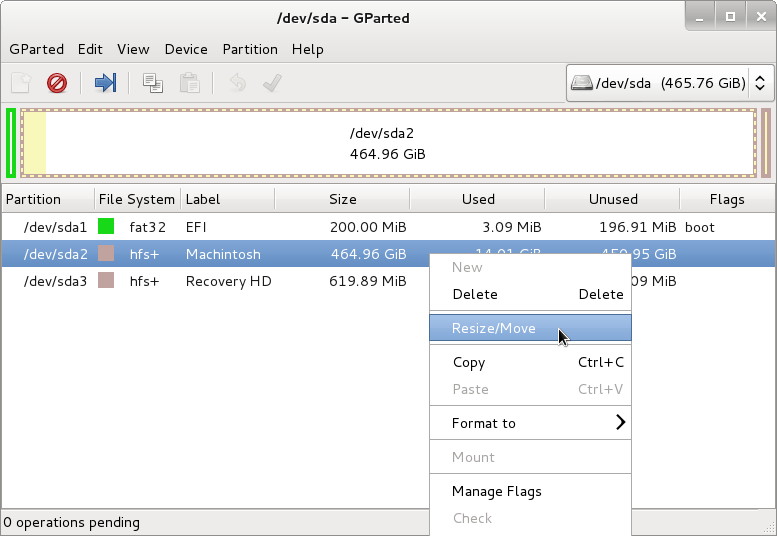
- Once you have resized your macOS/OS X partition, ensure you “Apply All Operations” on the hard disk. Exit gparted and reboot.
APFS/Recovery
This can be doing using either the command line, or graphical (using Disk Utility). Both option support resizing in a “normal” session, or booting into recovery mode. Using recovery mode, means the drive is not in use, so would reduce of the chances of issues. We would also recommend using the command line method, as it allows for a empty partition to be created which simplifies the setup process later on.
To get to command line access: Spotlight->Terminal
By using diskutil list , we can see our disk we want to resize is disk0s2 , and it is
- We want to reduce the 500GB to be 400GB. This would give Kali Linux 100GB (we recommend at least 20 GB).
- Quickly checking diskutil list again, we can see it has been successful.
Kali Linux Installation Procedure
- The installation procedure from this point onwards is similar to a Kali Linux Hard Disk install, until the point of the partitioning. At this point, you need to select “Guided — use the largest continuous free space” (rather than “Guided — the entire disk”) which got created earlier with gparted.
Do not forget you may need to press and hold the Option (or Alt) ⌥ key during the startup to see the boot menu (unless you have rEFInd installed).
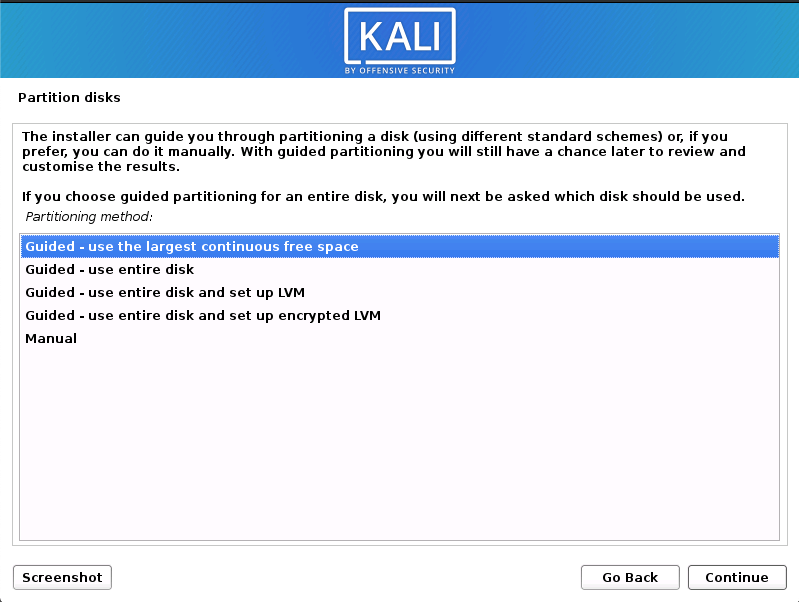
- You can carry on following the single boot Kali Linux install guide, expect you will not have the option to select desktop environment or metapackages as you are using the live image. Once the installation is done, reboot.
By default, macOS/OS X will boot into itself, rather than any other operating system/install media. As we have done it already a few times, you need to hold the Option (or Alt) ⌥ key. Whilst this “works”, but its not ideal as it is easy to not boot anything other tha macOS/OS X. Enter rEFInd, a replacement boot manager (which can also have themes applied).

Installing rEFInd
rEFInd is a boot manager, replacing the limiting default one with macOS/OS X, allowing for greater options. It can be installed either before or after Kali Linux’s installation, as well as from macOS/OS X or Kali Linux.
Since the release of macOS/OS X El Capitan (10.11), an additional security feature got introduced, System Integrity Protection (SIP). To install rEFInd using macOS/OS X, this first needs to be one-time bypassed (recommended), or disabled. Alternatively rEFInd can be installed using Kali Linux (we recommended todo so after when Kali Linux is installed rather than using live mode).

Installing rEFInd using macOS/OS X
rEFInd cannot easily be downloaded when in recovery mode, as there is limited space and tools/libraries available (e.g. curl does not support https). As a result, we will download rEFInd inside of a normal macOS/OS X session and afterwards reboot to recovery mode to install.
At the time of this writing, the latest version of rEFInd is 0.12.0.
- We will start off by downloading rEFInd, check its a valid zip file, and then extract.
- We are going to restarting macOS/OS X, and press the Command (⌘) and R keys at the same time, until you see a boot logo. At this point, if there is a firmware password, you will need to enter it in order to continue.
This will bypass SIP by using macOS/OS X’s Recovery System version which is in-built to the firmware (so no Internet connection is required).
- When recovery mode has fully loaded, from the menu: Utilities->Terminal.
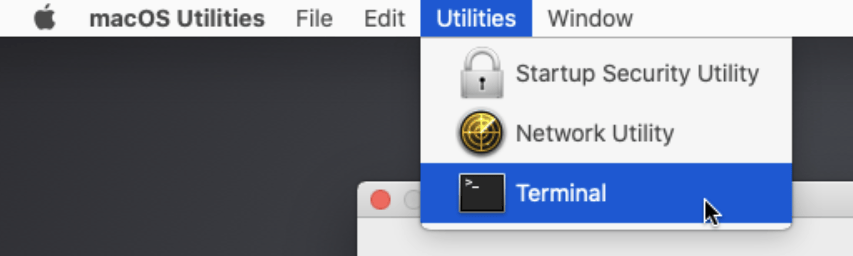
- Afterwards, we need to navigate to the extracted folder.
The path will be different, as its based on the label of the hard disk (in our case, Macintosh HD ) and username ( username ) and version of rEFInd ( 0.12.0 )
- Execute shell script refind-install .
Even though we are in recovery, where SIP is not running, rEFInd still believes it is. We will overwrite this.
- Reboot macOS/OS X. From the menu: Apple->Restart.
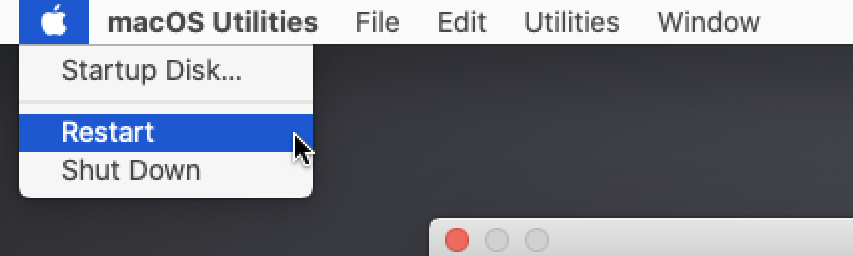
- Upon restart you should see the new boot manager, rEFInd.
Installing rEFInd using Kali Linux
rEFInd is also included with Kali Linux. We can quickly install it by doing the following:
During the installation, you will get a prompt saying about automatically running rEFInd. We recommend you press yes, otherwise you will need to run sudo dpkg-reconfigure refind (or sudo refind-install ) afterwards.
Upon restart you should see the new boot manager, rEFInd.
Configuring rEFInd
If you wish, you can alter rEFInd in various ways now, including:
- The default OS selection
- Timeout for menu selection
- Direct boot into the default OS (Note, by pressing Option (or Alt) ⌥ key during boot, you will have a one-time boot menu).
- Adding custom icons/themes.
refind.conf
macOS/OS X El Capitan
If you wish to make any of these alterations, this can be done by editing rEFInd’s configuration file. If you are using macOS/OS X El Capitan (10.11) or later, you need to mount the EFI boot volume first to access the file. This is done by doing the following.
macOS/OS X Yosemite
If you are using macOS/OS X Yosemite (10.10) or earlier, the configuration file is located here as no mounting is required.
Kali Linux
On Kali Linux, the configuration file is found in the following location.
Post Installation
Now that you’ve completed installing Kali Linux, it’s time to customize your system.
The General Use section has more information and you can also find tips on how to get the most out of Kali Linux in our User Forums.
Updated on: 2021-Sep-27
Author: g0tmi1k
Источник


