- Установка виртуальной Кали Линукс на VirtualBox.
- Скачивание виртуальной Кали Линукс: ISO или OVA?
- Установка виртуальной Кали Линукс.
- Первый запуск виртуальной Кали Линукс.
- Настройка Дополнений гостевой ОС
- 5 thoughts on “ Установка виртуальной Кали Линукс на VirtualBox. ”
- Kali linux установка образ
- System Requirements
- Installation Prerequisites
- Preparing for the Installation
- Kali Linux Installation Procedure
- Language
- Network
- User Accounts
- Clock
- Encrypted LVM
- Proxy Information
- Metapackages
- Boot Information
- Reboot
- Post Installation
Установка виртуальной Кали Линукс на VirtualBox.
Установка виртуальной Кали Линукс на VirtualBox в Windows 10. В статье я сделаю упор на несколько главных моментов, которые интересуют пользователя. Как то:
Ссылки, которые вам пригодятся чуть позже:
Скачивание виртуальной Кали Линукс: ISO или OVA?
Все мы перед установкой стоим перед небольшим выбором: на виртуальную машину можно поставить образ для физических машин или готовый образ для виртуальных. Установка виртуальной Кали Линукс с помощью ISO (CD формат) пригодиться вам, если вы собираетесь попрактиковаться с подготовкой жёсткого диска к установке Grub, разбиением на разделы, прохождением процедуры установки языковых и прочих настроек и т.п. Т.е. установкой Кали Линукс так, словно бы вы ставили её на реальную машину. Файл готовой виртуальной машины нам предлагается для упрощения процедуры установки. Функционал будет тем же, что и в предыдущем случае, но диск с системным содержимым, файл манифеста, OVF XML (спецификация аппаратного обеспечения) уже влючены в сборку и ставить ничего не нужно. Так что выбор в пользу OVA очевиден. Отправляемся по официальному адресу с выбором загрузок
Пролистываем верхнюю таблицу Download Kali Linux Images вниз до строки Kali Linux 64-bit VirtualBox и переходим по ссылке загрузок со страницы Offensive Security VM Download Page . По крайней мере, структура ссылок на странице загрузок в 2020 г. такая.
На следующей странице нас ждёт всегда свежий файл диска, готовый для скачивания. Скорость обмена с сервером неплохая, так что можете выбрать любой вариант загрузки: через браузер или торрентом. И ждать закачки:
Скачанную папку лучше переместить из папки Загрузок на отдельный диск или другое место, откуда вы его по ошибке не удалите.
Установка виртуальной Кали Линукс.
Самый быстрый этап. В открытом первоначальном окне Virtual Box выбираем Файл — Импорт конфигураций… и указываем на папку с файлом виртуальной машины. Наш — рыжий значок с именем типа kali-linux-2020.2a-vbox-amd64 . Не ошибётесь:
Жмём Открыть и оставляем настройки виртуальной машины пока как есть, запуская процедуру установки, щёлкнув по Импорт:
Соглашаемся с окнами, если вылезут и ждём:
После завершения установки в левой части окна VirtualBox жмём Настроить для выбранной виртуальной Кали Линукс. Скорректируем настройки виртуальной машины для улучшения производительности. Я обычно делю «возможности» хозяйской Windows 10 пополам в части процессора и RAM и присваиваю их таким образом виртуальной машине. В любой момент вы сможете эти характеристики изменить:
Первый запуск виртуальной Кали Линукс.
Пароль и логин для виртуальной Кали Линукс kali и kali. Система встречает нас неверным временем и английским языком:
В соответствии с обновлёнными требованиями безопасности Кали сейчас также поставляется с автоматически активированной учётной записью Кали без root-прав. Так что любым командам в терминале должна предшествовать команда sudo с вводом пароля (в нашем случае kali). Усложнять пока процедуру знакомства регистрацией ещё одного пользователя мы не будем. А пока обновимся через терминал:
Перезагружаемся командой sudo reboot и готовим систему к установке дополнений.
Настройка Дополнений гостевой ОС
Для начала ISO дополнений VBoxGuest Additions нужно скачать. Он находится на странице загрузок версий, откуда вам его нужно скачать в виде образа переходом на страницу. Я качаю в виде ISO последней версии:
После загрузки укажем его в качестве диска (он должен появиться на Рабочем столе Кали):
Однако при попытке его закрепить в чистом виде (Подключить образ диска Дополнений гостевой ОС…) вылезет ошибка:
Входим в Кали Линукс, открываем терминал и вводим поочерёдно:
Последняя команда покажет содержимое диска Дополнений. Запускаем файл VBoxLinuxAdditions.run от имени root:
По окончании команды окно виртуальной машины развернётся во весь (или почти) экран. Перезагружаемся. Проверяем, настроены ли общий с хозяйской Windows 10 буфер обмена и общие папки:
Проверьте: скопируйте из Windows 10 что-нибудь и вставьте в терминал Кали скопированное сочетанием CTRL + Shift + V. Если содержимое буфера в терминале виртуальной машины отобразилось, всё настроено верно.
5 thoughts on “ Установка виртуальной Кали Линукс на VirtualBox. ”
Добрый день. В Кали Линукс виртуальной во время запуска на короткое время появляется в правом углу надпись vboxclient: failed to register resizing support. Не то чтобы очень мешает, но как убрать?
Речь, видимо. вот об этом:
В настройках графического контроллера поставьте VBoxVGA или VBoxSVGA. VirtualBox укажет на неправильные настройки, однако ошибки больше не будет.
Здравствуйте. При попытке установить Кали я вижу сообщение в углу
vboxclient: failed to get dis…
И ничего не происодит. Могу только выключить. Как настройками VirtualBox не играл, дальше этого окна уйти не могу. Что делать?
Обновитесь до последнего релиза Virtual Box (или поставьте предыдущую версию виртуальной Кали Линукс) и должно прийти счастье )). Вы, скорее всего, ставите последний OVA от Кали Линукс на довольно подустаревую версию VBox. Для виртуалок Кали идёт с интегрированным guest edition, этот факт немного сбивает машину с толку.
Источник
Kali linux установка образ
Installing Kali Linux (single boot) on your computer is an easy process. This guide will cover the basic install (which can be done on bare metal or guest VM), with the option of encrypting the partition. At times, you may have sensitive data you would prefer to encrypt using Full Disk Encryption (FDE). During the setup process you can initiate an LVM encrypted install on either Hard Disk or USB drives.
First, you’ll need compatible computer hardware. Kali Linux is supported on amd64 (x86_64/64-Bit) and i386 (x86/32-Bit) platforms. Where possible, we would recommend using the amd64 images. The hardware requirements are minimal as listed in the section below, although better hardware will naturally provide better performance. You should be able to use Kali Linux on newer hardware with UEFI and older systems with BIOS.
Our i386 images, by default use a PAE kernel, so you can run them on systems with over 4 GB of RAM.
In our example, we will be installing Kali Linux in a fresh guest VM, without any existing operating systems pre-installed. We will explain other possible scenarios throughout the guide.
System Requirements
The installation requirements for Kali Linux will vary depending on what you would like to install and your setup. For system requirements:
- On the low end, you can set up Kali Linux as a basic Secure Shell (SSH) server with no desktop, using as little as 128 MB of RAM (512 MB recommended) and 2 GB of disk space.
- On the higher end, if you opt to install the default Xfce4 desktop and the kali-linux-default metapackage, you should really aim for at least 2 GB of RAM and 20 GB of disk space.
- When using resource-intensive applications, such as Burp Suite, they recommend at least 8 GB of RAM(and even more if it large web application!) or using simultaneous programs at the same time.
Installation Prerequisites
This guide will make also the following assumptions when installing Kali Linux:
- Using the amd64 installer image.
- CD/DVD drive / USB boot support.
- Single disk to install to.
- Connected to a network (with DHCP & DNS enabled) which has outbound Internet access.
We will be wiping any existing data on the hard disk, so please backup any important information on the device to an external media.
Preparing for the Installation
Download Kali Linux (We recommend the image marked Installer).
Burn The Kali Linux ISO to DVD or image Kali Linux Live to USB drive. (If you cannot, check out the Kali Linux Network Install).
Backup any important information on the device to an external media.
Ensure that your computer is set to boot from CD/DVD/USB in your BIOS/UEFI.
Kali Linux Installation Procedure
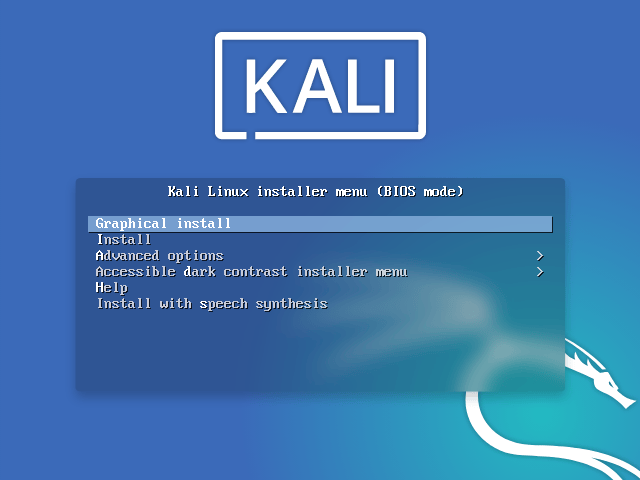
- To start your installation, boot with your chosen installation medium. You should be greeted with the Kali Linux Boot screen. Choose either Graphical install or Install (Text-Mode). In this example, we chose the Graphical install.
If you’re using the live image instead, you will see another mode, Live, which is also the default boot option. 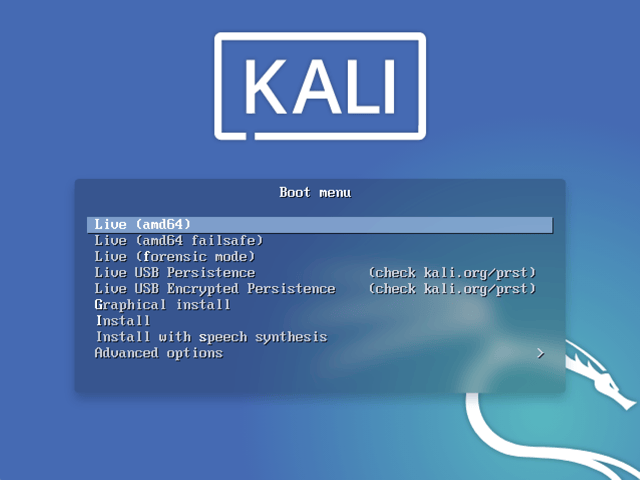
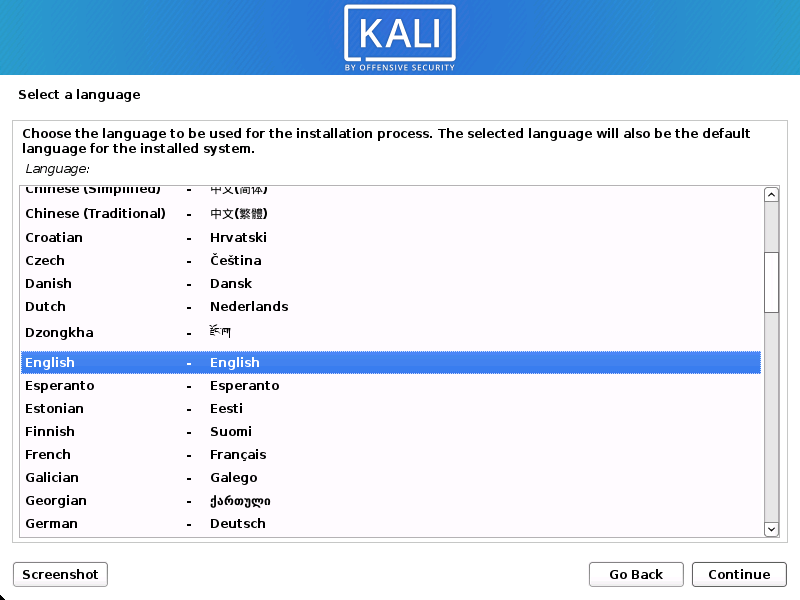
Language
- Select your preferred language. This will be used for both the setup process and once you are using Kali Linux.
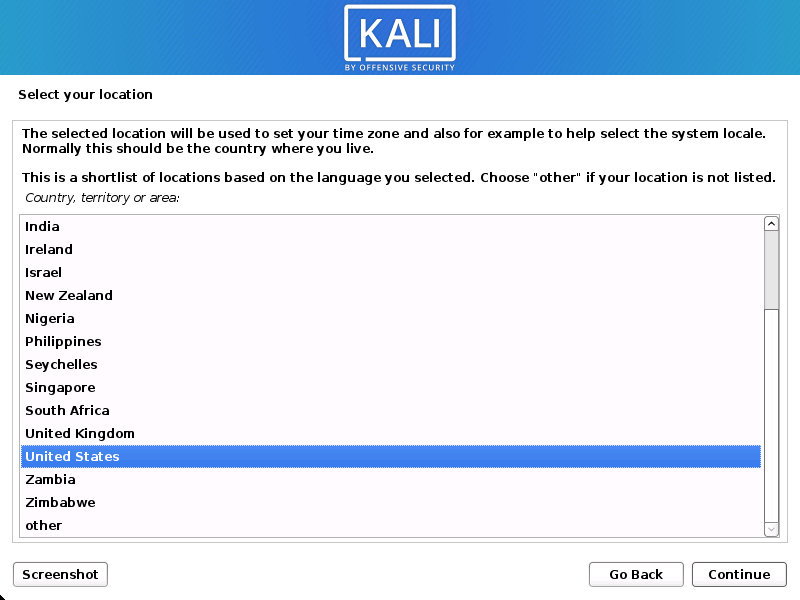
- Specify your geographic location.
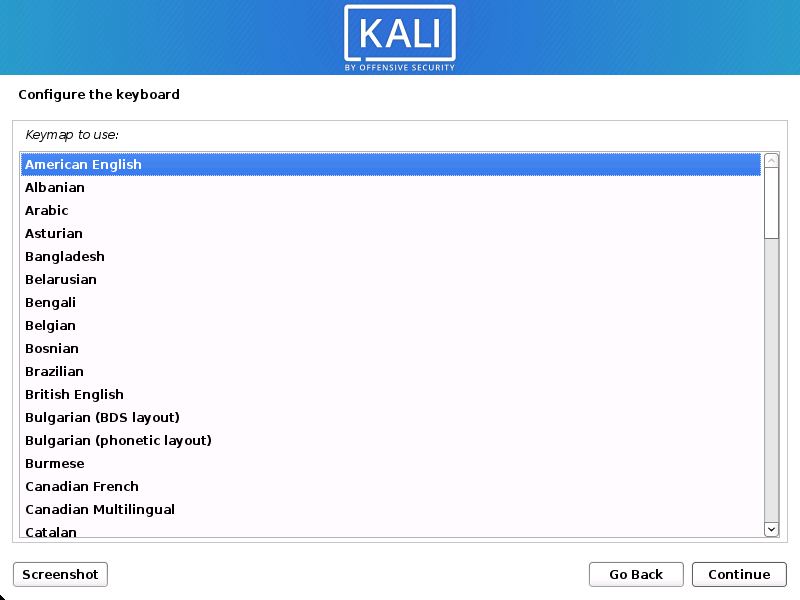
- Select your keyboard layout.
Network
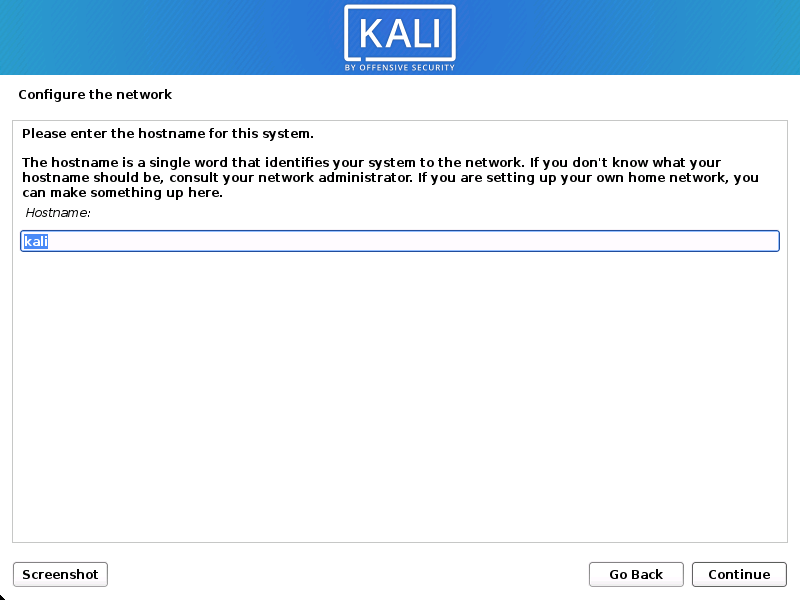
- The setup will now probe your network interfaces, looks for a DHCP service, and then prompt you to enter a hostname for your system. In the example below, we’ve entered kali as our hostname.
If there is no network access with DHCP service detected, you may need to manually configure the network information or do not configure the network at this time.
- If there isn’t a DHCP service running on the network, it will ask you to manually enter the network information after probing for network interfaces, or you can skip.
- If Kali Linux doesn’t detect your NIC, you either need to include the drivers for it when prompted, or generate a custom Kali Linux ISO with them pre-included.
- If the setup detects multiple NICs, it may prompt you which one to use for the install.
- If the chosen NIC is 802.11 based, you will be asked for your wireless network information before being prompted for a hostname.
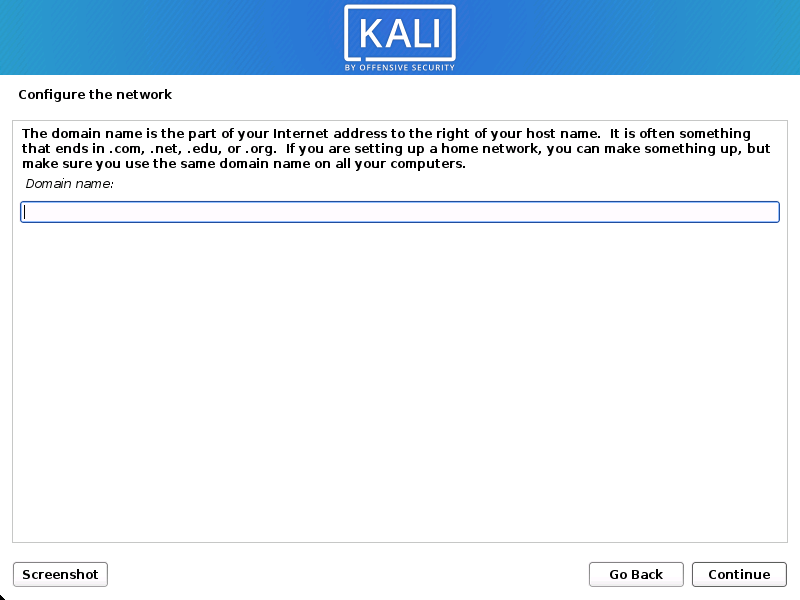
- You may optionally provide a default domain name for this system to use (values may be pulled in from DHCP or if there is an existing operating systems pre-existing).
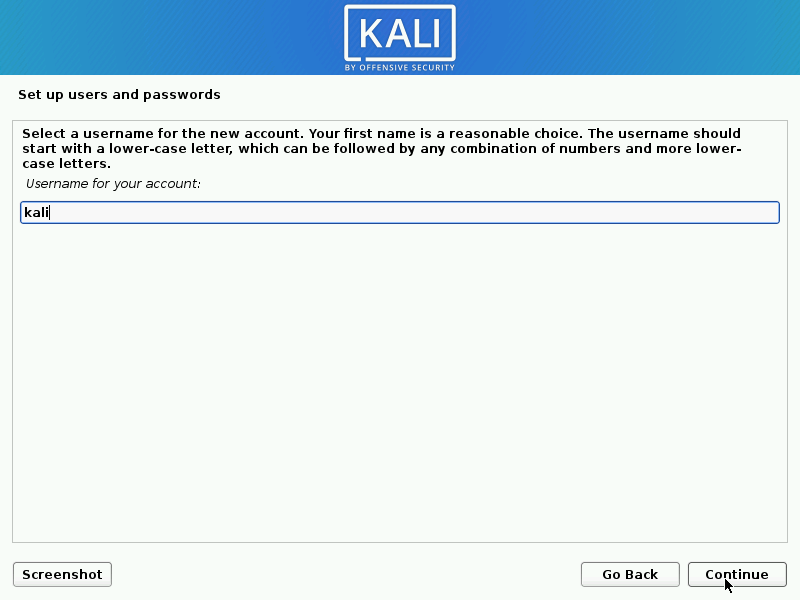
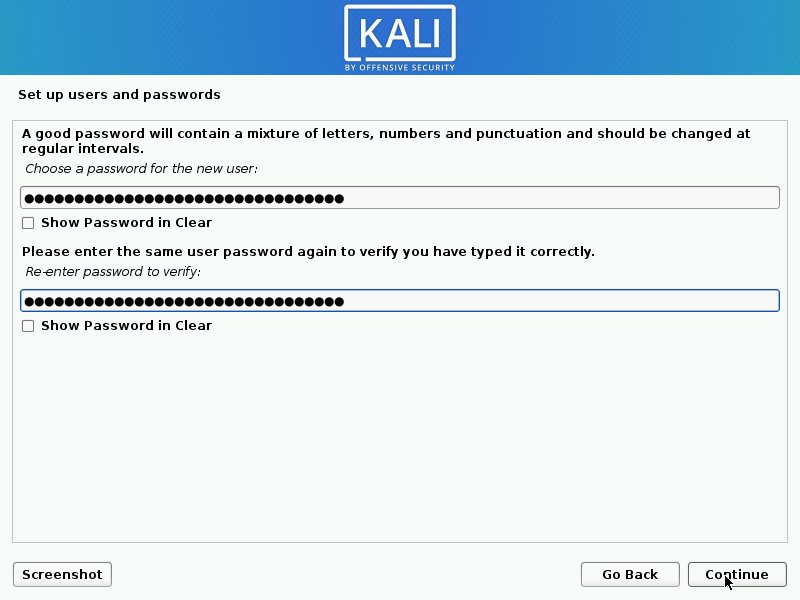
User Accounts
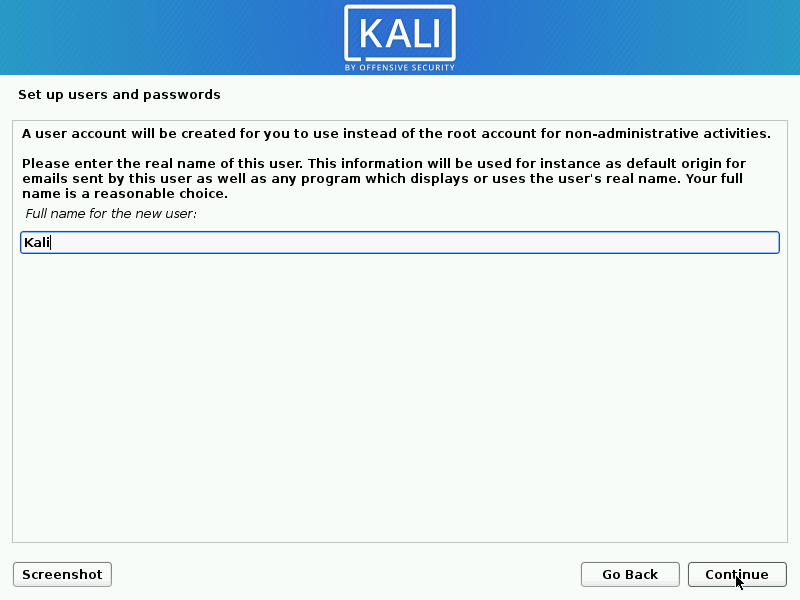
- Next, create the user account for the system (Full name, username and a strong password).
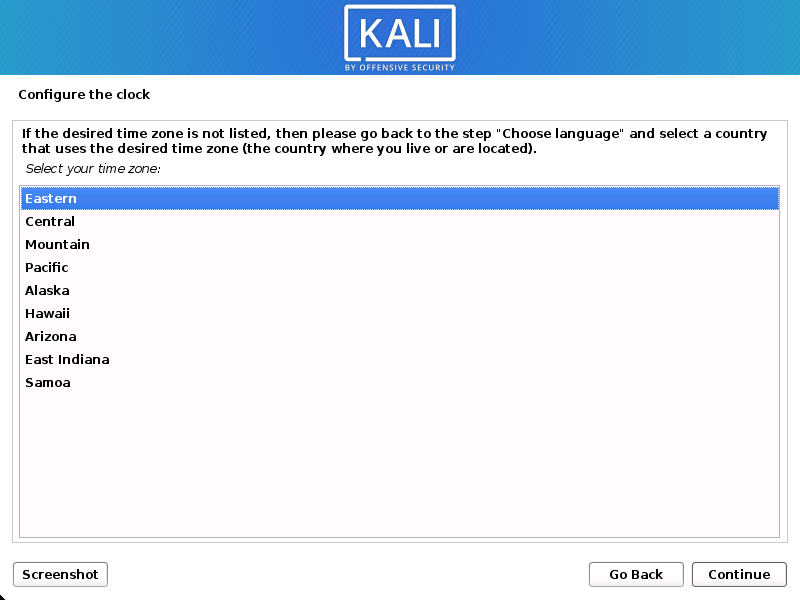
Clock
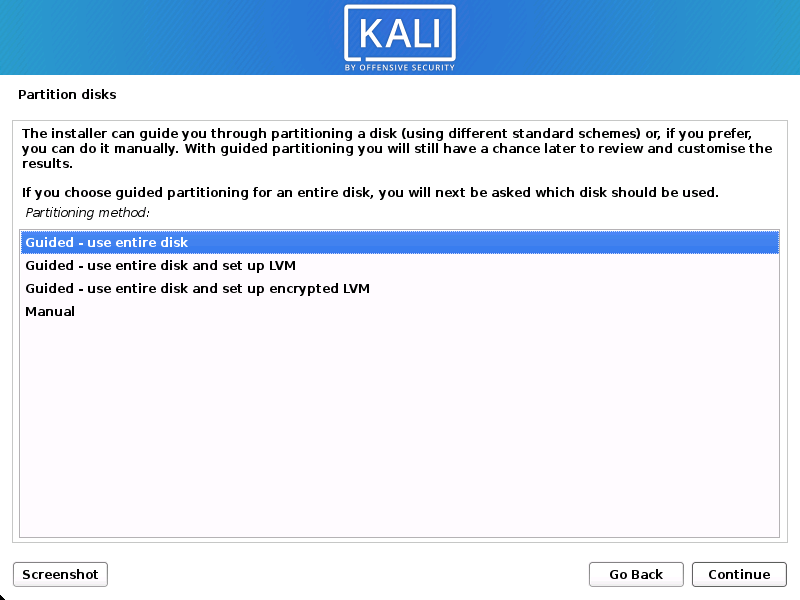
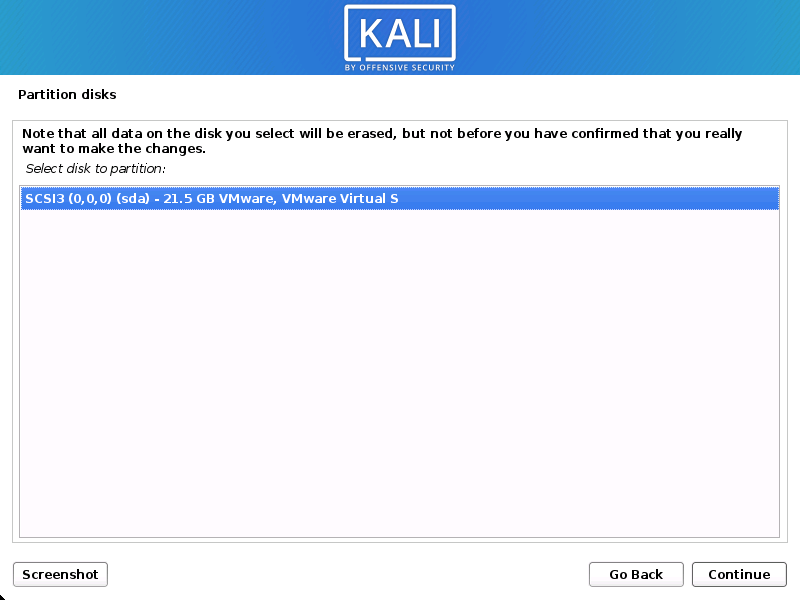
- The installer will now probe your disks and offer you various choices, depending on the setup.
In our guide, we are using a clean disk, so we have four options to pick from. We will select Guided — the entire disk, as this is the single boot installation for Kali Linux, so we do not want any other operating systems installed, so we are happy to wipe the disk.
If there is an pre-existing data on the disk, you will have have an extra option (Guided — use the largest continuous free space) than the example below. This would instruct the setup not to alter any existing data, which is perfect for for dual-booting into another operating system. As this is not the case in this example, it is not visible.
Experienced users can use the “Manual” partitioning method for more granular configuration options, which is covered more in our BTRFS guide.
If you want to encrypt Kali Linux, you can enable Full Disk Encryption (FDE), by selecting Guided — used entire disk and setup encrypted LVM. When selected, later on in the setup (not in this guide) prompt you to enter a password (twice). You will have to enter this password every time you start up Kali Linux.
- Select the disk to be partitioned.
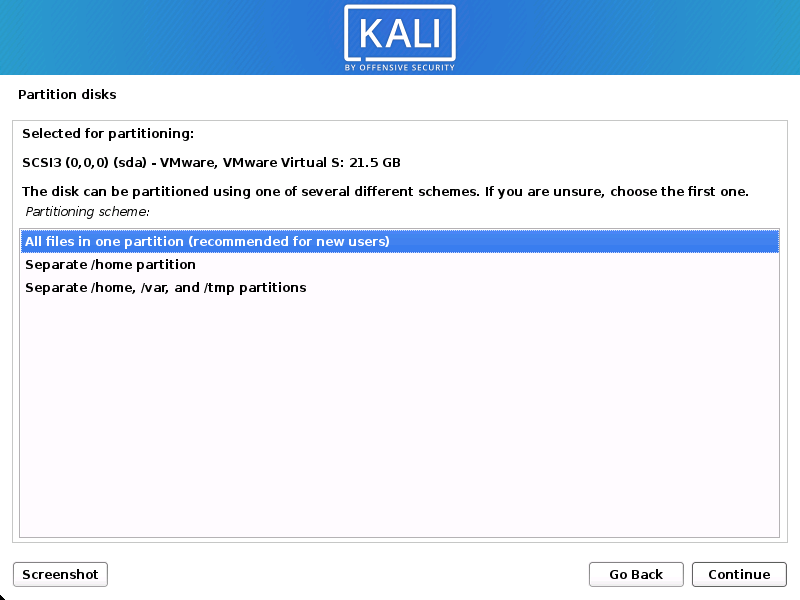
- Depending on your needs, you can choose to keep all your files in a single partition — the default — or to have separate partitions for one or more of the top-level directories.
If you’re not sure which you want, you want “All files in one partition”.
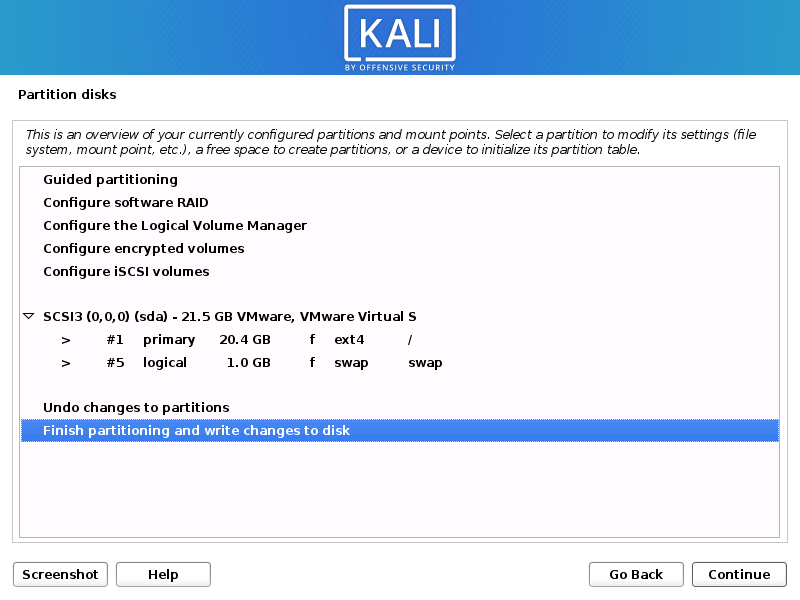
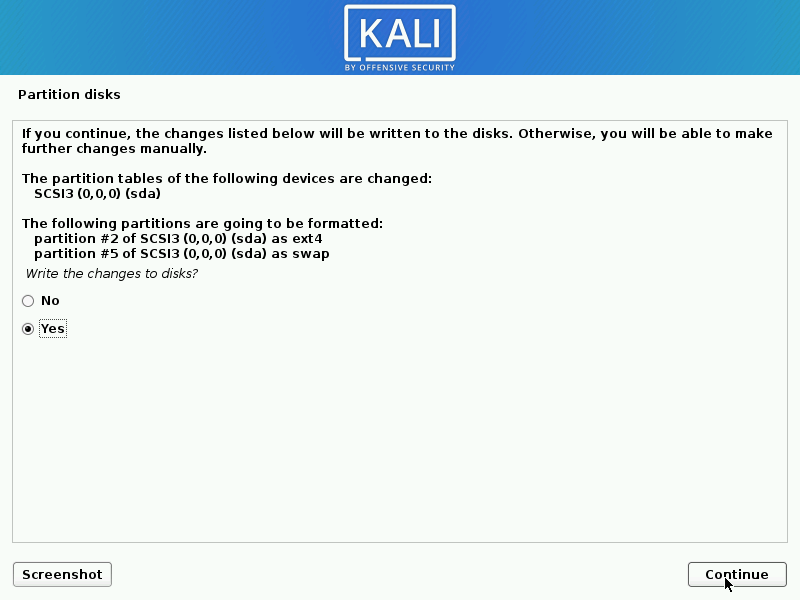
- Next, you’ll have one last chance to review your disk configuration before the installer makes irreversible changes. After you click Continue, the installer will go to work and you’ll have an almost finished installation.
Encrypted LVM
If enabled in the previous step, Kali Linux will now start to perform a secure wipe of the hard disk, before asking you for a LVM password.
Please sure a strong password, else you will have to agree to the warning about a weak passphrase.
This wipe may take “a while” (hours) depending on the size and speed of the drive.
If you wish to risk it, you can skip it.
Proxy Information
- Kali Linux uses a central repository to distribute applications. You’ll need to enter any appropriate proxy information as needed.

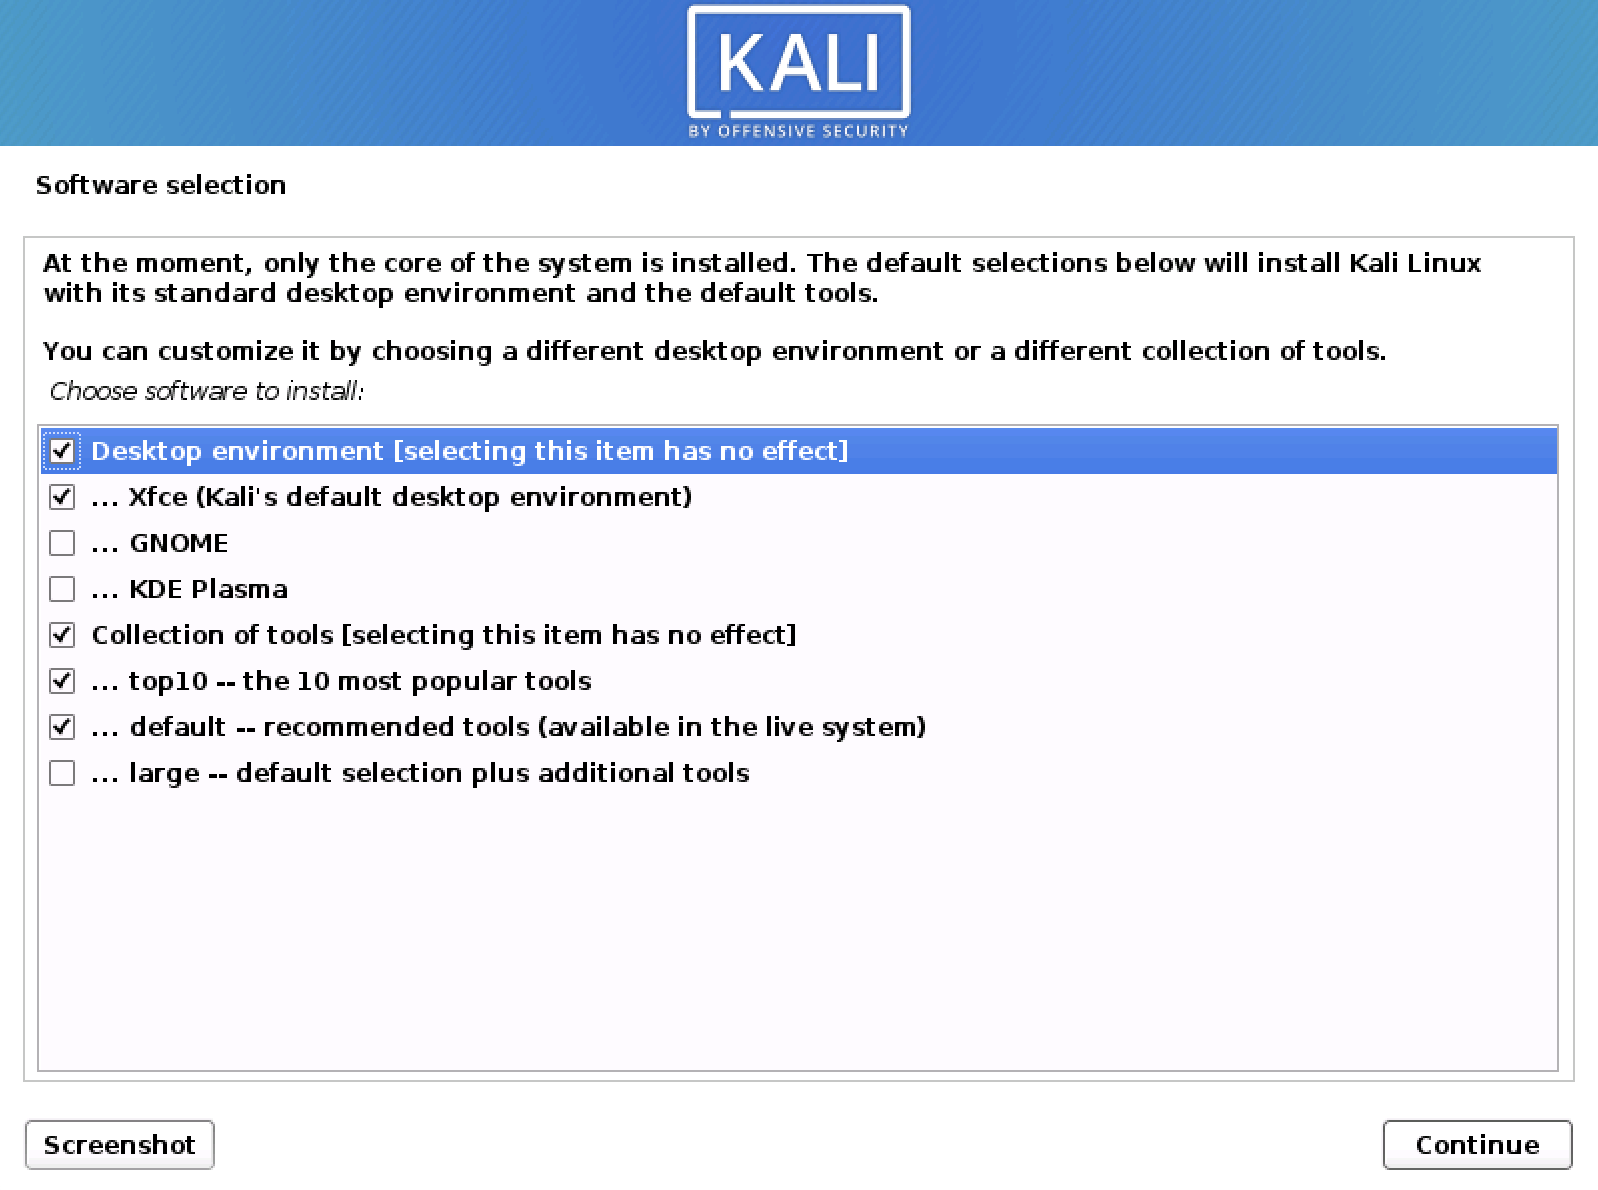
Metapackages
If network access was not setup, you will want to continue with setup when prompt.
If you are using the Live image, you will not have the following stage.
- Next you can select which metapackages you would like to install. The default selections will install a standard Kali Linux system and you don’t really have to change anything here.
Please refer to this guide if you prefer to change the default selections.
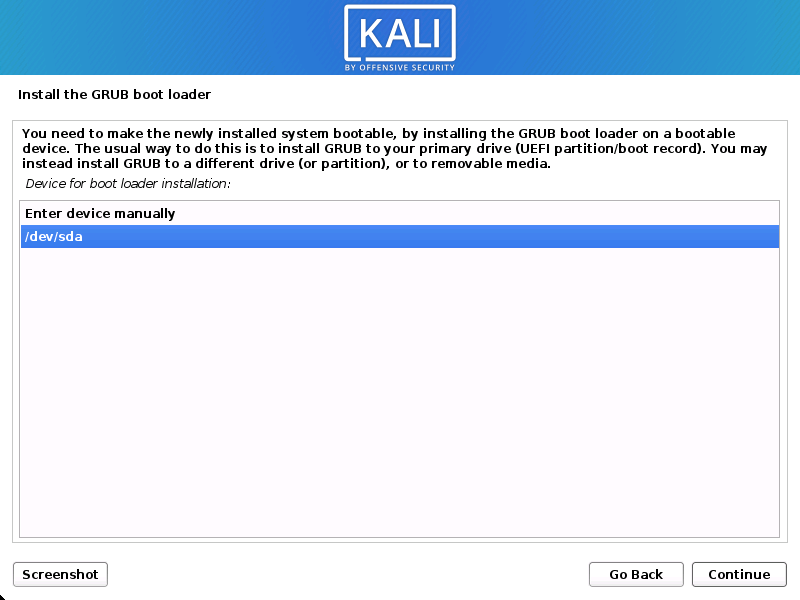
Boot Information
- Next confirm to install the GRUB boot loader.
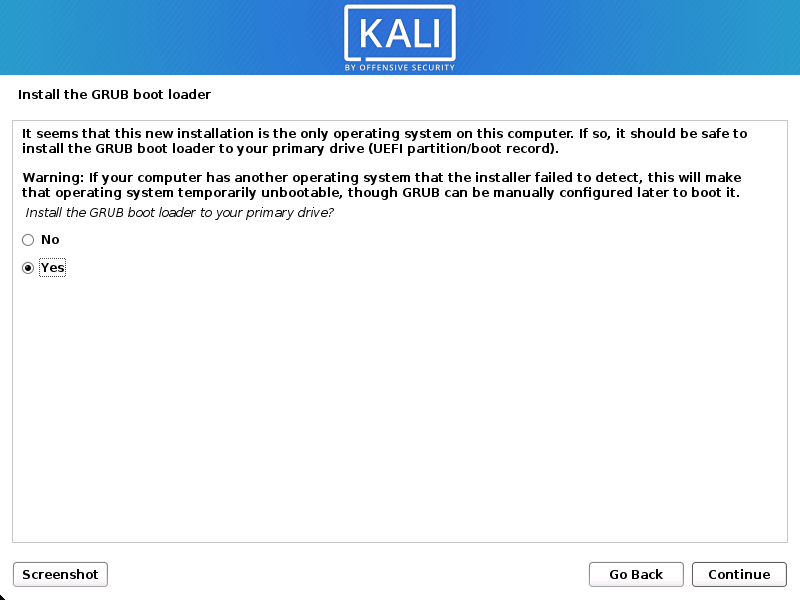
- Select the hard drive to install the GRUB bootloader in (it does not by default select any drive).
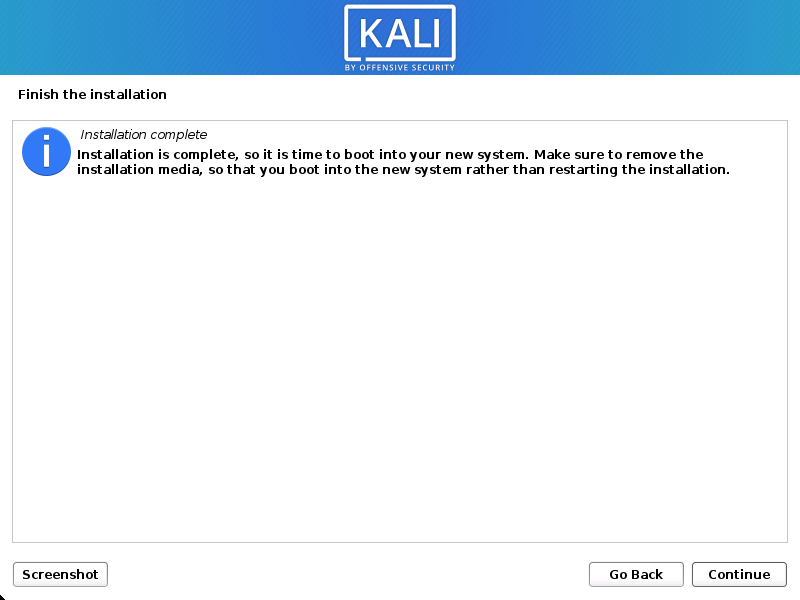
Reboot
- Finally, click Continue to reboot into your new Kali Linux installation.
Post Installation
Now that you’ve completed installing Kali Linux, it’s time to customize your system.
The General Use section has more information and you can also find tips on how to get the most out of Kali Linux in our User Forums.
Updated on: 2021-Sep-27
Author: gamb1t
Источник


