- Kali linux window manager
- This page details the steps to install Win-Kex in under 2 minutes.
- Installation
- Prerequisites
- Install Kali Linux in WSL2
- Install Win-KeX
- Run Win-KeX
- Win-KeX supports three modes:
- Optional Steps:
- Enjoy Win-KeX!
- Kali Linux в Windows
- Kali linux window manager
- Topics
- Switch Desktop Environments
- HiDPI
- Screen Captures
- Theme
- No Terminal Showing Up
- Language Settings
- Feedback
- Статья Кастомизация Kali-Linux [ Или прокачиваем свое кибер оружие]
Kali linux window manager
This page details the steps to install Win-Kex in under 2 minutes.
Installation
All installation steps, up to the point where we install Win-Kex, are also explained in the 5 minute video guide by the amazing NetworkChuck:
Prerequisites
- Running Windows 10 version 2004 or higher
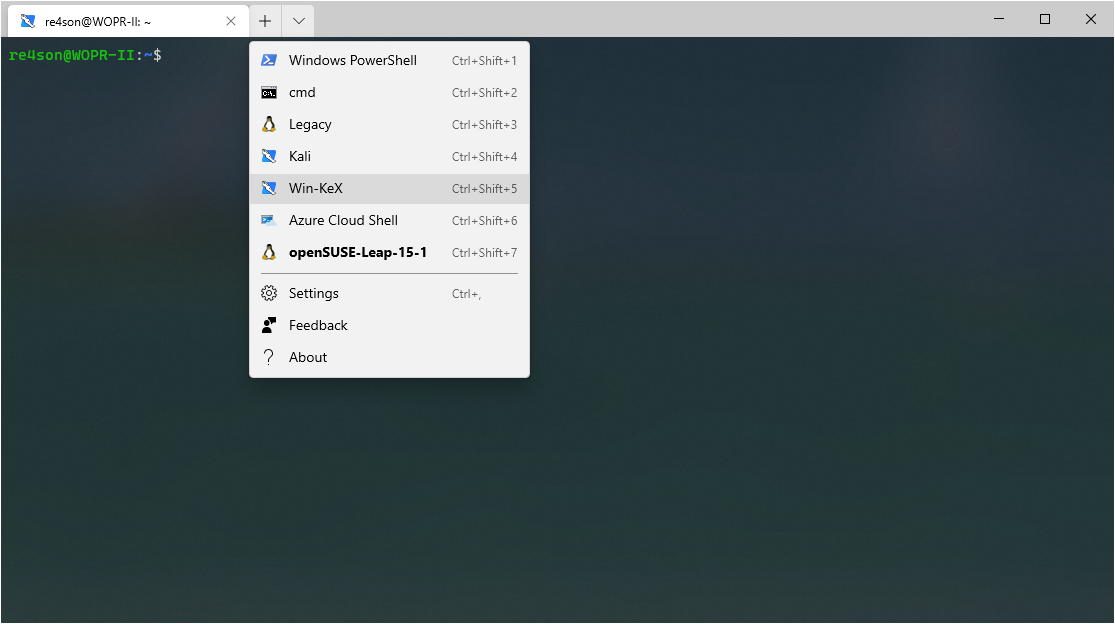
- Using Windows Terminal
Install Kali Linux in WSL2
- Open PowerShell as administrator and run:
-
Open PowerShell as administrator and run:
Download and install the WSL2 Linux Kernel from here: https://aka.ms/wsl2kernel
Open PowerShell as administrator and run: wsl —set-default-version 2
Install Kali Linux from the Microsoft Store
Note: to upgrade an existing WSL1 kali-linux installation, type: wsl —set-version kali-linux 2
Run Kali and finish the initial setup
Install Win-KeX
Run Win-KeX
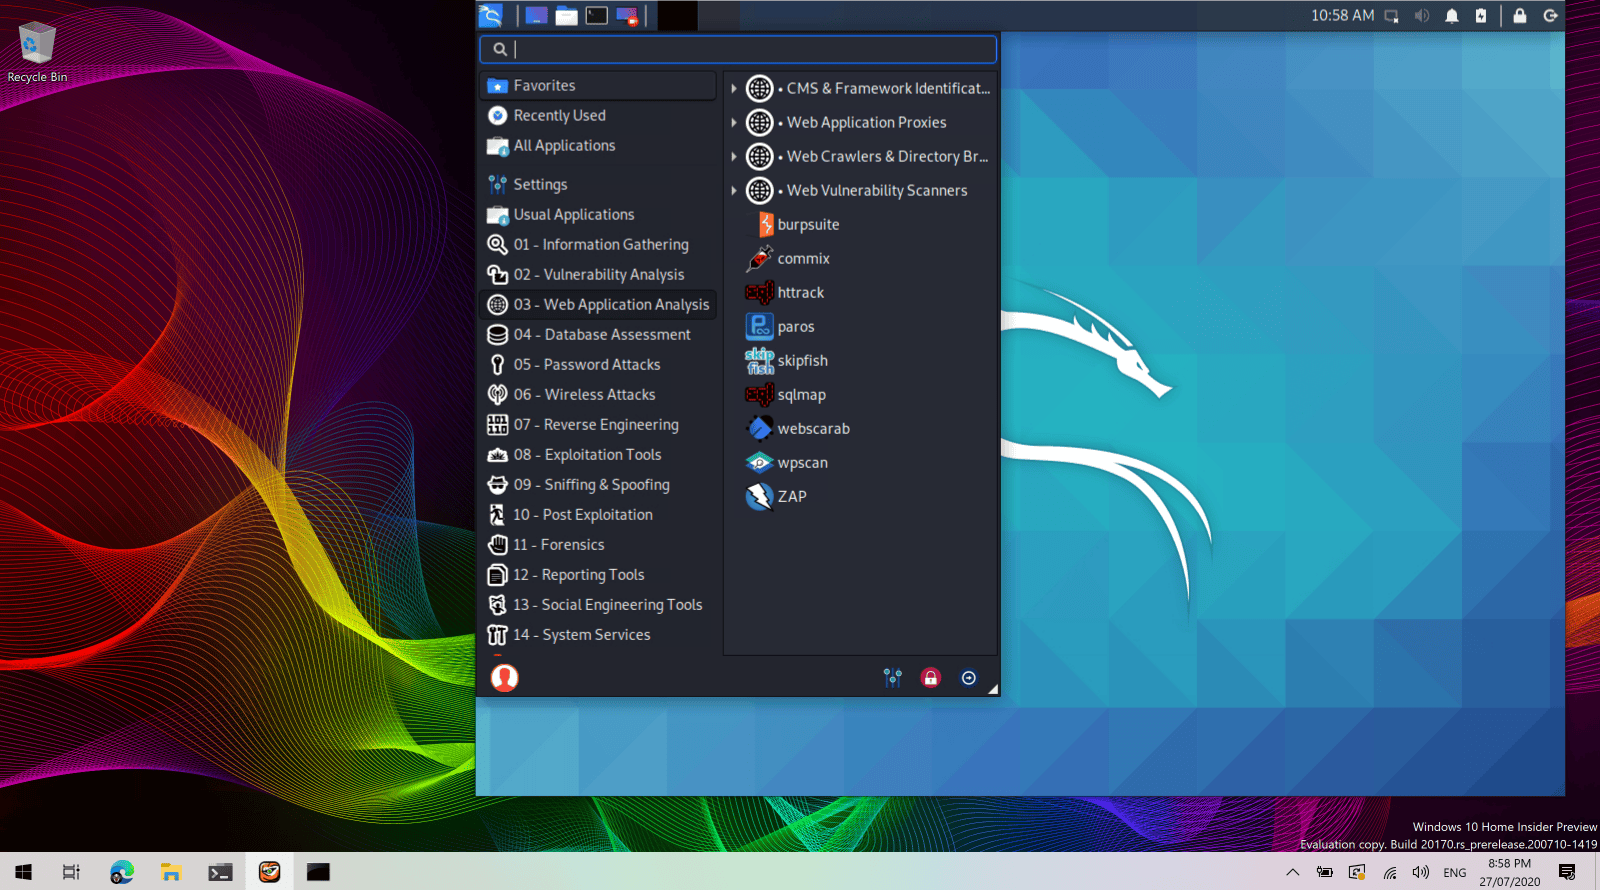
Win-KeX supports three modes:
Window Mode:

To start Win-KeX in Window mode with sound support, run
Refer to the Win-KeX Win usage documentation for further information.
Enhanced Session Mode:
To start Win-KeX in Enhanced Session Mode with sound support and arm workaround, run
Refer to the Win-KeX ESM usage documentation for further information.
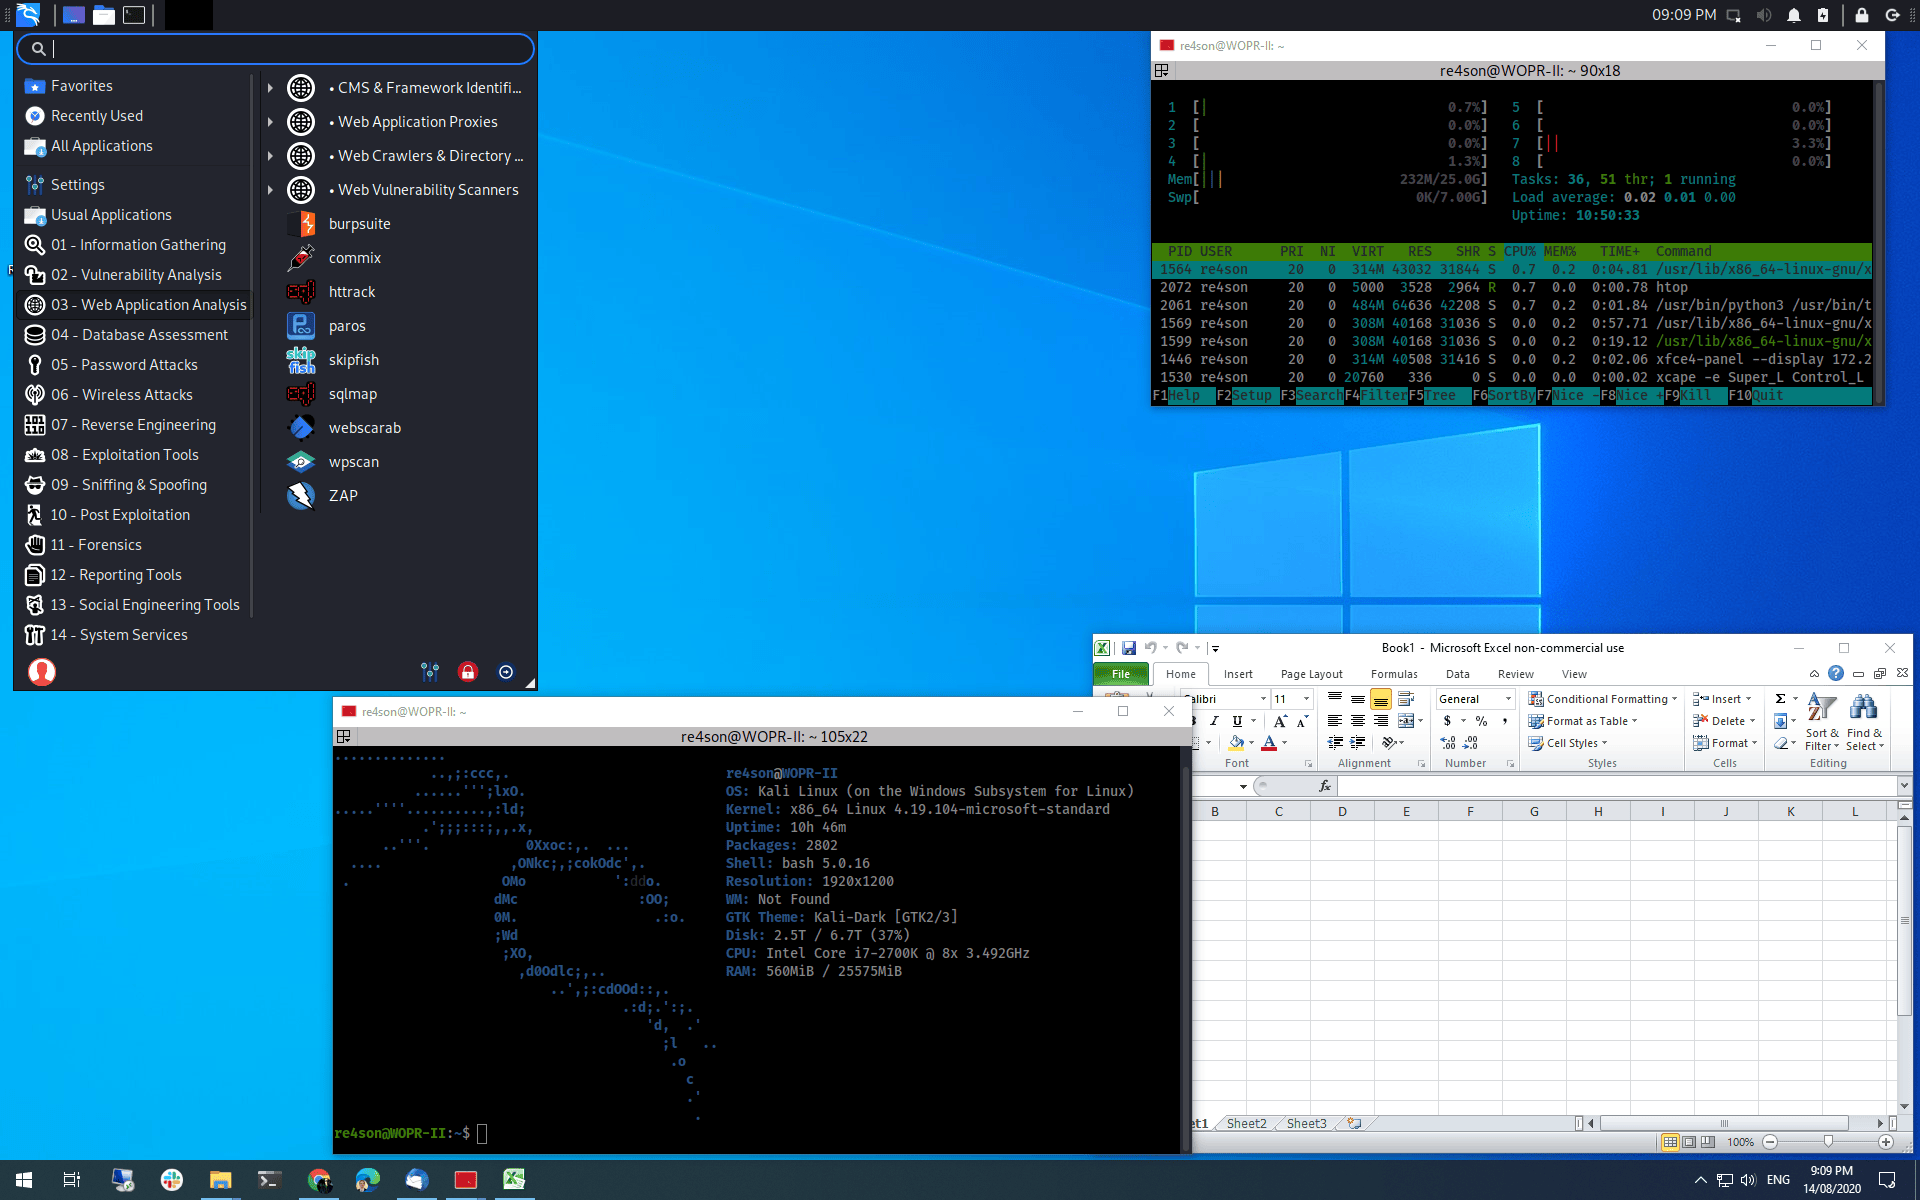
Seamless mode:
To start Win-KeX in Seamless mode with sound support, run
Refer to the Win-KeX SL usage documentation for further information.
Optional Steps:
- If you have the space, why not install “Kali with the lot”?: sudo apt install -y kali-linux-large
Choose amongst these options:
Basic Win-KeX in window mode with sound:
Advanced Win-KeX in window mode with sound — Kali icon and start in kali home directory:
Copy the kali-menu.png icon across to your windows picture directory and add the icon and start directory to your WT config:
Basic Win-KeX in seamless mode with sound:
Advanced Win-KeX in seamless mode with sound — Kali icon and start in kali home directory:
Copy the kali-menu.png icon across to your windows picture directory and add the icon and start directory to your WT config:
Basic Win-KeX in ESM mode with sound:
Advanced Win-KeX in ESM mode with sound — Kali icon and start in kali home directory:
Copy the kali-menu.png icon across to your windows picture directory and add the icon and start directory to your WT config:
For more information, ask for help via:
or consult the manpage via:
or join us in the Kali Forums
Enjoy Win-KeX!
Updated on: 2021-Sep-27
Author: Re4sonИсточник
Kali Linux в Windows
С введением подсистемы Windows для Linux (WSL) в Windows 10 появились новые возможности, такие как поддержка Linux дистрибутивов, в частности Ubuntu. В этой статье я расскажу, как с помощью этой подсистемы подключить Kali LInux в Windows среде не используя системы виртуализации.
Хотя работы Kali на Windows может быть не оптимальна из-за различных ограничений, все еще существует множество ситуаций, когда Kali Linux может быть необходим для использования совместно с Windows 10. Например это может быть консолидация рабочих областей, особенно если Windows является вашей основной рабочей средой. Также может быть полезна стандартизация инструментов и сценариев для работы в нескольких средах, быстрый перенос инструментов командной строки для тестирования проникновения в Linux для Windows и т. д.
Для того, чтобы установить Kali необходимо выполнить несколько шагов. В первую очередь необходимо включить и установить Windows Subsystem for Linux Command Reference — запустить powershell оболочку с правами администратора, выполнить команду и перезагрузить вашу машину:
После перезагрузки необходимо установить Ubuntu-environment:
Далее вам необходимо установить WSL Distribution Switcher. Эта программа предназначена для переключения подсистемы Linux для использования различных дистрибутивов Linux. Образы rootfs в настоящее время загружаются из репозиториев Docker Hub в виде исходников или prebuilt-сборок.
(Для клонирования проекта с git-репозитория необходимо установить git-клиент на Windows 10, например отсюда: https://git-scm.com/download/win, а также установить python для Windows).
Теперь, когда Kali-environment развернут на вашей Windows 10 вы можете вызвать его с помощью команды:
Далее вам необходимо обновить Kali Linux и установить кириллическую локализацию (при необходимости):
После развертывания Kali-environment мы можем установить необходимые утилиты и использовать их из Windows:
Таким простым способом вы получите современный дистрибутив для тестирования на проникновение в вашей Windows среде без запуска систем виртуализации, перезагрузок и прочего. Также, необходимо учесть, что из такой среды у вас не будут нормально работать утилиты по работе с железом, для вардрайвинга и т.д.
Источник
Kali linux window manager
The new Kali Linux Desktop is incredibly fast and absolutely gorgeous. Here are some tips and tricks to help you find your way around it quickly.
Topics
Switch Desktop Environments
Q: I absolutely love the new theme and I desperately want it, but without having to re-install my system. How can I migrate my existing Kali Linux installation?
A: Run sudo apt update && sudo apt install -y kali-desktop-xfce in a terminal session to install the new Kali Linux Xfce environment. When asked to select the “Default display manager”, choose lightdm .
Next, run update-alternatives —config x-session-manager and select Xfce’s option. If you would also like to remove the Gnome window manager, which we do not recommend until you are sure you are ready to, run apt purge —autoremove kali-desktop-gnome . Be sure to run this after setting up Xfce.
Next time you login after a reboot you will have the Xfce theme, if you did not run the update-alternatives command you can choose “Xfce” in the session selector in the top right hand corner of the login screen.
Q: I installed Xfce, but it doesn’t look like the preview. How can I get it to look the same?
A: If you are having issues, it may be that a config file is not set properly. First, backup .cache, .config, and .local. Next, running rm -r .cache .config .local and then rebooting will likely fix those issues.
Q: How can I get a Kali Linux image with GNOME instead of Xfce?
A: Just download the Kali GNOME image from kali.org/downloads/
Q: I tried Xfce and I really like it but I still would like to switch back to GNOME. How can I do that?
A: You can run sudo apt update && sudo apt install -y kali-desktop-gnome in a terminal session. Next time you login you can choose “GNOME” in the session selector in the top right hand corner of the login screen.
HiDPI
Q: I have a HiDPI screen and everything looks tiny. Is there a way to improve that?
A: Please see our HiDPI page
Screen Captures
Q: How can I take screenshots?
A: Press the Print Screen key on your keyboard will launch screenshooter. Pressing enter will take the screenshot. Alternatively you can click on the “Screen-Recorder” icon in the quick-launch panel (the far right icon in the panel next to the application menu) and choose “Screenshot”.
Q: How can I record videos of my screen activity?
A: Pressing Ctrl & Print Screen on your keyboard will launch the screen recorder. Pressing Enter will start recording. Alternatively you can click on the “Screen-Recorder” icon in the quick-launch panel (the far right icon in the panel next to the application menu).
Theme
Q: How can I switch to a lighter, brighter theme?
A: Kali Linux provides two default themes: dark and light. To switch to the light theme, go to “Settings -> Appearance” and:
— In the “Style” tab, select “Kali-Light” — In the “Icons” tab, select “Flat-Remix-Blue-Light”
go to “Settings -> Window Manager” and:
— In the “Style” tab, select “Kali-Light”
To switch from “Light” to “Dark”, just select the Dark themes in these settings.
Q: I love the buttons on the right hand side, but I’d love them even more on the the left. How can I switch?
A: You can move the buttons from one side to the other in “Settings -> Window Manager-> Style -> Button Layout”. Just drag and drop them to the other side of the word “Title”.
No Terminal Showing Up
Q: When I try to launch the terminal, the window shows up, but the contents are empty, what gives?
A: There may be an issue with your graphics and the xfwm4 compositor in use. To disable the compositor, go to “Settings -> Window Manager Tweaks” from the main menu on the desktop and:
— In the “Compositor” tab, uncheck Enable display compositing
If you want a compositor still, and the xfwm4 compositor isn’t working for you, you can use an alternative like “compton”.
— sudo apt install -y compton
Then to have it auto run at login, go to “Settings -> Session and Startup” and:
— In the “Application Autostart” tab, click “Add” and enter “Compton” for the name, and “compton” for the Command, then click “OK”, log out, and back in.
Alternatively, if this issue is occurring in a VM disable 3D acceleration in the VM settings.
Language Settings
Q: How can I change the GUI language?
A: In the LightDM login screen, select the desired language using the language selector on the right hand side of the top panel.
Q: How can I change my keyboard layout?
A: The keyboard layout can be changed in “Settings -> Keyboard -> Layout”
Q: How can I setup a different input method not available through “Settings -> Keyboard -> Layout”, e.g. Japanese (Anthy)?
A: You can install ibus to configure different input methods, for Anthy you also have to install ibus-anthy, i.e. via
sudo apt install -y ibus ibus-anthy
You can now add and configure various input methods through “Settings -> iBus Preferences”. Once configured, you can use the newly added “iBus” icon on the right hand side of the panel to select the preferred input method. For a list of available input method engines, refer to:
Feedback
Q: How can I get in touch to discuss some questions I have?
A: Please join us in the Kali Forums. It is the home of a vibrant community and the best place to discuss everything around Kali Linux.
Q: I have found a bug. Who should I talk to?
A: Awesome. Not the fact that there is bug but that you found it. Please open a bug report in the Kali Linux Bug Tracker. We really appreciate your help in making Kali Linux better.
Updated on: 2021-Sep-27
Author: re4sonИсточник
Статья Кастомизация Kali-Linux [ Или прокачиваем свое кибер оружие]
Сначала что такое XFCE и почему она? Простыми словами говоря — это среда окружения рабочего стола в Linux которая оптимально подходит для средних и слабых устройств . И разработчики Kali Linux официально поддерживают сборки с этой средой. Эта же среда используется в сборках Kali NetHunter , в сборках под Raspberry Pi а так же часто довольно ставиться на VPS серверах в качестве VNC
Почему она? Да она намного легче GNOME или KDE и довольно удобна в настройке и использовании.Установка ничем не отличается от обычной установки Kali Linux. Единственное на что можно добавить — это то что , если вы ставите ее на виртуальную машину то вам будет необходимо:
- Установить VMware Tools ( apt-get install -y open-vm-tools-desktop fuse ) В случае VMware
- Или OpenBox guest additions ( apt-get install -y virtualbox-guest-x11 ) В случае использования VBox
Openbox задуман как лёгкое, быстрое и простое решение для использования как совместно с окружением рабочего стола, так и без него. Несмотря на свою простоту, Openbox имеет множество настроек, манипулируя которыми пользователь может изменять практически любой аспект функционирования оконного менеджера в соответствии со своими потребностями. Также Openbox позиционируется как оконный менеджер, строго придерживающийся рекомендаций инициативной группы freedesktop.org.
Openbox является оконным менеджером по умолчанию в среде рабочего стола LXDE, а также linux-дистрибутивах CrunchBang, ArchBang, Manjaro, предназначенных для работы на слабом оборудовании.
/.config/openbox/) :
- autostart — отвечает за автозапуск приложений при старте сессии OpenBox
- environment — отвечает за переменные среды (локали, часовой пояс и т.д)
- menu.xml — настройка главного меню , которое вызывается ПКМ.
- rc.xml — настройка OpenBox ( горячие клавиши , структурированное меню и т.д )
-c включить тени
-С не использовать тени на доп. панелях , доках.
-z отрисовувать тени позаду окна
-m <от 0 до 1>— степень прозрачности всплывающих меню
-i <от 0 до 1>— степень прозрачности неактивных окон
—shadow-[blue|red|green] <от 0 до 1 >— соотношения цветовой гаммы тени
-b запустить как демона ( в фоновом режиме )Более подробную справку смотрите командой compton -h
Ну и как вы уже поняли , завершает нашу рубрику оконных менеджеров для Kali Linux — i3 wm
Который является представителем тайловых ( фреймовык оконных менеджеров )
Освоив его — вы минимизируете работу мышкой , все практически на хот-кеях , так же вы сможете настроить комфортную работу по рабочим областям и минимизируете нагрузку на систему.Нас встречает первый запуск и просит выбрать клавишу MOD (предлагает между Win или Alt )
Ну я выберу Win:/.config/i3/config )
Для запуска терминала используем хот-кей Win+ENTER
Поставим опять же таки какие то обои и включим композитность , а так же скачаем мой любимый редактор sublimeДля удобства я создал символьную ссылку на бинарный файл саблайма:
Некоторые стандартные горячие клавиши, которые работают по умолчанию:
mod+Enter открывает терминал
mod+d запускает dmenu (меню сверху экрана, которое по мере ввода с клавиатуры названия приложения предлагает варианты для запуска)
mod+Shift+Q закрывает активное окно
mod+v включает режим вертикального тайлинга (экран будет делиться горизонтально)
mod+h включает режим горизонтального тайлинга (экран будет делиться вертикально)
mod+w включает режим вкладок (каждое окно на рабочем столе занимает весь экран, сверху видны вкладки)
mod+s включает стековый режим (заголовки окон один под другим, каждое окно занимает весь экран)
mod+e возвращает стандартный режим
mod+Shift+Space переключает окно в режим плавающего и обратно
mod+Left/Right/Up/Down перемещает фокус в пределах рабочего стола
mod+Shift+Left/Right/Up/Down перемещает текущее окно в пределах рабочего стола
mod+1 и т.д. переключает на рабочий стол с указанным номером
mod+Shift+C читает настройки из файла конфигурации
mod+Shift+E выходит из i3wm на экран ввода имени пользователя и пароляКлавиша mod в моем случае — это Win
Источник