- Installing xRDP on Kali Linux
- Install xRDP
- “Authentication is required to create a color managed device”
- Open your Firewall
- Connecting via an SSH tunnel
- Install PuTTY & Set Up
- Create a Private Key file with PuTTYGen
- Connect the tunnel
- Last bits of security
- Set SSH to accept Certificates only
- Set xRDP to require SSH tunnels
- Erreinion / Kali Linux xrdp on AWS.txt
- This comment has been minimized.
- kikismalls commented Jan 29, 2017
- This comment has been minimized.
- sullyjman commented Feb 8, 2017 •
- This comment has been minimized.
- ghost commented Feb 15, 2017
- This comment has been minimized.
- jcconnell commented Apr 18, 2017
- This comment has been minimized.
- SVG62 commented Dec 25, 2017
- Ethical hacking and penetration testing
- InfoSec, IT, Kali Linux, BlackArch
- How to install and configure RDP server on Linux
- How to install an RDP server on Linux
- How to use freerdp-shadow to start an RDP server
- freerdp-shadow error ‘client authentication failure: -1’
- How to start an RDP server with xrdp
- Kali linux xrdp install
Installing xRDP on Kali Linux
13 October 2019
There are a lot of complicated tutorials on how to get xRDP working on Kali Linux. I suspect the tutorials have become complicated as they address a variety of bugs that xRDP and connecting software has had over time, but there isn’t much you actually need to do.
Note that if you are using Gnome, you’ll run into issues. I have got RDP working with Gnome before, but I haven’t been able to create a reliable set of steps to replicate it, as it usually starts working after several hours of messing around. If this is you, then you can try the below, but it may just be your starting point.
Install xRDP
The only package you need is xrdp, which you should enable after installation.
“Authentication is required to create a color managed device”
If you get this message there are a few potential fixes. The one I use is to add the following file to policy kit, and restart it:
Open your Firewall
If you are using UFW, you’ll need to open up a port.
Then in Windows, you’ll need to lower your color depth in the RDP settings when you make a connection:
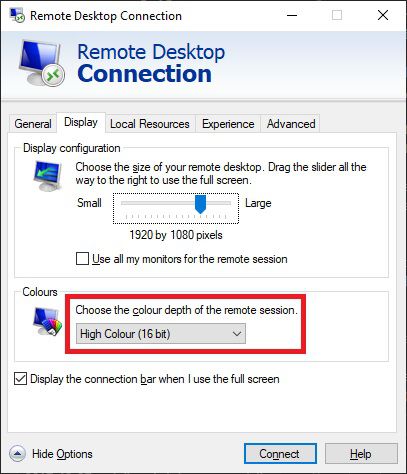
And it should work from this point.
Connecting via an SSH tunnel
xRDP transport is encrypted using TLS by default, and should be as secure as RDP is on windows, but if you open it up to the internet you can expect to be subject to ongoing brute force attacks. If a vulnerability is found, you can expect it to be used against you pretty soon. A safer option is to connect using an SSH tunnel, and secure that using certificates instead of passwords.
Install PuTTY & Set Up
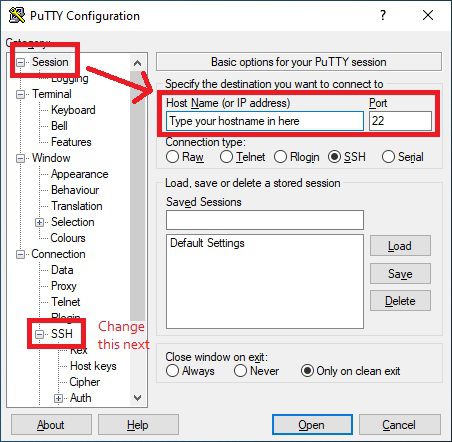
I’m assuming you know how to set up port forwarding on your router, and how to install puTTY. If not, Google is your friend. First step is just to put in your IP address (take a look at duckdns.org if you need a static one) and the external port that you’ve chosen into puTTY.
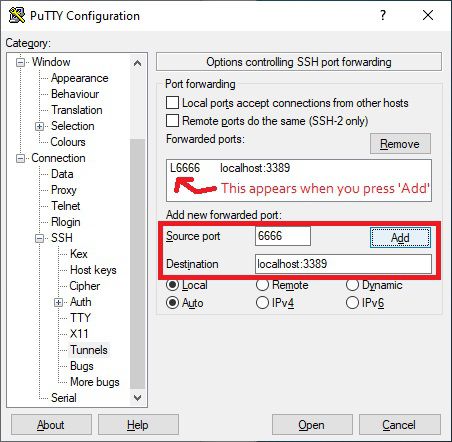
Next, you need to go into Tunnel under SSH. Here you need to add a Source port, which can be any port you have available on Windows. I’ve used 6666 in this example. Then under destination, add localhost:3389 .
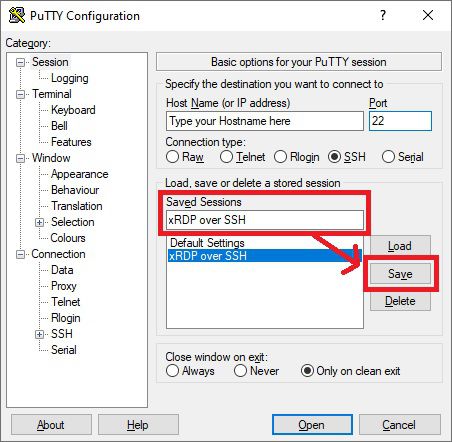
Under Session, you will probably want to save these settings so that you don’t need to do the setup every time.
Create a Private Key file with PuTTYGen
Press the Windows key and type in ‘PuttyGen’, which should open up the following program:
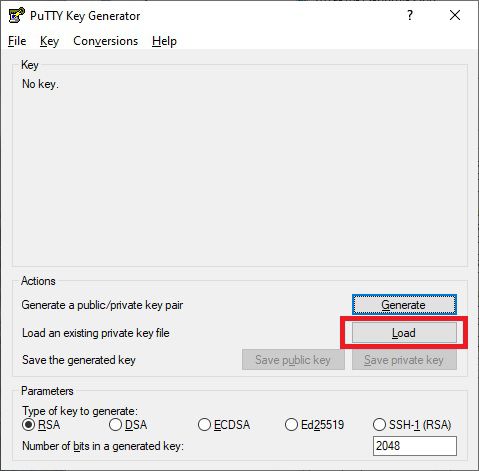
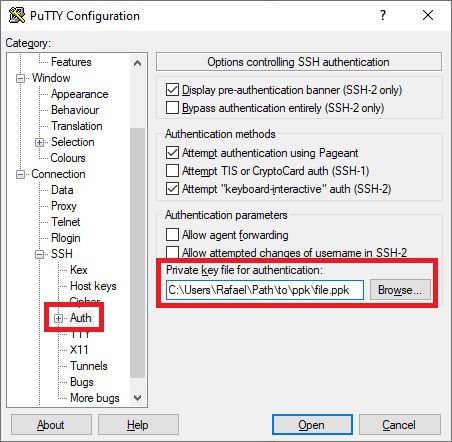
Click on Load, and select your private ‘id_rsa’ key that you normally use for logging in via SSH. You can then save this as a .ppk file. Once you have this, under SSH and Auth, add the .ppk key file.
Again, you’ll want to go back to Session and save this.
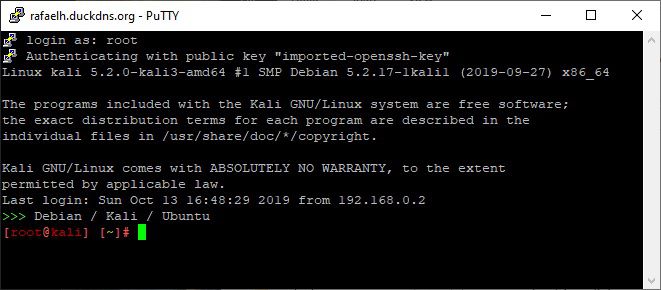
Connect the tunnel
Now that this is set up, connect using puTTY by pressing ‘Open’. You’ll get a black window, asking you for the username, which will probably be ‘root’ for Kali.
Now that the connection is established, go into RDP and use localhost and the port you configured in puTTY to connect:
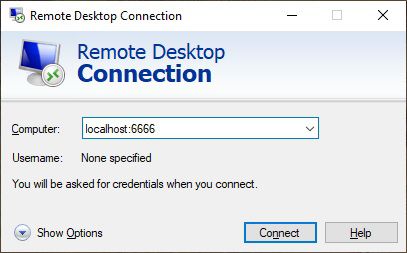
And all being well, you should successfully connect to xRDP via an SSH tunnel at this point
Last bits of security
Set SSH to accept Certificates only
You will need to edit the SSH daemon config and restart it. Make sure you have certificates set up and can authenticate without a password before you turn this off.
Set xRDP to require SSH tunnels
The last bit of security you can apply is to force xRDP to require a tunnel by constraining it to accept local connections only.
Hopefully that’s all you’ll need to connect in a reasonably secure fashion to your Kali box over the internet.
Источник
Erreinion / Kali Linux xrdp on AWS.txt
| Setting up xrdp on Kali Linux 2016.2 on AWS |
| AWS has an AMI for Kali 2016.2, but being remote, you need VNC or RDP to access the graphical tools. |
| VNC is easy to set up but very restrictive. RDP is harder to set up, but easier to use. These are the instructions I use to set up xrdp. |
| I use this config so that I connect to the Kali VM through an Apache Guacamole RDP proxy. This keeps Kali behind the firewall and in my pentesting lab. Guacamole also allows me to access the Kali box on SSH or RDP via a web interface from anywhere and any device. |
| OS: Kali Linux 2016.2 |
| AMI: Updated 19 Oct 2016 |
| Bash: |
| # Upgrade OS |
| sudo apt-get update -y && apt-get upgrade -y |
| sudo apt-get dist-upgrade -y |
| sudo apt-get install xrdp lxde-core lxde tigervnc-standalone-server -y |
| sudo update-alternatives —config x-session-manager |
| # choose xfce4-session |
| # New sudo user for Guacamole connection |
| sudo useradd -m kali |
| sudo passwd kali |
| sudo usermod -a -G sudo kali |
| sudo chsh -s /bin/bash kali |
| # edit xrdp.ini — reducing colour depth reduces bandwidth and can resolve black screen issues |
| sudo nano /etc/xrdp/xrdp.ini |
| autorun=sesman-any |
| max_bpp=16 |
| [sesman-any] |
| ip=127.0.0.1 |
| # changed username and password to the kali user |
| # Allow more than root to access the system |
| sudo nano /etc/X11/Xwrapper.config |
| allowed_users=anybody |
| # start services |
| sudo service xrdp start |
| sudo service xrdp-sesman start |
| # configure services to auto-start on boot |
| sudo update-rc.d xrdp enable |
| sudo systemctl enable xrdp-sesman.service |
This comment has been minimized.
Copy link Quote reply
kikismalls commented Jan 29, 2017
Thanks for this!! any chance of being able to share how you setup apache guacamole as well??
This comment has been minimized.
Copy link Quote reply
sullyjman commented Feb 8, 2017 •
I used this and it worked perfectly in Ubuntu
This comment has been minimized.
Copy link Quote reply
ghost commented Feb 15, 2017
Hi, i get an error message when trying to
sudo service xrdp start
A dependency job for xrdp.service failed. See ‘journalctl -xe’ for details.
when i do that i get a really long error message 
This comment has been minimized.
Copy link Quote reply
jcconnell commented Apr 18, 2017
Guac is disconnecting after 1-2 mins of connection and then I can’t reconnect until Kali is rebooted. Any ideas why?
This comment has been minimized.
Copy link Quote reply
SVG62 commented Dec 25, 2017
Thanks, I used your settings, but get connection errors
However, when I go to rdp from windows, I am able to connect and type in username and password but when I do, I get the following error:
Connecting to sesman IP 127.0.0.1 port 3350
sesman connect ok
sending login info to session manager, please wait.
srdp_mm_process_login_response:login successful for display
started connecting
connecting to 127.0.0.1 5910
error-problem connecting
I summarize here the solution:
I had to remove xrdp, vnc4server, tightvnc, which were all installed in the wrong order. I had to install tightvncserver, then install xrdp.
sudo apt-get remove xrdp vnc4server tightvncserver
sudo apt-get install tightvncserver
sudo apt-get install xrdp
Then restart the xrdp service:
sudo service xrdp restart
You can’t perform that action at this time.
You signed in with another tab or window. Reload to refresh your session. You signed out in another tab or window. Reload to refresh your session.
Источник
Ethical hacking and penetration testing
InfoSec, IT, Kali Linux, BlackArch
How to install and configure RDP server on Linux
How to install an RDP server on Linux
The Remote Desktop Protocol (RDP) Server can run on Windows and Linux as well. As a result, you can connect to Linux using the RDP protocol.
On Linux, the RDP protocol is not integrated by default as on Windows. Also, Linux does not have some other protocols that are used transparently (invisibly) for Windows users, for example, for network authentication.
However, there are RDP servers that run successfully on Linux.
How to use freerdp-shadow to start an RDP server
To install freerdp on Debian, Kali Linux, Linux Mint, Ubuntu and derivatives, run the command:
To install freerdp on Arch Linux and derivatives, run the command:
The executables in different distributions are called slightly differently. In Debian, Kali Linux, Linux Mint, Ubuntu, a file for starting an RDP server is called: freerdp-shadow-x11.
And in Arch Linux, the file for starting the RDP server is called: freerdp-shadow-cli.
But essentially this is same program and they have the same options.
Speaking a bit about rdesktop, we’ve already encountered Network Level Authentication (NLA), that is, network-level authentication. To run the RDP server on Linux, you must choose one of two options:
- start the server without authentication at all
- enable NLA and make the necessary settings for it
To start the RDP server without authentication at all, use the -auth option:
If authentication is enabled, PAM is used with the X11 subsystem. Running as root is not required, however, if running as user, only the same user who launched freerdp-shadow can authenticate. Warning: if authentication is disabled, everyone can connect.
Any network service without authentication is a disaster for system security. Therefore, consider how to run freerdp-shadow with NLA support.
First of all, for the NLA, you need to create a file in which there will be a line of the form:
We know the Linux username, to calculate the hash, we need to execute a command of the form:
For example, the username is mial, and the password is 2, then the command is as follows:
Calculated hash: 8f33e2ebe5960b8738d98a80363786b0
Create a SAM text file and write a line to it
Now run freerdp-shadow-x11 with two options:
- /sam-file:FILE – indicates the location of the NTLM SAM file for NLA authentication
- /sec:nla — force NLA authentication
So my command is as follows:
For verification, I connect from Windows:
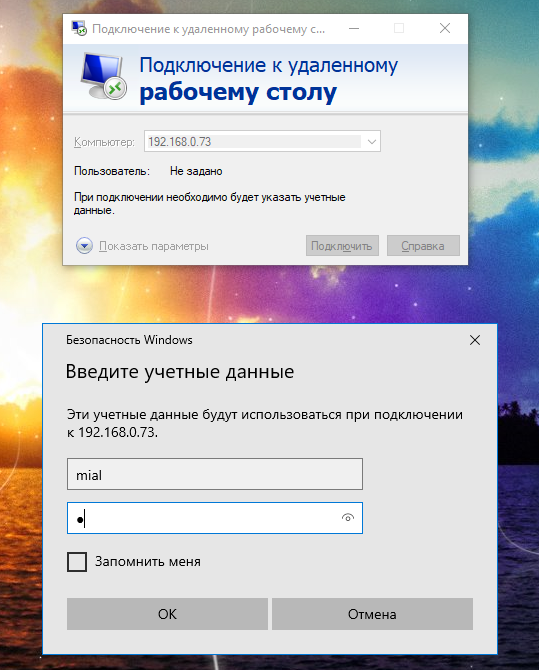
We are asked to enter credentials – this means that NLA authentication is enabled on the RDP server.
To share not only the entire screen, but only part of it, use the /rect:x,y,w,h option. Where:
- x,y are coordinates of the upper left corner of the rectangle
- w is rectangle width
- h is the height of the rectangle
For example, to share part of the screen 500×500 pixels with coordinates 200,300:
freerdp-shadow error ‘client authentication failure: -1’
If you get an error when starting the RDP freerdp-shadow server:
Then you need to create a SAM file and run freerdp-shadow with the /sam-file:SAM /sec:nla options as shown above.
How to start an RDP server with xrdp
To install xrdp on Debian, Kali Linux, Linux Mint, Ubuntu and derivatives, run the command:
To install xrdp on Arch Linux and derivatives, run the following commands:
To start the xrdp-sesman and xrdp services on any distribution, run the command:
Important xrdp files:
- /etc/xrdp/xrdp.ini – configuration file
- /var/log/xrdp.log – log file
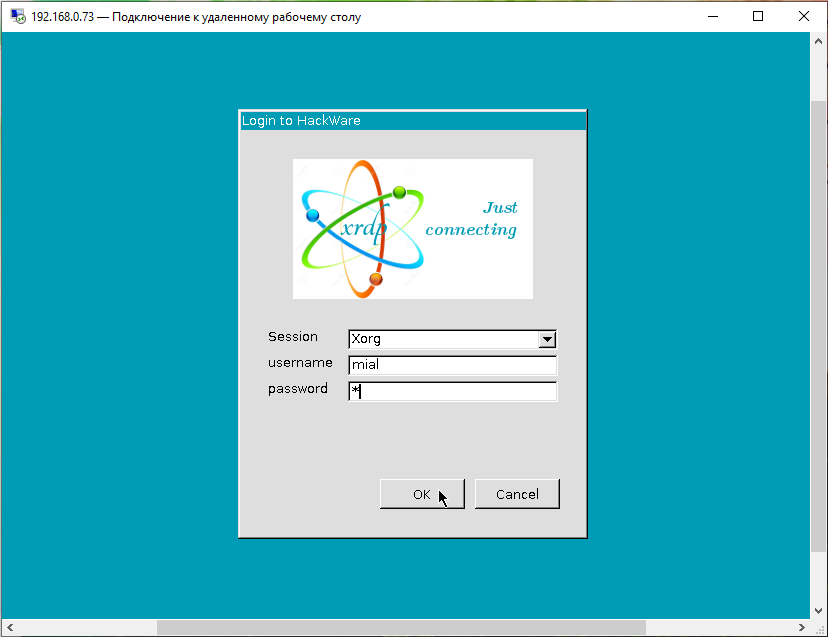
We are connected from Windows to Linux with xrdp. Enter the username and password of the Linux user:
Now we can execute commands on a Linux computer as if we were sitting in front of it:
Источник
Kali linux xrdp install
Other distributions available: KDE Neon (kWSL) and Ubuntu 20.04 (xWSL)
Kali-xRDP is a script that installs xRDP and XFCE 4.16 on top of Kali Linux from the Windows Store. Win-KeX is the better-known method for running a GUI in WSL, but only works with Windows 10 1903+ on WSL2, whereas this project was created to work well in WSL1 or WSL2. It includes optimizations and visual tweaks for a smooth and responsive desktop experience. Display scaling is configured automatically and works on everything from standard unscaled displays all the way to xHiDPI (250%+) displays such as the Microsoft Surface.

Kali-xRDP works with Windows 10 version 1809 onwards, Windows Server 2019/2022, Server Core, or Hyper-V Server. Running Kali in WSL1 may be useful for users on older hardware without VT-d, or in a virtual machine without nested virtualization support. Note that WSL1 has limitations in its networking stack that prevent some of Kali’s included tools from working as they should, so it’s advisable to run Kali in WSL2 unless you’re prevented from doing so for the reasons listed above. That said, ZenMap is pre-installed and able to run TCP-only portscans in WSL1.
The install script is meant to be run on a new Kali Linux installation from the Microsoft Store. If Kali is not installed on your system it will download the .AppX image directly from Microsoft and install it for you.
INSTRUCTIONS: Open a NEW elevated command prompt window (admin rights are required to open firewall ports for RDP and SSH) then type/paste the following command:
You will be asked a few questions. The installer script determines the current Windows DPI scaling of your system but you may set your own if preferred:
The script will download the LxRunOffline distro manager to bootstrap the installation. Install times will vary depending on system performance and the presence of antivirus software. A fast system with broadband Internet can complete the install in under 10 minutes and most machines will complete within 20 minutes. Expect it to take 30+ minutes if Windows Defender is running. If you want to track progress logs are located in %TEMP%\Kali-xRDP.
At the end of the script you will be prompted to create a non-root user which will automatically be added to sudo’ers.
A fullscreen remote desktop session will launch Kali using your stored credentials.
Configure Kali-xRDP to start at boot (like a service, no console window)
- Open the Windows Task Scheduler
- Right-click the task in Task Scheduler (kali-linux) and click properties
- Click the checkbox for Run whether user is logged on or not and click OK
- Enter your Windows credentials when prompted
Reboot your PC when complete and the xRDP service in Kali will startup automatically with your system.
Start/Stop Operation
- Start (or restart) the instance: schtasks /run /tn kali-linux
- Terminate the instance: wslconfig /t kali-linux
Convert to WSL2 instance
If your computer has virtualization support you can convert the instance to WSL2 (and back to WSL1 if needed.)
- Terminate the instance: wslconfig /t kali-linux
- Convert the instance to WSL2: wsl —set-version kali-linux 2
- Restart the Instance: schtasks /run /tn kali-linux
Make it your own:
From a security perspective, you should fork this project so you control the packages and files in the repository. This also allows you to customize the installer in any way you prefer:
- Sign into GitHub and fork this project
- Edit Kali-xRDP.cmd . On line 2 you will see SET GITORG=DesktopECHO — Change DesktopECHO to the name of your own repository.
- Customize the script any way you prefer.
- Launch the script using your repository name: PowerShell -executionpolicy bypass -command «wget https://github.com/YOUR-ORG/Kali-xRDP/raw/main/Kali-xRDP.cmd -UseBasicParsing -OutFile Kali-xRDP.cmd ; .\Kali-xRDP.cmd»
Additional Info:
- Rebuilt WebKitGTK 2.32 for WSL
- When you log out out of a desktop session the entire WSL instance is restarted, equivalent to a clean-boot at every login.
- Disconnected sessions continue to run in the background and resuming your session works reliably.
- Enabled gksu for apps needing elevated rights (Synaptic, root console) to work around limitations in WSL1.
- apt-fast added to improve download speed and reliability.
- Mozilla Seamonkey included as a stable browser that’s kept up to date via apt. Current versions of Chrome/Firefox do not work in WSL1.
- Installed base image consumes approximately 3GB of storage
- Minor visual tweaks were made and fonts in XFCE4 are supplied by the host OS (Segoe UI / Cascadia Code)
Источник


