- Make Your KDE Plasma Desktop Look Like MacOS
- 1. Top Panel
- System tray
- macOS-like Global menu
- macOS Dock for KDE Plasma
- Icons and Cursor
- macOS Themes for KDE Plasma
- Делаем из KDE, Mac OS
- Верхняя панель:
- Док панель:
- Вывод:
- Make Your KDE Plasma Desktop Look Like MacOS
- 1. Top Panel
- System tray
- macOS-like Global menu
- macOS Dock for KDE Plasma
- Icons and Cursor
- macOS Themes for KDE Plasma
Make Your KDE Plasma Desktop Look Like MacOS
Love it or hate it, Apple’s macOS has carved its place in the PC market, even more after the iPhone. One of the many advantages of using Linux though is that you have the freedom to make it look like anything you fancy. Follow the steps given below to install mac OS theme on your KDE Plasma desktop.
Being a Linux user doesn’t mean you have to loathe macOS or Windows. In fact, many people dig the look of Windows or macOS but simply don’t want to invest in buying them. The reasons can be several, but we won’t be discussing those here. Rather, let’s discuss how you can make your KDE Plasma desktop to look and feel like MacOS.
1. Top Panel
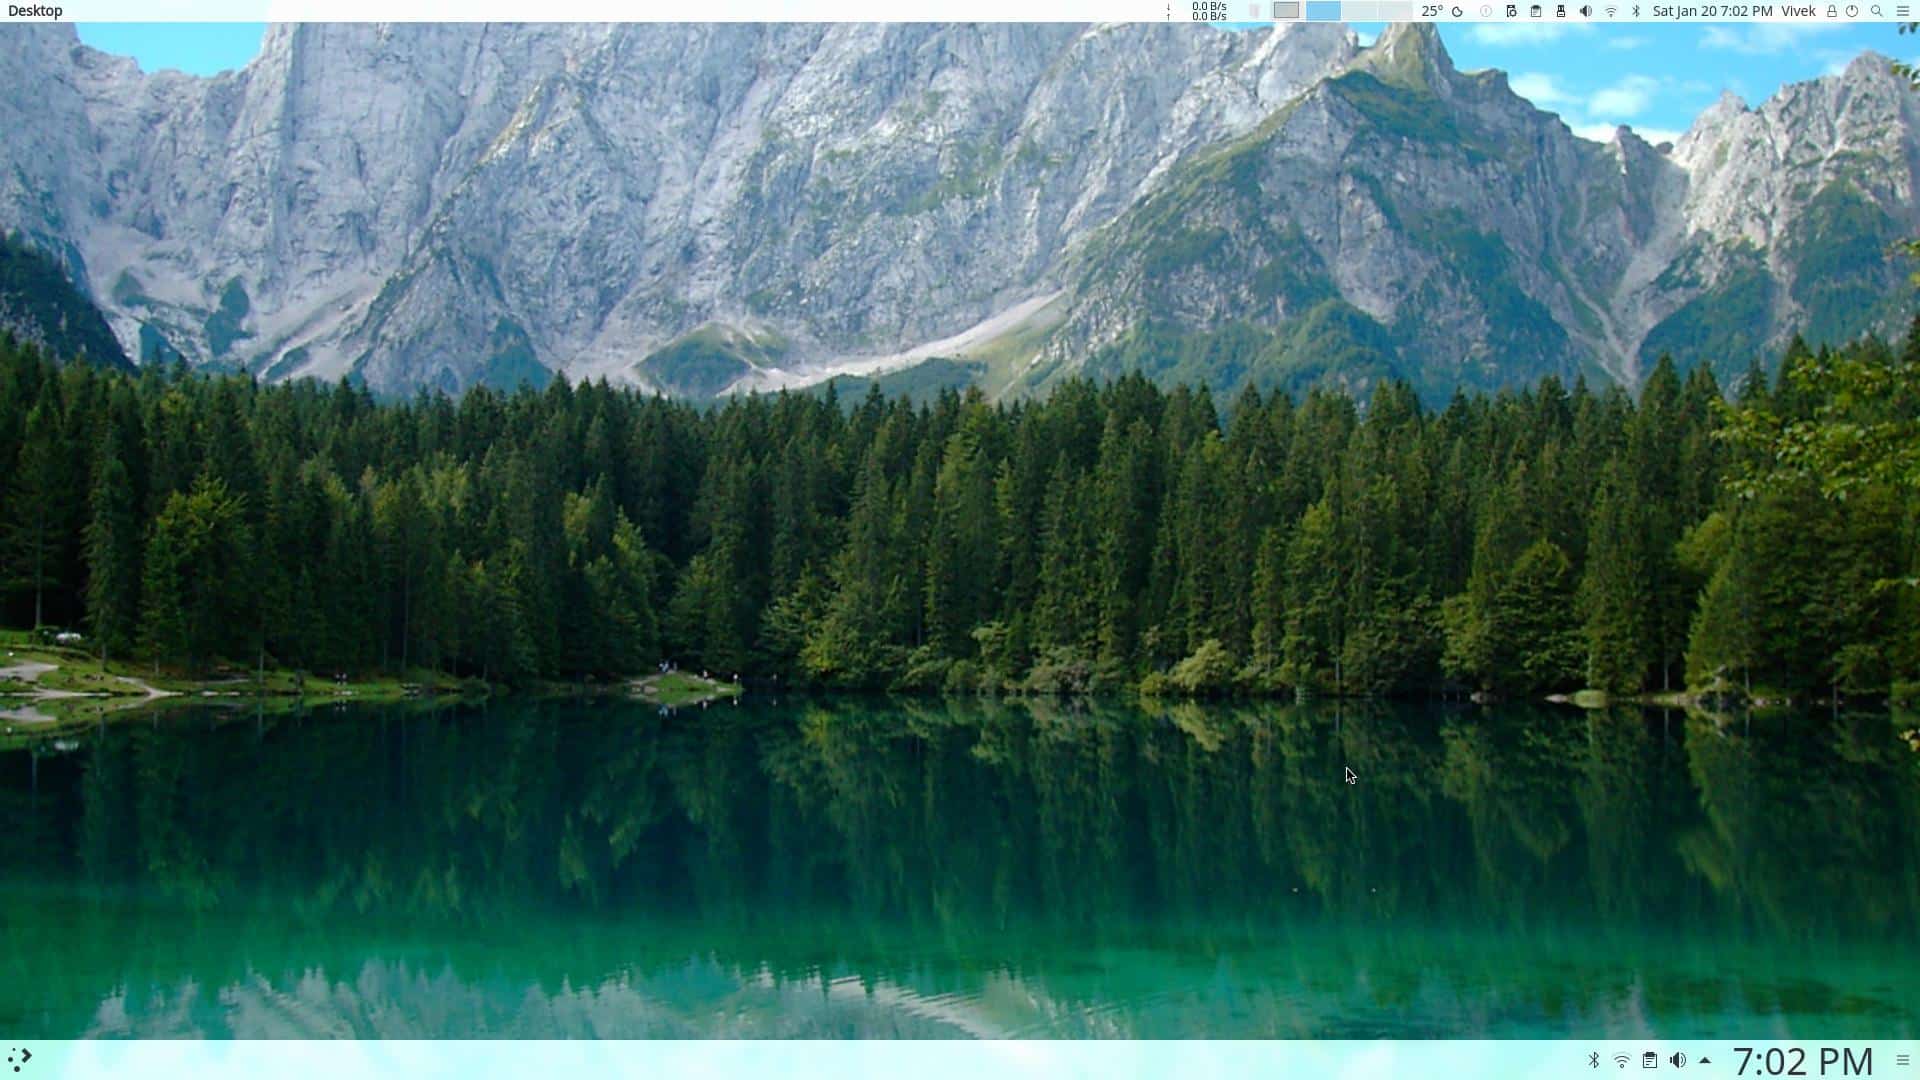
KDE Plasma looks more like Windows, by default than Mac. Some other desktop environments give more of a Mac feel with a top panel that houses the time/date, system tray, etc. Yet, it’s KDE Plasma that can replicate MacOS’s menu bar the best, as far as I know. In the screenshot above you can see the default KDE panel at the bottom, and a customized panel at the top that looks like the menu bar on a Mac. Before we can change anything, make sure widgets are unlocked.
System tray
- Right-click anywhere on the desktop and select Add panel > Application menu bar. This will add a white bar at the top of your screen. The panel you see in screenshots is the finished product and sadly I’m not willing to undo it all so …

- Click on the hamburger menu icon (three horizontal lines) on the very right and drag the Height button up or down to increase or decrease the height of the top panel to your liking.
- When you have the desired height, you can start adding widgets. Right-click anywhere and select Add widgets.
- Select the system tray from the Widgets and drag it to the very right of the top panel to place it. Do the same with the clock widget and add anything you want really. You can use the bottom panel as a guide or the screenshot above if you’re not sure which widgets to place.

- The system tray widget contains all the necessary icons which will appear when needed as it happens on Windows. I prefer adding each of the system tray icons manually because it gives more of a Mac look and is also less cluttered.
- In the screenshot above, right-to-left, the widgets are – Search, Lock/Logout, User Switcher, Simple Date and Time (you’ll have to download this one), Bluetooth, Networks, Audio Volume, Device Notifier, Clipboard, KDE Connect, Notifications, Weather widget. I’ve added Pager in order to easily switch between different virtual desktops, a trash widget, and a Netspeed widget as well but you can ignore those.
macOS-like Global menu

On the very left of the panel, add an Active Window Control Widget (might have to download it), next to it add the Global Menu widget. Unfortunately, I can’t show you how to space them but you’ll probably figure out how far or close you like those two on your own.
When you’re done, you might want to remove the bottom panel because you won’t be needing that. To do that click on the hamburger menu on the bottom panel, select More Settings… > Remove Panel.
macOS Dock for KDE Plasma

The other quite popular component of a Mac desktop is the dock at the bottom that houses all your favorite and currently open apps. The dock is not that hard to replicate though and can even be done on Windows with quite a perfection. Linux has many options such as Docky, Plank, and my favorite Cairo. You can use either you want, but you will need Mac themes for either one before it starts to look anything like the one in the screenshot above.
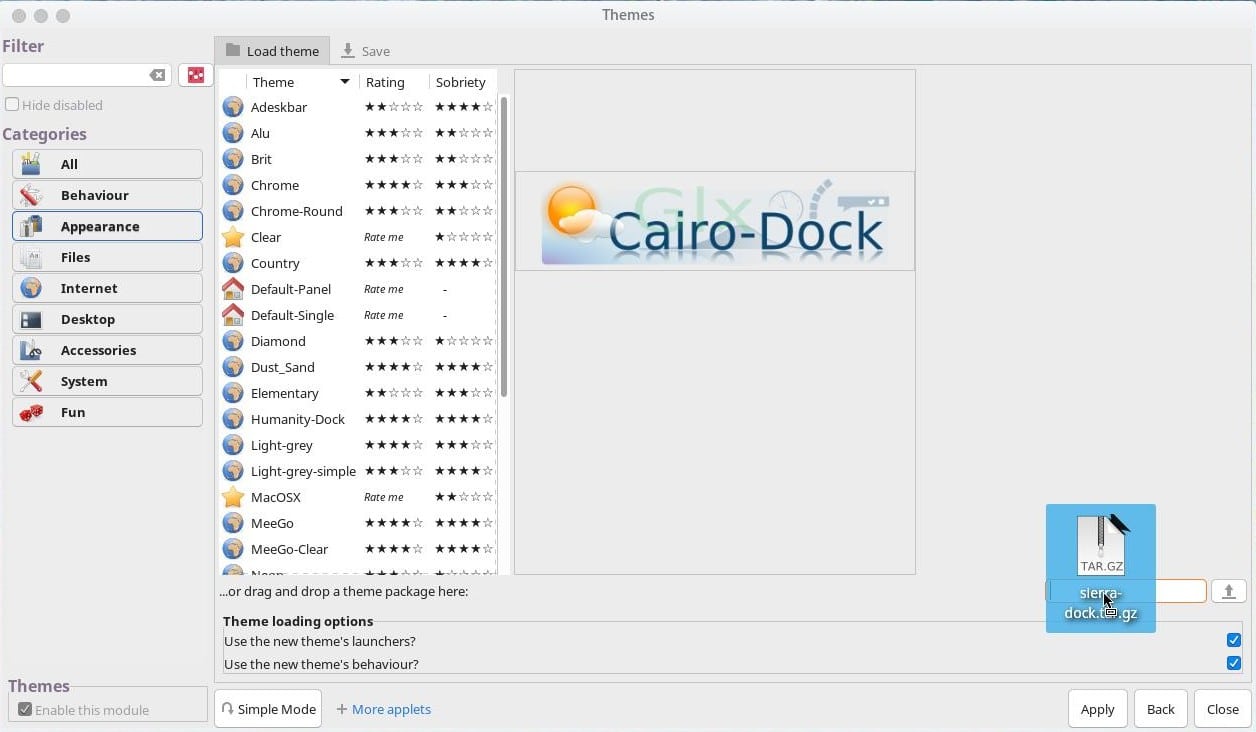
I’m using Cairo dock with a Mac theme (credit: sean barman). To install the theme on Cairo dock, right-click anywhere on the dock and select Cairo > Configure. Select Themes, then drag and drop the downloaded file to where it says …or drag and drop a theme package here: then click on Apply.
Icons and Cursor
There are so many MacOS icon packs and cursor themes for Linux that you can download and install and any of those will work fine. You can download the ones linked below if you’re having trouble finding them.
Extract the files and place the extracted folders in
macOS Themes for KDE Plasma
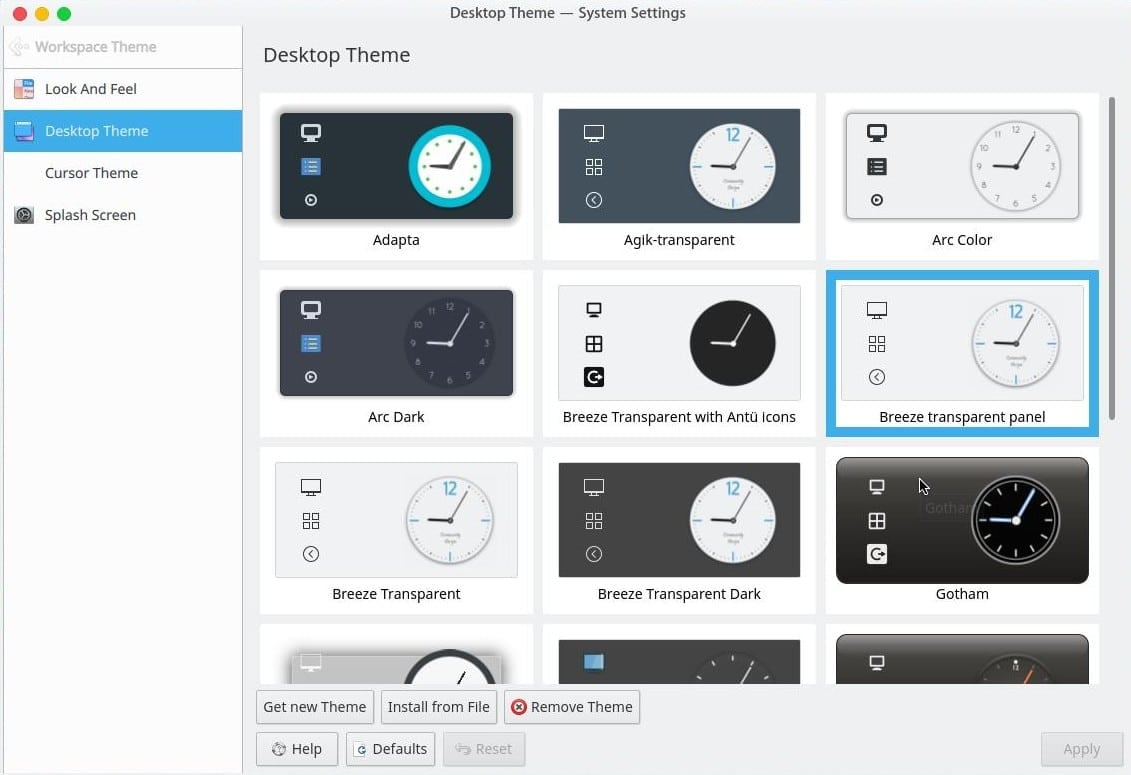
By now your desktop must look like Mac but the menu bar is still quite white which is not how it looks on the Mac. Not to mention any apps you open must look completely off with the default KDE theme. To change that, go to System Settings > Workspace Theme > Desktop Theme and click on Get New Theme. Install and Apply Breeze Transparent, Breeze Transparent with Antu icons or Breeze transparent panel which I am using because it makes the top panel more transparent than the others. The downside is that the other themes also make a few other parts of the UI transparent, while this one doesn’t.
While you’re at it, you can also apply the Cursor Theme.
Next, go to System Settings > Application Style and select Breezemite, then head over to System Settings > Icons and select your Mac icon pack.
That’s pretty much the gist of it although there still remain a few tweaks and modifications you can do to make it even better or just suit your style. Do you know that you can restart your KDE Plasma desktop with even rebooting? Read our tutorial to learn how to do that!
Источник
Делаем из KDE, Mac OS

В этой статье мы рассмотрим как сделать из оболочки KDE Plasma подобие Mac OS, операционной системы от Apple.
Я уже делал подобную статью, называется «Как сделать из Gnome 3 подобии MacOS на Ubuntu 20.04», всем кто хочет себе MacOS, но не может себе позволить, могут почитать.
Всё здесь показанное работает на Kubuntu 18.04 с версией KDE 5.12.7, но это должно работать и на более поздних версиях операционной системе и графической оболочки.
Для начала давайте установим нужную тему, но перед этим надо установить специальную программу, так как мы будем использовать тему kvantum, а не обычную.
Для этого введите несколько команд в терминал:
Таким образом мы скачали программу «Kvantum Manager», теперь можем для KDE Plasma установить theme Mac OS, или просто тему Mac OS.
Для этого перейдите по этой ссылке, скачиваете, разархивируем в любую папку, и теперь открываем «Kvantum Manager», нажимаем на кнопку «Select a Kvantum theme folder», выбираем папку в которой хранятся файлы тему.

После чего нажимаем «Install this theme», далее заходим во вкладку «Change/Delete Theme» и выбираем тему, которую установили.

И нажимаем кнопке «Use this theme». Заходим «Параметры системы > Оформление приложений» и там выбираем оформление Kvantum.
После надо поменять оформление окна, заходим в «Параметры системы > Оформление приложений > Оформление окон», там нажимаем на «Загрузить оформления окон…», ищем «McMojave Aurorae», нажимаем установить.

Выбираем скачанную тему. Далее заходим во вкладку цвета и там выбираем цветовую тему «Kvantum», нажимаем «Применить».
Ещё надо изменить тему оформления рабочего стола, заходим в «Параметры системы > Оформление рабочего стола > Тема оформления Plasma», нажимаем на «Загрузить тему рабочего стола», выбираем «McMojave Plasma» и устанавливаем её.
Верхняя панель:
Для этого нажимаем правой кнопкой мыши на рабочий стол и выбираем «Добавить панель > Строка меню приложения» и в принципе всё, но всё-таки стоит ещё добавить несколько виджетов:
- Системный лоток;
- Цифровые часы;
- Доска приложений или Меню запуска приложений;
Вот что у меня получилось:

Док панель:
Последние сделаем док панель или панель приложений как в Mac OS, для этого заходим в менеджер приложений и вписываем в строку поиска слово «Latte», выбираем приложение Latte, скачиваем его.

Я выбрал это приложение, так как, на мой взгляд оно на более удобное, и больше всего похоже на панель из Mac OS.
Запускаем его и нажимаем правой кнопкой мыши, выбираем там «Latte settings», настраиваете как вам надо и удаляем нижнюю панель, которая была до этого.
На этом всё, вот что у нас получилось:

Таким образом мы сделали из KDE подобие MacOS, конечно, всё равно видно что это только Linux, сделанный под MacOS, но всё же.
Также надо сказать, что я делал всё на виртуальной машине и где полупрозрачно, должно быть замыливание.
Вывод:
В этой статье вы прочитали как из KDE Plasma сделать подобии Mac OS, и в целом всё очень сильно похоже, но этим стоит пользоваться, только если вам прям очень сильно нравится дизайн, так как вы всё равно не получите того опыта использования как настоящий MacOS.
Поэтому если есть деньги, то лучше стоит купить нормальный Mac, а не это, так как там программ будет больше, да и в целом опыт использования интереснее.
Источник
Make Your KDE Plasma Desktop Look Like MacOS
Love it or hate it, Apple’s macOS has carved its place in the PC market, even more after the iPhone. One of the many advantages of using Linux though is that you have the freedom to make it look like anything you fancy. Follow the steps given below to install mac OS theme on your KDE Plasma desktop.
Being a Linux user doesn’t mean you have to loathe macOS or Windows. In fact, many people dig the look of Windows or macOS but simply don’t want to invest in buying them. The reasons can be several, but we won’t be discussing those here. Rather, let’s discuss how you can make your KDE Plasma desktop to look and feel like MacOS.
1. Top Panel
KDE Plasma looks more like Windows, by default than Mac. Some other desktop environments give more of a Mac feel with a top panel that houses the time/date, system tray, etc. Yet, it’s KDE Plasma that can replicate MacOS’s menu bar the best, as far as I know. In the screenshot above you can see the default KDE panel at the bottom, and a customized panel at the top that looks like the menu bar on a Mac. Before we can change anything, make sure widgets are unlocked.
System tray
- Right-click anywhere on the desktop and select Add panel > Application menu bar. This will add a white bar at the top of your screen. The panel you see in screenshots is the finished product and sadly I’m not willing to undo it all so …
- Click on the hamburger menu icon (three horizontal lines) on the very right and drag the Height button up or down to increase or decrease the height of the top panel to your liking.
- When you have the desired height, you can start adding widgets. Right-click anywhere and select Add widgets.
- Select the system tray from the Widgets and drag it to the very right of the top panel to place it. Do the same with the clock widget and add anything you want really. You can use the bottom panel as a guide or the screenshot above if you’re not sure which widgets to place.
- The system tray widget contains all the necessary icons which will appear when needed as it happens on Windows. I prefer adding each of the system tray icons manually because it gives more of a Mac look and is also less cluttered.
- In the screenshot above, right-to-left, the widgets are – Search, Lock/Logout, User Switcher, Simple Date and Time (you’ll have to download this one), Bluetooth, Networks, Audio Volume, Device Notifier, Clipboard, KDE Connect, Notifications, Weather widget. I’ve added Pager in order to easily switch between different virtual desktops, a trash widget, and a Netspeed widget as well but you can ignore those.
macOS-like Global menu
On the very left of the panel, add an Active Window Control Widget (might have to download it), next to it add the Global Menu widget. Unfortunately, I can’t show you how to space them but you’ll probably figure out how far or close you like those two on your own.
When you’re done, you might want to remove the bottom panel because you won’t be needing that. To do that click on the hamburger menu on the bottom panel, select More Settings… > Remove Panel.
macOS Dock for KDE Plasma
The other quite popular component of a Mac desktop is the dock at the bottom that houses all your favorite and currently open apps. The dock is not that hard to replicate though and can even be done on Windows with quite a perfection. Linux has many options such as Docky, Plank, and my favorite Cairo. You can use either you want, but you will need Mac themes for either one before it starts to look anything like the one in the screenshot above.
I’m using Cairo dock with a Mac theme (credit: sean barman). To install the theme on Cairo dock, right-click anywhere on the dock and select Cairo > Configure. Select Themes, then drag and drop the downloaded file to where it says …or drag and drop a theme package here: then click on Apply.
Icons and Cursor
There are so many MacOS icon packs and cursor themes for Linux that you can download and install and any of those will work fine. You can download the ones linked below if you’re having trouble finding them.
Extract the files and place the extracted folders in
macOS Themes for KDE Plasma
By now your desktop must look like Mac but the menu bar is still quite white which is not how it looks on the Mac. Not to mention any apps you open must look completely off with the default KDE theme. To change that, go to System Settings > Workspace Theme > Desktop Theme and click on Get New Theme. Install and Apply Breeze Transparent, Breeze Transparent with Antu icons or Breeze transparent panel which I am using because it makes the top panel more transparent than the others. The downside is that the other themes also make a few other parts of the UI transparent, while this one doesn’t.
While you’re at it, you can also apply the Cursor Theme.
Next, go to System Settings > Application Style and select Breezemite, then head over to System Settings > Icons and select your Mac icon pack.
That’s pretty much the gist of it although there still remain a few tweaks and modifications you can do to make it even better or just suit your style. Do you know that you can restart your KDE Plasma desktop with even rebooting? Read our tutorial to learn how to do that!
Источник


