- How to Get Telnet for MacOS in Big Sur, Catalina, Mojave or High Sierra
- Installing Telnet in MacOS with Homebrew
- Installing Telnet in MacOS Mojave & High Sierra via Older MacOS Versions or Backups
- Telnet Alternatives for Mac: SSH, Netcat
- Restoring Telnet to MacOS Mojave & High Sierra by Compiling Telnet from Source
- What about Telnet for iPad and iPhone? Telnet for iOS!
- Интерфейс командной строки (CLI) интернет-центра Keenetic
- Подключение к командной строке интернет-центра Keenetic через telnet-клиента
- Подключение к командной строке интернет-центра Keenetic из веб-конфигуратора
- How to Install Telnet on macOS?
- Install Telnet on Mac via Homebrew
- Conclusion
- Online помощник Cети плюс
- Сеть и интернет
- Цифровое ТВ
- Видеонаблюдение
- Новичкам
- Опытным пользователям
- Безопасность
- Режим командной строки в маршрутизаторах ZyXEL Keenetic
How to Get Telnet for MacOS in Big Sur, Catalina, Mojave or High Sierra

Need to use Telnet in MacOS? Well, many Mac users have discovered that Telnet has been removed from modern versions of system software, including macOS Big Sur, Catalina, Mojave and macOS High Sierra. Presumably this is to encourage using the ssh client instead, but there are many Mac users who need Telnet for a variety of reasons. Telnet continues to be in a valid tool for many systems and network administrators, security professionals, people working with Cisco hardware or towards Cisco certification, MUD enthusiasts, amongst many other purposes.
Accordingly, this tutorial will detail several different ways to get Telnet back in modern versions of Mac OS system software. We’ll cover installing Telnet with Homebrew, restoring Telnet from a prior system software release or backup, compiling Telnet from source, as well as a few alternatives to telnet.
This article will assume that you have experience working with the Terminal and command line, since Telnet is entirely command line based.
Installing Telnet in MacOS with Homebrew
By far the simplest option is for Mac users to install Telnet through Homebrew. Of course this means you will need to install Homebrew on the Mac first, but if you’re advanced user that spends time in the command line you’ll likely appreciate having Homebrew for other reasons since you
- Install Homebrew on Mac OS if you haven’t done so already – if you already have Homebrew skip this step
/usr/bin/ruby -e «$(curl -fsSL https://raw.githubusercontent.com/Homebrew/install/master/install)»
Use Homebrew to install telnet with the following command:
brew install telnet
One simple way to test that Telnet is working properly after installation is to connect to the goofy Star Wars telnet server, which plays Star Wars in ASCII art:
You’ll know Telnet is working when you are greeted by Star Wars rendered in ASCII characters (and yes seriously, it’s the full movie).
Installing Telnet in MacOS Mojave & High Sierra via Older MacOS Versions or Backups
If you happen to have access to a Mac that is running a prior version of MacOS (Sierra or prior), or you happen to have an older MacOS system software backup laying around from Time Machine or otherwise, you can actually just copy the old binaries from that computer or backup to your modern MacOS installation, and telnet will work just fine.
With Mac OS and Mac OS X versions that include telnet, you will find Telnet at the following location (thus serving as a reference for where to find the binary in the backups:
The telnet binary is tiny weighing in at only 114 kb, so this is a quick simple task.
Copying that telnet binary into the following location in modern macOS releases, including MacOS Mojave 10.14 and MacOS High Sierra 10.13.x, will allow telnet to run on the new system software releases:
At that point you can run the ‘telnet’ command as usual.
Another option which requires more caution is to request the telnet binary from a trusted coworker or trusted friend who is running MacOS Sierra or prior. All they need to do is zip up and send you their /usr/bin/telnet binary file. Do not try and find a random telnet binary zip file from the internet since it could be compromised or otherwise untrustworthy. It’d be a good idea to use md5 hash or sha1 checksum on the original telnet binary if you’re going this route.
By the way, if you’re relying on binaries of telnet from Sierra or earlier, you might also be interested in grabbing ftp as well, which is also removed from modern macOS releases, but is located at the following location in prior MacOS builds:
Again you’d place the ftp binary into /usr/local/bin/ on new versions of system software.
For those wondering, while Telnet (and ftp) has been removed from Mojave, High Sierra, and presumably anything moving forward, MacOS Sierra remains the last version of system software to include Telnet by default, while any MacOS / Mac OS X release prior to Sierra also includes Telnet and ftp, including El Capitan, Snow Leopard, Yosemite, Mountain Lion, Mavericks, Tiger, Cheetah, etc.
Telnet Alternatives for Mac: SSH, Netcat
Of course there are some alternatives for Telnet, depending on what you need to use telnet for in the first place.
For remote connections, ssh is the new standard as it is secured, and both the ssh server and ssh client are available by default in all modern versions of MacOS system software. Simply, connecting to a remote IP with ssh would look as follows:
For simple testing of network connectivity, or for testing of an open / listening port, netcat can often fulfill the same needs that telnet provides. For example, you can confirm that the connection to the aforementioned ASCII Star Wars server and port 80 works with the following netcat command string:
nc -vz towel.blinkenlights.nl 80
Remember that netcat for this purpose requires specifying a valid TCP or UDP port number of whatever the host protocol is.
Restoring Telnet to MacOS Mojave & High Sierra by Compiling Telnet from Source
If you don’t want to use Homebrew for whatever reason, you can also compile Telnet yourself from inetutils source. As a prerequisite you’ll still need to install the Mac OS command line tools to be able to accomplish this, however.
First you’d download the latest inetutils package from gnu.org:
curl -o http://ftp.gnu.org/gnu/inetutils/inetutils-1.9.4.tar.gz
Next you’d decompress the tarsal:
tar xvzf inetutils-1.9.4.tar.gz
Now change into the appropriate directory:
cd inetutils-1.9.4
Issue the configure command to begin:
./configure
When configure is complete, make from source:
make
And finally, use make install to complete the installation of inetutils and telnet:
sudo make install
Personally I think using Homebrew is easier, plus there are many other great and useful Homebrew packages available. If you’re familiar with compiling from source and you are this far, you’ll almost certainly appreciate having Homebrew anyway.
What about Telnet for iPad and iPhone? Telnet for iOS!
Just to cover all bases, there are also telnet clients available for iOS. How practical this is for you likely depends on your particular device and what your intention with telnet is, but a free option for iOS is iTerminal and an excellent paid option is Prompt. Using ssh and telnet from an iOS device can be a challenge without an external keyboard though, so you might want to connect one to your iPhone or iPad before going that route, and realistically this is a better option for the iPad simply due to the larger screen. Of course iOS is not MacOS however, so this is sort of off topic.
Alright so that’s a pretty comprehensive guide to getting Telnet in modern MacOS releases, but if you know of another method, or another approach to getting Telnet in MacOS High Sierra or returning Telnet to MacOS Mojave, share with us in the comments below!
Источник
Интерфейс командной строки (CLI) интернет-центра Keenetic
Для тонкой настройки интернет-центра предусмотрен профессиональный интерфейс командной строки (CLI — Command Line Interface). Для подключения к интерфейсу командной строки интернет-центра нужно использовать сетевой протокол TELNET/SSH.
Подключение к командной строке интернет-центра Keenetic через telnet-клиента
Важно! Если на вашем компьютере используется операционная система Windows Vista/7/8/10, обратитесь к статье » Включение службы Telnet «, т.к. в этих версиях ОС по умолчанию не установлен компоненты «Клиент Telnet». В Windows 2000/XP служба Telnet работает по умолчанию.
Запустите приложение «Командная строка» в операционной системе Windows (в системах Linux/Mac OS запустите «Терминал»). Вы увидите окно командной строки операционной системы компьютера.
По умолчанию в интернет-центре Keenetic предустановлен IP-адрес 192.168.1.1. Для подключения к командной строке интернет-центра введите команду:
и нажмите Enter.

После этого появится приглашение ввести пароль для входа в настройки интернет-центра.
Важно! Чтобы защитить систему от несанкционированного доступа, обязательно установите пароль администратора интернет-центра.
После успешной авторизации, вы увидите интерфейс командной строки (CLI):
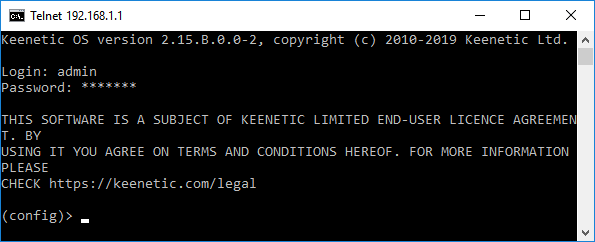
Для удобного использования интерфейса командной строки роутера пользуйтесь клавишей Tab. Например, если в приглашении командной строки (config)> нажать клавишу Tab, вы увидите набор доступных команд текущего уровня. Для того чтобы сделать процесс ввода команд максимально удобным, интерфейс командной строки имеет функцию автодополнения команд и параметров, подсказывая пользователю, какие команды доступны на текущем уровне вложенности. Автодополнение работает по клавише [Tab].
Для выхода из интерфейса командной строки (CLI) используйте команду:
Важно! Подробную информацию по работе с интерфейсом командной строки интернет-центра, полным описанием всех команд и их синтаксисом, вы найдете в справочнике командного интерфейса. Его можно найти на в разделе Центр загрузки , выбрав модель вашего устройства.
Подключение к командной строке интернет-центра Keenetic из веб-конфигуратора
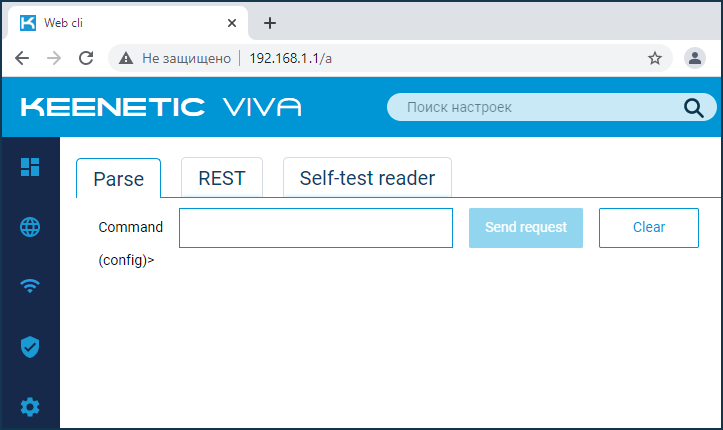
Подключившись к веб-конфигуратору в адресной строке браузера вы увидите адрес вида http://192.168.1.1/dashboard
Сотрите слово dashboard и после символа косой черты / добавьте маленькую строчную букву a английского алфавита http://192.168.1.1/a
В веб-интерфейсе откроется страница Web cli, с которой можно отправлять команды для роутера.
Важно! Web cli не является полноценным интерфейсом командной строки. Некоторые команды здесь могут не выполняться и вывод команд будет отличаться от того как это выглядит в CLI при подключении через TELNET/SSH. Функция автодополнения команд и параметров по клавише Tab работает с версии KeeneticOS 2.15.
Для профессиональной настройки интернет-центра используйте только подключение к интерфейсу командной строки через TELNET/SSH.
Web cli предназначен для инженеров и разработчиков, но в исключительных случаях может применяться пользователями, когда необходимая настройка отсутствует в веб-конфигураторе, её можно сделать только выполнив специальную команду, а доступ к интерфейсу CLI по какой-то причине невозможен. Пожалуйста, соблюдайте осторожность при работе в Web cli. При необдуманных действиях можно повредить конфигурацию интернет-центра.
Рассмотрим пример. Предположим, на роутере нужно выполнить команды:
ip name-server 8.8.8.8 «» on ISP
system configuration save
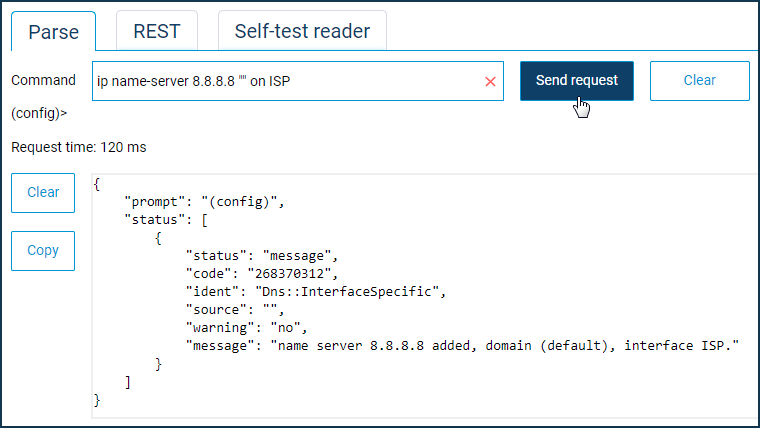
На вкладке «Parse» в поле «Command» введите команду и нажмите кнопку «Send request». Последовательно выполните нужные команды.
Источник
How to Install Telnet on macOS?

Greetings friends! After I upgraded my old MacBook Pro to High Sierra 10.13, Terminal surprised me with something like this: “telnet command not found on Mac”. What? It turns out! He was deleted! Well, here the question arose of how to return telnet on Mac?
Install Telnet on Mac via Homebrew
You must first install the missing Homebrew package manager. What does Homebrew do? Homebrew installs the packages you need that are not provided by Apple. Use this step-by-step guide for the fastest solution:
- Install Homebrew via Terminal:
- Install telnet using the Homebrew package manager:
- We are waiting for the installation to complete;
- Now telnet is installed on macOS High Sierra. We check the performance:
Conclusion
Of course, now few people use the telnet protocol, because there is SSH more powerful and secured tool, but still telnet sometimes could be necessary. Apple is so reckled about our security from that to exclude telnet from the list of basic Terminal commands on Mac.
It’s the best time to ask questions and give us your feedback in comments.
Hi there! My Name is Vincent Lago! My goal is to share insightful reviews, guides, and manuals for people looking to know more about current solutions for Apple hardware and OS. I have years of technological background knowledge including owning a custom iMacs & PCs which was using for different types of business. And now, I want to share my experience with you.
Источник
Online помощник
Cети плюс
Сеть и интернет
Цифровое ТВ
Видеонаблюдение
Новичкам
Опытным пользователям
Безопасность
Режим командной строки в маршрутизаторах ZyXEL Keenetic
Для того чтобы зайти в режим командной строки маршрутизатора, нужно использовать telnet-соединение для подключения к устройству.
Внимание! Если на вашем компьютере используется операционная система Windows Vista/7/8, в статье «Включение служб Telnet и TFTP в Windows Vista/7/8″ вы найдете информацию о том, как включить службу Telnet.
Для создания telnet-подключения в операционной системе Windows 2000/XP нажмите Пуск – Выполнить…

В открывшемся окне наберите telnet и нажмите кнопку OK. По умолчанию IP-адрес устройства 192.168.1.1.
После этого появится приглашение ввести пароль для входа в настройки устройства. Пароль 1234 по умолчанию установлен в устройствах.

После успешной авторизации, вы увидите режим командной строки:

Для выхода из режима командной строки выполните команду exit.
Интерфейс командной строки маршрутизатора Keenetic выглядит следующим образом:

Справочник команд для маршрутизатора Keenetic с микропрограммой второго поколения: cli_manual_ru_kn_ra.
Источник


