- Keil mdk arm linux
- Features
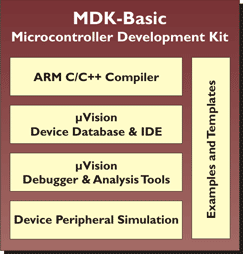
- Keil MDK
- Arm Keil MDK — Microcontroller Development Kit
- Product components
- Resources
- MDK editions
- Professional
- Essential
- Community
- Compare Editions
- Getting started
- Download and install MDK
- Install software packs
- Verify the installation using example projects
- Is there anybody using Keil MDK on Linux through wine?
- 1 Answer 1
- ST Development cross-platform tools with native Linux support:
- Keil mdk arm linux
- Начало работы с STM32 в Keil MDK-ARM
- Продолжение следует…
Keil mdk arm linux
MDK-Basic is not available for purchase anymore.
We recommend MDK-Cortex-M for projects with Cortex-M Microcontrollers and MDK-Standard for legacy projects with ARM7 and ARM9 MCUs. For more information, please visit the MDK-ARM Product Selector.
Features
- Complete support for Cortex-M, Cortex-R, ARM7, and ARM9 devices
- µVision4 IDE, debugger, and simulation environment
- C/C++ compiler from ARM
- Data and Event Trace tools for Cortex-M processor-based devices
- Complete Code Coverage information about your program’s execution
- Execution Profiler and Performance Analyzer enable program optimization
- Detailed start-up code using the Device Database
- Flash programming algorithms for ULINK debug adapters
- CMSIS Cortex Microcontoller Software Interface Standard compliant,
 Note
Note
- MDK-Basic does not support any components of RL-ARM including Keil RTX. The standard version of MDK is required to use RL-ARM.
- A code-size limited (32KB) version of MDK is available for download. It does not require a serial number or license key.
- The 32KB version can be converted into a full (unrestricted) or 256KB code limited version with a valid Product Serial Number.
Источник
Keil MDK
Arm Keil MDK — Microcontroller Development Kit
Arm Keil MDK is the most comprehensive software development solution for Arm-based microcontrollers and includes all components that you need to create, build, and debug embedded applications.
Latest Release | June 2021 | MDK v5.35, containing Arm Compiler 6.16.
Product components
MDK-Core is based on µVision (Windows only) with outstanding support for Cortex-M devices including the new Armv8.1-M architecture.
MDK includes the leading-edge Arm C/C++ Compiler with assembler, linker, and highly optimized run-time libraries that are tailored to Arm Cortex-M based devices for optimum code size and performance.
Software packs may be added any time to MDK-Core making new device support and middleware updates independent from the toolchain. They contain device support, CMSIS libraries, middleware, board support, code templates, and example projects.
MDK-Middleware is a set of software stacks that support TCP/IP networking, USB host and device connectivity, graphical user interfaces, and file systems for embedded devices.
Separately available debug probes help to identify problems in the application using sophisticated debug technologies, such as code coverage, performance analysis, event tracing, and power-aware debugging.
Resources
Guides
Webinars
MDK editions
Professional
All-in-one (including middleware)
Advanced (subset of middleware)
Essential
Community
Small projects, education, hobbyists, makers
Compare Editions
MDK is available in various editions:
Getting started
Download and install MDK
Download Arm Keil MDK and run the installer. Follow the instructions to install the MDK Core on your local computer. The installation also adds the Software Packs for Arm CMSIS, Arm Compiler and MDK-Professional Middleware. When finished, activate a license or skip this step to use MDK-Lite edition.
Note: You can request a free thirty-day trial license for MDK-Professional. This removes the code size limits and you can explore and test the comprehensive middleware.
Install software packs
After the installation is complete, Pack Installer is started automatically, which allows you to add supplementary software packs. As a minimum, you need to install a software pack that supports your target microcontroller device. On the Devices tab, select the microcontroller you wish to use. Then press the Install button of the corresponding Device Family Pack (DFP) on the Packs tab:
Note: If you require support for legacy devices not listed in Pack Installer, please also download and install the MDK v4 Legacy Support.
Verify the installation using example projects
Once you have selected, downloaded, and installed a software pack for your device, you can verify your installation using one of the examples provided.
In Pack Installer, select a device on the Devices tab. Click on the Examples tab to see available example projects:
Press Copy to install the selected example project on your machine. µVision opens up and you can start working with the project.
Источник
Is there anybody using Keil MDK on Linux through wine?
I’ve been having trouble using keil MDK on ubuntu 18.04. After doing a couple of trial I am able to use uVision IDE of keil on my ubuntu os. Everything working fine but while trying to program my mcu it shows «No ST-Link Found». But as I insisted to be using linux I tried to install stm32cube Programmer hopping try to do somehting with hex file, but didn’t work out. But somehow I managed st-link utility(which works on command line).
Now If I convert eclipse’s elf file to bin or hex and load to my stm32f103vet though st-link utility, it works just nice! But when I flash hex file generated from keil, it shows nothing. Doesn’t work. I am tired to try to program stm32 using keil MDK.
So if there is anybody who is using Keil MDK on his linux os please knock here. Please help me out!

1 Answer 1
This isn’t exactly an answer to your question directly per se, but it may still get you where you need to go in the end, and it’s more than a comment, so I’ll post it as an answer:
ST Development cross-platform tools with native Linux support:
I develop on Linux. I highly recommend you just switch to native Linux tools and drop Keil. ST has a full suite of natively-supported Linux Tools, which is one of the reasons I love ST so much (they are truly supporting Linux in everything they do):
STM32CubeProgrammer — https://www.st.com/en/development-tools/stm32cubeprog.html mycommandfile.txt contains simply 4 commands:
You can use Eclipse on Linux as your IDE — buy this ebook (Mastering STM32, by Carmine Noviello) to see full setup instructions — https://leanpub.com/mastering-stm32
Another note about running Windows tools in Ubuntu: Wine rarely works well for me except on the simplest of programs. Usually what I do is install Virtual Box (no cost) inside Ubuntu, install Windows 10 inside Virtual Box (no-cost download straight from Microsoft), then install whatever Windows software I need inside Windows 10.
That being said, I still recommend you ditch Keil and use native STM32 Linux tools, but the Virtual Box trick really comes in handy when there’s some piece of software that otherwise truly cannot be run and has no good substitute. Linux Ubuntu is my primary OS on all my home computers now, so I’ve had to use my Windows 10 virtual machine inside Virtual Box on occasion.
Источник
Keil mdk arm linux
Processor IP for the widest range of devices—from sensors to servers.
Mali processors offer a complete multimedia solution for SoC.
Solutions for the efficient implementation of complex SoC designs.
Perfect for high-efficiency IoT endpoints or a high-performance server SoC.
Security IP designed to protect against a variety of different vulnerabilities.
Corstone accelerates the development of secure SoCs for IoT and embedded devices.
Processors for HPC and cloud-to-edge infrastructure workloads and solutions.
NPUs with enhanced processing capabilities to deliver highest performance for machine learning inference.
Applications processors for devices undertaking complex compute tasks.
Real-time processors offering fast, reliable performance for time-critical systems.
Low-power processors for microcontrollers and constrained, energy-efficient applications.
Graphics processors for a range of mobile devices from smartwatches to autonomous vehicles.
- SoC Design
- Embedded & IoT Software Tools
- Server & HPC Application Tools
- Graphics Development Tools
- Development Boards
Mbed OS
Open-source IoT operating system for building intelligent connected products.
Armv9 is designed for AI, security and enhanced computing.
Search, browse, and download Arm products, software, and tools.
Get technical manuals and documentation for Arm products.
Transform lives through machine learning solutions.
Compute power built into everyday objects and physical systems.
Security for billions of devices through Arm technologies.
Connect anything anywhere with faster, low-latency 5G networks.
Autonomous driving is the next frontier for car manufacturers.
Advanced technology designed to deliver the latest gaming and graphics features to mobile devices.
Always-on, always connected laptops provide richer, more productive experiences.
Improve healthcare with proactive, and advanced treatment solutions.
Industrial and operational practices become increasing efficient with connected IoT devices.
IoT, cloud and 5G are driving the transformation from datacenter to devices.
Scalable solutions for a broad range of mobile devices power our connected digital lives on the go.
Transform cities to be more responsive to events and changes.
The power of home automation through always-on IoT devices.
Power to meet the growing needs of HDD & SSD storage applications.
Secure, flexible processing for wearable electronics with small silicon footprint.
Arm’s AI Ecosystem helps to deliver the next generation of AI solutions. Connect with Arm AI Ecosystem Partners.
Arm Architecture enables our partners to build their products in an efficient, affordable, and secure way.
Arm helps enterprises secure devices from chip to cloud.
Arm provides proven IP and the industry’s most robust SoC development resources.
Start your concept-to-compute journey with Arm processor designs and rich development resources.
Learn about real life stories and the triumphs that imagination, tenacity and Arm technology work together to create.
Arm’s commitment to customer satisfaction puts quality at the heart of everything we do.
Arm Flexible Access provides quick, easy, and unlimited access to a wide range of IP, tools and support to evaluate and fully design solutions.
Partnership opportunities with Arm range from device chip designs to managing these devices.
Arm’s AI Ecosystem helps to deliver the next generation of AI solutions. Connect with Arm AI Ecosystem Partners.
Arm technologies continuously evolve to ensure intelligence is at the core of a secure and connected digital world.
Arm executives and influencers bring insights and opinions from the world’s largest compute ecosystem.
Arm and our partners give you and potential investors the confidence needed to translate a transformational idea from inspiration to production.
Total Compute is Arm’s transformative strategy for designing computing solutions that will drive next-gen user experiences on devices and applications.
Download a wide range of Arm products, software and tools from our Developer website.
Stay informed with technical manuals and other documentation.
Learn more, and ask and answer questions on the self-service Arm Community.
Get the help you need, when you need it, with our range of support and training options.
Unblock issues by getting advice and assistance from Arm experts throughout your support contract.
Resolve technical issues about your Arm products quickly and efficiently by opening a support case.
Learn about Arm technology directly from the experts, with face-to-face, virtual classroom and online training options.
Optimize your Arm system on chip designs using advice from the most experienced Arm engineers in the industry.
Technical resources for Arm products, services, architecture, and technologies.
Ask questions about Arm products and technologies and search our knowledge base of solutions.
Get the latest news and information about Arm products.
A dedicated website for Mbed OS developers and the Mbed forum for detailed discussions.
Arm Education comprises of the Arm University Program, Arm Education Media and the Arm School Program.
Arm Education books appeal to students and learners as they progress from novices to experts in Arm-based system design.
Arm Research Program supports academic and industrial researchers across a wide range of disciplines.
Get knowledge from top technical experts about innovative projects building on Arm-based technology.
Quick and easy access to a wide range of IP and tools to evaluate and fully design solutions at a low upfront cost.
Our business is foundational technology. Our leaders are the foundation we build on.
Join the team with the skills and talent to make billions of lives better.
Get the latest news on Arm and our product and services.
Visit Arm at tradeshows, seminars, workshops, webinar and technical symposia.
Arm supply base is a source of excellence, quality standards and innovation for third-party products, goods and services.
End-to-end security offerings and our ongoing commitment to keeping our customers secure.
Website terms and policies.
The foundation of our compliance program and a valuable source of information for everyone at Arm to be familiar with.
Arm creates positive change at scale through people, innovation, investment, and leadership.
Arm adheres to Section 54 of the UK Modern Slavery Act 2015.
110 Fulbourn Road
Cambridge, UK
CB1 9NJ
Tel: +44 (1223) 400 400
Fax: +44(1223) 400 410
Arm executives and influencers bring insights and opinions from the world’s largest compute ecosystem.
Источник
Начало работы с STM32 в Keil MDK-ARM
Все картинки в этой статье кликабельны.
STM32 — это семейство 32-разрядных микроконтроллеров фирмы STMicroelectronics.
Микроконтроллеры содержат микропроцессорное ядро ARM, точнее ARM Cortex-M. Это ядро присуще не только микроконтроллерам STM32, оно существует само по себе, и на его основе выпускается множество микроконтроллеров от разных производителей.
Keil MDK-ARM (произносится «Кеил эм-ди-кей арм») — это среда разработки для микроконтроллеров с ядром ARM Cortex-M.
Среда продается за большие деньги, но существует бесплатная ограниченная версия, которую можно скачать с официального сайта.
Существует множество других сред разработки. Например, последнее время автор пользуется средой, которую описал в другой статье. Но в этой пойдет речь о Keil MDK-ARM, потому что она имеет большую популярность и достаточно проста.
Первым делом качаем последнюю версию Keil MDK-ARM с официального сайта. Она имеет ряд ограничений, которые не влияют на большинство задач. Самое существенное ограничение состоит в том, что среда не сгенерирует программу объемом больше 32 КБ, но такую программу надо постараться написать. Хотя микроконтроллеры STM32 часто имеют намного больший объем, вплоть до 2 МБ.
На момент написания статьи последняя версия Keil MDK-ARM — 5.18 (от 5 февраля 2016).
Чтобы скачать среду, надо заполнить форму на сайте Keil:
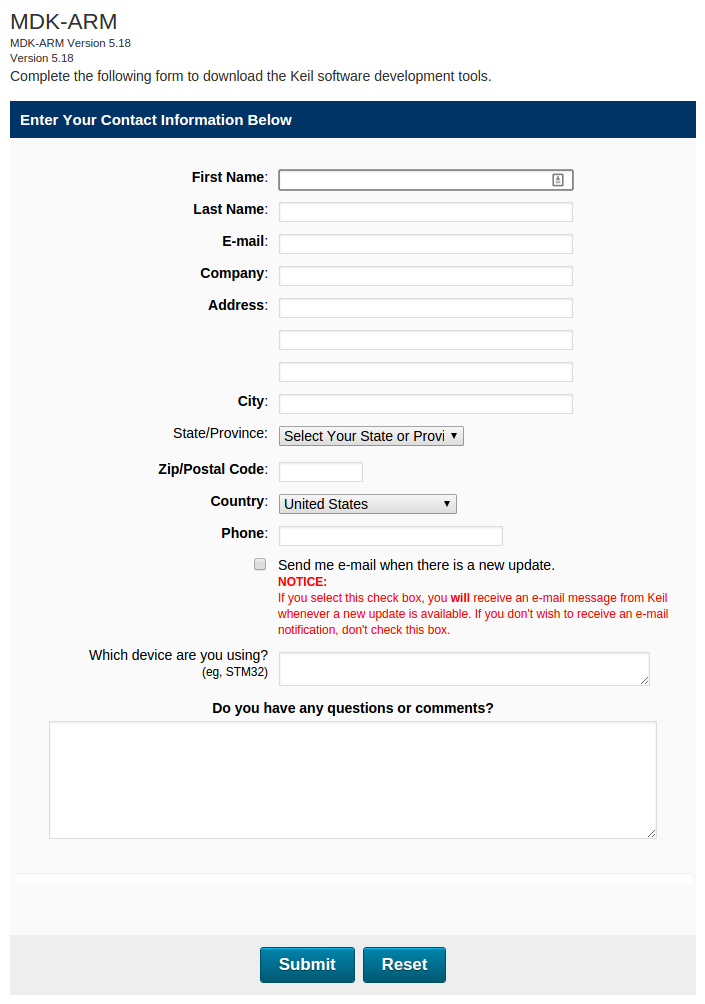
Следует ввести настоящий адрес электронной почты, иначе сайт будет ругаться. После заполнения и нажатия Submit, дается ссылка для скачивания:

Если вы хотите избежать заполнения формы, то воспользуйтесь страницей, которую сделал автор, чтобы облегчить скачивание.
Качаем и устанавливаем. Установленная среда занимает на диске около 1,3 ГБ. После установки автоматически запускается менеджер пакетов:

Он нужен, чтобы качать, устанавливать и обновлять различные дополнения (пакеты).
Менеджер пакетов появился в MDK-ARM версии 5, что уменьшило объем установочного файла почти в два раза (версия 4.71 была объемом 550 МВ, а версия 5.00 — 300 МБ).
В левой части менеджера мы выбираем устройства (микроконтроллеры), а в правой соответствующие им пакеты.
Допустим, нам надо вести разработку под микроконтроллер STM32F407VG, который установлен на отладочной плате STM32F4-Discovery.
Тогда находим этот микроконтроллер в списке слева и устанавливаем соответствующий пакет DFP:

Можно заметить, что среди установленных пакетов есть CMSIS. CMSIS — это библиотека для ядра Cortex-M, общая для всех микроконтроллеров. Библиотека разрабатывается фирмой ARM и доступна для скачивания с официального сайта после регистрации. Можно было бы не устанавливать этот пакет, а пользоваться официальным выпуском библиотеки, но это дополнительные сложности.
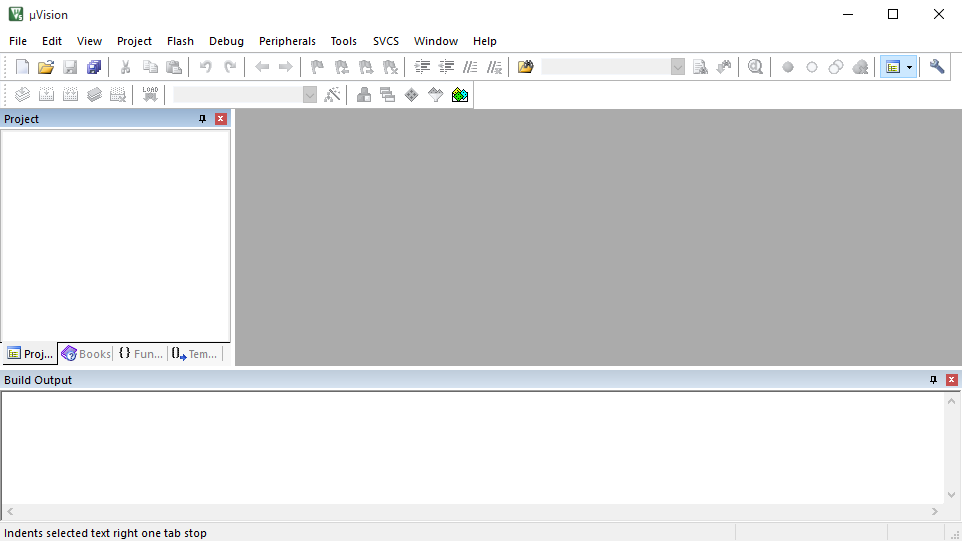
Закрываем менеджер пакетов и запускаем Keil uVision5 (произносится мю-вижен):

Keil uVision5 — это часть MDK-ARM, графический интерфейс среды, который включает редактор кода:
Я рекомендую произвести небольшую настройку редактора. Выбираем меню «Edit -> Configuration…», и производим следующие настройки:

- Кодировка UTF-8.
- Правая граница кода в 80 символов.
- Отступы по 4 пробела.
Эти настройки довольно спорные. У каждого разработчика свои предпочтения.
Теперь создаем проект. Для этого выбираем меню «Project -> New uVision Project…». В открывшемся окне выбираем расположение и имя проекта. Для проекта лучше создать отдельную папку и сохранить проект туда.
После сохранения появится окно выбора устройства. Выбираем нужный микроконтроллер и нажимаем «ОК». Если бы мы не установили нужный пакет, то микроконтроллера не было бы в списке:

В следующем окне предстоит выбрать компоненты, которые будут использоваться в проекте. Необходимо выбрать «CMSIS:CORE» и «Device:Startup»:

После нажатия «OK» процесс создания проекта завершится.
В дальнейшем вы всегда сможете запустить окно выбора компонентов, чтобы добавить или удалить их. Для этого надо выбрать меню «Project -> Manage -> Run-Time Evironment…».
При выборе компонентов может оказаться, что какой-то компонент зависит от других компонентов, которые вы не выбрали. Об этом вы узнаете из сообщений в нижней части окна. Необходимо будет выбрать зависимые компоненты.
После создания проекта описанным способом, в окне справа вы увидите следующую структуру проекта:
Здесь мы видим название проекта «example», цель проекта «Target 1», пустую группу файлов «Source Group 1», компоненты CMSIS и Device.
Целей проекта может быть сколько угодно. Цель включает в себя важнейшие настройки проекта в том числе выбор микроконтроллера. Цели нужны, чтобы можно было собрать программу разными способами для одних и тех же файлов исходного кода. Например, вам может понадобиться, чтобы проект охватывал множество микроконтроллеров.
Группы файлов нужны, чтобы красиво группировать файлы исходного кода. Группы помогают легко ориентироваться в файлах в большом проекте. Например, у вас может быть группа файлов, отвечающих за светодиоды, и отдельная группа с файлами для взаимодействия с USB.
В структуре мы видим два файла. Один с расширением «s». Он содержит исходный код на языке ассемблера. Другой с расширением «с». Он содержит исходный код на языке Си.
Собрать проект и получить файл прошивки можно нажав клавишу F7. Но в таком виде проект не будет собран и вы получите ошибку, потому что отсутствует функция «main()».
Функция «main()» — это точка входа в вашу программу, то с чего начинается программа. Ее наличие обязательно если вы пишите программу на языке Си.
Давайте создадим эту функцию. Кликнем на группе «Source Group 1» правой кнопкой и выберем «Add New Item to ‘Source Group 1’…» (перевод: добавить новый элемент в группу ‘Source Group 1’). Создадим файл «main.c»:

В созданный файл добавим код:
В конец файла стоит добавить пустую строку, иначе при сборке вы получите предупреждение «warning: #1-D: last line of file ends without a newline».
Теперь проект можно собрать клавишей F7. В результате вы получите файл «Objects\example.axf» (по умолчанию имя файла совпадает с именем проекта). Файл располагается в папке с проектом.
Обычно разработчику требуется файл прошивки в формате Intel HEX. Чтобы получить его, надо произвести настройку цели. Чтобы увидеть настройки цели нажмите Alt-F7, перейдите на вкладку «Output» и выберите «Create HEX File».
После очередной сборки вы получите файл «Objects\example.hex».
Сейчас программа не делает ничего, и прошивать ее бессмысленно. Давайте напишем программу, которая управляет состоянием ножки микроконтроллера.
Запустим выбор компонентов с помощью меню «Project -> Manage -> Run-Time Evironment…» и выберем компонент «Device:STM32Cube Hal:GPIO».
В нижней части окна мы увидим неудовлетворенную зависимость «Device:STM32Cube Hal:Common». Выберем этот компонент и увидим еще больший список зависимостей. Необходимо выбрать все требуемые зависимости:
- Device:STM32Cube Hal:Common
- Device:STM32Cube Hal:RCC
- Device:STM32Cube Hal:PWR
- Device:STM32Cube Hal:Cortex
- Device:STM32Cube Framework:Classic
STM32Cube — это библиотека, которую предоставляет STMicroelectronics.
При выборе компонентов мы выбираем какие возможности этой библиотеки использовать.
Микроконтроллер, кроме ядра, содержит большое количество периферийных устройств: АЦП, ЦАП, таймеры, различные интерфейсы и многое другое. Каждое периферийное устройство имеет свое название. Например, устройство для работы с портами микроконтроллера называется GPIO, об этом можно узнать из документации на микроконтроллер.
Библиотека STM32Cube многоуровневая, то есть включает в себя множество промежуточных библиотек. Одна из промежуточных библиотек называется STM32Cube HAL, или просто HAL. Она поделена на модули и каждый модуль соответствует какому-нибудь периферийному устройству. Название модуля совпадает с названием устройства, например, имеется модуль GPIO.
Существует большое количество документации по STM32Cube. Но основное описание по работе с периферийными устройствами содержится в руководстве по HAL. Это руководство разработчик использует большую часть времени. Обратимся к нему, чтобы заставить шевелиться ножки микроконтроллера.
Для начала подключим HAL в нашей программе, добавив строчку перед определением функции «main()»:
В самом начале функции «main()» вызовем функцию «HAL_Init()», которая инициализирует библиотеку.
Таким образом мы получим следующий код в файле «main.c»:
Продолжение следует…
На этом я вынужден прервать свою статью, так как в данный момент мне не на чем отлаживать программу, то есть нет под рукой отладочной платы.
Я написал программу, которая собирается и теоретически должна работать, но я не хочу вводить в заблуждение читателя. Выше изложенный материал считаю полезным и без конечного результата.
В статье я хотел еще привести конечный код и объяснить, как он работает. Могу лишь поделиться непроверенной программой:
Источник


