- Installing Kerio Control
- Product editions
- Installing Software Appliance edition
- Creating your VPN
- Network manager must connect with their ISP to ensure:
- Installing Virtual Appliance
- Hardware appliance
- Настройка клиента VPN от Kerio на Linux Ubuntu
- Установка Kerio VPN Client
- Настройка Kerio VPN Client
- Kerio VPN Client для Debian/Ubuntu Linux
- Kerio VPN Client for Debian/Ubuntu Linux. Установка и настройка в Linux
Installing Kerio Control
Kerio Control can be installed in three different ways:
From version 9.3 onwards 32-bit hardware is no longer supported.
Product editions
Kerio Control Software Appliance is a package of Kerio Control and a special Linux-based operating system. Install the appliance on a PC without an operating system.
Kerio Control Virtual Appliance is the software appliance edition pre-installed on a virtual host for the particular hypervisor. Virtual appliances for VMware and Hyper-V are available.
Kerio Control Box is a hardware device with Kerio Control Software Appliance pre-installed. Two models are available. For more information refer to Kerio Control NG series installation guide.
 Installing Software Appliance edition
The below information explains how to install the software appliance edition on a machine without an operating system.
Any existing operating system and files on the target hard disk will be erased.
For hardware requirements, refer to Hardware requirements.
- Download the ISO image from the Download page.
- Select one of these actions:
- Burn the ISO image on a CD/DVD
- Use the ISO image to create a bootable USB flash disk
- Boot from the appropriate drive. The installation runs automatically. Kerio Control checks all interfaces for a DHCP Dynamic Host Configuration Protocol — A protocol that automatically gives IP addresses and additional configuration to hosts in a network. server in the network and the DHCP server provides a default route after the installation:
- Internet interfaces — All interfaces where Kerio Control detects the DHCP server and the default route in the network. If there is more than one Internet interface with a default route, Kerio Control arranges the Internet interfaces in the load balancing mode.
- LAN Local area network — A network that connects computers and other devices in a small area. interfaces — All interfaces without any detected DHCP server. Kerio Control runs its own DHCP server through all LAN interfaces configured to 10.10.X.Y where X is the index of the LAN interface (starting with 10). Y is 1 for the Control interface and 11-254 for DHCP assigned hosts.
- Follow the instructions on the computer’s console to perform the basic configuration.
- To perform the initial setup, open the following address in your web browser: https://kerio_control_ip_address:4081/admin , for example, https://10.10.10.1:4081/admin which is the IP address An identifier assigned to devices connected to a TCP/IP network. where Kerio Control is accessible from your LAN.
- Follow the Activation Wizard.
After finishing the wizard, Kerio Control displays the login page.
To change the automatic pre-configuration, go to Kerio Control Administration to section Interfaces. For more information refer to Configuring network interfaces.
Creating your VPN
Here is a summary of what is required in terms of configuration:
Network manager sets up Kerio Control and gets the IP address or name(s) of the Kerio Control Server.
The network manager sends information to remote workers, with a link to the Download VPN Client, or as an executable file that has the client plus organization’s VPN information.
Remote workers must install the Kerio VPN Client on their machines that connects to the network. For more information refer to Installing and configuring Kerio Control VPN Client for users.
In the Users and Groups > Users section, enable the user right/access: Users can connect using VPN for your users. If you are using a template for all users, this right must be configured at the template level. For more information, see:
Connection to the VPN Server from the Internet as well as communication between VPN Clients must be allowed by traffic rules. There is a default traffic policy rule which should be enabled. Otherwise, there is a defined service for Kerio VPN (TCP Transmission Control Protocol — ensures packet transmission. /UDP User Datagram Protocol — ensures packet transmission. 4090), in case you do not have this rule.
Network manager must connect with their ISP to ensure:
- Inbound connections from the Internet to Kerio Control must be allowed via TCP and UDP port 4090
- Configure a DNS Domain Name System — A database enables the translation of hostnames to IP addresses and provides other domain related information. FQDN name for the VPN server Kerio Control includes a VPN server which provides users to connect to the Kerio Control network from the Internet securely. name that resolves to the correct public IP address assigned to the service
- If using commercial SSL Secure Sockets Layer — A protocol that ensures integral and secure communication between networks. certificates make sure the server certificate is imported into Kerio Control server and assigned to the VPN service
- Test VPN connections using an external computer with the Kerio VPN Client installed
- Document the configuration steps necessary in order to install and configure the VPN client and share the final document with remote users
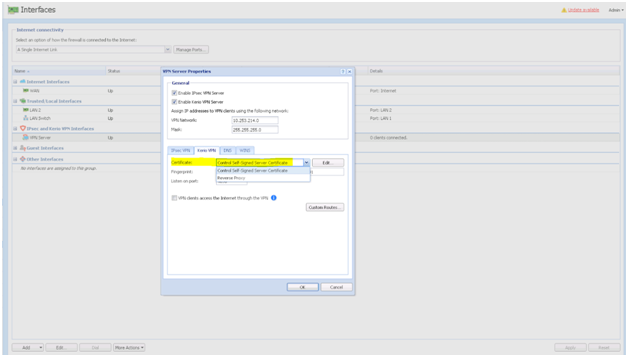
VPN Server Properties
Installing Virtual Appliance
Kerio Control Virtual Appliance is a UTM solution distributed as a virtual appliance for VMware and Hyper-V. The software provides a complex set of features for security of local networks, control of user access to the Internet and monitoring of user activity.
| Solution | Information |
|---|---|
| Kerio Control VMware Virtual Appliance | For more information refer to Kerio Control VMware Virtual Appliance. |
| Kerio Control Hyper-V Virtual Appliance | For more information refer to Kerio Control Virtual Appliance for Hyper-V. |
Hardware appliance
Kerio Control can be acquired as a dedicated hardware device that can be installed inside your network as an unified threat management firewall that features intrusion prevention, content filtering, activity reporting, bandwidth management, and virtual private networking.
| Appliance | Description |
|---|---|
| Hardware Appliance NG100 |


 Давно не было такого решения как то, о чем мы сейчас поговорим. Существовало множество продуктов и способов подключения VPN клиентов к серверам. Однако решения от компании Kerio пришло только недавно. В этой статье мы рассмотрим как установить и настроить данный клиент и подключаться к вашему VPN серверу через клиент Kerio VPN.


