- Настройка клиента VPN от Kerio на Linux Ubuntu
- Установка Kerio VPN Client
- Настройка Kerio VPN Client
- Kerio VPN Client для Debian/Ubuntu Linux
- Kerio VPN Client for Debian/Ubuntu Linux. Установка и настройка в Linux
- Installing and configuring Kerio Control VPN Client for users
- System requirements
- Prerequisites
- Kerio Control VPN Client for Windows
- Removing connections
- Changing a language
- Enabling/disabling balloon messages
- Kerio Control VPN Client for OS X
- Removing connections
- Troubleshooting SSL certificates
- Kerio Control VPN Client for Linux
- Troubleshooting
Настройка клиента VPN от Kerio на Linux Ubuntu
Установка Kerio VPN Client
Переходим на страницу загрузки Kerio Control и копируем ссылку на соответствующую версию клиента:

* со стороны Kerio есть клиенты для Linux только для Debian/Ubuntu 32-bit или 64-bit.
Используя скопированную ссылку, загружаем клиент на Linux:
* в данном примере нами была скопирована 64-х битная версия клиента.
Устанавливаем необходимые для работы VPN-клиента компоненты:
apt-get install debconf openssl
И устанавливаем сам клиент:
dpkg -i kerio-control-vpnclient-linux-amd64.deb
Система в процессе установки сразу предложит диалоговые окна для настройки. В первом окне вводим адрес нашего сервера (Kerio VPN Server):

* для примера мы введи адрес внутренней сети, но чаще, будет необходимость в использовании внешнего адреса для сервера.
Разрешаем автоматически определить отпечаток для сертификата сервера:

После определения отпечатка, он будет выведен на экран, а нам нужно будет его принять:

Вводим имя пользователя для авторизации в сети VPN:

Вводим пароль для пользователя:

Система завершит установку.
Разрешим автозапуск сервиса и стартанем его:
systemctl enable kerio-kvc
systemctl start kerio-kvc
Настройка Kerio VPN Client
Настройку клиента мы выполнили в момент установки. Но если нам необходимо изменить конфигурацию или мы ошиблись, то изменения можно внести командой:
Источник
Kerio VPN Client для Debian/Ubuntu Linux

Kerio VPN Client представляет собой инструмент для соединение с vpn сетью
работающей на шлюзе Kerio WinRoute Firewall. Не так давно появился клиент и под Linux.
Предлагаю небольшую инструкцию по установке и использованию Kerio VPN Client для Debian/Ubuntu Linux
Подготовка к установке
Поддерживаются 32-битные Debian / Ubuntu дистрибутивы:
Debian 5.0, Ubuntu 8.04, Ubuntu 8.10 и выше.
Перед тем как начать установку с Kerio VPN Client, убедитесь, что
‘Debconf «и» пакеты OpenSSL’ установлены на вашей системе.
# apt-get install debconf openssl
Для установки Kerio VPN Client, выполните следующие команды:
# dpkg -i kerio-kvc_###_i386.deb
Так же можно загрузить deb пакет с официального сайта www.kerio.ru/ru/firewall/download
Kerio VPN Client для Linux поддерживает одновременно только одно VPN соединение.
Во время установки пакета мастер конфигурации запускается автоматически.
Мастер запросит имя сервера / адрес, имя пользователя, пароль и предлагает автоматическое обнаружение сервера,
получение сертификата (для сервера проверки идентификации).
Кроме того, он может быть введён вручную.
Если вы хотите изменить конфигурацию позже, запустите мастер снова следующей командой:
Альтернативный вариант, править файл конфигурации:
После любых изменений потребуется перезапуск службы:
Kerio VPN Client будут автоматически запускаться после установки
и перезапуска после реконфигурации.
Вы можете запускать / останавливать его вручную, путем вызова команды:
Kerio VPN Client создает log файлы в директории
init.log — информация о старте или остановке демона
error.log — информация о критических ошибках
debug.log — детальная информация и статус соединения
Ну вот VPN сеть настроена, мной лично опробовано, работает стабильно.
Источник
Kerio VPN Client for Debian/Ubuntu Linux. Установка и настройка в Linux
Автор: SPwKA. Опубликовано в Linux статьи
 Давно не было такого решения как то, о чем мы сейчас поговорим. Существовало множество продуктов и способов подключения VPN клиентов к серверам. Однако решения от компании Kerio пришло только недавно. В этой статье мы рассмотрим как установить и настроить данный клиент и подключаться к вашему VPN серверу через клиент Kerio VPN.
Настройка
===========
Поддерживаемые дистрибутивы Linux и аппаратное обеспечение вы можете просмотреть на странице: http://www.kerio.com/control/technical-specifications
Перед началом установки, вам необходимо установить следующие пакеты : ‘debconf’ и ‘openssl’
# apt-get install debconf openssl
Установка. Обновление
======================
Для установкиKerio VPN Client on 32-bit Debian / Ubuntu, необходимо воспользоваться следующими командами в терминале ( делается все под ROOT):
# dpkg -i kerio-control-vpnclient-###-linux.deb
(Замените ### на цифры с актуальной версией клиента.)
Для установки Kerio VPN Client на 64-bit системы Linux, используются следующие команды:
# dpkg —add-architecture i386
# apt-get update
# dpkg -i kerio-control-vpnclient-###-linux.deb
# apt-get -f install
Для установки Kerio VPN Client в 64-bit Ubuntu 12.04, используются следующие команды:
# apt-get install ia32-libs
# dpkg -i kerio-control-vpnclient-###-linux.deb
Kerio VPN Client поддерживает только одно VPN соединение одновременно.
После установки пакетов и зависимостей автоматически начнется настройка соединения. В процессе настройки через мастер вам потребуется ввести название сервера ( или IP адрес сервера), имя и пароль пользователя. Так же прийдется принять и просмотреть сертификат сервера VPN.
Если вы хотите изменить конфигурационные данные позже после установки или же сменить сервер, то воспользуйтесь следующей командой:
# dpkg-reconfigure kerio-control-vpnclient
Так же можно произвести настройку путем редактирования конфигурационного файла:
/etc/kerio-kvc.conf
После внесения изменений в конфигурационный файл необходимо перезагрузить настройки командой :
# /etc/init.d/kerio-kvc reload
Kerio VPN Client автоматически запустится после завершения установки и конфигурирования
Вы можете управлять запуском службы вручную следующими командами:
Деинсталяция
==============
Для удаления Kerio VPN Client, удаления установленного пакета используется команда:
# apt-get remove kerio-control-vpnclient
Для удаления Kerio VPN Client полностью ( с конфигурационными файлами ) необходимо ввести команду :
# apt-get remove —purge kerio-control-vpnclient
Скачать клиент можно по ссылке :
Источник
Задали вопрос: как подключиться к Kerio VPN из Linux? Не проблема: сейчас расскажу и покажу как это сделать.
В качестве Linux я установил Ubuntu 12.04 i386. Теперь нужно любым удобным способом скачать отсюда свежую версию клиента и скопировать ее в папку Home:
 Установим Kerio VPN:
sudo dpkg — i kerio-control-vpnclient-8.2.2-1619-linux.deb
После установки запустится мастер, шаги которого просты и не требуют комментариев:


После настройки убедимся в том, что подключение успешно установлено:

Теперь немного полезной информации:
1. Чтобы запустить мастер повторно:
sudo dpkg-reconfigure kerio-control-vpnclient
2. Есть возможность редактировать конфигурацию непосредственно через файл конфигурации:
sudo /etc/init.d/kerio-kvc reload
sudo apt-get remove —purge kerio-control-vpnclient
- Место хранения логов (наиболее полезен error.log):
Относительно других версий Linux, официально поддерживаются такие (http://www.kerio.com/control/technical-specifications):

Зная Kerio, неудивительно, что заявленное не соответствует действительному, на 13.10 оно не работает из коробки. Предполагаемое решение , конечно, проблему не решает.
Относительно других дистрибутивов Linux — их немногим меньше, чем самих пользователей Linux, поэтому описать все варианты возможным не представляется 🙁
В качестве альтернативы можно использовать IPSec, который является достаточно универсальным и поддерживается в Kerio Control начиная с 8й версии.
На этом все — если Вы установите Kerio VPN Client, например, на CentOS, пишите в комментариях, этим Вы поможете другим читателям.
Источник
Installing and configuring Kerio Control VPN Client for users
Kerio Control VPN Virtual private network — A network that enables users connect securely to a private network over the Internet. Client enables an encrypted connection from individual systems (clients) to a remote private network via the Internet. The connection enables these clients to access the private network as if they were physically connected.
Three versions of Kerio Control VPN Client are available:
If you have administration rights to your computer, you can establish a persistent connection. Persistent connections are reestablished whenever you restart your machine.
Kerio Control 9.2.8 does not work with previous versions of Kerio Control VPN Client.
System requirements
Prerequisites
To connect to the Kerio Control network, you need to know:
- Your Kerio Control username and password
- The name of the Kerio Control server or its IP address An identifier assigned to devices connected to a TCP/IP network.
Kerio Control VPN Client for Windows
- Download and install Kerio Control VPN Client. Kerio Control VPN Client starts automatically after installation and you can see the Kerio Control VPN Client window.
- In the Connection field, type a name for the new connection.
- In the Server field, type the Kerio Control server name or IP address. If your administrator gives you more than one server name or IP address, separate them with semicolons.

- In the Username and Password fields, type your Kerio Control username and password.
- (Optional) Select Save password to save your password in Kerio Control VPN Client.
- (Optional) You can select Persistent connection if you have administration rights to your computer. Persistent connections are reestablished whenever you restart your machine.
- Click Connect.
Kerio Control requires a valid SSL certificate SSL certificates are used to authenticate an identity on a server. to verify your connection when establishing the connection. If an SSL Secure Sockets Layer — A protocol that ensures integral and secure communication between networks. certificate warning appears, consult the warning with your administrator.
If Kerio Control VPN Client is running, Windows taskbar displays the icon.
Removing connections
To remove old or broken connections:
- Open Kerio Control VPN Client.
- In the Connection menu, select the connection.
- Click the icon. Kerio Control VPN Client asks you if you want to remove the selected connection.
- Click Yes.
Kerio Control VPN Client removes the connection.
Changing a language
To change the language of the Kerio Control VPN Client interface:
- Right-click the icon in the notification area of the Windows taskbar.

- In the context menu, click Settings.
- In the Kerio Control VPN Client Settings dialog box, select your preferred language.
- Click OK.
Kerio Control VPN Client switches to the new language immediately.
Enabling/disabling balloon messages
A balloon message in Kerio Control VPN Client is a pop-up message that appears in the Windows taskbar at the Kerio Control VPN Client icon. To enable or disable balloon messages:
- Right-click the icon in the notification area of the Windows taskbar.
- In the context menu, click Settings.
- In the Kerio Control VPN Client Settings dialog box, select Enable balloon messages.
- Click OK.
Kerio Control VPN Client for OS X
- Download and install Kerio Control VPN Client. Kerio Control VPN Client starts automatically when you install it and you can see the Kerio Control VPN Client window.
- In the Connection field, type a name for the new connection.
- In the Server field, type the Kerio Control server name or IP address. If your administrator gives you more than one server name or IP address, separate them with semicolons. Kerio Control VPN Client tries to connect to the first server. If the connection cannot be established, Kerio Control VPN Client can then try the next server.
- In the Username and Password fields, type your Kerio Control username and password.

- (Optional) Select Save password to save your password in Kerio Control VPN Client.
- (Optional) You can select Persistent connection if you have administration rights to your computer (click the lock on the Kerio Control VPN Client window). Persistent connections are reestablished whenever you restart your computer.
- (Optional) Select Show VPN status in menu bar to display a status icon on the right side of the main menu bar when Kerio Control VPN Client is running.
Removing connections
To remove old or broken connections:
- Open Kerio Control VPN Client.
- In the Connection menu, select the connection.
- Click the Remove button. Kerio Control VPN Client asks you if you want to remove the selected connection.
- Click Yes.
Kerio Control VPN Client removes your connection.
Troubleshooting SSL certificates
Kerio Control requires a valid SSL certificate to verify Kerio Control VPN Client when establishing the connection to Kerio Control . If an SSL certificate warning appears, the certificate is probably self-signed and you must insert the Kerio Control certificate in the system keychain manually.
A self-signed certificate is a certificate that your administrator generated for you in Kerio Control . The certificate is not signed by any certification authority.
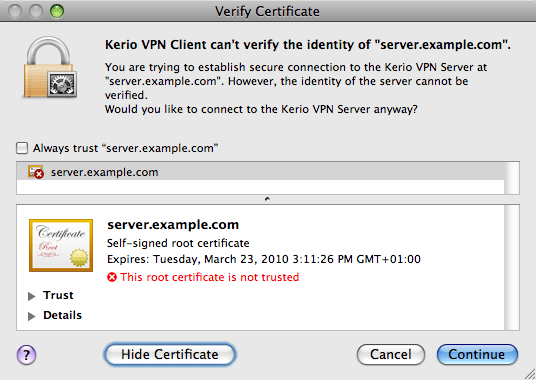
- In the Verify Certificate window warning, click the certificate image and drag it to the desktop. This creates a file with the certificate on the desktop (for example server.example.com.cer ).
The Keychain Access application must not be running at this point. If it is running, close it.
- Run the Keychain Access application. The Add Certificates dialog box displays.
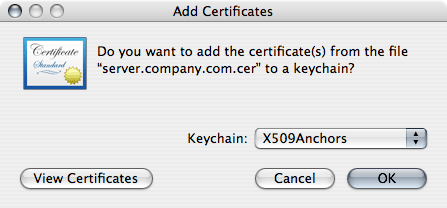
- Select the X509Anchors keychain. To add a certificate, you need to be logged in as an administrator.
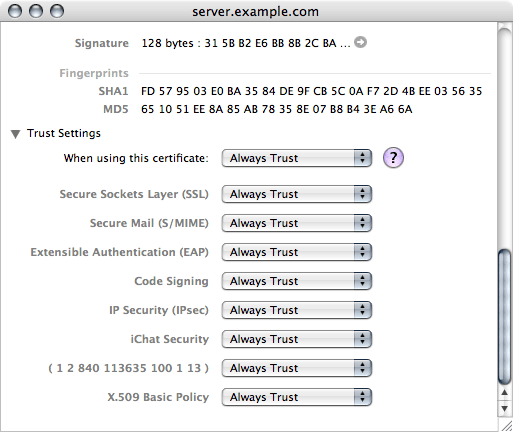
- In the Keychain Access application, select the X509Anchors keychain, look up the new certificate (for example, server.example.com ) and click to open it.
- In the certificate window, scroll to the bottom.
- Open the Trust Settings section.
- Set the Always Trust option for the When using this certificate entry.
- Close all running applications and log out of the system.
- Reboot the system and establish a VPN connection to Kerio Control .
From now on, Verify Certificate warning should not display.
Kerio Control VPN Client for Linux
Detailed information about Kerio Control VPN Client for Linux is included in the read-me file.
Troubleshooting
Kerio Control VPN Client generates logs of its own activity and detected errors. For more information refer to Kerio Control VPN Client for administrators.
Источник


