- Ubuntu / Debian Linux Install Keychain SSH Key Manager For OpenSSH
- Installing keychain for Debian and friends
- How do I set up public key authentication?
- Configure keychain
- Key manager для linux
- Key Manager
- Screenshots
- Demo Videos
- Getting Started
- Installing the program
- Working with the program
- Action control and hotkeys
Ubuntu / Debian Linux Install Keychain SSH Key Manager For OpenSSH
I do not want to start ssh-agent and ssh-add as described here to manage my ssh keys for password less login. How do I install keychain software to manage my keys running on a Debian or Ubuntu based cloud server?
OpenSSH offers RSA and DSA authentication to remote systems without supplying a password. keychain is a manager for ssh-agent.
| Tutorial details | |
|---|---|
| Difficulty level | Easy |
| Root privileges | Yes |
| Requirements | Debian/Ubuntu |
| Est. reading time | 5m |
The ssh-agent started by keychain is long-running and will continue to run, even after you have logged out from the system. However, you can control this behavior. This is useful for your shells and cron jobs for backups to easily share a single ssh-agent process. From the man page:
When keychain is run, it checks for a running ssh-agent, otherwise it starts one. It saves the ssh-agent environment variables to
/.keychain/$
Installing keychain for Debian and friends
You can install keychain the key manager for OpenSSH using the apt-get from the command line over an ssh session for cloud based instance or any other regular vps or dedicated server. Type the following apt-get command or apt command as root user:
$ sudo apt-get install keychain
OR
# apt-get install keychain
Here is sample installation session from my Ubuntu box:
- No ads and tracking
- In-depth guides for developers and sysadmins at Opensourceflare✨
- Join my Patreon to support independent content creators and start reading latest guides:
- How to set up Redis sentinel cluster on Ubuntu or Debian Linux
- How To Set Up SSH Keys With YubiKey as two-factor authentication (U2F/FIDO2)
- How to set up Mariadb Galera cluster on Ubuntu or Debian Linux
- A podman tutorial for beginners – part I (run Linux containers without Docker and in daemonless mode)
- How to protect Linux against rogue USB devices using USBGuard
Join Patreon ➔
First, CentOS 8 user turn on EPEL repo (see RHEL 8 turn on and enable EPEL repo) and then install it using the dnf command:
$ sudo dnf install keychain
How do I set up public key authentication?
First, create a directory called $HOME/.ssh/ using the mkdir command:
$ mkdir $HOME/.ssh/
$ chmod 0700 $HOME/.ssh/
Type any one of the following command to to generate your public and private keys in $HOME/.ssh/ directory using RSA (or any other type of key) encryption:
$ ssh-keygen
OR
$ ssh-keygen -t rsa -b 2048
OR
$ ssh-keygen -t rsa
Assign the pass phrase when prompted. You should see two new files in $HOME/.ssh/ directory:
- $HOME/.ssh/id_rsa – contains your private key.
- $HOME/.ssh/id_rsa.pub – contain your public key.
Sample sessions from above commands:
Animated gif -01: SSH Set Up Public Key Authentication Demo
/.ssh/authorized_keys
It is better to use the ssh-copy-id command to copy or append locally available keys to authorise logins on a remote box:
$ ssh-copy-id -i $HOME/.ssh/id_rsa.pub nixcraft@server1.cyberciti.biz
Configure keychain
You need to edit a file called $HOME/.bashrc or
/.bash_profile using a text editor such as vi, run:
$ vi $HOME/.bashrc
OR
$ vi $HOME/.bash_profile
Add/append the following lines:
Источник
Key manager для linux
Permission key manager for Linux
This project is in a premature state.
It is a good proof of concept with solid base for futur integration.
What does it contain?
This project provides:
- A manager of permissions that is accessed via the filesystem
- A tool for setting, dropping, querying keys and also for serving authorizations
- a C/DBUS/GLIB library for interacting with the manager through the filesystem
This produces the following binaries:
- keyzen-fs , the permission manager via the filesystem;
- keyzen , a tool for making tests.
and the following libraries:
- libkeyzen.a the C API for accessing permissions;
- libkeyzen-dbus.a the C API for accessing permissions of a DBUS connection.
Launching the filesystem and testing it
To launch it for example to the directory /tmp/keyzen, type
To test using keyzen , after having launched keyzen-fs as above in a terminal, in an other terminal, type:
This will show you the list of the running process pids and two special entries: dial and self . That is like type ls /proc . Even the special entry self has the same meaning that for /proc/self : it is a link to the entry of the current pid.
Each «pid» sub-directory of /tmp/keyzen list the possible keys of the process. For example, type:
It will show you nothing. It is normal because your shell has no authorized keys.
Let create the authorised key hello :
The directory /tmp/keyzen/$$ now contains one entry, the entry (a pseudo file) of name hello , indicating that word is a possible key for the process of pid $$ (your shell).
We are adding the key hello now.
The tool keyzen is also able to ask and drop the keys.
The possible keys are not the same than the authorized keys because of the model of validation of keys.
The model of validation is stating that permissions are granted to applications (then to the running processes) following the 5 modes below:
- blanket prompt: the user has to validate at least one time
- session prompt: the user has to validate at least one time per session
- one-shot prompt: The user has to validate each time
- permit: the permission is granted (forever?)
- deny: the permission is denied (forever?)
Keyzen is understanding all this modes. To set the mode for a key permission, we are using the following prefix code:
- blanket prompt: !
- session prompt: +
- one-shot prompt: *
- permit: =
- deny: —
Then to set the key ‘word’ with the mode * (one-shot prompt), be sure that there is no key word by dropping it using ./keyzen drop /tmp/keyzen/$$/word if needed and then type:
The key world appears in the set of possible keys without the given prefix that is removed.
Let ask now if the possible key word is granted?
Keyzen is able to handle it but it needs an authorisation server to be running and collaborating to achieve that function. That is the role of the special file /tmp/keyzen/dial . To try it, you need to launch a third terminal where you type:
Then come back to the terminal where issuing commands and re-type
The command doesn’t ends but in the terminal of the keyzen authorization server, a prompt appeared. Grant access by typing y:
Then the command asking for the key word returns and prompt:
Because it is a one-shot prompt mode, the server will be asked each time. For other modes, the server is replies to the filesystem key manager keyzen-fs to definitely allow or deny the key. Other policies are possibles.
The above examples are only possible because, currently, by default, the security is disabled to make it easier to test.
In the Makefile, line 16:
Remove that line or replace 1 by 0 will add the security to keyzen.
In that case, the security apply the following rules.
Dropping permission keys is easy:
- Any process can drop any of its permission key at any time;
- No process can drop a permission key of an other process.
Adding permission keys is subject to security restrictions:
- To add itself a permission key, a process must have the permission key keyzen.admin ;
- No process can add a permission key to an other process.
At startup, the processes are gaining the permission keys set in the extended security attribute of name security.keyzen .
For exemple, issuing setfattr -n security.keyzen -v application.kill appkiller will make the command appkiller start with the only permission key ‘application.kill’. And issuing setfattr -n security.keyzen -v «application.kill application.read» appkiller will set 2 permission keys.
The libraries are only delivered as static. It detects automatically the keyzen filesystem. It offers various verbs to query, add, drop and list keys.
It is, currently, not multi-thread ready.
The heder file is keyzen.h .
Any program can interact with the filesystem easily: there is no need to open a socket (and its buffer) and to manage the dialog state.
The current implementation rely only on existence of files. It is working with the functions access , mknod , unlink that are stateless and fast because there is only a kernel switch (if the implementation were made in the kernel what is the final goal).
The model of validation of the keys is currently implemented. This model states that permissions are granted to applications (then to the running processes) following the 5 modes below:
- blanket prompt: the user has to validate at least one time
- session prompt: the user has to validate at least one time per session
- one-shot prompt: The user has to validate each time
- permit: the permission is granted (forever?)
- deny: the permission is denied (forever?)
Using the companion projet smaunch (https://github.com/jobol/smaunch) it provides a strong security system for native applications.
The FUSE system is good for rapid development but is slow. That will be corrected by using a kernel module integration and even better an integration to SMACK as an added facility.
The keys are not following forks/execs. That will be changed when integrated into the kernel and even better an integration to SMACK as an added facility.
The current implementation of the model of validation is blocking the access system call when necessary until the permission is permitted or forbidden. This behaviour may be problematic for client that would prefer to have a non-blocking interface. This can be acheived in a futur by allowing to query permission by reading 0/1/Y/N from the virtual permission file. Having a not blocking opened file descriptor would allow to poll it until the answer.
The interrupts are not handled currently. Then typing ctrl+C in the server doesn’t seems to have any effect.
Links to Cynara
The current implementation of keyzen is only taking care of PIDs. Cynara is taking care of applications (application id).
A link can be made between the two models. For memory, I list below two possible ways:
- The filesystem principle of keyzen can be modified to replace the pids with a couple uid/appid.
- Keyzen could include a mechanism fo identifying the application-id and the user.
Источник
Key Manager

Key Manager is a more functional version of the program Key Remapper that, in addition to remapping keys and mouse buttons, has many other useful functions. For example, Key Manager allows you to remap combinations of keys and mouse buttons, key and mouse button sequences, and long presses (press and hold). Remap keys depending on your keyboard layout. You can display your actions in the form of pop-up menus that can be opened with hotkeys, record, edit, and execute macros (key sequences), emulate mouse clicks, type and paste text (including formatted text), instantly fill in forms on websites, launch programs, open websites (you can insert currently selected text into their address parameters), change the layout and case of selected text, manage the power settings of your monitor and computer, control the volume or set it at a certain level, move and resize windows, and much more.
Key Manager gives your keyboard and mouse a new life and allows you to save lots of time and efforts in your daily work. Thanks to its flexible interface, you can create various actions and execute them by pressing keys, mouse buttons and combinations of both, as well as represent them in the form of a popup actions menu. Apart from this, the application features powerful key and mouse button redefinition and blocking tools. Key redefinition and the execution of assigned actions can be restricted to specific applications and/or windows.
Key Manager allows you to assign the following actions to regular, sequential and long (press and hold) key presses, mouse button presses, the mouse wheel rotation, combinations with modifiers, as well as popup menu items:
show popup menus with a list of user-defined actions;
press and block keys, key combinations, press mouse buttons and emulate mouse wheel rotation;
position and shift the mouse cursor relative to the entire screen, active window, and previous position with the option of returning the cursor to the initial position once the action is performed;
paste user-defined RTF or Plain text to any application with an option to insert current time, date and other information from a template;
launch any application or open a file or a folder (to create an event, just drag and drop a shortcut, folder or file onto the action window);
open a specific webpage;
instantly create an email;
perform actions on all windows or active ones only (close, minimize, maximize, restore, hide, show, redraw, move, resize);
manage your computer’s power, monitor’s power, sound settings, adjust volume, start the screensaver and much more.
The software also enables you to turn virtually any key or mouse button into a user-defined modifier and use it (similar to Alt and Ctrl) in combination with other keys, mouse buttons and modifiers.
| Interface Languages: |
| |||||
| System Requirements: | Windows 11/10/8.1/8/7/Vista/XP/2008/2003/2000 | |||||
 English,
  Deutsch,
  Español,
  Français,
  Italiano,
 Português,
  Русский, Română, 日本語
Screenshots
Demo Videos
Replacement of key combinations with other key combinations
An example of a key combination replacement: Ctrl + Insert (Copy), Shift + Insert (Paste), Shift + Delete (Cut) and Alt + Backspace (Undo) combinations in the old Borland Turbo C++ (DOS) application are replaced by the standard Ctrl + C, Ctrl + V, Ctrl + X and Ctrl + Z combinations. The new combinations are also shown in a popup menu when Ctrl+»Right mouse button» is pressed and can be added to an exception allowing these replacements to work in a specified application only.
How to position and shift mouse cursor
In Key Manager v1.10 was added the possibility to position and shift the mouse cursor relative to the entire screen, active window, and previous position (in the «Key sequence» action) with the option of returning the cursor to the initial position once the action is performed.
Pasting user-defined formatted text (RTF) into MS Word or other text fields
The example shows the process of pasting formatted RTF text containing the current date into an MS Word document. It also shows how a selected text fragment is replaced with the same text in brackets.
Opening a selected text fragment in the Internet browser
The example shows the result of the «Open web page» action in combination with the %km_seltext (selected text) template.
Emulation of a double click of the left mouse button
The example shows how a double click of the left mouse button is assigned to F1 and F2 with a 600 ms delay.
Recording and pasting a typed text fragment (macro)
This example shows the process of recording a text macro (logging and pasting the typed text) and its assignment to the Win+5 combination.
Pasting text from the clipboard into applications that do not support the clipboard
The «Type Text» action using the %km_cbtext template is assigned to the Ctrl + V combination, which allows you to type the content of the clipboard in applications that do not support it.
Getting Started
Installing the program
To install the program, download the installation distributive file and run it.
Working with the program
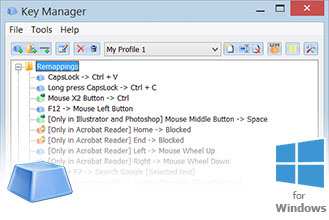
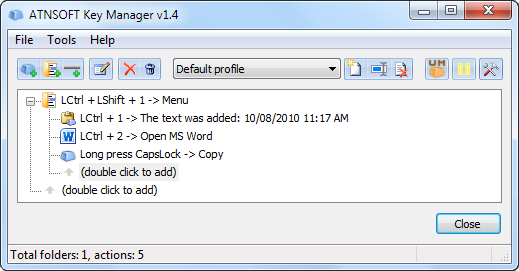
Once the installation is complete, start the program. The following window will appear:
The top part of this window contains the profile management panel, as well as the “Pause” and “Program options” buttons:
Below this panel is a window that allows you to add new actions and folders and manage them.
To add a new action, click the “(double click to add)” line:
You will see a window like the one below:
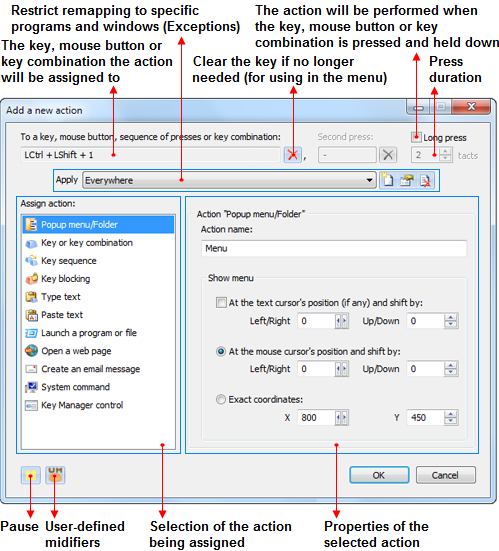
Most actions have a name that is displayed in the “Action name” field. It is automatically generated using the action data.
Once added, the new action appears in the action tree of the main window:
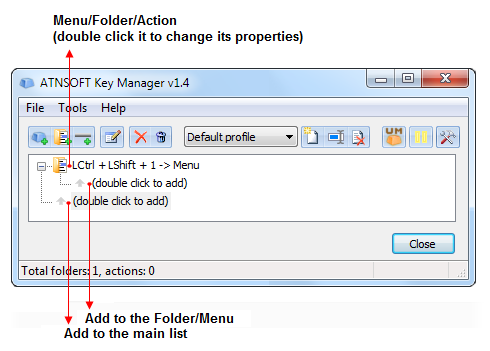
As the folder that we added in our example has an assigned key combination — «LCtrl+LShift+1» – it allows you both to give some structure to the rest of the actions and represent the actions inside it in the form of a popup menu.
To demonstrate this, let’s add three additional actions to the above action folder. The first one will insert some text, the second one will launch a program and the third one will replace the long press of the CapsLock key by the Ctrl+C combination (which corresponds to the “copy to clipboard” Windows command).
To do this, click the “(double click to add)” line inside the action folder:

Select the “Type text” action in the new window. Then type some text in the “Text:” field, for instance: «The text was added:» followed by the current date and time. To use date and time, you need to use a template. Click the  button and select the necessary type of date and time in the menu. You can edit templates using examples as a reference.
The finite form of the message is shown in the “Preview” field:

The name of the action is generated automatically. If you want to give the action a specific name, just type it in the “Action name” field.
To add the action, press «ОК».
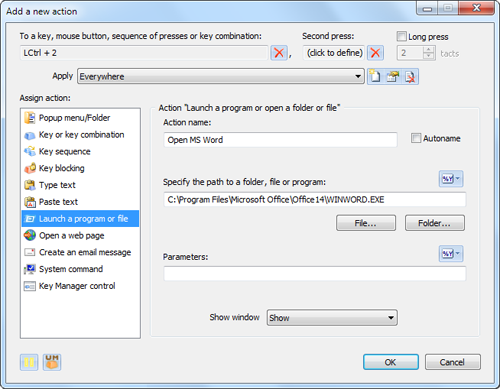
Now add another action to the action folder. Click the “(double click to add)” line inside the folder again and select the «Launch a program or file» action.
In this example, we will be starting MS Word. To specify the path to the MS Word executable, you can click the «File. » button and point to the executable. You can also do it by simply dragging the necessary executable (for instance, from «C:\Program Files\») or program shortcut from the “Start” menu and dropping it onto the action properties window.
Let’s also assign this action to the «LCtrl+2» combination in the “To a key, mouse button, sequence of presses or key combination:” field.
In the end, our window will look like this:
To add this action, press «ОК».
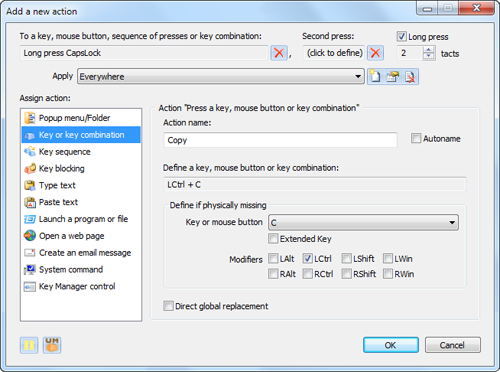
Now it’s time to add the last action to this folder – the press of the Ctrl+С key combination assigned to a long press (press and hold) of the «CapsLock» key.
To do that, click the “(double click to add)” line inside the folder again and select the «Key or key combination» action.
Click the “Define a key, mouse button or key combination:” field and press the Ctrl+C combination.
Enter «Copy» into the «Action name:» field.
Click the “To a key, mouse button, sequence of presses or key combination:” field, press the «CapsLock» key and check the “Long press” box.
The window will look like that:
To add this action, press «ОК».
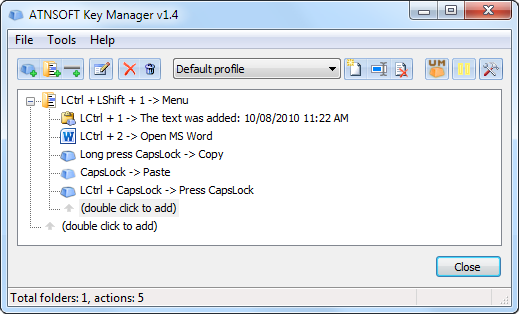
In the end, the main window will look like that:
Let’s try it in action now. Make sure that the program is not paused and press the «LCtrl+2» key combination – MS Word will start.
Press the «LCtrl+LShift+1» combination in MS Word – the following menu will appear:
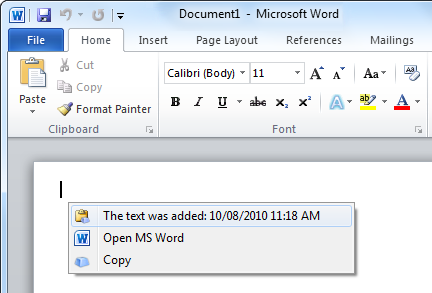
Select the first element of the menu — «The text was added: . » – and see that the following text is added to the Word document:
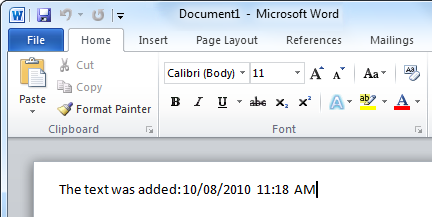
Add something to the pasted text, select all the text in the document, then press and hold the «CapsLock» key – it will emulate the press of the «Ctrl+C» combination, which copies text to the clipboard. Select «Paste» in the main menu of MS Word and the copied text will be pasted!
For training purposes, try assigning the Ctrl+V (Paste) combination to the regular press of the «CapsLock» key. Call the action “Paste” and you will be able to paste from the clipboard by pressing a single key — «CapsLock». You may want to use a long press for copying and a regular press for pasting.
If you want «CapsLock» to perform its regular function, you can assign the press of this key to any other key or key combination, for instance to «Ctrl+CapsLock» or «Ctrl+Shift+Tab»:
Action control and hotkeys
You can easily move and copy (by pressing and holding the Ctrl key) the created folders and actions.
In order to add, edit or remove actions and folders, use the context menu or the following hotkeys:
Источник


