- Windows key
- Where is the Windows key on the keyboard?
- Where is the Menu key (application key) on the keyboard?
- What keys are next to the Windows key?
- Why is my Windows key not working?
- What is the button or key with a Windows logo and a lock?
- Where is the Windows key on a Chromebook or Apple computer?
- Related pages
- How to Enable and Disable the Windows Key
- Method 1: Press Fn + F6 or Fn + Windows Keys
- Method 2: Press Win Lock
- Method 3: Change Registry settings
- Method 4: Clean the keyboard
- For Computer:
- For notebook:
- Method 5: Replace the keyboard
- Windows Keyboard Equivalents for the Mac’s Special Keys
- Yes, you can keep that Windows keyboard you love so much
- Windows and Mac Keyboard Differences
- The Command and Option Key Swap
- How to Reassign Key Locations on a Mac
- Keyboard Shortcuts
- How to Remap Your Keyboard
- Remap Keys With SharpKeys
- Customize Hotkeys With Your Keyboard’s Software
- Create Complex Scripts With AutoHotkey
- The Best Keyboards and How to Clean Them
Windows key
A Windows key may refer to any of the following:

1. Alternatively referred to as the winkey, win, or WK, the Windows key is a key found on IBM compatible keyboards used with the Microsoft Windows operating system. The Windows key has the Microsoft logo on it and is found between the left Ctrl and Alt keys on the keyboard. Pressing the Windows key by itself opens the Start menu that also displays the search box.
Holding down the Windows key and pressing another key, to trigger a keyboard shortcut, can speed up common tasks. For example, the keyboard shortcut Windows key+E (press and hold the Windows key and then, while holding that key, press the E key, and then let go of both buttons) opens Windows Explorer. For a full list of Windows key shortcuts, see the Windows shortcut keys guide.
Users who are familiar with Macs can relate the Windows key to the Apple Command key.
Where is the Windows key on the keyboard?
As seen below, the Windows key is found between the Alt keys and Ctrl keys on both sides of the spacebar. Some PC keyboard manufacturers may substitute the Windows logo for another picture, but the key still functions the same. For example, some Linux users may put a Tux sticker over the Windows key or replace the key with a key that shows Tux.

Where is the Menu key (application key) on the keyboard?
Next to the Windows key on the right side of the keyboard is the Application key or Menu key. It brings up a menu for the current window or highlighted text. Pressing this button is usually the same as pressing the menu that appears when you right-click the mouse.
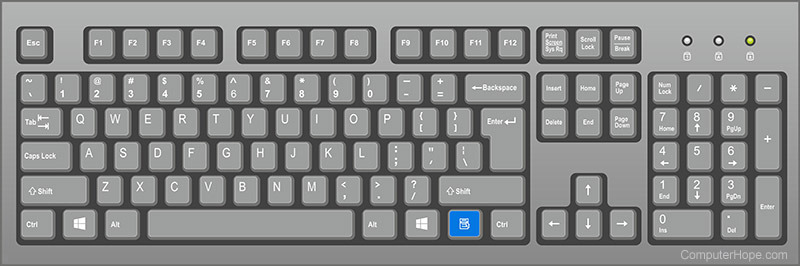
What keys are next to the Windows key?
On the left side of the keyboard, the Windows key is in-between the Ctrl key and the Alt key. On the right side of the keyboard, the Windows key is in-between the Alt key and the Windows Menu key (shown above).
Why is my Windows key not working?
If both Windows keys on the keyboard are not working, try the following steps to troubleshoot the problem. If only one of the Windows keys is not working, the key is either broken or dirty.
- Ensure that pressing the Windows key alone and the Windows key with another letter (e.g., E) both do not work.
- If you have a keyboard with an Fn key, make sure it is turned off.
- If you have a function key or other key with a Windows logo and a lock, see the below Windows lock key section.
- Individually press all other modifier keys in case one of them is stuck either physically or in software. For example, press the Shift , Alt , and Ctrl keys on both sides of the keyboard at least once.
- Reboot the computer.
- How to restart Microsoft Windows.
- Try other suggestions mentioned on our keyboard key troubleshooting page.
- Some of the keys on my computer keyboard aren’t working.
What is the button or key with a Windows logo and a lock?
When playing a game, if you press the Windows key , it exits you from the game, and in some cases, may even crash the game. Some gaming keyboards have a function key with a Windows logo or a separate button next to a Windows logo. This key and button are designed to enable and disable the Windows key. So, when playing a game, you can disable the Windows key to prevent it from doing anything if it’s mistakenly pushed.
If this is a separate button, pressing the button enables and disables the Windows key. There may also be an indicator light to indicate when it’s enabled or disabled. If your keyboard has a function key with a Windows flag icon, use the Fn key and that function key to enable and disable the Windows key. For example, on a Cooler Master gaming keyboard, this feature is on the F12 key, so pressing Fn + F12 enables and disables the Windows key.
Where is the Windows key on a Chromebook or Apple computer?
Chromebooks and Apple computers do not have a Windows key. The Windows key is only found on keyboards designed for Microsoft Products. With Apple keyboards, the Windows key is replaced with the Option key. On Chromebooks, there’s a Search key that’s similar to the Windows key. However, it’s located where the Caps Lock key is on most keyboards.
Related pages
2. A Windows key may also be a short way of saying the Windows product key.
How to Enable and Disable the Windows Key
Windows key is located on every keyboard, and we are using this key for various actions. If you press Windows key, you will open the Start menu. Also, you can use Windows key in combination with another key. For example, if you press Windows key + E you will open Windows Explorer or File Explorer, if you press Windows key + R, you will open a Run dialog box and many others combination keys. If Windows key is not working properly, you will not be able to to this actions. So, why this problem occurs?
There are different reasons why Windows key is not working, including keyboard issue, system settings, game settings or application settings.
We will show you how to solve the issue by using 5 different methods. These methods are compatible with operating systems from Windows XP to Windows 10. I hope you are using minimum Windows 7 because previous operating systems are not anymore supported by Microsoft. If you are one of the users who want to disable Windows key when playing games, you will be able to do it after reading this article.
Method 1: Press Fn + F6 or Fn + Windows Keys
In the first method, we will use combination keys to activate or deactivate Windows key. Please, press Fn + F6 to activate or deactivate Windows key. This procedure is compatible with computers and notebooks, regardless which brand are you using. Also, try pressing “Fn + Windows” key which can sometimes get it working again.
Method 2: Press Win Lock
Are you using gaming keyboard? If not, you should read next method. If you are using gaming keyboard, please check is there Win Lock key located on your keyboard. If yes, you should press this key to enable or disable Windows key. Few users solved their problem by pressing Win Lock key on their gaming keyboard, including keyboard model Logitech G15. If you can not find Win Lock key, please read the technical documentation of your gaming keyboard.

Method 3: Change Registry settings
If combination keys are not working well, you will need to enable Windows key through Registry Editor. Before you do any registry configuration, we are recommending you to backup registry database. Why do you need to do registry backup? In the case of some misconfiguration, you can revert registry database to the previous state when everything worked without any problems. For this method, you will need to use a user account with Administrator privilege, because Standard user account is not allowed to do any system changes. How to do registry backup? Please read instructions on this LINK, and follow the procedure of on the method 4, from step 1 to step 7. After that, you will need to download and run registry file from this LINK. Also, if you want to disable Windows key, you will need to download and run registry key from this LINK.
Method 4: Clean the keyboard
If your keyboard is dirty and if there is dust between your keys, you should clean your keyboard. Sometimes, dust can block some of your keys, including Windows key. Based on that, we are recommending you to clean your keyboard. Please follow the procedure below.
For Computer:
- Unplug keyboard from computer
- Clean the keyboard
- Plug keyboard back
- Test Windows key
For notebook:
- Turn off your notebook
- Unplug AC DC adapter from notebook
- Unplug battery from notebook
- Clean the keyboard
- Plug battery back
- Plug the AC DC back
- Turn on your notebook
- Test Windows key
Method 5: Replace the keyboard
If cleaning your keyboard did not solve your problem, we are recommending you to replace your keyboard with the new one. Before purchasing new keyboard you should test your computer keyboard on another machine or plug another keyboard to your current computer or notebook. If you are using a notebook, please plug USB keyboard on your notebook and check is working properly. If another keyboard is working properly on your machine, you will need to purchase a new keyboard. Before purchasing a new keyboard, please check is your brand name computer, keyboard or notebook under warranty. If yes, the vendor will replace your keyboard for free.
Windows Keyboard Equivalents for the Mac’s Special Keys
Yes, you can keep that Windows keyboard you love so much
:max_bytes(150000):strip_icc()/ryanperiansquare-de5f69cde760457facb17deac949263e-180a645bf10845498a859fbbcda36d46.jpg)
Newcomers and old pros alike use Windows keyboards with Macs. Why toss a perfectly good keyboard just because you switched platforms? Some people just prefer how the keys feel to the ones Apple supplies. Any wired USB keyboard or Bluetooth-based wireless keyboard will work fine with a Mac.
In fact, Apple even sells the Mac Mini without a keyboard or mouse. There’s just one little problem with using a non-Apple keyboard: figuring out some of the keyboard equivalents.
Windows and Mac Keyboard Differences
At least five keys have different names or symbols on a Windows keyboard than they do on a Mac keyboard, which can make it difficult to follow Mac-related instructions. For example, a software manual may tell you to hold down the command key ( ⌘ ), which appears to be missing from your Windows keyboard. It’s there; it just looks a little different.
Here are the five most commonly used special keys on a Mac and their Windows keyboard equivalents.
Mac Key
Windows Key
Use these to control various Mac functions, including using Mac OS X startup shortcuts.
Another helpful bit of information for new Mac users is to know which menu key symbols correspond to which keys on the keyboard. The symbols used in the Mac menus can be a bit strange to those new to the Mac, as well as old hands who may be more mousers than keyboard users.
The Command and Option Key Swap
Besides Windows and Mac keyboards having slightly different names, they also swap the positions of two often-used modifier keys: the Command and Option keys.
If you’re a long-time Mac user transitioning to a Windows keyboard, the Windows key, which is equivalent to the Mac’s Command key, may occupy the physical position of the Option key on a Mac keyboard. Likewise, the Windows keyboard’s Alt key is where you expect to find the Mac’s Command key. If you’re used to using the modifier keys from your old Mac keyboard, you’re likely to run into trouble for a while as you relearn the key locations.
How to Reassign Key Locations on a Mac
Instead of having to relearn key locations, use the Keyboard pane in System Preferences to reassign the modifier keys.
Launch System Preferences by clicking its icon in the Dock, or clicking the Apple menu on the left side of the menu bar then selecting System Preferences.
:max_bytes(150000):strip_icc()/001_what-are-windows-keyboard-equivalents-to-mac-2260203-5c785200c9e77c00011c8336.jpg)
In the System Preferences window that opens, select the Keyboard preference pane.
:max_bytes(150000):strip_icc()/002_what-are-windows-keyboard-equivalents-to-mac-2260203-5c78521bc9e77c0001d19cd1.jpg)
Click the Modifier Keys button.
:max_bytes(150000):strip_icc()/003_what-are-windows-keyboard-equivalents-to-mac-2260203-5c78523546e0fb0001edc7d1.jpg)
Use the pop-up menu next to the Option and Command keys to select the action you wish the modifier keys to perform. In this example, you want the Option key (the Alt key on a Windows keyboard) to execute the Command action, and the Command key (the Windows key on a Windows keyboard) to perform the Option action.
Don’t worry if this sounds a bit confusing, it will make more sense when you see the drop-down pane in front of you. Also, if things get a bit mixed up, click the Restore Defaults button to put everything back the way it was.
:max_bytes(150000):strip_icc()/004_what-are-windows-keyboard-equivalents-to-mac-2260203-5c7852cf46e0fb0001edc7d3.jpg)
Make your changes and click the OK button, then close System Preferences.
With the modifier keys remapped, you shouldn’t have any problems using any Windows keyboard with your Mac.
Keyboard Shortcuts
People new to the Mac but proficient using keyboard shortcuts to speed up their workflow may be a little taken aback by the notation used in the Mac’s menu system to indicate when a keyboard shortcut is available.
If a keyboard shortcut is available for a menu item, the shortcut will be displayed next to the menu item using the following notation:
How to Remap Your Keyboard
If you’re looking to change key functions on your computer’s keyboard in Windows, we have three different methods that can help you.


The standard Windows keyboard layout hasn’t changed much in the past few decades, and there’s a chance you don’t use every key on your keyboard. If you think the Caps Lock key would work better as something else, or wish you could open up Windows’ Task Manager with one keystroke, there are a few ways to remap those unused keys.
Remap Keys With SharpKeys
If you merely want to remap one key to another, SharpKeys is a simple, open-source program that uses the Windows registry. As an example, I use SharpKeys to make my Alt key act as the Ctrl key, and my Caps Lock act as the Windows key.
Since SharpKeys writes this information directly to the Windows registry, it’s the best option for these kinds of one-to-one key remappings. You don’t have to rely on some other software as a middleman, and you’ll run into the fewest compatibility issues, since Windows itself is interpreting the keystrokes.
Download the program (I recommend the portable zip version, which doesn’t require installation) and start it up. To remap a key, click the Add button and choose your keys from the two columns. The left column denotes the key you’ll press (for example, the Caps Lock key) and the right column denotes the action that key will take (for example, acting as the Windows key). You can also press the Type Key button and press a key on your keyboard if you have trouble hunting it down in the list.
When you’re done, click OK. Repeat this process for any other remappings, then click the Write to Registry button. Close the program, restart your computer, and you should find your keys have taken on their new roles. You can even delete SharpKeys when you’re done; the program is merely a user-friendly interface for the Windows registry, so once the changes are made, you don’t need it anymore.
Customize Hotkeys With Your Keyboard’s Software
If your keyboard comes with advanced software, like Logitech’s Gaming Software, Corsair’s iCUE, or Razer’s Synapse, you may have some key-remapping features already present on your system.
Not only can you remap keys, but many of these programs let you create multi-key shortcuts, insert blocks of text, or create different profiles for each of your games. Some will even let you «record» macros, allowing you to create complex shortcuts just by recording your actions and assigning them to a hotkey.
Each of these programs are a bit different, so we can’t go into all of them here, but the gist should be the same across manufacturers: download the software, select your keyboard, and look for the option to create new hotkeys, macros, or actions. When in doubt, check the support page for your specific keyboard, and you’ll find tutorials on how to get it done.
Your mileage may vary with these, as I’ve found certain programs to be jankier than others in the past. But if you already have it on your system, it may be able to do exactly what you want without installing any other software, so give it a shot.
Create Complex Scripts With AutoHotkey
If neither of the above options suit your needs, you can create extremely powerful hotkeys with AutoHotkey, a free program that comes with its own little scripting language for you to describe the actions you want your hotkeys to take. It’s a bit more difficult to use than the software you get with gaming keyboards, but if your keyboard doesn’t come with its own remapping program, it’s your next best bet.
After installing AutoHotkey, you can create your hotkeys by right-clicking anywhere in Windows Explorer and choosing New > AutoHotkey Script. Right-click on the resulting file and open it in Notepad.
You can create basic hotkeys by adding a line like this:
This remaps Caps Lock to the right Windows key. You can add a comment above it using a semicolon (;) to remind you of what that hotkey does or why.
Again, SharpKeys is a better choice for a simple remapping like this, but let’s say you wanted to do something slightly more complicated, like remap Caps Lock to Ctrl+Shift+Esc, so you can see the Windows Task Manager with one keypress. You would create a line in your script like this:
Where ^ corresponds to Ctrl and + to Shift, as described here.
This is where AutoHotkey becomes more powerful. You can create hotkeys to type certain lines of text, run a program or batch file, or create shortcuts for specific programs. You can even have one hotkey perform multiple actions in a series, giving you robust control over your shortcuts.
Once you’ve finished adding your hotkeys to the script, save the file and double-click on it. This will launch AutoHotkey in the system tray, and it will run in the background interpreting your hotkeys for you. You can quit the program at any time to set your keys back to their default actions. (I recommend adding your .ahk script to Windows’ startup folder, located at %APPDATA%\Microsoft\Windows\Start Menu\Programs\Startup, so it will automatically run every time you turn on your computer.)
There’s more to AutoHotkey than we could ever fit into one small article, so check out the AutoHotkey documentation and forums for more advanced instructions and ideas. If you can imagine it, there’s almost certainly a way to make AutoHotkey do it.
The Best Keyboards and How to Clean Them
If you’re looking for a new keyboard, check out PCMag’s favorites, as well as the best Mechanical, RGB, and Gaming Keyboards. While you’re messing around with your keyboard, it may be a good idea to clean it; the video above outlines how to do that.


