- Kali Linux — беспроводные атаки
- Папоротник Wifi Cracker
- кисмет
- GISKismet
- Призрачный Фишер
- Wifite
- King Phisher – Phishing Campaign Toolkit
- Introduction
- King Phisher: Phishing Campaign Toolkit
- Features:
- Plugins & Templates:
- Supported OSs:
- Install
- Linux (Client/Server)
- Windows (Client only):
- Basic Usage
- King-phisher setup
- Server Install
- Client Install
- Client Configuration
- Additional Configurations
- Basic authentication for creds capture
Kali Linux — беспроводные атаки
В этой главе мы узнаем, как использовать инструменты взлома Wi-Fi, встроенные в Kali Linux. Тем не менее, важно, чтобы у беспроводной карты была поддержка режима мониторинга.
Папоротник Wifi Cracker
Взломщик Fern Wifi — это один из инструментов, который Кали может взломать.
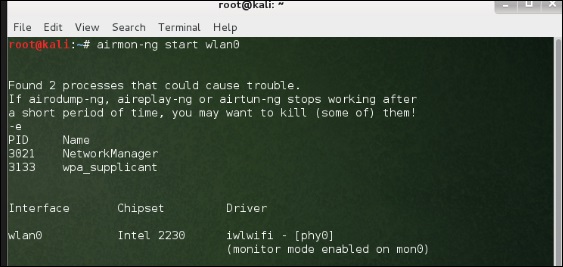
Перед тем, как открыть Fern, мы должны включить беспроводную карту в режим мониторинга. Для этого наберите «airmon-ng start wlan-0» в терминале.
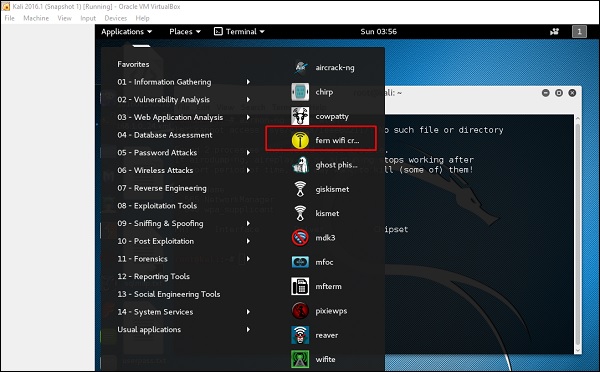
Теперь откройте Fern Wireless Cracker.
Шаг 1 — Приложения → Нажмите «Беспроводные атаки» → «Fern Wireless Cracker».
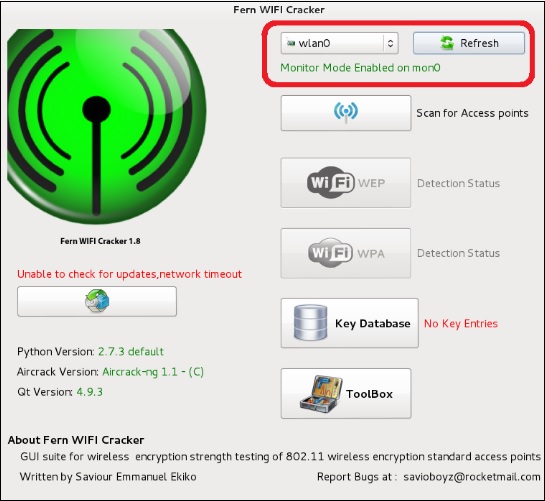
Шаг 2 — Выберите беспроводную карту, как показано на следующем снимке экрана.
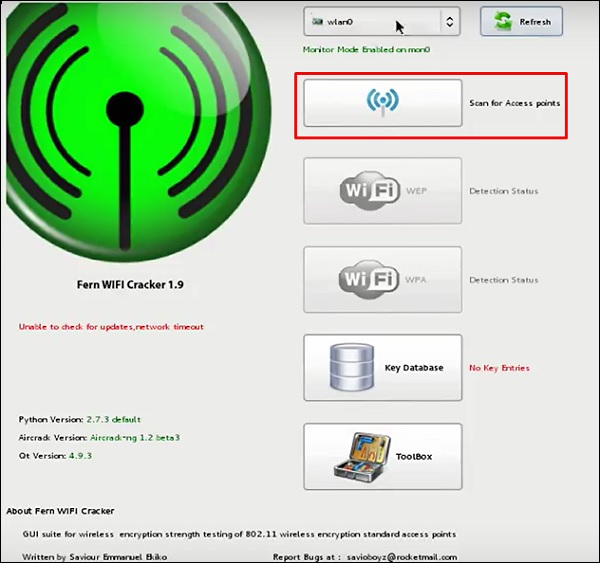
Шаг 3 — Нажмите «Сканировать точки доступа».
Шаг 4 — После завершения сканирования, он покажет все найденные беспроводные сети. В этом случае были обнаружены только «сети WPA».
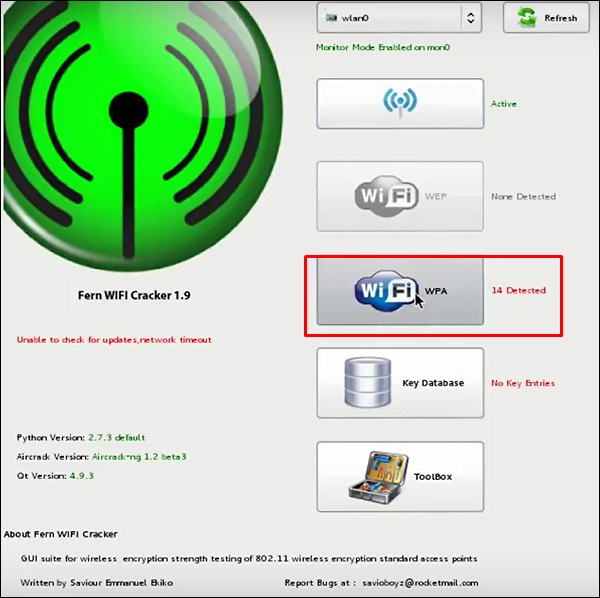
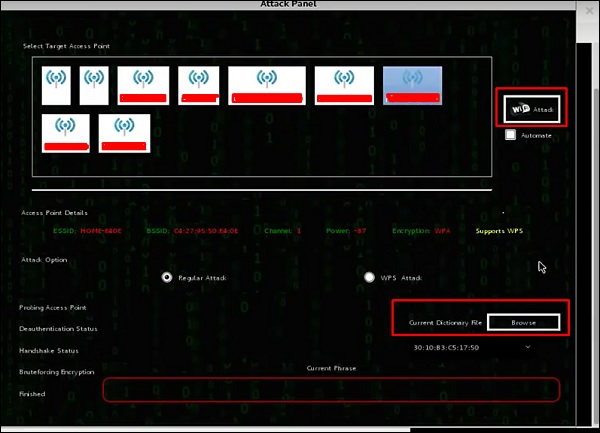
Шаг 5 — Нажмите на сети WPA, как показано на скриншоте выше. Он показывает все найденные беспроводные сети. Как правило, в сетях WPA он выполняет атаки по словарю как таковые.
Шаг 6 — Нажмите «Обзор» и найдите список слов для использования при атаке.
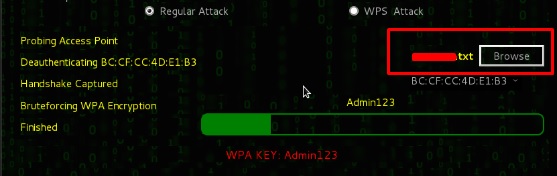
Шаг 7 — Нажмите «Wifi Attack».
Шаг 8 — После завершения атаки по словарю, он нашел пароль и покажет, как показано на следующем снимке экрана.

кисмет
Kismet — это инструмент анализа сети WIFI. Это детектор беспроводной сети уровня 802.11, анализатор и система обнаружения вторжений. Он будет работать с любой беспроводной картой, поддерживающей режим необработанного мониторинга (rfmon), и может прослушивать трафик 802.11a / b / g / n. Он идентифицирует сети, собирая пакеты, а также скрытые сети.
Чтобы использовать его, включите беспроводную карту в режим мониторинга и для этого введите «airmon-ng start wlan-0» в терминале.

Давайте узнаем, как использовать этот инструмент.
Шаг 1 — Чтобы запустить его, откройте терминал и введите «kismet».
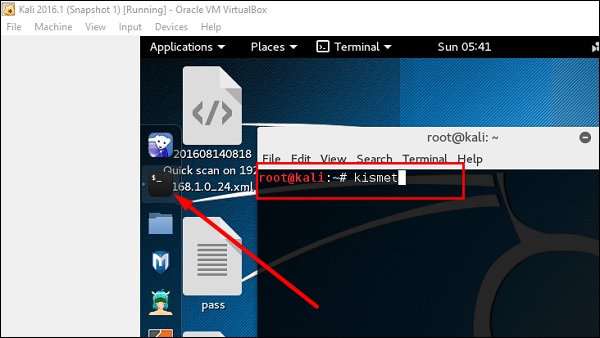
Шаг 2 — Нажмите «ОК».
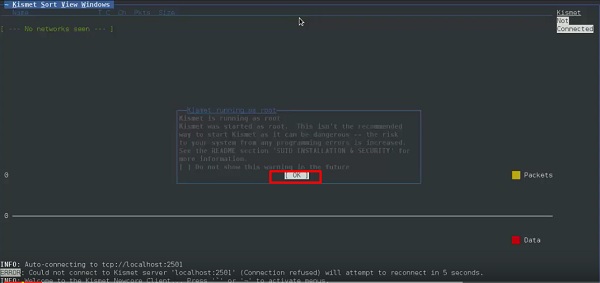
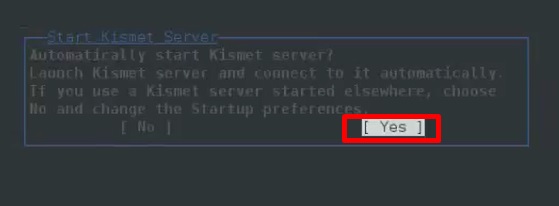
Шаг 3 — Нажмите «Да», когда появится запрос на запуск Kismet Server. В противном случае он перестанет функционировать.
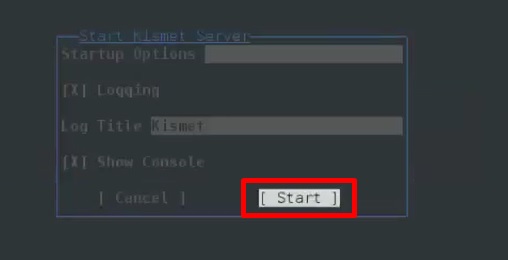
Шаг 4 — Параметры запуска, оставьте по умолчанию. Нажмите «Пуск».
Шаг 5 — Теперь он покажет таблицу с просьбой определить беспроводную карту. В таком случае нажмите Да.
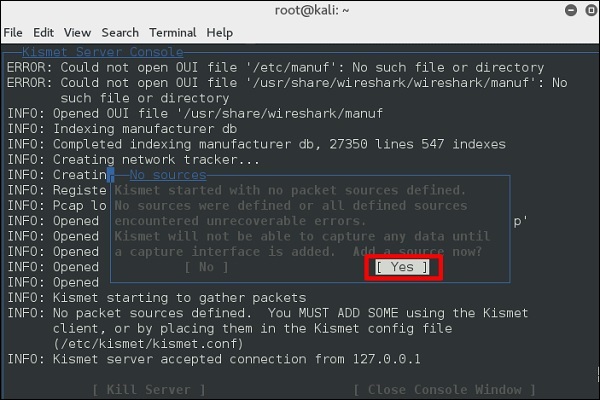
Шаг 6 — В этом случае беспроводным источником является «wlan0» . Это нужно будет написать в разделе «Intf» → нажать «Добавить».
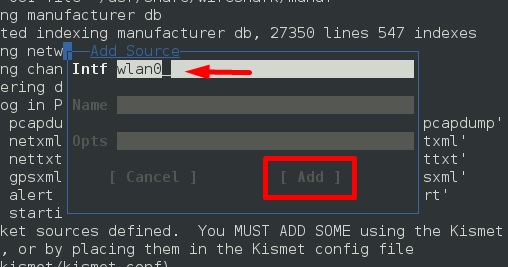
Шаг 7 — Он начнет прослушивать сети Wi-Fi, как показано на следующем снимке экрана.
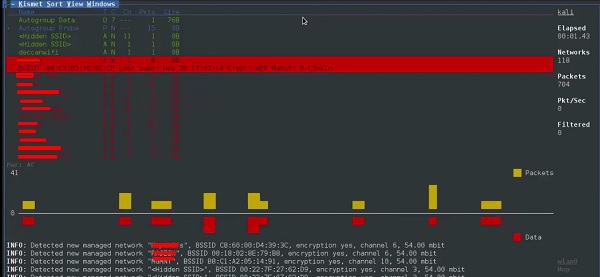
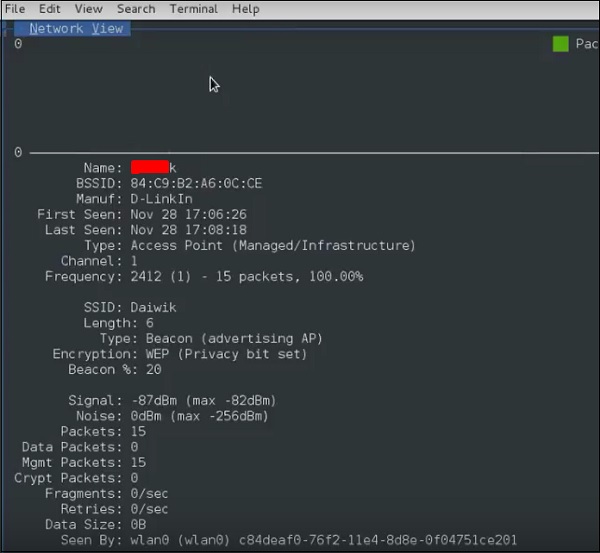
Шаг 8 — Нажмите на любую сеть, она выдаст беспроводные данные, как показано на следующем снимке экрана.
GISKismet
GISKismet — это инструмент беспроводной визуализации для практического представления данных, собранных с помощью Kismet. GISKismet хранит информацию в базе данных, чтобы мы могли запрашивать данные и генерировать графики с использованием SQL. В настоящее время GISKismet использует SQLite для базы данных и файлы GoogleEarth / KML для построения графиков.
Давайте узнаем, как использовать этот инструмент.
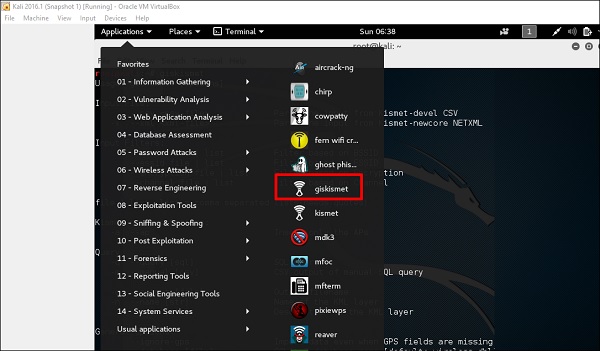
Шаг 1 — Чтобы открыть GISKismet, перейдите по ссылке: Приложения → Нажмите «Беспроводные атаки» → giskismet.
Как вы помните в предыдущем разделе, мы использовали инструмент Kismet для изучения данных о беспроводных сетях и всех этих данных Kismet, упакованных в файлы netXML.
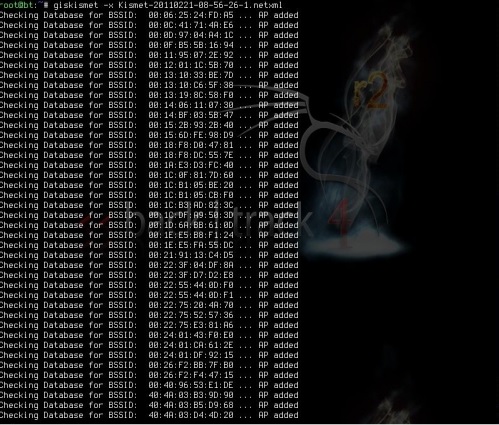
Шаг 2. Чтобы импортировать этот файл в Giskismet, введите «root @ kali:
# giskismet -x Kismetfilename.netxml», и он начнет импорт файлов.
После импорта мы можем импортировать их в Google Планета Земля, которые мы нашли ранее.
Шаг 3. Предполагая, что мы уже установили Google Планета Земля, мы нажимаем Файл → Открыть файл, созданный Giskismet → Нажмите «Открыть».
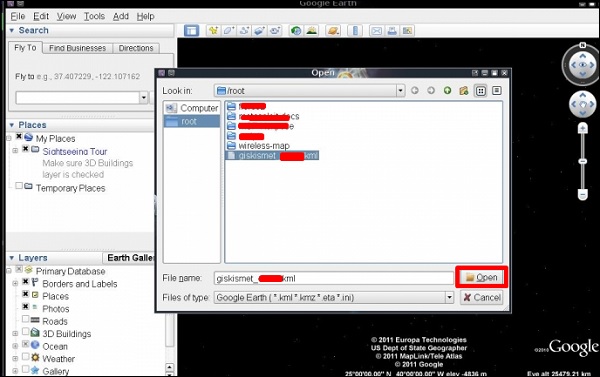
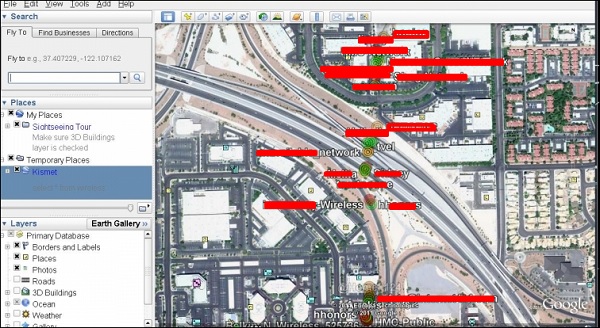
Следующая карта будет отображаться.
Призрачный Фишер
Ghost Phisher — это популярный инструмент, который помогает создавать поддельные точки беспроводного доступа, а затем создавать атаки типа «человек посередине».
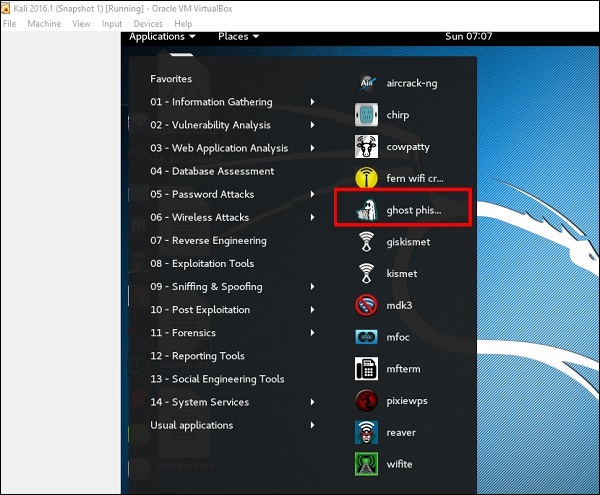
Шаг 1 — Чтобы открыть его, нажмите Приложения → Беспроводные атаки → «Призрачный фишинг».
Шаг 2 — После его открытия мы настроим поддельную точку доступа, используя следующую информацию.
- Вход беспроводного интерфейса: wlan0
- SSID: имя беспроводной точки доступа
- IP-адрес: IP-адрес, который будет иметь точка доступа
- WAP: пароль, который будет иметь этот SSID для подключения
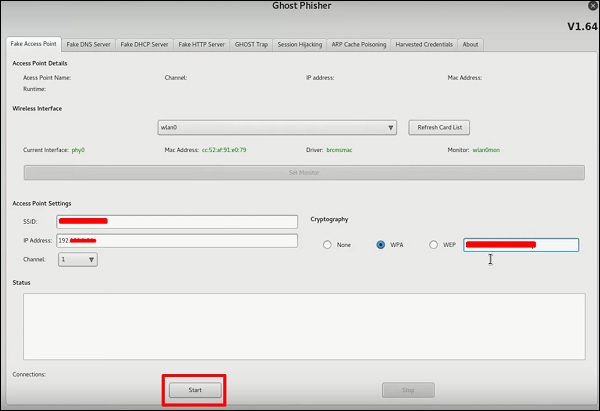
Шаг 3 — Нажмите кнопку Пуск .
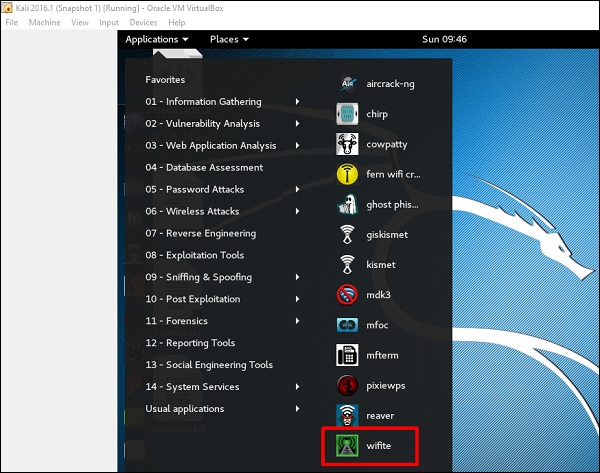
Wifite
Это еще один инструмент для взлома беспроводных сетей, который атакует несколько зашифрованных сетей WEP, WPA и WPS.
Во-первых, беспроводная карта должна находиться в режиме мониторинга.
Шаг 1 — Чтобы открыть его, перейдите в Приложения → Беспроводная атака → Wifite.
Шаг 2 — Введите «wifite –showb» для сканирования сетей.
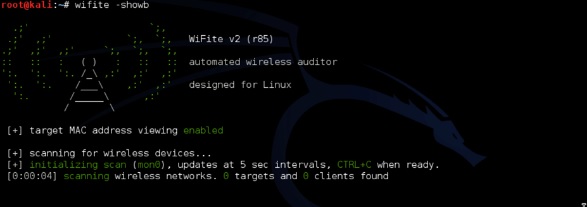
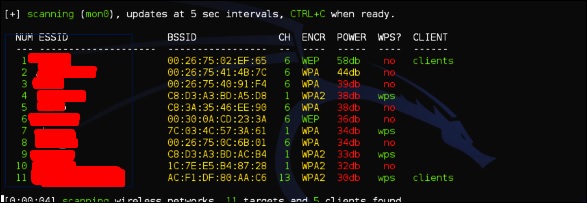
Шаг 3 — Чтобы начать атаковать беспроводные сети, нажмите Ctrl + C.

Шаг 4 — Введите «1», чтобы взломать первый беспроводной.
Шаг 5 — После завершения атаки ключ будет найден.
Источник
King Phisher – Phishing Campaign Toolkit
CyberPunk MITM

Introduction
King Phisher is a tool for testing and promoting user awareness by simulating real world phishing attacks. Its flexible architecture allows you the full control over both emails and server content.
King Phisher: Phishing Campaign Toolkit
The King Phisher is an open source phishing tool, which is fully featured and very flexible. It allows you to easily run multiple separate campaigns, with different areas (phishing attacks/credential harvesting, education, etc.) and with huge number of targets ( up to 10k+). According to the official documentation, it also supports sending messages with embedded images and determining when emails are opened with a tracking image.
It’s written in Python, and since it’s fully open sourced, you can modify source code to suite your needs. In addition, there is no web interface which makes King Phisher server hard to identify if it’s being used for social engineering.
Features:
- Fully open source means there’s no limits on use
- Run multiple phishing campaigns simultaneously
- View detailed graphs regarding the campaign results
- Send email with embedded images for a more legitimate appearance
- Optional Two-Factor authentication
- Highly flexible to accommodate different phishing goals
- Powerful template system using the Jinja2 engine
- Ability to capture credentials
- SMS alerts regarding campaign status
- Web page cloning capabilities
- Integrated Sender Policy Framework (SPF) checks
- Easy installation without setting up an additional web server
- Geo location of phishing visitors
- Send email with calendar invitations
- Plugin support for extending both the Client/Server
Plugins & Templates:
Supported OSs:
- Windows
- Linux [Tested on: BackBox, CentOS, Debian, Ubuntu 16.04, Fedora, Red Hat, Kali Linux]
Install
Linux (Client/Server)
It is recommended to install King Phisher into /opt/king-phisher. Clone the repo:
Then run the install.sh script (located in the tools directory), which will install all required packages and set up a default server configuration:
To see Install script options, use —help :
To install client, run the following:
Windows (Client only):
Click the “download” button at the bottom to download the latest build.
Basic Usage
In order to connect and start using client, you’ll need to start King Phisher server first:
But you may encounter the following error:
So, run the config script:
To start the client, run:
Now, you’ll be prompt to enter the credentials (same as for SSH).

After you connect, you’ll need to confirm server’s host key and SSH key passphrase. If the client successfully connects to the server, you’ll see the campaign page. Before you continue, configure your SMPT settings.
Источник
King-phisher setup

Latest tested version: 1.11.0
Server platform: Scaleway VC1S VPS Debian 9.1 64-bit (£5/m)
Client platform: Official Kali Linux 2018.1 64-bit VM
Prereqs: Registration DNS control of domain of choice, non-root user with sudo access and SSH certificate authentication configured on VPS server and all packages updated.
Please ensure you have the prerequisites configured otherwise you’ll likely face issues.
Server Install
The following details the installation and configuration of the king-phisher server. Non-fatal errors can be safely ignored.
$ useradd -m sysadmin -G sudo -s /bin/bash
root@phishyserver:
$ passwd sysadmin
Enter new UNIX password: ********
Retype new UNIX password: ********
passwd: password updated successfully
root@phishyserver:
$ su sysadmin
sysadmin@phishyserver:/root$ sudo apt install git python-certbot-apache (you may need to add a new repo if python-certbot-apache isn’t available)
…
…
sysadmin@phishyserver:/root$ cd /opt/;sudo wget -q https://github.com/securestate/king-phisher/raw/master/tools/install.sh
sysadmin@phishyserver:/opt$ sudo bash ./install.sh
INFO: Linux version detected as Debian
Install and use PostgreSQL? (Highly recommended and required for upgrading) [Y/n] y
…
…
INFO: You can start the King Phisher client with the following command:
/opt/king-phisher/KingPhisher
sysadmin@phishyserver:/opt$ sudo service king-phisher stop
sysadmin@phishyserver:/opt$ sudo git clone https://github.com/securestate/king-phisher-templates.git
…
…
sysadmin@phishyserver:/opt$ sudoc ertbot certonly –standalone –preferred-challenges http -d yourdomain.com
…
…
(Enter recovery email address of your choice)
(Agree to terms of service)
(Enter your domain name including hostname e.g. evil.blahblah.com)
…
IMPORTANT NOTES:
– Congratulations! Your certificate and chain have been saved at
/etc/letsencrypt/live/egresshax.com/fullchain.pem. Your cert will
expire on 2018-07-13. To obtain a new or tweaked version of this
certificate in the future, simply run certbot again. To
non-interactively renew *all* of your certificates, run “certbot
renew”
– If you like Certbot, please consider supporting our work by:
Donating to ISRG / Let’s Encrypt: https://letsencrypt.org/donate
Donating to EFF: https://eff.org/donate-le
sysadmin@phishyserver:/opt$ sudo vi /opt/king-phisher/server_config.yml
…
(Modify the relevant values to match the below, replacing with your domain details:)
server:
# Bind address information, multiple ports can be addresses:
– host: 0.0.0.0
port: 443
ssl: true
ssl_cert: /etc/letsencrypt/live/ /fullchain.pem
ssl_key: /etc/letsencrypt/live/ /privkey.pem
…
sysadmin@phishyserver:/opt$ sudo apt install mailutils postfix
Reading package lists… Done
…
(Choose Internet Site and enter a FQDN e.g evil.blahblah.com)
…
Processing triggers for ufw (0.35-0ubuntu2) …
sysadmin@phishyserver:/opt$ sudo bash
root@phishyserver:/opt$ echo “root sysadmin@evil.blahblah.com” > /etc/postfix/generic
root@phishyserver:/opt$ postmap /etc/postfix/generic
root@phishyserver:/opt$ exit
sysadmin@phishyserver:/opt$ sudo vi /etc/postfix/main.cf
…
(Modify the relevant values to match the below:)
inet_interfaces = 127.0.0.1
smtp_generic_maps = hash:/etc/postfix/generic
…
sysadmin@phishyserver:/opt$ sudo service postfix restart
sysadmin@phishyserver:/opt$ sudo ln -s /opt/king-phisher/templates/Website_Templates/Training/Phishing_Awareness_v2/www/* /var/www/
sysadmin@phishyserver:/opt$ sudo service king-phisher start
You will likely need to check your web server configuration to harden it (remove directory listing, etc) before you kick off your actual campaign. Check your server thoroughly from both the inside and outside for misconfigurations (like no auto-redirect from http to https, etc), info leaks (server tokens, etc) and such before the big day. Success means preparing well and checking carefully.
Client Install
The following details the installation and configuration of the king-phisher client. Non-fatal errors can be safely ignored, but please ensure you have completely updated and upgraded your Kali instance before starting. Other point to note is, if you run the installer, then try to run the same installer process again, you are likely to get fatal errors. Once is enough – if the client runs, it runs. Don’t muck about trying to re-install because pip threw a package error at you that wasn’t fatal.
root@kali:/root$ cd /opt;wget -q https://github.com/securestate/king-phisher/raw/master/tools/install.sh
root@kali:/opt$ git clone https://github.com/securestate/king-phisher-templates.git
Cloning into ‘king-phisher-templates’…
…
…
root@kali:/opt$ bash ./install.sh ₋₋skip-server
INFO: Linux version detected as Kali
INFO: Skipping installing King Phisher Server components
INFO: Attempting to update apt-get cache package information
…
…
You can start the King Phisher client with the following command:
python3 /opt/king-phisher/KingPhisher
root@kali:/opt$ python3 /opt/king-phisher/KingPhisher
Client Configuration
With your SSH certificates properly configured, you’ll be able to log into the king-phisher server using your passphrase, but will still need to include the username/password of the local account on your king-phisher server:

When you click Connect you will be asked to confirm the server’s host key, and then requested to provide your SSH key passphrase – the client will then connect to the king-phisher server and present the campaigns page. Set up a new campaign using the wizard and load it up.
You’ll need to configure your SMTP settings before proceeding much further. Click Edit>Preferences and select the SMTP Server tab. All you need to do is ensure Tunnel Over SSH is ON, then fill in the same details for SSH Server and SSH Username match those that you used to log in the king-phisher server when you first started the client.
That’s it. You’re now ready to read the rest of the doco available at king-phisher.readthedocs.io and get rolling on your first campaign!
Additional Configurations
The following are additional configs that may be of interest, depending on how you plan to use king-phisher.
Basic authentication for creds capture
Using Jinja, you can create content that will prompt for a basic authentication request. Create a file on the king-phisher server /var/www/auth and populate it with the following:
Источник


