- Push Button Reset: редактирование скрытого раздела восстановления Windows 8
- Push-button reset
- What’s new for Windows 10
- How push-button reset features work
- Restoring the operating system and customizations
- Restoring Windows
- Restoring language packs
- Restoring drivers
- Restoring previously installed Windows apps
- Restoring other customizations
- Keep my files
- Settings
- User data
- Windows Applications
- Remove everything
- Compact OS
Push Button Reset: редактирование скрытого раздела восстановления Windows 8
Перед большинством пользователей после выполнения восстановления ОС в заводской конфигурации стоит задача разделения диска на разделы: системный раздел с установленной ОС и раздел для пользовательских данных. Использование сторонних программ часто приводит к различным проблемам и часто связано с некоторыми неудобствами: необходимость их загрузки и установки уже после восстановления ОС, что занимает время, а также приводит к ошибкам работы встроенной программы восстановления Acer eRecovery. Далее приводится информация, как отредактировать скрытый раздел, чтобы после восстановления оригинальной предустановленной операционной системы диск уже был разбит так, как задумано пользователем.
Функция, особенности работы и создание данного раздела PBR достаточно подробно описаны у его разработчика (Microsoft):
Push Button Reset overview
Deploy Push Button Reset features
Компания Acer наряду с образом предустановленной операционной системы добавляет в этот раздел ряд скриптов, которые управляют как процессом восстановления ОС, так и работой с конфигурацией жесткого диска. Далее опишу несложные действия, которые позволят программе восстановления «разбить» диск на нужные разделы и раздел PBR останется функциональным.
По умолчанию раздел PBR скрыт и не доступен для редактирования. Открыть его можно, запустив командную строку от имени администратора и введя команды:
diskpart
sel disk
list part
В появившемся списке вы увидите список имеющихся на диске разделов. В предустановленной конфигурации раздел PBR будет пятым, его и выбираем:
sel part 5
assign
Не закрывая командную строку переходим в проводник, где видим искомый раздел. В папке RecoveryImage, кроме образа предустановленной системы в виде файла install.wim, можно увидеть 2 файла:
В них прописан сценарий восстановления и разбивки диска, эти файлы и будем редактировать. Советую сохранить оба файла где-нибудь на внешнем носителе, если захотите вернуть все на свои места. Итак, эти файлы только для чтения и для того, чтобы это ограничение снять, возвращайтесь в командную строку и вводите:
exit (для выхода из diskpart)
attrib -s -h S:\RecoveryImage\*
где S — буква, присвоенная разделу PBR (она у вас будет своя)
Возвращайтесь в проводник и открывайте в блокноте файл ReCreatePartition.txt. Там вы увидите следующее:
convert gpt
create partition primary size=600
set
format fs=ntfs label=»RECOVERY» quick override
assign letter=T
gpt attributes=0x8000000000000001
create partition EFI size=300
assign letter=S
format fs=fat32 label=»ESP» quick override
create partition MSR size=128
create partition primary
shrink minimum=16691
assign letter=W
format fs=ntfs label=»Acer» quick override
create partition primary
format fs=ntfs label=»Push Button Reset» quick override
set
assign letter=R
gpt attributes=0x8000000000000001
exit
Это набор команд для diskpart. Видно, что диск будет иметь только один видимый раздел Acer с установленной ОС. Добавляем следующие команды (выделены красным цветом):
convert gpt
create partition primary size=400
set
format fs=ntfs label=»RECOVERY» quick override
assign letter=T
gpt attributes=0x8000000000000001
create partition EFI size=300
assign letter=S
format fs=fat32 label=»ESP» quick override
create partition MSR size=128
create partition primary size=150000 (указывает на объем раздела с установленной ОС, в данном случае 150 Гб)
assign letter=W
format fs=ntfs label=»ACER» quick override
create partition primary
shrink minimum=17408 Эту строчку перенесли ниже. 17408 указывает на объем раздела PBS
assign letter=K
format fs=ntfs label=»DATA» quick override
create partition primary
format fs=ntfs label=»Push Button Reset» quick override
set
assign letter=R
gpt attributes=0x8000000000000001
exit
Закрываем файл. На вопрос «Сохранить изменения?» отвечаем утвердительно. Далее в блокноте открываем файл ResetConfig.xml и видим следующее:

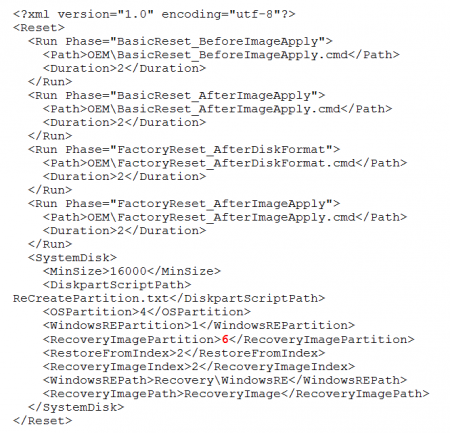
Также закрываем файл, согласившись на сохранение изменений.
Вышеописанное редактирование этих 2-х файлов еще лучше сделать непосредственно на USB диске восстановления и с него пробовать восстановление ОС с параметром «Да, заново разбить диски на разделы».
Все, теперь можете пробовать использовать функцию восстановления eRecovery с новыми параметрами.
Успехов вам и всего доброго!
Все вопросы, связанные с данной темой, обсуждаем здесь.
Push-button reset
If you’re a user who wants to reset a computer that runs Windows 10, see Recovery options in Windows 10.
This topic is intended for original equipment manufacturers (OEMs) who want to add push-button reset features to their Windows 10 desktop computer manufacturing processes.
Push-button reset is a recovery tool that repairs the OS while preserving data and important customizations. It reduces the need for custom recovery applications by providing users with more recovery options and the ability to fix their own PCs with confidence.
Push-button reset is included in WindowsВ 10 for desktop editions (Home, Pro, Enterprise, and Education), and was introduced in Windows 8.
What’s new for Windows 10
In Windows 10, version 2004, Push-button reset has been updated to include the following change:
- Cloud download is a new option for users to download Windows instead of using the existing installation to perform the reset. This can decrease the overall time it takes to reset if using high speed internet.
In Windows 10, version 1903, Push-button reset has been updated to include the following change:
- Preinstalled apps is a new option under Keep my files which does not apply any customizations from the PC manufacturer. This includes auto-apply folders, desktop applications, and extensibility points.
Previous versions of Windows 10 provided the following improvements to push-button reset:
- Auto-apply folders make Push-button reset customization easier. Placing customizations and their related asset files in predetermined folders ensures they are restored when a device is reset. This method of configuring Push-button reset can be used instead of the legacy method that used custom scripts and extensibility points.
- Preinstalled apps get restored to an updated state. If a preinstalled Windows app has been updated by the Microsoft Store after installation, it will be restored in its updated state.
- Use default config files when using ScanState to capture customizations: Starting with Windows 10 Version 1703, you have to use the /config option with ScanState when capturing customizations. Use only one of the default configuration files included with the Assessment and Deployment Kit (ADK). These files are:
Config_AppsAndSettings.xml – Use this configuration file to specify that both desktop applications and OS settings should be captured by the ScanState tool.
Config_AppsOnly.xml – Use this configuration file to specify that only desktop applications should be captured by the ScanState tool. Since desktop applications are not always well-defined, this configuration file does not guarantee that all setting related to desktop applications are captured.
Config_SettingsOnly.xml – Use this configuration file to specify that only OS settings should be captured by the ScanState tool.
You can modify these configuration files by setting the migrate attribute for specific components to no, but components that are already excluded from capture/migration in the default configuration files must remain excluded.
The Push-button reset user experience continues to offer customization opportunities. Manufacturers use Auto-apply folder; or insert custom scripts, install applications or preserve additional data at available extensibility points.
The following Push-button reset features are available to users with WindowsВ 10 PCs and devices:
How push-button reset features work
Restoring the operating system and customizations
This section discusses the mechanisms Push-button reset uses to restore software on the PC.
Restoring Windows
Push-button reset restores WindowsВ 10 by constructing a new copy of the OS using runtime system files located in the Windows Component Store (C:\Windows\WinSxS). This allows recovery to be possible even without a separate recovery image containing a backup copy of all system files.
In addition, Push-button reset restores Windows to an updated state rather than to the factory-preinstalled state. All updates installed on the PC (such as WindowsВ 10, version 1809) will be restored. Due to this improvement it is not required nor recommended to mark updates as permanent by using the DISM /Cleanup-Image command with the /ResetBase option.
This approach provides a balance between user experience in terms of the number of updates which need to be reinstalled and the features’ effectiveness in addressing update problems. It also allows Windows to remove older system files which are no longer needed for runtime use or for recovery, freeing up disk space.
Restoring language packs
Language packs that are installed and used by at least one user account are restored. This includes languages installed by users.
Seven days after the Out-of-Box Experience (OOBE), any language packs that haven’t yet been used are removed. Using Push-button reset features after that will not restore the removed language packs.
On PCs running single-language editions of Windows, such as WindowsВ 10 Home, users cannot download or install additional language packs, and they cannot use push-button reset features to switch languages if the preinstalled language packs have been removed.
Restoring drivers
Drivers are restored in a similar fashion as the OS. Instead of restoring them from a recovery image, existing drivers are preserved across recovery. Starting with Windows 10, version 1709, the latest drivers are restored as part of Push-button Reset.
Prior to Windows 10, version 1709, As with system files, drivers are restored to the state they were in when the most recent release or major update is installed. For example:
- If the customer performs recovery after booting up a new PC preinstalled with Windows 10, drivers that are present during OOBE will be restored, even if newer drivers have been installed since.
- If the customer performs recovery after upgrading from WindowsВ 10 to WindowsВ 10, version 1511, the drivers that are present during the upgrade will be restored, even if newer drivers have been installed since.
Device applets which are installed outside of the driver INF package are not restored as part of this process. They are restored to factory version and state in the same way as other customizations such as Windows desktop applications. (See Restoring other customizations for more information.) If the device applet must always stay in sync (version wise) with the driver, it is recommended that both the driver and the device applet be installed via the same INF package.
Restoring previously installed Windows apps
Starting with Windows 10, version 1809, preinstalled Windows apps that have been updated after their initial installation get restored to their updated state. Prior to Windows 10, version 1809, preinstalled Windows apps get restored to their factory version and state. Instead of restoring them from a recovery image, a copy of the Windows apps is automatically backed up when they are provisioned during image customization and manufacturing, and the backups are restored when Push-button reset features are used.
Restoring other customizations
To restore Windows desktop applications and settings, you can use provisioning packages created using the ScanState utility, and either push-button reset extensibility points or Auto-apply folders (Windows 10, version 1809 and later).
Keep my files
The Keep my files feature preserves a number of system and user settings that are required to keep the system running while minimizing the need for users to reconfigure their PCs.
Preserved settings can be broadly categorized into one of the following categories:
- Are required for users to log on to their PCs after running the Keep my files feature.
- Affect how users access their documents and personal files.
- Are difficult for most users to recreate.
- Affect system security or user privacy.
- Personalize the PC.
Settings
The preserved settings are summarized as follows:
- User accounts (local, domain, Microsoft account), and group memberships
- Domain settings
- Windows Update settings
- Library settings
- Lock screen background
- Desktop themes
- International settings
- Wireless network profiles
- Settings configured in Windows Welcome
- User controlled privacy settings (such as location, camera, microphone)
The privacy setting to store my activity history on this device will be enabled by default.
User data
Because user data can be stored in many locations, the Keep my files feature preserves most folders and files that are not part of a standard Windows installation. The Keep my files feature refreshes the following system locations and does not preserve the contents.
- \Windows
- \Program Files
- \Program Files(x86)
- \ProgramData
- \Users\ \AppData (in each user profile)
NoteВ В Some applications store user data in the \AppData folder in user profiles. The \AppData folders are available in C:\Windows.old after using the Keep my files feature.
The Keep my files feature bypasses the following locations and preserves the contents:
- File History versioning data
- All files and folders on non-OS partitions
Windows Applications
The Keep my files feature handles application types differently in order to ensure that the PC can be restored to a reliable state.
Applications are handled as follows:
- User-acquired Windows apps from the Microsoft Store are not preserved. Users will need to reinstall them from the Microsoft Store. This is a change from Windows 8/8.1.
- Starting with Windows 10, version 1809, preinstalled Windows apps that have been updated since initial installation will be restored to an updated state. Prior to Windows 10, version 1809, preinstalled Windows apps are restored to their factory version and state. Updates to these apps will be downloaded and reapplied automatically when internet connectivity is available.
- User-acquired Windows desktop applications are not preserved. Users will need to reinstall them manually.
- Preinstalled Windows desktop applications captured in the customizations provisioning package will be restored to their factory condition, even if users have previously uninstalled them.
The Keep my files feature does not preserve user-installed Windows desktop applications by default, and locations that are commonly used for storing application settings (\AppData and \ProgramData) are deleted. Manufacturers can leverage Auto-apply folders or the push-button reset extensibility points to save and later restore specific application settings and data, if necessary.
Remove everything
When users use the Remove everything feature, they will be presented with options that affect the way that their data is removed from the PC.
If the PC has more than one user-accessible hard drive volumes, users can choose to remove data from all volumes or only the Windows volume.
The Windows volume is never formatted, as the files needed to rebuild the OS are on it. Instead, user data files are deleted individually.
If user chooses to remove data from all volumes, the data volumes are formatted.
Users can choose to simply delete their files or to also perform data erasure on the drive(s) so that recovery of the data by someone else is much more difficult.
Manufacturers must configure custom utility partitions as follows to ensure these partitions are not affected by the reset process.
- For UEFI-based PCs, utility partitions on GUID Partition Table (GPT) disks should have the GPT_ATTRIBUTE_PLATFORM_REQUIRED attribute set. See PARTITION_INFORMATION_GPT structure for more information on GPT partition attributes.
- For BIOS-based PCs, utility partitions on Master Boot Record (MBR) disks must be of a type other than 0x7, 0x0c, 0x0b, 0x0e, 0x06, and 0x42.
The time it takes to perform data erasure depends on drive speed, partition size, and whether the drive is encrypted using Windows BitLocker Drive Encryption. The data erasure functionality is targeted at consumers and does not meet government and industry data erasure standards.
If Compact OS is enabled on the OS before the reset, Compact OS will remain enabled after the PC has been reset.
Compact OS
Compact OS is a collection of technologies which allow Windows 10 to be deployed on PCs with storage capacity as low as 16 gigabytes (GB). The following two technologies in particular work in conjunction with the Push-button reset changes to reduce Windows’ disk footprint:
- Per-file compression When applying a reference image file (WIM) to a PC, the files written to the disk can be compressed individually using the XPRESS Huffman codec. This is the same codec used by the WIMBoot technology in Windows 8.1. When Push-button reset features rebuilds the OS, the runtime system files remain compressed.
- Single-instancing of installed customizations After the installed customizations (e.g. Windows desktop applications) have been captured (using ScanState) into a reference device data image stored inside a provisioning package, the two copies of the customizations can be singled-instanced to reduce disk footprint impact. This is accomplished by converting the installed customizations (e.g. C:\Program Files\Foo\Foo.exe) into file pointers linked to the contents of the reference device data image.
The following diagram illustrates the high-level content layout of PCs with Compact OS enabled:

Both technologies are optional and can be configured during deployment.


