- Шаг 1. Создание проекта приложения Windows Forms Step 1: Create a Windows Forms App project
- Откройте Visual Studio 2017. Open Visual Studio 2017
- Запустите Visual Studio 2019. Open Visual Studio 2019
- Сведения о проекте приложения Windows Forms About the Windows Forms App project
- Дальнейшие действия Next steps
- Пошаговое руководство. Создание приложения Windows с поддержкой специальных возможностей Walkthrough: Creating an Accessible Windows-based Application
- Создание проекта Creating the Project
- Начало разработки приложения To begin making the application
- Добавление элементов управления в форму Adding the Controls to the Form
- Обеспечение специальных возможностей приложения Windows To make your Windows Application accessible
- Поддержка режима высокой контрастности Supporting High Contrast Mode
- Эффективный способ обеспечения высокой контрастности To enable High Contrast mode in an effective way
- Передача важной информации способами помимо звукового сигнала Conveying Important Information by Means Other Than Sound
- Обеспечение передачи важной информации способами помимо звукового сигнала To supply information by some other means than sound
- Тестирование приложения Testing the Application
- Тестирование специальных возможностей To test accessibility features
Шаг 1. Создание проекта приложения Windows Forms Step 1: Create a Windows Forms App project
Первый шаг в создании программы для просмотра изображений — это создание проекта приложения Windows Forms. When you create a picture viewer, the first step is to create a Windows Forms App project.
Откройте Visual Studio 2017. Open Visual Studio 2017
В строке меню выберите Файл > Создать > Проект. On the menu bar, choose File > New > Project. Диалоговое окно должно выглядеть так же, как на следующем снимке экрана. The dialog box should look similar to the following screenshot.
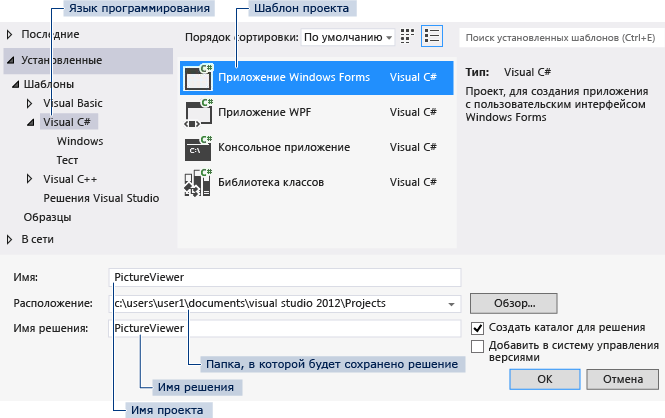
Диалоговое окно _ _»Новый проект» New project _ _dialog box
В левой части диалогового окна Новый проект выберите Visual C# или Visual Basic, а затем — Классическое приложение Windows. On the left side of the New Project dialog box, choose either Visual C# or Visual Basic, and then choose Windows Desktop.
В списке шаблонов проектов выберите Приложение Windows Forms (.NET Framework). In the project templates list, choose Windows Forms App (.NET Framework). Назовите новую форму PictureViewer и нажмите кнопку ОК. Name the new form PictureViewer, and then choose the OK button.
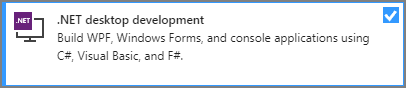
Если вы не видите шаблон Приложение Windows Forms (.NET Framework), используйте Visual Studio Installer, чтобы установить рабочую нагрузку Разработка классических приложений .NET. If you don’t see the Windows Forms App (.NET Framework) template, use the Visual Studio Installer to install the .NET desktop development workload.
Дополнительные сведения см. в разделе Установка Visual Studio. For more information, see the Install Visual Studio page.
Запустите Visual Studio 2019. Open Visual Studio 2019
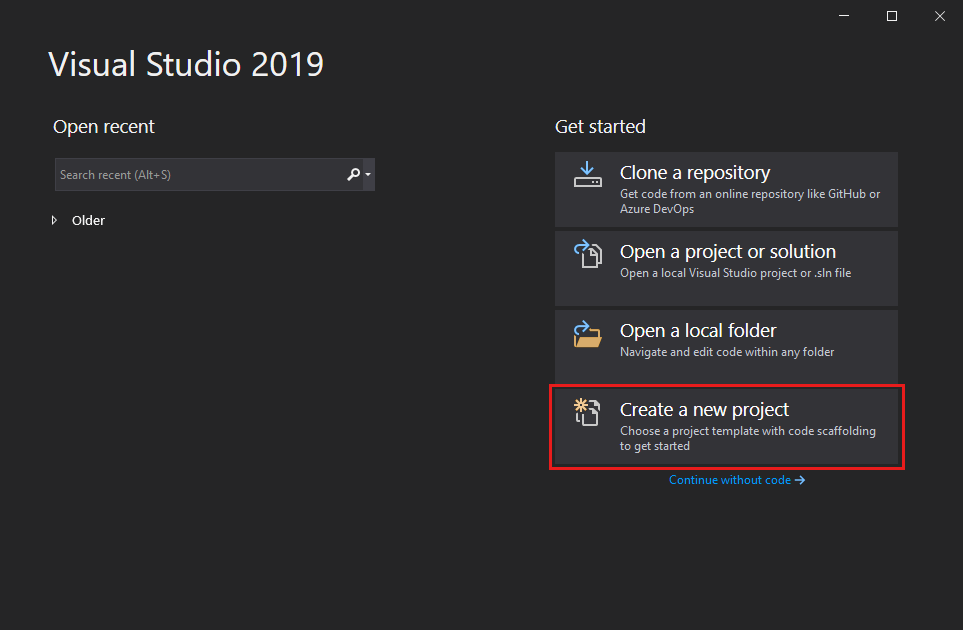
На начальном экране выберите Создать проект. On the start window, choose Create a new project.
В поле поиска окна Создание проекта введите Windows Forms. On the Create a new project window, enter or type Windows Forms in the search box. Затем в списке Тип проекта выберите Рабочий стол. Next, choose Desktop from the Project type list.
Применив фильтр Тип проекта, выберите шаблон Приложение Windows Forms (.NET Framework) для C# или Visual Basic и нажмите кнопку Далее. After you apply the Project type filter, choose the Windows Forms App (.NET Framework) template for either C# or Visual Basic, and then choose Next.

Если шаблон Приложение Windows Forms (.NET Framework) отсутствует, его можно установить из окна Создание проекта. If you don’t see the Windows Forms App (.NET Framework) template, you can install it from the Create a new project window. В сообщении Не нашли то, что искали? выберите ссылку Установка других средств и компонентов. In the Not finding what you’re looking for? message, choose the Install more tools and features link.

После этого в Visual Studio Installer выберите рабочую нагрузку Разработка классических приложений .NET. Next, in the Visual Studio Installer, choose the Choose the .NET desktop development workload.

Затем нажмите кнопку Изменить в Visual Studio Installer. After that, choose the Modify button in the Visual Studio Installer. Вам может быть предложено сохранить результаты работы; в таком случае сделайте это. You might be prompted to save your work; if so, do so. Выберите Продолжить, чтобы установить рабочую нагрузку. Next, choose Continue to install the workload.
В поле Имя проекта окна Настроить новый проект введите PictureViewer. In the Configure your new project window, type or enter PictureViewer in the Project name box. Затем нажмите Создать. Then, choose Create.
Visual Studio создает решение для приложения. Visual Studio creates a solution for your app. Решение играет роль контейнера для всех проектов и файлов, необходимых приложению. A solution acts as a container for all of the projects and files needed by your app. Более подробно эти термины поясняются далее в этом учебнике. These terms will be explained in more detail later in this tutorial.
Сведения о проекте приложения Windows Forms About the Windows Forms App project
Среда разработки содержит три окна: главное окно, Обозреватель решений и окно Свойства. The development environment contains three windows: a main window, Solution Explorer, and the Properties window.
Если какое-либо из этих окон отсутствует, можно восстановить макет окон по умолчанию. If any of these windows are missing, you can restore the default window layout. В строке меню выберите Окно > Сброс макета окна. On the menu bar, choose Window > Reset Window Layout.
Можно также отобразить окна с помощью команд меню. You can also display windows by using menu commands. В строке меню выберите Вид > Окно «Свойства» или Обозреватель решений. On the menu bar, choose View > Properties Window or Solution Explorer.
Если открыты какие-либо другие окна, закройте их с помощью кнопки Закрыть (x) в верхнем правом углу. If any other windows are open, close them by choosing the Close (x) button in their upper-right corners.
- Главное окно. В этом окне выполняется основная часть работы, например работа с формами и редактирование кода. Main window In this window, you’ll do most of your work, such as working with forms and editing code. В окне показана форма в редакторе форм. The window shows a form in the Form Editor. В верхней части окна находятся две вкладки — вкладка Начальная страница и вкладка Form1.cs [Design]. At the top of the window, the Start Page tab and the Form1.cs [Design] tab appear. (В Visual Basic имя вкладки заканчивается на .vb, а не на .cs.) (In Visual Basic, the tab name ends with .vb instead of .cs.)
- Главное окно. В этом окне выполняется основная часть работы, например работа с формами и редактирование кода. Main window In this window, you’ll do most of your work, such as working with forms and editing code. В окне показана форма в редакторе форм. The window shows a form in the Form Editor.
- Окно «Обозреватель решений». В этом окне можно просматривать все элементы, входящие в решение, и переходить к ним. Solution Explorer window In this window, you can view and navigate to all items in your solution.
Если выбрать файл, содержимое в окне Свойства изменится. If you choose a file, the contents of the Properties window changes. Если открыть файл кода (с расширением .cs в C# и .vb в Visual Basic), откроется сам файл кода или конструктор для него. If you open a code file (which ends in .cs in C# and .vb in Visual Basic), the code file or a designer for the code file appears. Конструктор — это визуальная поверхность, на которую можно добавлять элементы управления, такие как кнопки и списки. A designer is a visual surface onto which you can add controls such as buttons and lists. При работе с формами Visual Studio такая поверхность называется конструктор Windows Forms. For Visual Studio forms, the designer is called the Windows Forms Designer.
Окно «Свойства». В этом окне производится изменение свойств элементов, выбранных в других окнах. Properties window In this window, you can change the properties of items that you choose in the other windows. Например, выбрав форму Form1, можно изменить ее название путем задания свойства Text, а также изменить цвет фона путем задания свойства Backcolor. For example, if you choose Form1, you can change its title by setting the Text property, and you can change the background color by setting the Backcolor property.
В верхней строке в обозревателе решений отображается текст Решение «PictureViewer» (1 проект). Это означает, что Visual Studio автоматически создала для вас решение. The top line in Solution Explorer shows Solution ‘PictureViewer’ (1 project), which means that Visual Studio created a solution for you. Решение может содержать несколько проектов, но пока что вы будете работать с решениями, которые содержат только один проект. A solution can contain more than one project, but for now, you’ll work with solutions that contain only one project.
В строке меню выберите Файл > Сохранить все. On the menu bar, choose File > Save All.
Другой вариант — нажать кнопку Сохранить все на панели инструментов, как показано на рисунке ниже. As an alternative, choose the Save All button on the toolbar, which the following image shows.
Кнопка «Сохранить все» _ _на панели инструментов Save All _ _toolbar button
Visual Studio автоматически заполняет имя папки и имя проекта, а затем сохраняет проект в папке проектов. Visual Studio automatically fills in the folder name and the project name and then saves the project in your projects folder.
Дальнейшие действия Next steps
Следующий раздел руководства: Шаг 2. Запуск приложения . To go to the next tutorial step, see Step 2: Run your app.
Пошаговое руководство. Создание приложения Windows с поддержкой специальных возможностей Walkthrough: Creating an Accessible Windows-based Application
Создание приложений со специальными возможностями необходимо по деловым соображениям. Creating an accessible application has important business implications. Во многих странах для продаваемого программного обеспечения существуют правительственные требования в отношении специальных возможностей. Many governments have accessibility regulations for software purchase. Логотип «Сертифицировано для Windows» предполагает соответствие продукта требованиям в отношении специальных возможностей. The Certified for Windows logo includes accessibility requirements. По предварительным оценкам, только в США 30 миллионов пользователей нуждаются в программном обеспечении со специальными возможностями. Многие из них являются потенциальными клиентами. An estimated 30 million residents of the U.S. alone, many of them potential customers, are affected by the accessibility of software.
В этом пошаговом руководстве рассматриваются пять требований в отношении специальных возможностей, выполнение которых необходимо для использования эмблемы «Сертифицировано для Windows». This walkthrough will address the five accessibility requirements for the Certified for Windows logo. Согласно этим требованиям в приложении со специальными возможностями обеспечиваются: According to these requirements, an accessible application will:
поддержка настройки размера, цвета, шрифта и параметров ввода с панели управления; Support Control Panel size, color, font, and input settings. изменение размеров строк меню, строк заголовков, границ и строки состояния при изменении соответствующих параметров на панели управления The menu bar, title bar, borders, and status bar will all resize themselves when the user changes the control panel settings. (дополнительные изменения элементов управления или кода в приложении не требуются); No additional changes to the controls or code are required in this application.
поддержка режима высокой контрастности; Support High Contrast mode.
документированный доступ с клавиатуры ко всем возможностям; Provide documented keyboard access to all features.
наглядное и программное представление фокуса клавиатуры; Expose location of the keyboard focus visually and programmatically.
предоставление важной информации не только с помощью звукового сигнала. Avoid conveying important information by sound alone.
Информацию о поддержке различных раскладок клавиатуры см. в разделе Рекомендации по разработке международных приложений. For information on supporting varying keyboard layouts, see Best Practices for Developing World-Ready Applications.
Создание проекта Creating the Project
В этом пошаговом руководстве создается пользовательский интерфейс для приложения, принимающего заказы на пиццу. This walkthrough creates the user interface for an application that takes pizza orders. Оно содержит поле (TextBox) для имени заказчика, группу переключателей (RadioButton) для выбора размера пиццы, флажки (CheckedListBox) для выбора начинки, две кнопки с надписями «Заказать» и «Отмена», а также меню с командой «Выход». It consists of a TextBox for the customer’s name, a RadioButton group to select the pizza size, a CheckedListBox for selecting the toppings, two Button controls labeled Order and Cancel, and a Menu with an Exit command.
Пользователь вводит имя заказчика, размер пиццы и выбранную начинку. The user enters the customer’s name, the size of the pizza, and the toppings desired. Когда пользователь нажимает кнопку «Заказать», сводка заказа и его цена выводятся в окне сообщения, а элементы управления очищаются и становятся готовыми к приему следующего заказа. When the user clicks the Order button, a summary of the order and its cost are displayed in a message box and the controls are cleared and ready for the next order. Когда пользователь нажимает кнопку «Отмена», элементы управления очищаются и становятся готовыми к приему следующего заказа. When the user clicks the Cancel button, the controls are cleared and ready for the next order. Когда пользователь выбирает в меню команду «Выход», программа закрывается. When the user clicks the Exit menu item, the program closes.
Основное внимание в этом пошаговом руководстве уделяется не коду для системы розничной продажи, а специальным возможностям пользовательского интерфейса. The emphasis of this walkthrough is not the code for a retail order system, but the accessibility of the user interface. В примере демонстрируются специальные возможности для некоторых часто используемых элементов управления, таких как кнопки, переключатели, поля и метки. The walkthrough demonstrates the accessibility features of several frequently used controls, including buttons, radio buttons, text boxes, and labels.
Начало разработки приложения To begin making the application
- Создайте новое приложение Windows на Visual Basic или Visual C#. Create a new Windows Application in Visual Basic or Visual C#. Назовите проект PizzaOrder. Name the project PizzaOrder. Дополнительные сведения см. в разделе Создание новых решений и проектов. For details, see Creating New Solutions and Projects.
Добавление элементов управления в форму Adding the Controls to the Form
При добавлении элементов управления в форму придерживайтесь приведенных ниже правил для того, чтобы приложение было доступным для пользователей с физическими ограничениями. When adding the controls to a form, keep in mind the following guidelines to make an accessible application:
Укажите свойства AccessibleDescription и AccessibleName. Set the AccessibleDescription and AccessibleName properties. В этом примере для свойства AccessibleRole достаточным является значение Default. In this example, the Default setting for the AccessibleRole is sufficient. Подробнее о свойствах специальных возможностей см. в разделе Определение сведений, связанных со специальными возможностями, для элементов управления в Windows Forms. For more information on the accessibility properties, see Providing Accessibility Information for Controls on a Windows Form.
Задайте размер шрифта 10 пунктов или выше. Set the font size to 10 points or larger.
Если задать для формы размер шрифта 10 в начале работы, то все элементы управления, добавляемые в форму после этого, также будут иметь размер шрифта 10. If you set the font size of the form to 10 when you start, then all controls subsequently added to the form will have a font size of 10.
Убедитесь в том, что любой элемент управления Label, относящийся к элементу TextBox, непосредственно предшествует элементу TextBox в последовательности табуляции. Make sure any Label control that describes a TextBox control immediately precedes the TextBox control in the tab order.
Добавьте ключ доступа с помощью символа «&» к Text свойству любого элемента управления, к которому пользователю может потребоваться перейти. Add an access key, using the «&» character, to the Text property of any control the user may want to navigate to.
Добавьте ключ доступа с помощью символа «&» к Text свойству метки, предшествующей элементу управления, к которому пользователю может потребоваться перейти. Add an access key, using the «&» character, to the Text property of the label that precedes a control that the user may want to navigate to. Задайте для свойства UseMnemonic метки значение true , чтобы при нажатии клавиши доступа фокус переводился на следующий элемент управления в последовательности табуляции. Set the labels’ UseMnemonic property to true , so that the focus is set to the next control in the tab order when the user presses the access key.
Добавьте клавиши доступа для всех элементов меню. Add access keys to all menu items.
Обеспечение специальных возможностей приложения Windows To make your Windows Application accessible
Добавьте в форму элементы управления и задайте их свойства, как описано ниже. Add the controls to the form and set the properties as described below. Модель размещения элементов управления в форме см. на рисунке после таблицы. See the picture at the end of the table for a model of how to arrange the controls on the form.
| Объект Object | Свойство Property | Значение Value |
|---|---|---|
| Form1 Form1 | AccessibleDescription AccessibleDescription | Форма заказа Order form |
| AccessibleName AccessibleName | Форма заказа Order form | |
| Размер шрифта Font Size | 10 10 | |
| Текст Text | Форма заказа пиццы Pizza Order Form | |
| PictureBox PictureBox | Имя Name | логотип logo |
| AccessibleDescription AccessibleDescription | Порция пиццы A slice of pizza | |
| AccessibleName AccessibleName | Логотип компании Company logo | |
| Образ Image | Любой значок или растровое изображение Any icon or bitmap | |
| Метка Label | Имя Name | companyLabel companyLabel |
| Текст Text | Вкусная пицца Good Pizza | |
| TabIndex TabIndex | 1 1 | |
| AccessibleDescription AccessibleDescription | Название организации Company name | |
| AccessibleName AccessibleName | Название организации Company name | |
| Backcolor Backcolor | Синий Blue | |
| Forecolor Forecolor | Желтый Yellow | |
| Размер шрифта Font size | 18 18 | |
| Метка Label | Имя Name | customerLabel customerLabel |
| Текст Text | &Имя &Name | |
| TabIndex TabIndex | 2 2 | |
| AccessibleDescription AccessibleDescription | Подпись имени заказчика Customer name label | |
| AccessibleName AccessibleName | Подпись имени заказчика Customer name label | |
| UseMnemonic UseMnemonic | Верно True | |
| TextBox TextBox | Имя Name | customerName customerName |
| Текст Text | (нет) (none) | |
| TabIndex TabIndex | 3 3 | |
| AccessibleDescription AccessibleDescription | имя пользователя; Customer name | |
| AccessibleName AccessibleName | имя пользователя; Customer name | |
| GroupBox GroupBox | Имя Name | sizeOptions sizeOptions |
| AccessibleDescription AccessibleDescription | Размеры порции пиццы Pizza size options | |
| AccessibleName AccessibleName | Размеры порции пиццы Pizza size options | |
| Текст Text | Размер пиццы Pizza size | |
| TabIndex TabIndex | 4 4 | |
| RadioButton RadioButton | Имя Name | smallPizza smallPizza |
| Текст Text | &Маленькая 300 р. &Small $6.00 | |
| Флажок установлен Checked | Верно True | |
| TabIndex TabIndex | 0 0 | |
| AccessibleDescription AccessibleDescription | Маленькая пицца Small pizza | |
| AccessibleName AccessibleName | Маленькая пицца Small pizza | |
| RadioButton RadioButton | Имя Name | largePizza largePizza |
| Текст Text | &Большая 500 р. &Large $10.00 | |
| TabIndex TabIndex | 1 1 | |
| AccessibleDescription AccessibleDescription | Большая пицца Large pizza | |
| AccessibleName AccessibleName | Большая пицца Large pizza | |
| Метка Label | Имя Name | toppingsLabel toppingsLabel |
| Текст Text | &Начинки (40 р. за каждую) &Toppings ($0.75 each) | |
| TabIndex TabIndex | 5 5 | |
| AccessibleDescription AccessibleDescription | Метка начинки Toppings label | |
| AccessibleName AccessibleName | Метка начинки Toppings label | |
| UseMnemonic UseMnemonic | Верно True | |
| CheckedListBox CheckedListBox | Имя Name | toppings toppings |
| TabIndex TabIndex | 6 6 | |
| AccessibleDescription AccessibleDescription | Выбор начинок Available toppings | |
| AccessibleName AccessibleName | Выбор начинок Available toppings | |
| Элементы Items | Пепперони, колбаса, грибы Pepperoni, Sausage, Mushrooms | |
| Кнопка Button | Имя Name | порядок order |
| Текст Text | &Порядок &Order | |
| TabIndex TabIndex | 7 7 | |
| AccessibleDescription AccessibleDescription | Сумма заказа Total the order | |
| AccessibleName AccessibleName | Сумма заказа Total order | |
| Кнопка Button | Имя Name | cancel cancel |
| Текст Text | О&тмена &Cancel | |
| TabIndex TabIndex | 8 8 | |
| AccessibleDescription AccessibleDescription | Отмена заказа Cancel the order | |
| AccessibleName AccessibleName | Отмена заказа Cancel order | |
| MainMenu MainMenu | Имя Name | theMainMenu theMainMenu |
| MenuItem MenuItem | Имя Name | fileCommands fileCommands |
| Текст Text | &Файл &File | |
| MenuItem MenuItem | Имя Name | exitApp exitApp |
| Текст Text | Вы&ход E&xit |
Форма будет выглядеть примерно так, как на следующем рисунке: Your form will look something like the following image:

Поддержка режима высокой контрастности Supporting High Contrast Mode
Режим высокой контрастности представляет собой тип системной настройки Windows, при которой удобство чтения текста повышается за счет более контрастных цветов и размеров шрифта, подходящих для пользователей с нарушениями зрения. High Contrast mode is a Windows system setting that improves readability by using contrasting colors and font sizes that are beneficial for visually impaired users. Свойство указывается, HighContrast чтобы определить, установлен ли режим Высокая контрастность. The HighContrast property is provided to determine whether the High Contrast mode is set.
Если свойство SystemInformation.HighContrast имеет значение true , то в приложении происходит следующее: If SystemInformation.HighContrast is true , the application should:
Все элементы пользовательского интерфейса отображаются с использованием системной цветовой схемы. Display all user interface elements using the system color scheme
Любая информация, передающаяся цветом, также передается с помощью визуальных или звуковых сигналов. Convey by visual cues or sound any information that is conveyed through color. Например, если определенный элемент списка выделен красным шрифтом, можно также отобразить его полужирным шрифтом, чтобы пользователь, не различающий цвета, видел, что элемент выделен. For example, if particular list items are highlighted by using a red font, you could also add bold to the font, so that the user has a non-color cue that the items are highlighted.
Опускаются все рисунки или узоры за текстом. Omit any images or patterns behind text
Приложение должно проверять значение свойства HighContrast при запуске и отвечать на системное событие UserPreferenceChanged. The application should check the setting of HighContrast when the application starts and respond to the system event UserPreferenceChanged. При изменении значения свойства HighContrast происходит событие UserPreferenceChanged. The UserPreferenceChanged event is raised whenever the value of HighContrast changes.
В этом примере единственным элементом, не использующим системные параметры цвета, является lblCompanyName . In our application, the only element that is not using the system settings for color is lblCompanyName . SystemColorsКласс используется для изменения параметров цвета метки на выбранные пользователем системные цвета. The SystemColors class is used to change the color settings of the label to the user-selected system colors.
Эффективный способ обеспечения высокой контрастности To enable High Contrast mode in an effective way
Создайте метод, задающий для метки системные цвета. Create a method to set the colors of the label to the system colors.
Вызовите процедуру SetColorScheme в конструкторе форм ( Public Sub New() в Visual Basic; public Form1() в Visual C#). Call the SetColorScheme procedure in the form constructor ( Public Sub New() in Visual Basic and public Form1() in Visual C#). Чтобы получить доступ к конструктору в Visual Basic, необходимо развернуть область с меткой Код, автоматически созданный конструктором форм Windows. To access the constructor in Visual Basic, you will need to expand the region labeled Windows Form Designer generated code.
Создайте процедуру обработки события с соответствующей подписью для реагирования на событие UserPreferenceChanged. Create an event procedure, with the appropriate signature, to respond to the UserPreferenceChanged event.
Добавьте код в конструктор форм после вызова метода InitializeComponents , чтобы подключить процедуру обработки событий к системному событию. Add code to the form constructor, after the call to InitializeComponents , to hook up the event procedure to the system event. Этот метод вызывает процедуру SetColorScheme . This method calls the SetColorScheme procedure.
Добавьте код в метод Dispose формы перед вызовом метода Dispose базового класса, чтобы освободить событие при закрытии приложения. Add code to the form Dispose method, before the call to the Dispose method of the base class, to release the event when the application closes. Чтобы получить доступ к методу Dispose в Visual Basic, необходимо развернуть область «Код, автоматически созданный конструктором форм Windows». To access the Dispose method in Visual Basic, you will need to expand the region labeled Windows Form Designer generated code.
Код системного события выполняется в потоке, отдельном от основного приложения. The system event code runs a thread separate from the main application. Если не освободить событие, то код, связанный с событием, будет выполняться даже после закрытия программы. If you do not release the event, the code that you hook up to the event will run even after the program is closed.
Нажмите клавишу F5 для запуска приложения. Press F5 to run the application.
Передача важной информации способами помимо звукового сигнала Conveying Important Information by Means Other Than Sound
В этом приложении никакая информация не предоставляется только с помощью звукового сигнала. In this application, no information is conveyed by sound alone. Если вы используете звук в своем приложении, следует также предусмотреть альтернативные способы передачи информации. If you use sound in your application, then you should supply the information by some other means as well.
Обеспечение передачи важной информации способами помимо звукового сигнала To supply information by some other means than sound
Сделайте строку заголовка мигающей с помощью функции FlashWindow интерфейса Windows API. Make the title bar flash by using the Windows API function FlashWindow. Пример вызова функций Windows API см. в разделе Пошаговое руководство. Вызов API Windows. For an example of how to call Windows API functions, see Walkthrough: Calling Windows APIs.
У пользователя может быть включена служба визуального оповещения Windows, что также приведет к миганию окна при подаче системных звуковых сигналов через встроенные динамики компьютера. The user may have the Windows SoundSentry service enabled, which will also cause the window to flash when the system sounds are played through the computer’s built-in speaker.
Выводите важную информацию в немодальном окне, чтобы пользователь мог реагировать на нее. Display the important information in a non-modal window so that the user may respond to it.
При выводе окна сообщения передавайте ему фокус клавиатуры. Display a message box that acquires the keyboard focus. Этот способ не следует применять в момент, когда пользователь может осуществлять ввод с клавиатуры. Avoid this method when the user may be typing.
Выводите индикатор состояния в области уведомлений о состоянии панели задач. Display a status indicator in the status notification area of the taskbar. Подробнее см. в разделе Практическое руководство. Добавление значков приложения на панель задач с помощью компонента NotifyIcon в Windows Forms. For details, see Adding Application Icons to the TaskBar with the Windows Forms NotifyIcon Component.
Тестирование приложения Testing the Application
Перед развертыванием приложения необходимо протестировать реализованные специальные возможности. Before deploying the application, you should test the accessibility features that you have implemented.
Тестирование специальных возможностей To test accessibility features
Для проверки доступа с клавиатуры отключите мышь и перейдите к каждому элемента пользовательского интерфейса, используя только клавиатуру. To test keyboard access, unplug the mouse and navigate the user interface for each feature using only the keyboard. Убедитесь в том, что все задачи можно выполнить с помощью клавиатуры. Ensure that all tasks may be performed using the keyboard only.
Для проверки режима высокой контрастности используйте компонент «Специальные возможности» на панели управления. To test support of High Contrast, choose the Accessibility Options icon in Control Panel. Выберите вкладку «Экран» и установите флажок «Высокая контрастность». Click the Display tab and select the Use High Contrast check box. Перейдите по всем элементам управления и убедитесь в том, что отражаются изменения цвета и шрифта. Navigate through all user interface elements to ensure that the color and font changes are reflected. Кроме того, убедитесь в том, что отсутствуют рисунки или узоры под текстом. Also, ensure that images or patterns drawn behind text are omitted.
В Windows NT 4 значок «Специальные возможности» на панели управления отсутствует. Windows NT 4 does not have an Accessibility Options icon in Control Panel. Поэтому этот способ изменения значения свойства SystemInformation.HighContrast не работает в Windows NT 4. Thus, this procedure for changing the SystemInformation.HighContrast setting does not work in Windows NT 4.
Доступны также другие средства тестирования специальных возможностей приложения. Other tools are readily available for testing the accessibility of an application.
Для тестирования демонстрации фокуса клавиатуры запустите экранную лупу. To test exposing the keyboard focus, run Magnifier. (Для этого нажмите кнопку Пуск, выберите Программы, Стандартные, Специальные возможности, а затем щелкните Экранная лупа.) (To open it, click the Start menu, point to Programs, point to Accessories, point to Accessibility, and then click Magnifier). Выполните переходы по интерфейсу пользователя, используя клавишу TAB и мышь. Navigate the user interface using both keyboard tabbing and the mouse. Убедитесь в том, что все переходы правильно отображаются экранной лупой. Ensure that all navigation is tracked properly in Magnifier.
Для проверки отображения элементов экрана запустите программу Inspect и перейдите к каждому элементу с помощью мыши и клавиши TAB. To test exposing screen elements, run Inspect, and use both the mouse and the TAB key to reach each element. Убедитесь в том, что сведения, выводящиеся в полях «Name», «State», «Role», «Location» и «Value» окна программы Inspect для каждого объекта в интерфейсе являются полезными для пользователя. Ensure that the information presented in the Name, State, Role, Location, and Value fields of the Inspect window is meaningful to the user for each object in the UI.


