/dev/head

Делаем из Komodo Edit полноценную IDE для python
В поисках нормальной IDE для python, я потратил много времени и сил и с каждым днём во мне всё больше и больше созревала ненависть к этому великолепному языку. Я с недавних пор начал програмить на Яве к которой по крайней мере есть три супер навороченные IDE (Eclipse, Netbeans и IntelliJIDEA). Недавно я захотел написать программу на питоне и понял, что мой emacs как-то не дотягивает до удобной работы ибо я уже привык к Netbeans который я использую для кодинга на яве. Увы из нового Netbeans поддержку пистона выпилили, печаль
Вот какой путь я прошёл:
- PyDev — конечно крут, но увы очень дико тормозит ибо это плагин для Eclipse, так что как-то не сложилось у меня.
- geany — конечно это не IDE, но слишком уж простая. Я её рассматривал, просто очень многие её советовали.
- emacs + python-mode — я до поисков IDE регулярно пользовался emacs’ом, удобно но это тоже не полноценная IDE.
- Spyder — эта хрень у меня так нормально не заработала ;(
- idle — простой стандартный редактор, не пойдёт.
- Eric — полнейший УГ, в стиле программ KDE, много кнопок и менюшек, короче работать на таком сложно.
- Monkey Studio — боже упаси, тоже самое что и Eric, да ещё вылетает после каждого чиха.
- Wing IDE 101 — не впечатлило, но IDE не плохая, но как-то не в моём вкусе 🙂
- DrPython — для начинающих, но не для меня.
- Komodo IDE — вот это я понимаю, стоящая вещь но увы платная 🙁
- Komodo Edit — редактор кода, недо-IDE. стойте. тут можно написать макросы. плагины. добавлять элементы интерфейса. круто. поговорим о этом чуде:
Установка
Есть два способа установки на Ubuntu.
- Скачать с оф.сайта —> распаковать —> установить
- Подключить репозиторий от доброго человека
После того как вы скачали и установили Komodo Edit, мы его запустим 🙂
Вот что пишет педовики про этот редактор:
Komodo Edit — бесплатный текстовый редактор для динамических языков программирования, изданный компанией-разработчиком ActiveState. Начиная с версии 4.3.0, распространяется под свободной тройной лицензией Mozilla — MPL, GNU GPL и GNU LGPL.
Komodo Edit унаследовал много свойств от коммерческой Komodo IDE, такие как широкий диапазон поддерживаемых языков (PHP, Python, Ruby, JavaScript, Perl, Tcl, XML, HTML 5, CSS 3) и платформ (GNU/Linux, Apple Mac OS, Microsoft Windows NT 5.0+).
Редактор поддерживает подсветку синтаксиса, синтаксиса на лету, а также автозавершение скобок, кавычек и зарезервированных слов. Быстрый запуск, удалённая работа с файлами, горячие клавиши, инструментарий с интегрированной поддержкой командной оболочки, макросов и сниппетов, а также механизм расширений аналогичный Mozilla Firefox.
Неплохой функционал, но много чего не хватает, например банальной кнопки Run, для запуска наших программ на python, вот сейчас мы займемся устранением этих проблем.
Добавляем менюшку и кнопку выполнения программ
Открываем меню View —> Tab & Sidebars —> Toolbox.
С боку появится панель Toolbox
Жмём на свободное пространство в этой панели и нажимаем правую кнопку мыши.
Add —> New Custom Menu —> Вводим название меню ( в нашем варианте это «Run»)
Ура появилось меню!
В Toolbar’е выбираем наше меню «Run», нажимаем правую кнопку мыши.
Появится окно —> в самом верхнем поле вводим название макроса в нашем случае «Run program», а в большой текстовой области вставляем макрос:
// Macro recorded on: Mon Oct 22 2012 01:25:32 GMT+0400 (MSK)
komodo.assertMacroVersion(3);
if (komodo.view) < komodo.view.setFocus(); >
ko.commands.doCommand(‘cmd_save’)
ko.run.output.kill(-1);
setTimeout(function() <
ko.run.runEncodedCommand(window, ‘%(python) \»%F\» <\'cwd\': u\'%D\'>‘);
>, 100);
После этого переходим на вкладку «Key Binding» —> «New Key Sequence»—> Нажимаем соответствующую клавишу которую вы хотите привязать к этому макросу (В нашем случае это «F5») —> Жмём «OK»
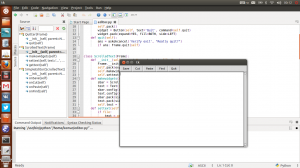
Вот так это должно выглядеть:
Source tree
Ну если кто внимательный, тот увидел на моём скрине крутое дерево кода «Source», расскажу как такую фичу добавить:
- Tools—>Add-ons —>Get Add-ons—> В поиске пишем «NST» и жмём Install.
- View —>Tab & Sidebars —>Source
Вот и всё, вы получаете достаточно неплохую IDE, но увы без продвинутого дебагера, как в коммерческой версии Komodo IDE.
Источник
Komodo Edit for Mac
Komodo Edit 12.0.1 Build 18441 LATEST
Mac OS X 10.9 or later
Komodo Edit for Mac 2021 full offline installer setup for Mac
Komodo Edit for Mac from ActiveState is a free, open source, multi-platform, multi-language editor (PHP, Python, Ruby, Perl and Tcl, JavaScript, CSS, HTML and template languages like RHTML, Template-Toolkit, HTML-Smarty and Django). Background syntax checking and syntax coloring catch errors immediately, while autocomplete and calltips guide you as you write. Available on Windows, Mac OS X and Linux. XPI extensions allow you to create your own plug-ins. XPI extension support provides the same capability as Firefox, with all standard Mozilla APIs based on XUL, XBL, and XPCOM, plus own for Python and JavaScript. Other features include Vi emulation, Emacs keybindings, code folding and code snippets.
Features and Highlights
Track Changes
The editor has gained a new left margin, which highlights unsaved changes, as well as any uncommitted SCC changes. Clicking on the margin shows a diff dialog of the changes, and allows you to revert individual changes. Sweet!
Commando (Go to Anything)
This powerful popup dialog is the combined successor of the Fast Open and Invoke Tool dialogs in previous versions of Komodo. Commando provides fuzzy matching, match highlighting, search for files (find any file under a folder), toolbox search, bookmark integration, shortcuts (go-tool) integration as well as custom category filtering.
GoLang Support
Google Go (GoLang) is now supported in Komodo, and features syntax coloring, code folding, syntax checking (linting) and code intelligence
Markdown Viewer
For Markdown files, Komodo provides a preview of the generated HTML directly within a Komodo split view and contents dynamically update whenever you make a change to the Markdown text — it doesn’t even need to be saved.
Kopy.io Helper
Like pastebin, now you can easily share snippets of code with other people directly from Komodo. Simply make a text selection and use the editor: right-click context menu and choose Share Code via Kopy.io. Kopy.io supports client side encryption, so you can make those shared pastes more secure.
Color Schemes and Themes
«We’ve updated the Komodo color schemes and we’ve made Tomorrow_Dark the new default Komodo color scheme (a dark-based scheme). The Komodo UI has been updated to match the latest operating systems, so Komodo now looks even better. We also added the ability to tweak the editor line height spacing.»
Notifications
Notification messages shown to the user now appear in a separate popup panel that overlays the main Komodo editor window (they previously appeared in the Komodo statusbar). This makes for more intuitive and informative use of Komodo; no more asking yourself «What just happened?».
Language Icons
Language icons have been overhauled to be consistent and easily identifiable by their colors and emblems. Komodo dynamically generates new icons for filetypes that it has not previously encountered, so you’ll always have unique icons for each language.
New Developer SDK
An overhaul of the Komodo APIs makes it easier to load and access the methods inside of Komodo. We’re now making use of CommonJS (aka Node.js) require() calls to load individual modules.
Note: Requires 64-bit processor.
Источник
Komodo edit python mac os
This readme explains how to get started building, using and developing with the Komodo Edit source base.
Whilst the main Komodo Edit source is hosted under this repository you may also want to check out the individual component/addon repositories under https://github.com/Komodo in case you only want to contribute to a specific component. This’ll save you some time and hassle as you would not have to build the entire project.
Table of Contents

There are several ways to get in contact with the Komodo devs:
Note that these are simplified steps of the building process, for a more in-depth guide check (outdated) BUILD.txt.
Building on Windows
Python >=2.7 (but not Python 3.x yet). You can install ActivePython from here.
Visual C++ 11.0 (aka Visual Studio 2012) and all the Platform SDKs for building Mozilla with vc11 as described here.
- Once installed remove the wget and hg directories
- Download version 2.2.0 and install it to a temp directory, then copy the wget directory from 2.2 to the 1.9 install directory
Install the Perl
Checkout Komodo Edit: git clone https://github.com/Komodo/KomodoEdit.git
Using the command line, enter your checkout directory and run:
This will configure and build mozilla and can take anywhere from 30 minutes to several hours to complete (depending on your specs). For most modern machines it should be about an hour.
After mozilla is built successfully go back to the main repo directory and build komodo:
This should take significantly less time than building Mozilla.
Once the build has completed you can simply run Komodo by executing bk run
Upon making any modifications to the source you will again have to run bk build , or simply bk build && bk run to quickly get back into Komodo. Subsequent builds should be a lot faster as much of the compiled data is cached.
Building on Mac
Python >=2.7 (but not Python 3.x yet). You can install ActivePython from here.
If you prefer the Python builds from python.org should be sufficient as well.
Xcode 6.4(SDK 10.9 & 10.10). For 8.0 see below. You can get version 6.4 from the developer downloads site.
MacOSX10.10.sdk or older
IDE ONLY SDK 10.8 for Code Intel. Can be found in Xcode 5.1.1
If you have/need other versions of Xcode installed then you can use xcode-select to change the active Xcode:
$ xcode-select -s /Path/To/Xcode\ 6.4.app/
Xcode Command Line Tools.
Open the Xcode preferences, then in the Downloads tab, select and install the Command Line Tools.
MacPorts. (Note: Fink may work too but most of the build testing and instructions is done with MacPorts.)
autoconf v2.13. Once you have MacPorts installed you need just run sudo port install autoconf213
ensure you are using clang or gcc 4.2 (or higher)
See http://developer.mozilla.org/en/docs/Mac_OS_X_Build_Prerequisites for more details on Mac OS X build prerequisites. However, following the above steps is meant to be sufficient to get Komodo building.
Xcode 8 Prerequisites
Officially we do not support Xcode 8, however it is possible to build Komodo under Xcode 8 using a new extra steps.
- Copy over the 10.8 and 10.9 SDK’s from an older XCode install, they should be in: Xcode.app/Contents/Developer/Platforms/macOSX.platform/
- Set MinimumSDKVersion to 10.9 in Xcode.app/Contents/Developer/Platforms/macOSX.platform/Info.plist
- Ensure you are using ccache 3.1 (later versions will break)
- Configure Mozilla with —options=disable-webrtc
Checkout Komodo Edit: git clone https://github.com/Komodo/KomodoEdit.git
Using the terminal, enter your checkout directory and run:
This will configure and build mozilla and can take anywhere from 30 minutes to several hours to complete (depending on your specs). For most modern machines it should be about an hour.
** Building with GCC 5.0 and higher **
If you are using GCC 5.0, the build may fail. If it does, there are changes that need to be made to two files. However, if you are running a clean build for the first time, you need to allow this part of the build to fail first. This is because the files are in the Mozilla part of the build which has to be downloaded first.
These files need to be changed:
- /KomodoEdit/mozilla/build/moz3500-ko9.10/mozilla/configure.in
See bug #1153109 in Mozilla’s bug database for more information.
See Porting to GCC 5 for more information.
After mozilla is built successfully, go back to the main repo directory and build komodo:
This should take significantly less time than building Mozilla.
Once the build has completed you can simply run Komodo by executing bk run
Upon making any modifications to the source you will again have to run bk build , or simply bk build && bk run to quickly get back into Komodo. Subsequent builds should be a lot faster as much of the compiled data is cached.
Building on Linux
Building with Docker
The easiest way to get started is to use our Docker image, this will basically provide you with a Ubuntu 12.04 based build of Komodo.
After cloning the repository simply navigate into
To use the docker image you need to of course have Docker installed as well as have X11 forwarding enabled in your SSH client (should work by default on most linux distros).
Prepare Docker Image
- Build the docker image: ./util/docker/docklet image
- Start your container: ./util/docker/docklet start
- SSH into your container to start working: ./util/docker/docklet ssh
Your project files will be mounted at /komodo/dev
NOTE — if you are updating from a previous version where your project files were at /root/komodo you will need to fix permissions on your Komodo project and profile folders. Ie:
You will also need to redo your build (distclean mozilla and komodo).
Once your image is prepared you can follow the building steps for linux as described above. You will be running these from the docker container, so ssh into it using the command above and then run the commands from /komodo/dev
Once your build is complete you exit out of the container ( exit ) and can then run Komodo with
To rebuild Komodo (after making changes) and run it again you can use
./util/docker/docklet build run
If your changes are not being reflected you may need to clean your build, to do this use
Or to do it all at once (clean, build and run)
./util/docker/docklet clean build run
If any errors occur during your first built-time and it is not obvious how to fix the issue on your own please refer to the Feedback section on how to get in contact with us.
Note that if building complications arise after you updated your repo with the latest changes you might need to clear your local cache as it might be conflicting with the new changes, to do this run bk distclean before running your build steps.
Build a single piece
Sometimes bk build is too much and bk build quick isn’t enough. If bk build quick doesn’t appear to pickup your changes, try pointing bk build at the piece in question.
Example
bk build build/release/modules/places #this will build the places module only
NOTE: Do not rely on this method as bk build quick is faster and in some cases does some steps that the above example won’t perform. Use it as a last ditch effort before you try bk distclean && bk build .
About
Komodo Edit is a fast and free multi-language code editor. Written in JS, Python, C++ and based on the Mozilla platform.
Источник


