- Установка Lazarus и Free Pascal Compiler в Linux и Windows
- Установка в Windows
- Установка в Linux
- Компилятор free pascal для линукс
- Компиляция Free Pascal в Linux
- Создание программы
- Компиляция и запуск
- Installing the Free Pascal Compiler
- Contents
- Overview
- Linux
- FPC Binary Packages
- FPC Tar Balls
- FPC sources
- Update from the source repository using SVN or Git
- Getting the source
- Getting a separate branch
- Documentation sources
- Compiling the FPC source
- FreeBSD
- Installing from the ports collection
- Installing from tar
- OpenBSD
- Installing from tar
- Installing from source on BSD/Linux
- Windows
- Installing an FPC release with the Windows installer
- Installing from source
- Obtaining the source with a command line svn client
- Obtaining the source with the GUI TortoiseSVN client
- Obtaining a bootstrap compiler
- Compiling the FPC source
- macOS
- Installing an FPC release from the official macOS packages
- Step 1: Download Xcode (optional)
- Step 2: Xcode Command Line Tools
- Step 3: Download FPC
- Installing from source
- FPC Trunk
- FPC Fixes 3.2
- Other installation options
- Testing the FPC Install
- Useful command-line switches for compiling from source
- Installing cross compilers
Установка Lazarus и Free Pascal Compiler в Linux и Windows
Смирнов Сергей
В этом деле есть два пути: простой и сложный. Простой путь заключается в том, чтобы просто скачать и установить бинарный релиз Lazarus, ссылку на который можно без особого труда найти на сайте проекта. Наиболее крупный недостаток этого пути — то, что версия системы будет не самая новая. В условиях относительно быстрого развития проекта придется мучительно долго ждать очередного бинарного релиза, чтобы заполучить какую-нибудь «вкусность». Поэтому, рассмотрим второй путь, тем более, что первый и описывать особо нечего. Сразу хочу предупредить, что зеркала ftp-серверов fpc обновляются довольно хаотично, поэтому будьте внимательны к датам файлов, которые собираетесь закачать.
Установка в Windows
Для начала нужно запастись всем необходимым. Я имею ввиду набор пакетов, необходимых для сборки и запуска Lazarus. Их всего три: бинарный релиз компилятора fpc, исходники Lazarus и исходники компилятора. Минимально потребуются первые два. Я не хочу давать точные ссылки на них, так как они чрезвычайно изменчивы. Лучше расскажу, как их искать. Бинарный релиз fpc можно обнаружить и на сайте самого fpc и на сайте Lazarus. Лучше брать тот, который свежее. Распаковав полученный архив в отдельный каталог, запустим install.exe и, если для обратного нет веских оснований, согласимся установить компилятор в предложенный каталог C:\pp. После этого добавим в переменную окружения PATH (в файле autoexec.bat) путь к компилятору, причем обязательно в начало, например так:
И перезагрузим компьютер. Далее будем искать самые новые исходники Lazarus. На практике — это ежедневный снапшот текущих исходников проекта, который можно обнаружить на каком-нибудь из зеркал ftp-сервера разработчиков fpc в каталоге вроде /pub/fpc/snapshot/lazarus. Скачаем и разархивируем (это будет архив lazarus.zip) исходники, допустим, в каталог C:\Lazarus, после чего запустим сеанс MS-DOS и выполним команды (их можно записать в bat-файл и запускать его):
Здесь мы в начале переходим в каталог исходных кодов, а затем просто запускаем сборку проекта в «автоматическом режиме». И не спрашивайте, зачем надо сначала скомпилировать файл ресурсов. Так устроен fpc в Windows. Последняя команда выглядит немного странно, но поверьте, без нее не обойтись. Когда мы будем пересобирать Lazarus из него самого (это необходимо при установке пакетов), он попытается перезаписать файл lazarus.exe и если тот будет загружен, а следовательно заблокирован операционной системой Windows, то случится ошибка линковщика. Именно поэтому мы переименовываем исполняемый файл и запускаем именно его. Разумеется, не обязательно использовать имя lazarus1.exe. Это может быть lazarus_safe.exe или любое другое имя, допустимое в ОС. Учитывая, что перекомпилировать Lazarus нам придется неоднократно, добавим в наш пакетный файл команды очистки. В итоге, например у меня, получается следующее:
Если Lazarus благополучно собрался, то можно уже запустить lazarus1.exe (или как Вы его там назвали). И первое сообщение, которое мы увидим будет о том, что не указан каталог с исходниками fpc. Это нормально. Продолжим работу. Через пару секунд система закончит грузиться и мы сможем удовлетворенно покидать контролы на макет формы автоматически создавшегося проекта. Без исходников fpc ничего больше сделать не получится.
Если компиляция Lazarus завершилась сообщением об ошибке или его запуск вызвал ошибку, то проще всего день подождать и попытаться с новым снапшотом, либо получить обновление через сервер cvs проекта. Как правило Lazarus должен собираться той версией компилятора, которая рекомендуется на сайте Lazarus и которую мы, надеюсь, и установили. Итак, будем считать, что все в порядке. Приступим к заключительному этапу.
И тут нас может ждать одна большая проблема: довольно часто команда разработчиков fpc не снабжает промежуточный релиз компилятора исходниками. Именно так обстоят дела с последней на сегодня версией 1.9.4. Оставим это на их совести и посмотрим, что можно сделать. К счастью, разработчики Lazarus сами заботятся об этом и на их сайте обычно можно найти исходники практически точно соответствующие банарному релизу компилятора. Если окажется, что это не так, у нас не будет другого выхода, как собрать компилятор самостоятельно или «накатить» бинарный снапшот. Последний способ представляется мне гораздо более затратным. Есть в обновлении компилятора и другой соблазн: все невизуальные компоненты Lazarus входят в состав библиотеки fcl, которая является частью компилятора, поэтому собирать новейшую версию Lazarus старым fpc зачастую просто не имеет смысла.
Для начала скачаем снапшот исходников fpc с одного из зеркал его сервера. Обычно это . /pub/fpc/snapshot/v19/source/fpc.zip или что-то вроде того. Распакуем архив в любое место (наверное, лучше, чтобы путь был без пробелов) и запустим сеанс MS-DOS, в котором вначале перейдем в корневой каталог исходников (это там, где каталоги compiler, demo, doc и т.д.), а потом (в предположении, что fpc у нас установлен в C:\pp\bin\win32) выполним пару команд:
Разумеется, если первая из команд завершится с ошибкой, то вторую выполнять не следует. В этом случае лучше подождать немного или, наоборот, взять более старые исходники. Больше ничего делать не надо. Если обе команды отработали успешно, то считайте, что у Вас уже новый компилятор. Теперь заново соберем и запустим Lazarus. Если это удалось сделать, то остается только указать ему каталог с исходниками fpc с помощью меню environment-environment options (окружение-параметры окружения). Если удалось найти исходники для уже готового бинарного дистрибутива fpc, то шаги с перекомпиляцией компилятора и Lazarus можно опустить. Всё. Lazarus готов к работе.
В заключение, не могу не заметить, что с каждым разом дистрибутив, подготовленный разработчиками Lazarus и включающий в себя всё необходимое, становится всё лучше и лучше. Пройдёт ещё немного времени и описанные здесь манипуляции будут нужны разве что для срочной сборки текущей девелоперской версии системы.
Установка в Linux
Если Вы еще не прочитали начало предыдущей главы, то самое время это сделать, потому, что установка Lazarus в Linux начинается с того-же самого: добывания установочных пакетов. Разница лишь в том, что бинарный дистрибутив fpc должен быть пригодным для Вашего дистрибутива Linux. У меня ASPLinux на 3-х дисках и поэтому я скачал и без малейших проблем установил rpm-пакет fpc 1.9.4. Исходники Lazarus и более свежей версии fpc у меня остались от установки под Windows.
Если у Вас простенький однодисковый дистрибутив, то, скорее всего, Вам придется сделать две вещи: доустановить пакеты binutils, make и gdb (которые проще всего найти на ftp-сервере разработчика дистрибутива) и создать симлинки на кой-какие библиотеки, используемые Lazarus. Например, для ALTLinux Junior мне пришлось выполнить вот такой нехитрый скрипт:
После этого можно собрать Lazarus просто командой make, находясь в корне каталога его исходников. «Пляски с бубном» как в Windows тут не нужны. В случае успешной сборки в этом каталоге появится исполняемый файл lazarus. Его и надо запускать. Еще удобнее создать на него ссылку на рабочем столе. И точно также надо указать расположение исходников используемой версии компилятора fpc. Если они у Вас есть. Если их нет, придется перекомпилировать компилятор. Как и в Windows, исходники fpc надо распаковать куда-нибудь и из их корневого каталога выполнить команды:
Только, в отличие от Windows, этого не будет достаточно. Вторая команда установит компилятор по-умолчанию куда-нибудь вроде /usr/local/lib/fpc в подкаталог 1.9.5, который можно там и оставить, а можно положить рядом с исходным, который у меня, например, лежит в /usr/lib/fpc. Можно также задать нужные префиксы еще при сборке, если не лень. Дальше необходимо создать новый файл конфигурации fpc.cfg, для чего предусмотрен специальный скрипт, который и надо выполнить, находясь в каталоге нового компилятора (у меня получилось в /usr/lib/fpc/1.9.5):
Здесь /etc — это каталог, где у Вас лежит fpc.cfg. И, наконец, последнее, что нужно сделать — это создать новый симлинк (ppc386) в каталоге /usr/bin на новый компилятор. Всё. Еще раз компилируем Lazarus и если все нормально — можно работать.
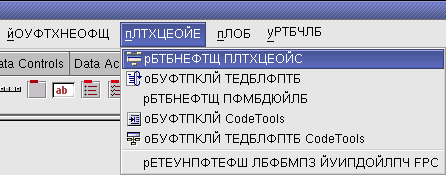
«Подводные камни». Их, наверное, много, но я заметил пока два. Первый — если не удалить каталог /home/ваш_логин/.lazarus с настройкими среды, то можно получить мощный сбой при автоматической загрузке последнего проекта, если он использовал какой-нибудь нестандартный пакет (его ведь ещё не успели установить). Для борьбы с этим в последних версиях Lazarus даже предусмотрен специальный ключ командной строки —skip-last-project. Второй связан с русификацией. Если у Вас стоит локаль cp1251, то при первом запуске Lazarus на экране будут «иероглифы», так как русификация Lazarus рассчитана на KOI-8R. Придется действовать вслепую. Вот так можно выбрать меню «Окружение»-«Параметры окружения»:
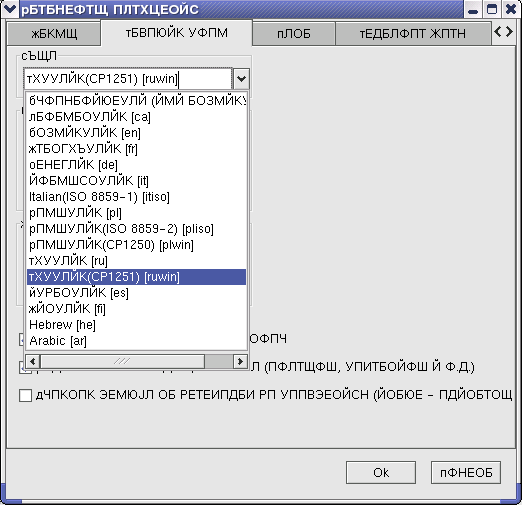
И установить нужную кодовую страницу русификации среды Lazarus:
Дальше надо нажать «OK», закрыть и повторно запустить Lazarus. Если удалить каталог с его настройками, то эту забавную процедуру придется повторить снова. В остальном, все проходит относительно гладко. Среда напоминает Delphi, хотя есть и отличия. Некоторое недоумение вызывает отсутствие компонент для работы с источниками данных. Разработчики объясняют это связью соответствующих пакетов с нестандартными библиотеками, в случае отсутствия которых эффект будет напоминать описанный выше первый «подводный камень». Но, что есть — то есть. На самом деле, установить пакет довольно легко, но это уже отдельная тема.
Источник
Компилятор free pascal для линукс
The l i n u x distribution of Free Pascal comes in three forms:
- a tar.gz version, also available as separate files.
- a .rpm (Red Hat Package Manager) version, and
- a .deb (Debian) version.
If you use the .rpm format, installation is limited to
Where X.Y.Z is the version number of the .rpm file, and ARCH is one of the supported architectures (i386, x86_64 etc.).
If you use Debian, installation is limited to
Here again, XXX is the version number of the .deb file.
You need root access to install these packages. The .tar file allows you to do an installation below your home directory if you don’t have root permissions.
When downloading the .tar file, or the separate files, installation is more interactive.
In case you downloaded the .tar file, you should first untar the file, in some directory where you have write permission, using the following command:
We supposed here that you downloaded the file fpc.tar somewhere from the Internet. (The real filename will have some version number in it, which we omit here for clarity.)
When the file is untarred, you will be left with more archive files, and an install program: an installation shell script.
If you downloaded the files as separate files, you should at least download the install.sh script, and the libraries (in libs.tar.gz ).
To install Free Pascal, all that you need to do now is give the following command:
And then you must answer some questions. They’re very simple, they’re mainly concerned with 2 things : 1. Places where you can install different things. 2. Deciding if you want to install certain components (such as sources and demo programs).
The script will automatically detect which components are present and can be installed. It will only offer to install what has been found. Because of this feature, you must keep the original names when downloading, since the script expects this.
If you run the installation script as the root user, you can just accept all installation defaults. If you don’t run as root , you must take care to supply the installation program with directory names where you have write permission, as it will attempt to create the directories you specify. In principle, you can install it wherever you want, though.
Источник
Компиляция Free Pascal в Linux
Free Pascal Compiler (FPC) — это свободно распространяемый компилятор языка Pascal с открытым исходным кодом. FPC — кроссплатформенный инструмент, поддерживающий огромное количество платформ.
В одной из предыдущих статей мы рассматривали вопрос установки компилятора FPC в Ubuntu. В данной же статье мы узнаем, как скомпилировать свою первую программу после установки данного компилятора.
Материалы, которые могут пригодиться: Создание программыПрограммы на языке FPC можно писать с помощью любого текстового редактора и сохранять в текстовом формате с расширением «.pas». Для примера такой программы я буду использовать утилиту для определения количества кругов итераций необходимых для нахождения случайного числа, равного нулю. Это одна из моих старых практических работ студенческих времен, какую-либо фактическую пользу данная программа скорее всего не несет. Перейдем к созданию программы. Создадим файл las.pas в домашнем каталоге пользователя: Откроем данный файл в редакторе nano и запишем в него нижеприведенный код: Компиляция и запускСохраним данный файл (las.pas) и выполним его компиляцию с помощью FPC: На выходе получем два файла: Файл с расширением «.o» нас не интересует — он является объектным файлом. Компилятор создает объектный файл для каждого исходного файла, прежде чем связать их вместе в окончательный исполняемый файл. Нас же интересует выходной бинарный исполняемый файл las. Именно его мы и попробуем запустить:
Как видно из скриншота выше — программа отработала и случайное число (от 0 до 100 (предела, который мы указали)) равное нулю было получено на 40 раз исполнения команды random();. Если при выполнении команды ./las ты получишь ошибку доступа или сообщение о том, что файл не найден, тогда задай права на исполнение на данный файл. По умолчанию такие права должны быть ему заданны компилятором, но бывает всякое: Источник Installing the Free Pascal CompilerContentsOverviewThere are a number of ways to install the Free Pascal Compiler and its libraries on your system. The current version and trunk, and sometimes beta and release candidates, are available directly from the FPC website (tar, exe, rpm, dmg, pkg files). In addition, versions of FPC are provided (including rpm and deb files) from the Lazarus download site. Linux users can almost certainly find FPC in their distribution’s repositories but may find that it is outdated. It is possible to build FPC from source, typically each release needs to be built with the previous release. It is possible to install FPC in the application space (often requiring root or administrator access) or in a your own user space. These things depend on your particular operating system. There is an extensive discussion of how to install and build Free Pascal compilers available here http://www.stack.nl/ marcov/buildfaq.pdf — it may be a little too detailed for some users, but it is very comprehensive. LinuxFPC Binary PackagesNote: You have a number of way to install FPC presented here, which one is best for you depends very much on what you are planning to do and if you need a very current version. If you are also planning on installing Lazarus, perhaps a quick look at Installing_Lazarus and Installing_Lazarus_on_Linux is a very good idea. With the recent release of FPC 3.2.0, only a few distributions will have the new FPC compiler in its repositories. You can do one of —
FPC Tar BallsAnother option is installing from a tar, an easy and possibly even more useful model. These tars are available for a wide range of Unix like systems. You need to download the appropriate binary tar for your OS and CPU and you may also need the source files, common for all OS/CPU. You install FPC this way in your own space, not as root. Here is a series of commands, not a script, that will install FPC on a 64 bit Linux system. It could be scripted but would would need sanity and error checking. Note that I like to install things like this in my $HOME/bin directory, if you prefer having it in $HOME, it is even easier, I am sure you can see the differences. Note: A tar install does not resolve dependencies, if they are not already present, first install binutils, make, gcc. Note: The second wget above assumes you are working with an amd64 (AMD or Intel) type machine, other platforms require a different tar ball. For example, for a Raspberry Pi, you would use — FPC sourcesThe FPC source files are stored in a Subversion (SVN) repository (https://svn.freepascal.org/svn/fpc/trunk) and mirrored in a Git repository (git://github.com/graemeg/freepascal.git). The repository keeps track of all the changes by developers in the source tree. Once you have the sources, please see Installing from source under BSD/Linux for instructions on how to install them. Update from the source repository using SVN or GitThe SVN or Git repository has been made accessible for everyone, with read-only access. This means that you can directly access the code, and you will have really the last-minute sources available. It is also a method which requires less bandwidth once you have done the first download (checkout in SVN lingo; clone in Git lingo). Getting the sourceFirst, you need to have an SVN or Git client installed. Use your package manager, install a tool like TortoiseSVN on Windows, or look at the Subversion web site or the Git webs site for more details and client downloads. Using command line svn: change directory (cd) to the parent directory of your development area, eg To retrieve the full source repository for the first time into an fpc subdirectory under your home directory, type: Note: FreeBSD includes the svnlite client in the base system which you can use instead of installing the full Subversion svn client. Using command line git: change directory (cd) to the parent directory of your development area, eg To retrieve the full source repository for the first time into an fpc subdirectory under your home directory, type: To update the sources which were downloaded (checked out/cloned) above: Getting a separate branchIf the current trunk version is in a state of rapid change and unsuitable for much use unless you want to work on the compiler itself, you can stay on a version that is updated with fixes. To do this, you have to find out a stable branch that you want to track instead of the default trunk development version. The example below shows how you can track the fixes_3_2 version; of course replace as needed depending on what branch you want to track. This example keeps the fixes in another directory under your home directory — it wouldn’t make sense to put two versions of the source in one directory. Update as usual: Note: There is no Git repository for fixes_3_2. Documentation sourcesThe documentation sources are in a separate repository called fpcdocs, so the command to get them is: If you want to learn more about subversion, read this excellent Subversion book which is also available online in different formats for free. For more information, see the Free Pascal website. Compiling the FPC source
Decide about install/to/directory and also add options that you need. /.fpc.cfg or /etc/fpc.cfg. It either has to be valid for the trunk compiler as well or you have to move it to the ../etc directory above your compiler executable. E.g. if your compiler is in /software/fpc/3.2.0/bin), you have to move the fpc.cfg to /software/fpc/3.2.0/lib/fpc/etc. FreeBSDNote: If you wish to also install Lazarus, you can omit installing FPC with the steps below as the Lazarus port will install it for you. See Installing Lazarus on FreeBSD. Installing from the ports collectionThe FreeBSD ports collection has FPC v3.2.2 version in /usr/ports/lang/fpc. FPC is scattered over 105(!) packages. The FPC source is now installed by default; it previously needed to be copied and uncompressed from /usr/ports/distfiles/freepascal. This must be done as root. Also, you can install FPC and units from pkg binaries: Once FPC is installed you can check if it’s working by simply running as a normal user: which should produce output similar to this: Installing from tarSelect the appropriate 32 bit/64 bit tar file based on your system. For x86_64 64-bit FreeBSD, download from x86_64. For i386 32-bit FreeBSD, download from i386. To install Free Pascal from a terminal: Replace the desired Free Pascal version (3.0.4, 3.2.0, 3.2.2 or 3.3.1) and architecture (x86_64 or i386) as required. If you want to install the Free Pascal Compiler globally, for example in /usr/local, run the install.sh script as root. install.sh script uses bash shell syntax. If you get Bad substitution error, make sure you run script with bash. If you are on FreeBSD 12 or newer, the default linker is the lld . This may cause problems if you have code that uses, for example, the cthreads unit as in the following program: The executable generated for this program will cause a segmentation fault when run. To fix this issue, you need to install the GNU linker: and add a symbolic-link from /usr/local/bin/ld.bfd to /bin/ld.bfd . OpenBSDInstalling from tarSelect the appropriate 32 bit/64 bit tar file based on your system. For x86_64 64-bit OpenBSD, download from x86_64. For i386 32-bit OpenBSD, download from i386. To install Free Pascal from a terminal: Replace the desired Free Pascal version (3.0.4, 3.2.0 or 3.3.1) and architecture (x86_64 or i386) as required. If you want to install the Free Pascal Compiler globally, for example in /usr/local, run the install.sh script as root. install.sh script uses bash shell syntax. If you get Bad subtitution error, make sure you run script with bash. OpenBSD uses ksh as default shell. You need to install bash manually. Installing from source on BSD/LinuxEffectively, you need: 2. A starting (bootstrap) FPC compiler. An FPC release can always be built by the previously released FPC version, and FPC trunk can always be built by the current FPC release. You can download a bootstrap Free Pascal Compiler or use your distribution’s package management/software system to install one. FPC build process:
WindowsInstalling an FPC release with the Windows installerWarning: If you are intending to also install Lazarus using the official Windows installer which installs both FPC + Lazarus, please ignore these instructions and instead refer to Installing Lazarus on Windows to avoid having to resolve any resulting conflicts. By far the easiest way to get a working installation of the Free Pascal Compiler is to download and run the appropriate self-extracting Windows installer from the official SourceForge repository for FPC 3.2.0 — this release contains the current versions of the Free Pascal Compiler and the Free Pascal libraries. The Windows installer packages install very easily, and should work ‘out-of-the-box’. You will be taken through a typical Windows installation wizard to install the FPC binaries and Free Pascal libraries:
Installing from sourceInstalling from source with a command line Subversion (svn) client is not for novices, since you also need a working bootstrap compiler to be able to compile the Free Pascal Compiler from source. Instructions for obtaining a bootstrap compiler are included below. Obtaining the source with a command line svn clientThe easiest way to get the Free Pascal Compiler source is by using a Subversion (svn) client. The exact commands may vary between svn clients; the commands given below are for the command line Subversion client downloadable from SourceForge — win32svn. Source for a release version of FPCFirst create a directory in which you’d like to keep the source. Any normal user can do this. Create a directory for FPC (eg C:\Source) by typing the following at a command prompt: Now type issue the following command at a command prompt: Wait while the Subversion repository is downloaded to the fpc-3.2.0 directory in your newly created Source directory. This can take a while. have a look at the helpful Free Pascal Forums while you wait 🙂 You may also like to read the excellent How to use the Forum Wiki article which explains how to get answers to pesky questions quickly. New Forum users are always welcome. Source for a non-release version of FPCThere are two current non-release branches of the Free Pascal Compiler: the development (trunk) branch and the Fixes 3.2.0 branch which includes additional fixes to the released 3.2.0 version. Developers, and those who like living on the bleeding edge and testing new features and fixes, will choose the development version; more normal users, who wish to use a stable branch with some additional fixes since the latest release version, will choose the Fixes branch. The instructions below cover both these branches. If it does not already exist, create a directory in which you’d like to keep the FPC source (eg C:\Source). Any normal user can do this. Now type the following command at a command prompt: For the Fixes branch of FPC 3.2.0 For the Development (trunk) branch of FPC Hint: To update your local copy of the repository with subsequent changes, you need only do: For the Fixes branch of FPC 3.2.0 For the Development (trunk) branch of FPC Obtaining the source with the GUI TortoiseSVN clientThe first thing you will probably need to do is download the GUI TortoiseSVN Subversion client from TortoiseSVN website Download file area if you do not already have it available. After downloading the appropriate Windows installer and installing it, you are ready to begin. You will notice that TortoiseSVN has added a number of shortcuts to the File Explorer context menu so that you can work easily with svn without needing to use the command prompt. Source for a release version of FPCTo download the latest release version Free Pascal Compiler source from the Subversion repository, first create the directory in which you’d like to keep the source. Any normal user can do this:
Source for a non-release version of FPCThere are two current non-release branches of the Free Pascal Compiler: the development (trunk) branch and the Fixes 3.2.0 branch which includes additional fixes to the released 3.2.0 version. Developers, and those who like living on the bleeding edge and testing new features and fixes, will choose the development version; more normal users, who wish to use a stable branch with some additional fixes since the latest release version, will choose the Fixes branch. The instructions below cover both these branches. The instructions are the same as for a release version of the Free Pascal Compiler given above, except that you will need to replace the «URL of the Repository» and «Checkout directory» fields with the appropriate values set out below: For the Fixes branch of FPC For the Development (trunk) branch of FPC Updating your local repository To update your local copy of the repository with subsequent source changes:
Obtaining a bootstrap compilerTo obtain a bootstrap Free Pascal Compiler, download the distribution package fpc-3.2.0.i386-win32.exe and run it — it is a self-extracting installer, so just follow the instructions to install it. The installer should set the PATH environment variable as appropriate. Then restart windows. Compiling the FPC sourceBefore you start
|


