- MinGW/FFmpeg installation guide
- Contents
- Introduction
- Installing Requirements
- MinGW
- Option 1: MinGW-w64
- Option 2: MinGW «mainline»
- Option 1: MSYS
- Option 2: MSYS2
- MinGW Installation Style
- libx264
- lib.exe
- DirectShow
- OpenAL
- pkg-config
- Configuring FFmpeg
- Windows Compilation Tips
- More Resources
- Pruffme BLOG .
- Инструкция по установке и работе с программой FFMPEG на Windows
- С ЧЕГО НАЧАТЬ?
MinGW/FFmpeg installation guide
Contents
Introduction
In order to compile FFmpeg on Windows, you need to install the MinGW environment and a few tools which are strictly required. The following sections give some indications for installing some of the required components.
Tip: The Media Autobuild Suite can automatically build FFmpeg under Windows with several external dependencies. You can still follow this guide if you want to manually compile FFmpeg.
Note that the only strict requirement for compiling a plain vanilla version of FFmpeg (no external libraries) is MinGW (compilation environment) and Git required for downloading and updating the source code.
Also note that sometimes it is easier to cross compile, see the Cross Compiling guide, which also may contain some hints/clues for compiling the various dependencies you’d need using MinGW, too.
Some Windows-specific compilation information can be found in the official documentation.
Installing Requirements
MinGW
You have two options for a compiler:
Both offer working gcc s for Windows. The first tends to be slightly more up to date than the latter, and offers more library compatibility, like DirectShow headers, so preferably use MinGW-w64.
The MinGW package provides gcc and headers.
Option 1: MinGW-w64
This project does not have downloadable compilers by default; you’ll probably want the «mingw-builds» project, which provides pre-built compilers.
To use MinGW-w64, install Msys using the MinGW setup, as above, but only check the «msys for developers option». Then install a MinGW-w64 compiler. Here is an example.
Then configure your PATH appropriately, for instance mine looks like this:
In this case, the MINGW_PATH would be:
To access DirectShow input devices you have to use MinGW-w64 as the compiler (or cross compiler), as straight MinGW headers don’t have this functionality.
To install libraries you’d either use
The latter if you wanted to install something to your MINGW_PATH itself.
Option 2: MinGW «mainline»
Go to http://www.mingw.org and look for the «Download» page.
The recommended way to install MinGW/MSys is through the automated installer, mingw-get-setup.exe .
This will download most of the basic core packages. It will usually install in C:\MinGW but you can define the installation path when configuring. Note down this path (that we will call as «MinGW path» or MINGW_PATH later in this guide).
Once you install MinGW you should see in the Windows menu the «MinGW» entry with the option «MinGW shell». Click on it and it will launch a terminal with a bash shell. This is supposed to be a GNU/Unix environment, and you’re supposed to know a bit of UNIX commands for getting through it. Alternatively, or in case the MinGW entry is missing, you need to manually launch the MINGW_PATH/msys/1.0/msys.bat file.
MinGW adopts a mounting mechanism to make Windows directories appear like native UNIX-like paths. Check the output of the mount command, and familiarize yourself with the mapping mechanism. In the rest of the guide, when not explicitly specified, we’ll use the UNIX mapped paths.
Note that by default the user home will be placed in MINGW_PATH/msys/1.0/home/USER , and that will be your working directory of the msys shell.
Finally, you need to edit the system environment PATH variable, adding the MINGW_PATH/bin directory. This will allow both the system and the msys shell to find programs provided by MinGW. This can be done for example with:
Msys provides shell utilities like make and bash . Choose either MSys or MSYS2.
Option 1: MSYS
Then run its console. You will be able to then run configure (assuming you’ve installed a gcc to your PATH already).
Option 2: MSYS2
Then run the mingw32_shell.bat or mingw64_shell.bat command in the MSYS2 installation home. Be careful not to run the MSYS2 Shell as this will result in FFmpeg’s configure saying building an MSYS binary is not recommended and exiting.
Now install requisite packages:
Alternatively, you can also install GCC from MSYS2 system itself, and not need any of the MinGW-w64 instructions above:
MSYS2 comes with a package management system called pacman adopted from Arch Linux, and allows to easily install binary packages from the commandline. To compile FFmpeg, you need to install the mingw-w64 GCC environment (either in the i686 or x86_x64 flavor). Use one of the commands:
This installs «gcc.exe» commands that are actually built for MSYS2 but are the windows gcc compilers. Configure and make as normal.
If you use MSYS2 many packages can be easily installed by using pacman (for example pacman -S pkg-config ).
Unfortunately the gcc.exe it provides seems to create binary’s that require files like «libgcc_s_dw2-1.dll» and «libwinpthread-1.dll» (etc.?) to accompany your executable, so can cause some difficulty there. You can remove some files to remove dependencies on things like «libbzip2.dll» see https://ffmpeg.zeranoe.com/forum/viewtopic.php?f=5&t=3688 and possibly avoid the libgcc.dll requirement by using «-static» at linking time.
MinGW Installation Style
It is a good norm to keep the locally installed packages separated from the MinGW/MSys packages. For this reason we recommend to use /usr/local for locally installed files. That means that packages will be configured with —prefix=/usr/local . For removing the local packages it will be sufficient to erase the /usr/local directory.
This should also avoid conflicts with MinGW/MSys.
Git is the source code control system used by FFmpeg, and you need it for downloading and updating the source code.
The official Git project site is here. The recommended installation way is through the Git for Windows project.
The autoinstaller will create a separate Msys environment for Git. In order to be able to let your MinGW and msysgit coexist on the same system you need some tuning in the Windows environment. Indeed the msysgit installer will modify some of the environment values set by the MinGW install, and you may need to manually restore them.
In particular, you need to:
- Fix the HOME variable, so that it will point to $MINGW_PATH/msys/1.0/home/$USER
- Edit the path, so that the git bin and cmd paths are located after the corresponding MinGW bin directory.
YASM is a non-strict requirement; it allows for optimized compilation so it is recommended to install it. The easiest way to install it for Windows is by simply downloading the binary provided.
You’ll have to choose between the versions provided (e.g. 32 vs 64 bit), download and install it in /usr/local/bin or in /bin .
Since the name of the binary is usually suffixed with the program version (e.g. it is named yasm-1.1.0-win32.exe ), you need to create a copy named yasm , so it can be invoked by using simply yasm .
Alternatively you may install the source version and compile it.
In case the system is complaining about a missing MSVCR100.dll file when trying to run yasm, you may need to install the Microsoft Visual C++ 2010 SP1 Redistributable Package from Microsoft.
SDL is required for ffplay and the SDL output device. You need the 1.2 version.
Once installed in the MINGW_PATH , the FFmpeg configure should be able to auto-detect it.
Note that SDL flags, as issued by sdl-config/pkg-config, contain the -mwindows flag which will prevent applications to log on console. As a workaround you’ll need to remove that flag, e.g. by editing the sdl-config script or the SDL pkg-config file in lib.
libx264
libx264 can be compiled and installed in the MinGW+MSys environment.
If you want libx264.dll files (instead of static) you should use the —enable-shared configure option.
The only way I was able to figure out how to get this to work was to add —extra-ldflags=L../libx264_unpacked_dir —extra-cflags=-I../libx264_unpacked_dir to my ffmpeg configure line, after successfully building libx264.
lib.exe
lib.exe is required for creating .dll.a import stub libraries, so that you can link to the DLLs from MSVC (Microsoft Visual Studio compiler, bundled with it), if you are planning on creating a DLL style FFmpeg build and need/want to do that.
lib.exe is a Microsoft tool used for creating DLL files. It is bundled together with Visual Studio. Microsoft Visual Studio Express download is available for free. Once installed you’ll need to add the directory where lib.exe is located to the system path.
dlltool.exe (which is part of binutils) may be used instead of lib.exe . The downside in this case is that the import libraries break if you use the linker optimization option in MSVC (which is enabled by default).
DirectShow
DirectShow SDK is required for DirectShow capture, supported through the dshow input device. DirectShow support is enabled only through mingw-64 compilation.
For more detailed information related to DirectShow check the dshow section in the FFmpeg manual.
OpenAL
Required for acquiring from the audio device using the OpenAL framework.
Download and install the SDK (the file named like «OpenAL11CoreSDK.zip»), then configure with —enable-openal (you may need to add —extra-cflags and —extra-ldflags for specifying where OpenAL libraries and headers are placed). Note that you may also need to move all the headers in the include dir to a separate «AL» directory, which is where FFmpeg will look for the OpenAL headers.
pkg-config
pkg-config is a program used by many software libraries (FFmpeg included) for determining the compilation flags to use. It is not installed by default by MinGW, so you need to manually install it.
There is also a related MinGW FAQ:
pkg-config can be found at one of these addresses:
At this point you need to install the following packages:
- GLib (Binaries)
- gettext-runtime (Binaries)
- pkg-config (Binaries)
gettext-runtime contains the intl.dll (GNU Internationalization Library) which is required by pkg-config.
Configuring FFmpeg
To configure a basic build you just need to run ./configure in the FFmpeg source directory.
Once you installed all the necessary packages (MinGW is the only strict requirement for building FFmpeg, git is required to update your FFmpeg source), you need to open a MinGW shell, change directory to where you checked out the FFmpeg sources, and configure and make FFmpeg the usual way.
Note that under MinGW, configuring can be painfully slow.
Windows Compilation Tips
- You may want to use Dependency Walker for troubleshooting dependency issues. depends.exe is similar in purpose to ldd .
- Working with a Windows native terminal can be painful, especially if you have a non-US/EN keyboard and you have no means to type special characters like ‘
‘. AutoHotKey is a nice FLOSS project which allows to compose shortcuts and do other nifty things.
More Resources
You can find many resources dedicated to FFmpeg in Windows in:
At this address you can find a MinGW environment used for MPlayer, as well as FFmpeg builds:
The following project has a script for cross compiling lots of FFmpeg dependencies, and may contain hints as to how to get them working with mingw:
Pruffme BLOG .
Платформа для создания и проведения вебинаров и автовебинаров, онлайн-курсов, тестов и опросов Pruffme.com
Инструкция по установке и работе с программой FFMPEG на Windows
Информация для тех, кто хотел бы научиться на своём компьютере/ноутбуке редактировать записи вебинаров через специальную программу!
Программа FFMPEG предназначена для конвертирования видео и аудио файлов через специальные команды в командной строке Вашего компьютера/ноутбука, благодаря которым возможно самостоятельно:
1. Изменить формат и качество записи;
2. Изменить разрешение и битрейт для видео и аудио;
3. Нарезать фрагменты записи на отдельные записи;
4. Замедлить и ускорить воспроизведение видео и аудио;
5. Склеить видео и аудио в единый файл;
6. Удалить аудио из видео, а также извлечь аудио из видео.
(Более подробную информацию см. в шаге №5).
С ЧЕГО НАЧАТЬ?
Шаг №1. Скачиваем программу на Windows
Для начала Вам необходимо перейти на официальный сайт разработчиков и скачать файл программы. Ссылка на скачивание программы: https://yadi.sk/d/_ybZxA8VN2pBmQ
Шаг №2. Установка программы
Этот шаг требует особого внимания, так как работа с FFMPEG происходит через командную строку, поэтому разберём по пунктам алгоритм установки FFMPEG:
1. Вы скачали архивный файл и Вам необходимо его открыть;
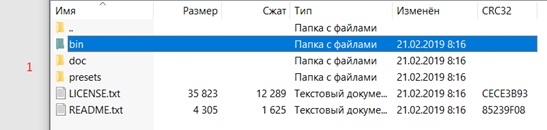
2. Открываем скачанный архивный файл и находим папку «bin», внутри которой располагается файл-приложение «ffmpeg.exe»;
Примечание! Если у Вас нет архиватора для открытия файла, то можно скачать архиватор WinRar на официальном сайте разработчиков.
Ссылка на скачивание: https://winrar-pro-download.com

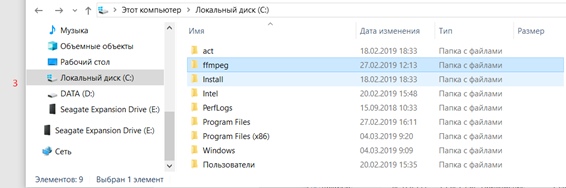
3. Извлекаем файл «ffmpeg.exe» в заранее созданную папку «ffmpeg» на корневом диске (как правило, это диск «C»);
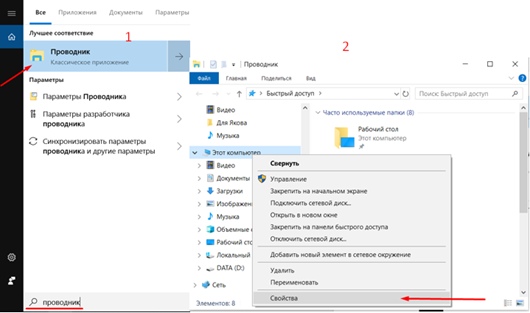
4. Далее заходим в проводник (иконка «лупа») и находим «Мой компьютер». Нажимаем на него правой кнопкой мыши и выбираем «свойства», после чего появится следующее окно:
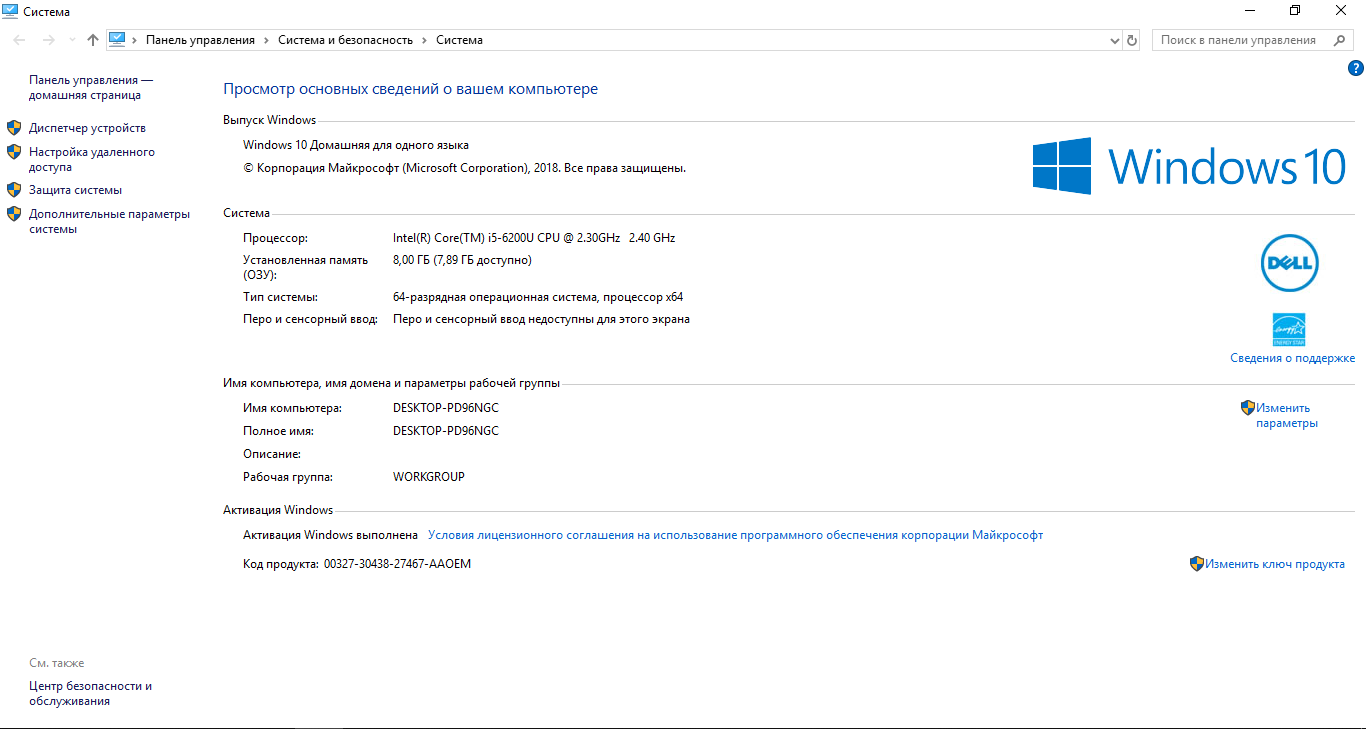
5. Нажимаем на «Дополнительные параметры системы» и заходим в «переменные среды»;
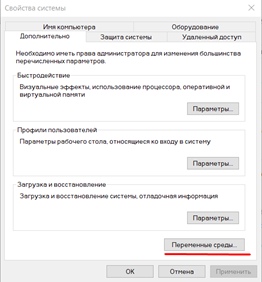
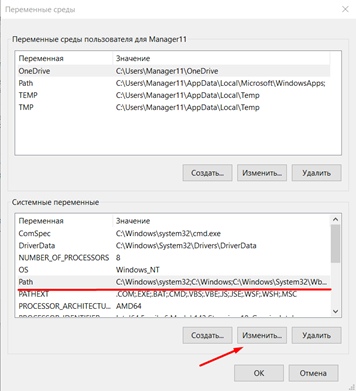
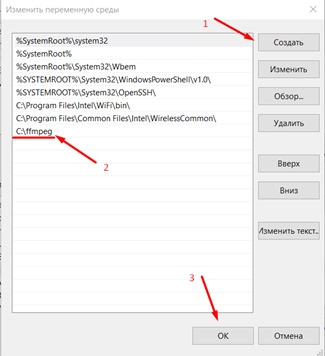
6. Находим в окошке «системные примененные» пункт «Path», нажимаем «изменить»;
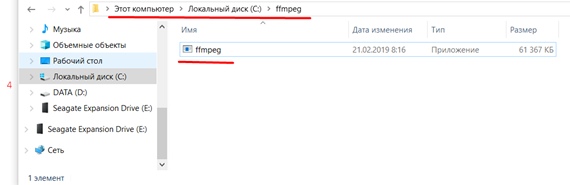
7. В появившемся окне нажимаем на кнопку «создать» и указываем путь к файлу ffmpeg. Для этого переходим в папку с ffmpeg и кликаем на строчку, выделенную красным (см. на картинке), после чего нажмите сочетание клавиш Ctrl+C;
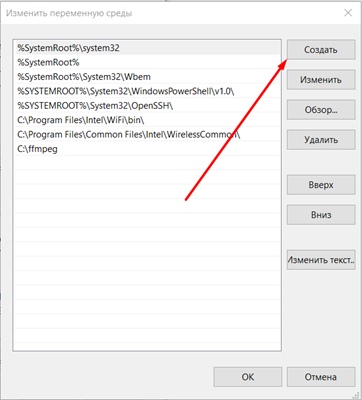

8. После того, как нажали клавишу «Создать» (1), вставляем скопированное в строку (2) и нажимаем на «Ок» (3).
Шаг №3. Запускаем программу
1) Если вы используете ОС Windows10, то вам достаточно нажать на значок «поиск»(лупа) и ввести английскими буквами «cmd»:
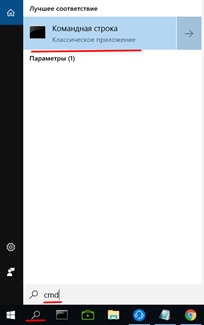
(Прим. Если же Вы используете более ранние версии Windows (7,8), то Вам нужно зайти в меню «пуск» и строка «поиск» будет в самом низу).
2) Далее, заходим в командную строку и проверяем – работает ли программа. Для этого вводим: ffmpeg, после чего нажимаем кнопку Enter. Если Вы всё сделали правильно, у Вас будет примерно следующий отклик в командной строке:

(Прим. Если же у Вас появляются строки красного цвета, то вероятно – Вы сделали что-то не так. Попробуйте повторить алгоритм по новой).
Шаг №4. Используемые файлы
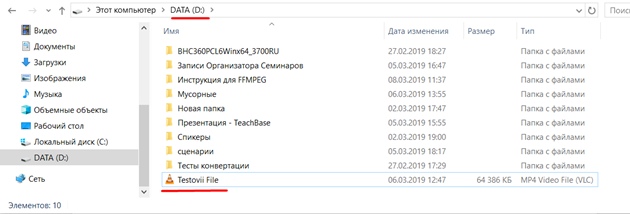
Для начала работы с видео-файлом необходимо, чтобы файл находился в директории доступных дисков. Например: имеется видео-файл «Testovii File.mp4». Я расположил его прямо на диск D.
Таким же образом разместите остальные файлы, с которыми вы собираетесь работать в ffmpeg.
Либо, если не хотите перетаскивать файл, вам нужно будет скопировать путь к файлу(об этом позже).
(Прим. Рекомендуется использовать английские буквы в названии файлов, с которыми собираетесь работать)
Теперь с файлами можно работать.
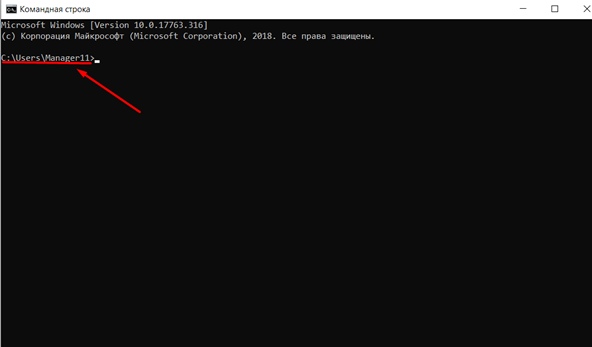
Запускаем командную строку. Как правило, по умолчанию в командной строке указан путь к корневой папке, например:
Чтобы начать обрабатывать файл, необходимо указать тот диск, где расположен нужный файл. В нашем случае, это Диск D. Для смены диска, в строке прописываем команду: D:
После чего нажимаем Enter и видим, что теперь у нас отображается Диск D:


Теперь мы можем начать работать с файлами. Любая команда начинается со слова ffmpeg в строке:

Далее будет представлен ряд простых команд, где input.mp4 – название исходного видео-файла; input.mp3 – название исходного аудио-файла; output.format – название полученного файла; а ключ «–i» -это то, что необходимо прописывать перед обрабатываемым файлом (input.mp4/input.mp3).
Шаг №5. Основные команды
1) Для того, чтобы перевести видео в другой видеоформат:
ffmpeg –i Z\input.avi output.mp4
(Прим. – Z\ — путь к файлу input.avi, пример: выбираем нужный файл в папке (1), кликаем на него, затем кликаем на строку с его расположение (2), и копируем правой кнопкой мышки; также следует помнить, что при попытке форматирования из более легкого файла(Mp4) в более тяжелый(avi) – полученный файл будет в более плохом качестве)
2) Для того, чтобы перевести видео в аудио:
ffmpeg –i Z\input.mp4 output.mp3
(Прим. – Если появляется красная строка при нажатии ENTER, то попробуйте поместить input.mp4 в Кавычки – «input.mp4»)
3) Для того, чтобы вырезать фрагмент из видео:
Способ : 1 – обрезать концовку.
ffmpeg -i input.mp4 –t 00:00:00 output.mp4
(Прим. -t 00:00:00 – указывается время продолжительности видео от начала)
Способ : 2 – вырезать кусок из любой точки.
ffmpeg -ss 00:00:00 -i input.mp4 -t 00:00:00 output.mp4
(Прим. –ss 00:00:00 – указывается время начала желаемого куска; -t 00:00:00 – указывается время продолжительности желаемого куска;
Если появляется красная строка, то попробуйте поместить input.mp4 в Кавычки – «input.mp4»)
P.S Применимо как к видео, так и к аудио файлам!
4) Команда для склеивания пустого видео файла и аудио файла:
ffmpeg -i input.mp3 -i input.mp4 output.mp4
(Прим. Если вы используете разные по длительности файлы, то у них вседа будет совпадать начало, а длительность конечного файла будет равна самому длинному исходному файлу, пример:
Аудиофайл.mp3 – длительность 00:05:00 + Видеофайл.mp4 – длительность 00:03:00 = финальный файл.mp4 – длительность 00:05:00)
5) Команда для удаления аудио из видео:
ffmpeg -i input.avi -vcodec copy –an output.avi
6) Команда для ускорения/замедления видео:
ffmpeg –i input.avi -vf setpts=X*PTS output.avi
(Прим. X больше 1 – замедление; X меньше 1 — ускорение)
7) Команда для ускорения/замедления аудио:
Ffmpeg –I input.mp3 -filter:a «atempo=X» –vn output.mp3
(Прим. X значение больше нуля – ускорение; X значение меньше нуля (0.5;0.8) – замедление)
8) Команда для ускорения/замедления файла с аудио и видео:
ffmpeg -i input.mp4 -filter_complex «[0:v]setpts=X*PTS[v];[0:a]atempo=Y[a]» -map «[v]» -map «[a]» output.mp4
(Прим. X больше 1 – замедление; X меньше 1 – ускорение;
Y значение больше нуля – ускорение; Y значение меньше нуля (0.5;0.8) – замедление)
9) Для того, чтобы изменить параметр «качество»:
ffmpeg -i input.avi -q X output.avi
(Прим. X от 23 до 50, где 50 – минимальное качество; данная опция помогает уменьшить размер файла)
ffmpeg -i input.mp4 -crf X output.mp4
10) Для того, чтобы изменить Битрейт:
Для аудио: ffmpeg -i input.mp4 -b:a 128k output.mp4
(Прим. Где 128k– цифра, обозначающая размер битрейта)
Для видео: ffmpeg -i input.mp4″ -b:v 1000k output.mp4
11) Для того, чтобы изменить разрешение видео:
ffmpeg -i input.mp4 -s X output.mp4
(Прим. X – разрешение, например: «-s 800×600»)
Для общего сжатия видео:
13) ffmpeg -i input.mp4 -codec:a copy -vcodec libx264 -preset fast -crf 32 output.mp4
В этой статье были рассмотрены:
— Способ установки ffmpeg для Windows
— Была представлена выжимка из самых распространённых команд, которая позволит использовать программу «ffmpeg» для решения, пусть не самых сложных, но всё-же возникающих задач.
Команды в программе ffmpeg не ограничиваются тем списком, что был представлен в данной статье. Как было сказано выше, в интернете существует более 200 страниц со всевозможными командами, призванными проводить манипуляции с видео\аудио-файлами, которыми, как правило, пользуются продвинутые пользователи.
Мы же предоставили краткий мануал по основным возможностям, и надеемся, что этот материал окажется полезным для наших пользователей!


