- Create a package for Windows
- Requirements
- PyInstaller default hook
- Packaging a simple app
- Single File Application
- Bundling Data Files
- Packaging a video app with gstreamer
- Overwriting the default hook
- Including/excluding video and audio and reducing app size
- Kivy — Создание мобильных приложений на Python
- Содержание
- Принципы работы фреймворка Kivy Python
- Установка Kivy
- Installation on Windows
- Installation components
- Installing Python
- Source installation Dependencies
- Making Python available anywhere
- Double-click method
- Send-to method
- Трепещущий Kivy. Обзор возможностей фреймворка Kivy и библиотеки KivyMD
- Flutter:
- StoryCard
- Flutter:
- TopBar
- Читают сейчас
- Редакторский дайджест
- Похожие публикации
- Разработка мобильных приложений на Python. Создание анимаций в Kivy. Part 2
- Материальный дизайн. Создание анимаций в Kivy
- Дополнительные компоненты для кроссплатформеннной библиотеки материального дизайна KivyMD
- Курсы
- Минуточку внимания
- Комментарии 26
Create a package for Windows
This document only applies for kivy 1.9.1 and greater.
Packaging your application for the Windows platform can only be done inside the Windows OS. The following process has been tested on Windows with the Kivy wheels installation, see at the end for alternate installations.
The package will be either 32 or 64 bits depending on which version of Python you ran it with.
Requirements
Latest Kivy (installed as described in Installation on Windows ).
PyInstaller 3.1+ ( pip install —upgrade pyinstaller ).
PyInstaller default hook
This section applies to PyInstaller (>= 3.1) that includes the kivy hooks. To overwrite the default hook the following examples need to be slightly modified. See Overwriting the default hook .
Packaging a simple app
For this example, we’ll package the touchtracer example project and embed a custom icon. The location of the kivy examples is, when using the wheels, installed to python\\share\\kivy-examples and when using the github source code installed as kivy\\examples . We’ll just refer to the full path leading to the examples as examples-path . The touchtracer example is in examples-path\\demo\\touchtracer and the main file is named main.py .
Open your command line shell and ensure that python is on the path (i.e. python works).
Create a folder into which the packaged app will be created. For example create a TouchApp folder and change to that directory with e.g. cd TouchApp . Then type:
You can also add an icon.ico file to the application folder in order to create an icon for the executable. If you don’t have a .ico file available, you can convert your icon.png file to ico using the web app ConvertICO. Save the icon.ico in the touchtracer directory and type:
For more options, please consult the PyInstaller Manual.
The spec file will be touchtracer.spec located in TouchApp . Now we need to edit the spec file to add the dependencies hooks to correctly build the exe. Open the spec file with your favorite editor and add these lines at the beginning of the spec (assuming sdl2 is used, the default now):
Then, find COLLECT() and add the data for touchtracer ( touchtracer.kv , particle.png , …): Change the line to add a Tree() object, e.g. Tree(‘examples-path\\demo\\touchtracer\\’) . This Tree will search and add every file found in the touchtracer directory to your final package.
To add the dependencies, before the first keyword argument in COLLECT add a Tree object for every path of the dependencies. E.g. *[Tree(p) for p in (sdl2.dep_bins + glew.dep_bins)] so it’ll look something like:
Now we build the spec file in TouchApp with:
The compiled package will be in the TouchApp\dist\touchtracer directory.
Single File Application
Next, we will modify the example above to package the touchtracer example project as a single file application. Following the same steps as above, instead issue the following command:
As before, this will generate touchtracer.spec, which we will edit to add the dependencies. In this instance, edit the arguments to the EXE command so that it will look something like this:
Now you can build the spec file as before with:
The compiled package will be in the TouchApp\dist directory and will consist of a single executable file.
Bundling Data Files
We will again modify the previous example to include bundled data files. PyInstaller allows inclusion of outside data files (such as images, databases, etc) that the project needs to run. When running an app on Windows, the executable extracts to a temporary folder which the Kivy project doesn’t know about, so it can’t locate these data files. We can fix that with a few lines.
First, follow PyInstaller documentation on how to include data files in your application.
Modify your main python code to include the following imports (if it doesn’t have them already):
Modify your main python code to include the following (using the touchtracer app as an example):
Finally, follow the steps for bundling your application above.
Packaging a video app with gstreamer
Following we’ll slightly modify the example above to package a app that uses gstreamer for video. We’ll use the videoplayer example found at examples-path\widgets\videoplayer.py . Create a folder somewhere called VideoPlayer and on the command line change your current directory to that folder and do:
to create the gstvideo.spec file. Edit as above and this time include the gstreamer dependency as well:
and add the Tree() to include the video files, e.g. Tree(‘examples-path\\widgets’) as well as the gstreamer dependencies so it should look something like:
Then build the spec file in VideoPlayer with:
and you should find gstvideo.exe in VideoPlayer\dist\gstvideo , which when run will play a video.
If you’re using Pygame and need PyGame in your packaging app, you’ll have to add the following code to your spec file due to kivy issue #1638. After the imports add the following:
Overwriting the default hook
Including/excluding video and audio and reducing app size
PyInstaller includes a hook for kivy that by default adds all the core modules used by kivy, e.g. audio, video, spelling etc (you still need to package the gstreamer dlls manually with Tree() — see the example above) and their dependencies. If the hook is not installed or to reduce app size some of these modules may be excluded, e.g. if no audio/video is used, with an alternative hook.
Kivy provides the alternate hook at hookspath() . In addition, if and only if PyInstaller doesn’t have the default hooks runtime_hooks() must also be provided. When overwriting the hook, the latter one typically is not required to be overwritten.
The alternate hookspath() hook does not include any of the kivy providers. To add them, they have to be added with get_deps_minimal() or get_deps_all() . See their documentation and pyinstaller_hooks for more details. But essentially, get_deps_all() add all the providers like in the default hook while get_deps_minimal() only adds those that are loaded when the app is run. Each method provides a list of hidden kivy imports and excluded imports that can be passed on to Analysis .
One can also generate a alternate hook which literally lists every kivy provider module and those not required can be commented out. See pyinstaller_hooks .
To use the the alternate hooks with the examples above modify as following to add the hooks with hookspath() and runtime_hooks (if required) and **get_deps_minimal() or **get_deps_all() to specify the providers.
For example, add the import statement:
and then modify Analysis as follows:
to include everything like the default hook. Or:
e.g. to exclude the audio and video providers and for the other core modules only use those loaded.
The key points is to provide the alternate hookspath() which does not list by default all the kivy providers and instead manually to hiddenimports add the required providers while removing the undesired ones (audio and video in this example) with get_deps_minimal() .
Kivy — Создание мобильных приложений на Python
В наши дни каждый разработчик может столкнуться с необходимостью работы над мобильным или веб-приложением на Python. В Python нет встроенных инструментов для мобильных устройств, тем не менее существуют пакеты, которые можно использовать для создания мобильных приложений. Это Kivy, PyQt и даже библиотека Toga от Beeware.
Содержание
Библиотеки являются основными элементами мобильного мира Python. Однако, говоря о Kivy, нельзя игнорировать преимущества данного фреймворка при работе с мобильными приложениями. Внешний вид приложения автоматически подстраивается под все платформы, разработчику при этом не нужно компилировать код после каждой поправки. Кроме того, здесь для создания приложений можно использовать чистый синтаксис Python.
В руководстве будут разобраны следующие темы:
- Работа с виджетами Kivy;
- Планировка UI и лейауты;
- Добавление событий;
- Использование языка KV;
- Создание приложения-калькулятора;
- Упаковка приложения для iOS, Android, Windows и macOS.
Разбор данного руководства предполагает, что читатель знаком с объектно-ориентированным программированием. Для введения в курс дела можете просмотреть статью об Объектно-ориентированном программировании (ООП) в Python 3.
Принципы работы фреймворка Kivy Python
Kivy был создан в 2011 году. Данный кросс-платформенный фреймворк Python работает на Windows, Mac, Linux и Raspberry Pi. В дополнение к стандартному вводу через клавиатуру и мышь он поддерживает мультитач. Kivy даже поддерживает ускорение GPU своей графики, что во многом является следствием использования OpenGL ES2. У проекта есть лицензия MIT, поэтому библиотеку можно использовать бесплатно и вкупе с коммерческим программным обеспечением.
Во время разработки приложения через Kivy создается интуитивно понятный интерфейс (Natural user Interface), или NUI. Его главная идея в том, чтобы пользователь мог легко и быстро приспособиться к программному обеспечению без чтения инструкций.
Kivy не задействует нативные элементы управления, или виджеты. Все его виджеты настраиваются. Это значит, что приложения Kivy будут выглядеть одинаково на всех платформах. Тем не менее, это также предполагает, что внешний вид вашего приложения будет отличаться от нативных приложений пользователя. Это может стать как преимуществом, так и недостатком, все зависит от аудитории.
Установка Kivy
У Kivy есть множество зависимостей, поэтому лучше устанавливать его в виртуальную среду Python. Можно использовать встроенную библиотеку Python venv или же пакет virtualenv.
Виртуальная среда Python создается следующим образом:
Installation on Windows
To install Kivy on Windows, please follow the main installation guide .
Installation components
Following, are additional information linked to from some of the steps in the main installation guide , specific to Windows.
Installing Python
To install Python on Windows, download it from the main Python website and follow the installation steps. You can read about the individual installation options in the Python guide.
If you installed the Python launcher, you will be more easily able to install multiple Python versions side by side and select, which to run, at each invocation.
Source installation Dependencies
To install Kivy from source, please follow the installation guide until you reach the Kivy install step and then install the compiler below before continuing.
To install kivy from source, you need a compiler. On Windows, the Visual Studio Build Tools are required, and they are available for free. You can either:
Download and install the complete Visual Studio IDE, which contains the build tools. This is the easiest approach and the IDE can be downloaded from here.
The IDE is very big, so you can also download just the smaller build tools, which are used from the command line. The current download (2019) can be found on this page under “Tools for Visual Studio 2019”. More info about this topic can be found in the Kivy wiki.
Now that the compiler is installed, continue to install Kivy .
Making Python available anywhere
There are two methods for launching Python when double clicking on your *.py files.
Double-click method
If you only have one Python installed, and if you installed it using the default options, then *.py files are already associated with your Python. You can run them by double clicking them in the file manager, or by just executing their name in a console window (without having to prepend python ).
Alternatively, if they are not assigned, you can do it the following way:
Right click on the Python file (.py file extension) in the file manager.
From the context menu that appears, select Open With
Browse your hard disk drive and find the python.exe file that you want to use (e.g. in the the virtual environment). Select it.
Select “Always open the file with…” if you don’t want to repeat this procedure every time you double click a .py file.
You are done. Open the file.
Send-to method
You can launch a .py file with Python using the Send to menu:
Browse to the python.exe you want to use. Right click on it and copy it.
Open Windows Explorer (the file explorer in Windows 8), and to go the address ‘shell:sendto’. You should get the special Windows directory SendTo .
Paste the previously copied python.exe file as a shortcut.
Rename it to python
You can now execute your application by right clicking on the .py file -> “Send To” -> “python
Трепещущий Kivy. Обзор возможностей фреймворка Kivy и библиотеки KivyMD
Kivy и Flutter — два фреймворка с открытым исходным кодом для кроссплатформенной разработки.
Flutter:


Как вы думаете, какое приложение на вышеприведенных скриншотах написано с использованием Flutter и какое с помощью Kivy? Ответить сходу трудно, поскольку ярко выраженных отличий нет. Единственное, что сразу бросается в глаза (нижний скриншот) — в Kivy все еще нет нормального сглаживания. И это грустно, но не критично. Сравнивать мы будем отдельные элементы приложения и их исходный код на Dart (Flutter) и Python/KV language (Kivy).
Посмотрим теперь как выглядят компоненты изнутри…
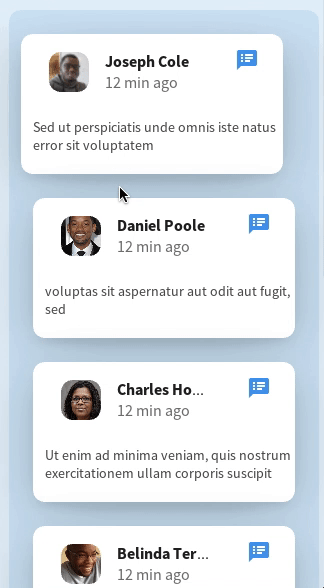
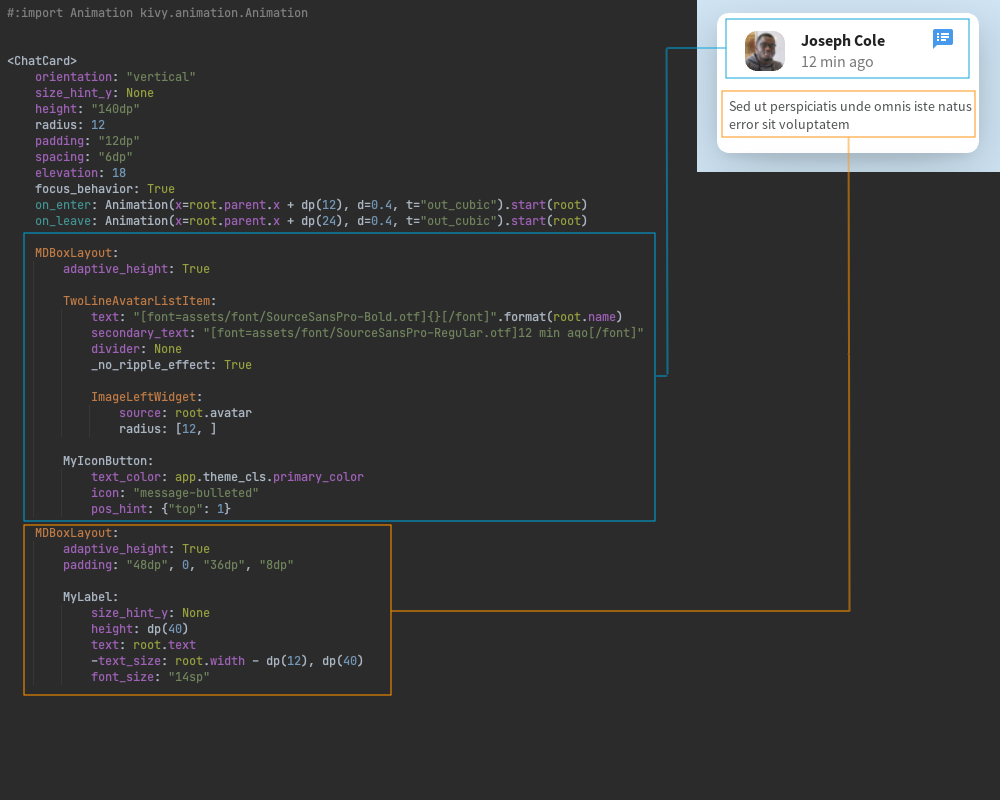
StoryCard
Разметка карточки на языке KV-Language:

Базовый Python класс:
Flutter:
Как видим, код на Python и KV-Language получается вдвое короче. Исходный код проекта на Python/Kivy, который рассматривается в этой статье, имеет общий размер 31 килобайт. 3 килобайта из этого объема приходится на Python код, остальное — KV-Language. Исходный код на Flutter — 54 килобайт. Впрочем, здесь удивляться, кажется, нечему — Python один их самый лаконичных языков программирования в мире.
Мы не будем спорить о том, что лучше: описывать UI при помощи DSL языков или прямо в коде. В Kivy, кстати, также можно строить виджеты Python кодом, но это не очень хорошее решение.
TopBar


Реализация этого бара, включая анимацию, на Python/Kivy заняла всего 88 строчек кода. На Dart/Flutter — 325 строк и 9 килобайт на диске. Посмотрим, что представляет из себя этот виджет:
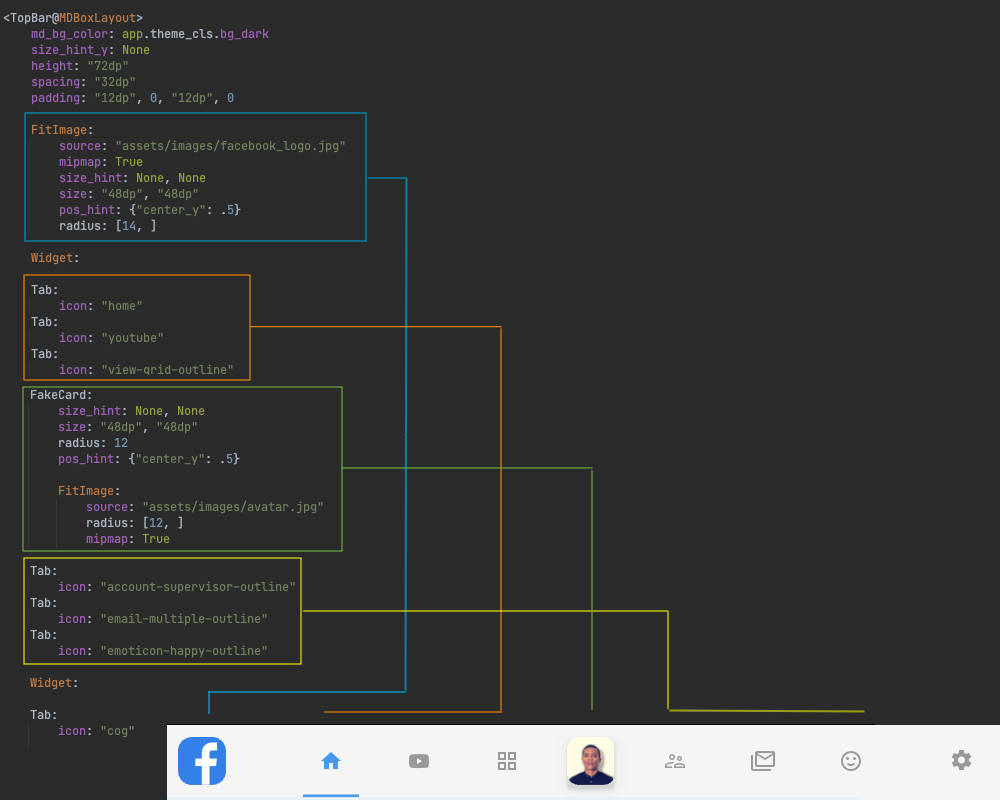
Лого, три таба, аватар, три таба и один таб — кнопка настроек. Реализация таба с анимированным индикатором:

Анимация индикатора и смена типа курсора мыши реализована в Python файле в одноименном с правилом разметки классе:
Мы просто анимируем ширину и opacity индикатора в зависимости от состояния кнопки (active). Состояние кнопки устанавливается в главном классе экрана приложения:
Подробнее об анимации а Kivy:
Реализация на Dart/Flutter.
Поскольку кода очень много, я спрятал все под спойлеры:

Анимация сдвига карточки происходит относительно родительского виджета (parent) при получении событий фокуса и анфокуса (on_enter, on_leave):
И базовый класс Python:
Реализация Python/Kivy — 60 строк кода, реализация Dart/Flutter — 182 строки кода.
Но не все так просто, как кажется. В процессе я обнаружил, что в библиотеке KivyMD отсутствуют кнопки с типом «badge». В проекте на Flutter, кстати, тоже использовались кастомные кнопки. Поэтому для создания правой панели инструментов пришлось сделать такие кнопки самостоятельно.
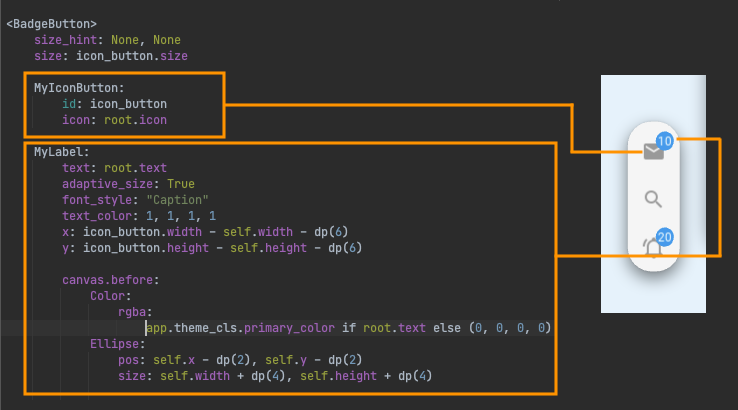
Базовый Python класс:
И уже создать левую панель инструментов:

Даже учитывая, что мне пришлось создавать кастомные кнопки типа «badge», код левой панели инструментов на Python/Kivy получился короче — 58 строк кода, реализация на Dart/Flutter — 97 строк.
Безусловно я не умаляю достоинств фреймворка Flutter. Инструмент замечательный! Я всего лишь хотел показать Python разработчикам, что они могут делать те же самые вещи, что и во Flutter, но на их любимом языке программирования с помощью фреймворка Kivy и библиотеки KivyMD. Что касается мобильных платформ, то здесь стоит признать, что Flutter превосходит Kivy в скорости работы. Но это уже уже другая статья… Ссылка на репозиторий проекта Facebook Desktop Redesign built with Flutter Desktop в реализации Python/Kivy/KivyMD.
Читают сейчас
Редакторский дайджест
Присылаем лучшие статьи раз в месяц
Скоро на этот адрес придет письмо. Подтвердите подписку, если всё в силе.

Похожие публикации
Разработка мобильных приложений на Python. Создание анимаций в Kivy. Part 2
Материальный дизайн. Создание анимаций в Kivy
Дополнительные компоненты для кроссплатформеннной библиотеки материального дизайна KivyMD
Курсы
AdBlock похитил этот баннер, но баннеры не зубы — отрастут
Минуточку внимания
Комментарии 26

Очень притянуто за уши. На флаттере так никто в здравом уме писать не будет, все эти виджеты можно сделать гораздо компактнее. Вы в него либо не умеете, либо специально понаписали этой индусской лапши.
Например, тот же TopBar можно переписать так:
А, прошу прощения, не обратил внимания, что флаттеровский код – от автора редизайна. Да, тогда его проект – это прям анти-реклама флаттера какая-то.
Мы, кстати, в комментариях к одной из статей собирались сделать showcase-приложения для различных архитектурных подходов на флаттере. Я даже под это дело репозиторий создал. Можем его адаптировать под подходы к мобильным приложениям в целом. Ну или что-нибудь другое придумать.
А если кто-нибудь еще и дизайн приличный нарисует, то вообще замечательно будет.


нет вообще никаких путёвых видео-уроков
Видимо не до конца дочитал мой коммент. Обрати внимание на фразу «Но никто не показал в серии видео, как сделать нормальное многооконное приложение на Kivy. (не какой нибудь «чёрный калькулятор» или «жёлтый конвертер», а да, ещё есть любители «узнавателей погоды», а что-либо действительно стоящее, которое раскроет все возможности)». Под словом «нормальный» я имел ввиду современный, вот хотя бы такой, как представлен в этой статье.
А какие примеры дизайна нам показывает сам kivy? Вот элементарно зайди на галерею примеров киви. Одна чернота. И ладно, если бы эти примеры показывали, какой был дизайн 30 лет назад. Но нет. Это они показывают сейчас.
А по поводу ютуба, ты сам зайди и посмотри, что за «красоту» ваяют создатели уроков по Kivy. Возьми и проматай код, и посмотри, что в итоге вышло. Это даже дизайном не назвать. На фоне таких дизайнов, даже Tkinter смотрится куда круче.
И опять же я не говорю, что движок плохой. Но раз уж мы пришли делать дизайн в 2021 году, так почему бы не сделать учебные материалы, где получиться дизайн действительно современный. А у Kivy этого нет. И пока не появиться, kivy так и останется в тени QT. Тем более вышел PyQT6.
p.s. не забываем, что речь идёт про Desktop
А какие примеры дизайна нам показывает сам kivy?
Нужно понимать философию Kivy для начала. Это просто база. Для того, чтобы вы могли сделать все, что угодно. Нужен iOS UI — пожалуйста, нужен Android UI — пожалуйста. Виджеты Kivy настолько кастомизируются, насколько позволяет фантазия. И никто из коробки не привязывает, например, класс Button, ни к одной платформе. Это сделано в целях кроссплатформы. Библиотека KivyMD — тому пример. Мы взяли «страшные» виджеты Kivy и сделали из них виджеты в стиле Material Design.
Если вам нужны примеры красивого Kivy UI:
А по поводу ютуба, ты сам зайди и посмотри, что за «красоту» ваяют создатели уроков по Kivy.

Приложение на kivy в play market без проблем попадет?


