- Компьютер выключается вместо перехода в спящий режим – что делать?
- Проверка параметров питания
- Диагностика параметров питания
- Включение режима энергосбережения
- Установка последней версии драйвера IME
- What to do if Windows 10 computer shuts down instead of Sleep
- What to do if Windows 10 computer shuts down instead of Sleep
- Option 1 – Check the Sleep Advanced Settings
- Option 2 – Try to run the Power troubleshooter
- Option 3 – Troubleshoot Sleep Mode issue in a Clean Boot State
- Option 4 – Try to run the Power Efficiency Diagnostics Report
- Option 5 – Try to update the BIOS
Компьютер выключается вместо перехода в спящий режим – что делать?
В Windows 10 можно столкнуться с неполадкой, когда компьютер или ноутбук выключается вместо перехода в спящий режим. Такое поведение системы может возникнуть после внесения изменений в настройки схемы питания, отключения параметра в BIOS или из-за повреждения драйвера IME.

Проверка параметров питания
В первую очередь нужно проверить настройки текущей схемы электропитания. Вполне возможно, что кнопка питания настроена на выключение компьютера при кратковременном нажатии. Кроме того, в некоторых устаревших моделях ноутбуков это стандартное поведение, когда при закрытии крышки он выключается вместо перехода в спящий режим или гибернацию.
Если до этого компьютер можно было перевести в спящий режим, то, скорее всего, утилиты энергосбережения переопределили настройки схемы электропитания и вернули значения по умолчанию. Для их проверки следуйте инструкции.
Перейдите на вкладку «Питание и спящий режим» командой ms-settings:powersleep , запущенной из окна «Выполнить» (Win + R).
Прокрутите страницу вниз и кликните на Дополнительные параметры питания.
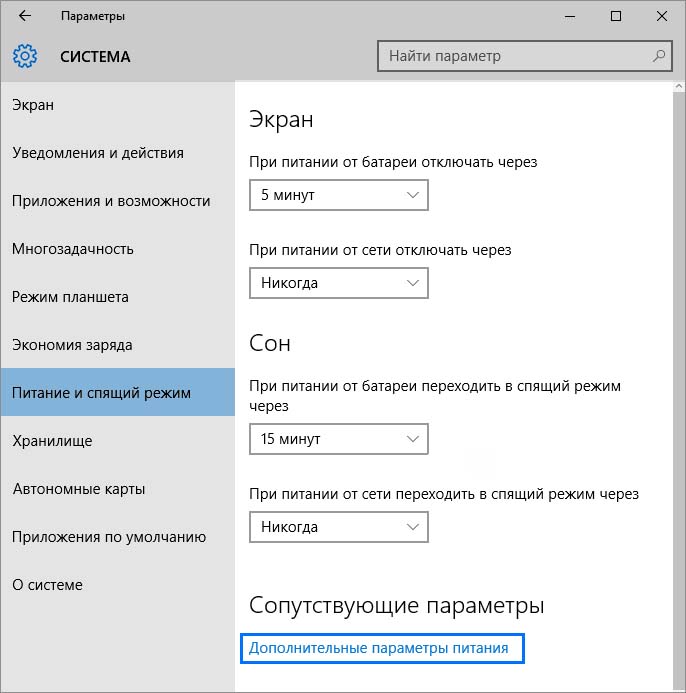
На левой панели выберите «Действие кнопки питания».

В окне Системные параметры измените действие при нажатии кнопки для перехода в спящий режим с помощью двух раскрывающихся меню. Затем измените значение на «Сон» при нажатии кнопки сна и закрытии крышки.

После сохраните изменения, и закройте окно. Проверьте, переходит ли компьютер (ноутбук) в спящий режим при кратковременном нажатии кнопки или после закрытия крышки.
Диагностика параметров питания
Если компьютер по-прежнему выключается, попробуйте запустить средство устранения неполадок электропитания. Это встроенная функция, которая содержит набор решений для устранения распространенных ошибок. Для ее запуска выполните следующие шаги.
Откройте раздел Устранения неполадок командой ms-settings:troubleshoot , запущенной из окна «Выполнить» (Win + R).

В правой части окна кликните на вкладку Питание и запустите средство устранения неполадок.
Дождитесь завершения начального сканирования. Если инструменту удалось обнаружить ошибку, нажмите на кнопку «Применить это исправление».
После его завершения перезагрузите компьютер. Если ноутбук или компьютер по-прежнему выключается вместо того, чтобы перейти в спящий режим, посмотрите следующее решение.
Включение режима энергосбережения
Windows не будет переходить в состояние сна, если в настройках BIOS выключен режим энергосбережения. Поэтому проверьте, не причастен ли он к этой проблеме.
Перейдите в настройки BIOS с экрана, который появляется сразу после включения компьютера, нажатием на клавишу, указанную внизу в строке «Press _ to run Setup».
Найдите функцию энергосбережения. Например, если используете материнскую плату ASUS, найдите параметр «EPU Power Saving Mode» в Расширенных настройках и установите значение «Enabled».
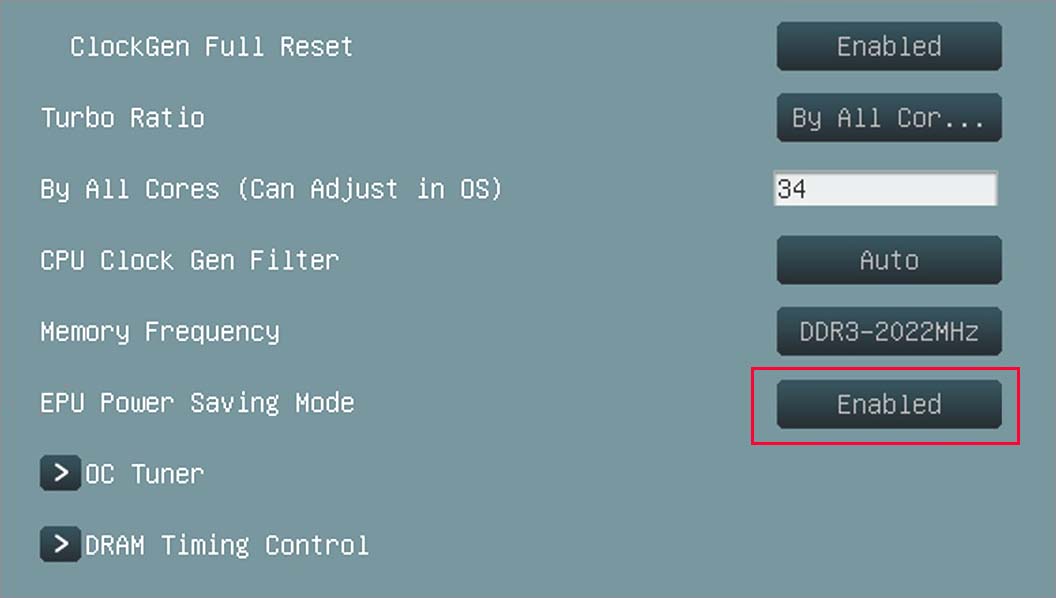
Сохраните изменения и выйдите из BIOS. Если ПК выключается при запросе или наступлении события сна, перейдите к следующему решению.
Установка последней версии драйвера IME
Если средством устранения неисправностей удалось решить проблему автоматически, попробуйте это сделать вручную. Она может произойти из-за поврежденного драйвера Intel Management Engine (IME). Пользователям удавалось восстановить нормальную функциональность режима сна путем удаления текущего драйвера и установкой последней версии, загруженной со страницы Intel.
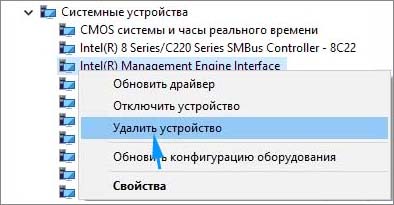
Откройте «Диспетчер устройств» командой devmgmt.msc из окна «Выполнить».

Разверните вкладку с системными устройствами. Затем щелкните правой кнопкой на интерфейсе Intel Management Engine и выберите Свойства.
Перейдите на вкладку Драйвер и проверьте его версию. Если версия 11.0.X и ниже, то, скорее всего, в этом и причина выключения компьютера при попытке перевести его в состояние сна. Кликните на «Удалить». После перезагрузите Windows, чтобы позволить системе удалить оставшиеся компоненты, связанные с драйвером IME.
После сделайте запрос в интернете «Intel Management Engine driver». Перейдите на указанный сайт и загрузите последнюю версию драйвера.


Запустите скачанный файл и следуйте инструкциям на экране до завершения установки. После перезагрузите систему и проверьте, устранена ли проблема.
Если используете SSD, имейте в виду, что программное обеспечение для этого устройства также включает функцию настройки сна. Поэтому ее нужно выключить, чтобы избежать конфликта с переводом компьютера в спящий режим инструментами Windows.
What to do if Windows 10 computer shuts down instead of Sleep
What to do if Windows 10 computer shuts down instead of Sleep

As you know the Windows 10 operating system is has a lot of features and some of them are related to turning off your computer in different ways in order to save power at different levels. These particular features are Shut down, Restart, Hibernate and Sleep. However, there are times when you might encounter some issues when using any of the aforementioned features. One of these issues is when your computer shuts down instead of going to Sleep.
This issue could be caused by several factors including a bug related to the Intel Management Engine Interface or IMEI driver as well as any misconfiguration in the power settings of the BIOS or UEFI. If your computer is going through this problem, read on as this post will guide you in fixing it.
There are several potential fixes you can try to fix the problem. You can try to check the Sleep Advanced Settings or run the built-in Power troubleshooter or run the Power Efficiency Diagnostic Report. In addition, you can also try to troubleshoot the problem in a Clean Boot State or reset or update the BIOS.
Option 1 – Check the Sleep Advanced Settings
- Click on the Windows key and type “control panel” in the field and select the related search result.
- Next, select the Security and Maintenance option and click on the Power Options.

- After that, you have to select the Change Plan Settings but keep in mind that this option is barely readable so you need to read each option carefully.
- Now click on the Change advanced power settings button and a new window will appear.
- Then look for the “Sleep” option and expand it. Make sure that the “Allow hybrid sleep” option is on.
- Reboot your computer and check if your computer now functions properly. If it still didn’t work, you may have to reverse the changes you’ve made.
Option 2 – Try to run the Power troubleshooter
The next thing you can do is to run the Power troubleshooter. To do so, follow these steps:
- Go to Settings and navigate to Update & Security > Troubleshoot.
- After that, look for the “Power” option from the given list of built-in troubleshooters and click on it.

- Next, click on the “Run the troubleshooter” button to run the Power troubleshooter.
- Once the troubleshooter is done identifying the problems, follow the next on-screen instructions to resolve the problem.
Option 3 – Troubleshoot Sleep Mode issue in a Clean Boot State
The issue with Sleep Mode might be caused by some third party programs installed in your computer. This program might be the one that puts your computer to sleep and so to isolate this possibility, you have to put your PC in a Clean Boot State using the steps below.
- Log onto your PC as administrator.
- Type in msconfig in the Start Search to open the System Configuration utility.
- From there, go to the General tab and click “Selective startup”.
- Clear the “Load Startup items” check box and make sure that the “Load System Services” and “Use Original boot configuration” options are checked.
- Next, click the Services tab and select “Hide All Microsoft Services” check box.
- Click Disable all.
- Click on Apply/OK and restart your PC. (This will put your PC into a Clean Boot State. And to configure Windows to use the usual startup, just simply undo the changes.)
- After that, try to put your computer into Sleep again.
Option 4 – Try to run the Power Efficiency Diagnostics Report
You could also try to run the Power Efficiency Diagnostics Report to fix the problem. This tool is helpful and will help you analyze the status of the battery but note that this can be quite overwhelming especially if you’re not well-versed in this matter.
Option 5 – Try to update the BIOS
Updating the BIOS can help you fix the ATTEMPTED_WRITE_TO_READONLY_MEMORY BSOD error but as you know, BIOS is a sensitive part of a computer. Even though it is a software component, the functioning of the hardware depends on it largely. Thus, you must be careful when modifying something in the BIOS. So if you don’t know much about it, it’s best if you skip on this option and try the other ones instead. However, if you are well-versed in navigating the BIOS, then follow the steps below.
- Tap the Win + R keys to open the Run dialog box.
- Next, type “msinfo32” in the field and press Enter to open System Information.
- From there, you should find a search field on the bottom where you have to search for the BIOS version and then press Enter.
- After that, you should see the developer and version of the BIOS installed in your PC.
- Go to your manufacturer’s website and then download the latest version of BIOS in your computer.
- If you are using a laptop, make sure that you keep it plugged in until you have updated the BIOS.
- Now double click on the downloaded file and install the new BIOS version in your computer.
- Now restart your computer to apply the changes made.
Note: If updating the BIOS didn’t help, you might want to consider resetting it instead.
In addition to the Sleep mode problem in your Windows 10 PC, if you are also facing other issues right now concerning your computer system which has been bothering you for quite some time, there is a one-click solution known as Restoro you can use. This program is a useful tool that could repair corrupted registries and optimize your PC’s overall performance. Aside from that, it also cleans out your computer for any junk or corrupted files that help you eliminate any unwanted files from your system. This is basically a solution that’s within your grasp with just a click. It’s easy to use as it is user-friendly. For complete set of instructions in downloading and using it, refer to the steps below.
Perform a full system scan using Restoro. To do so, follow these steps:
- Turn on your computer. If it’s already on, you have to reboot

- After that, the BIOS screen will be displayed, but if Windows pops up instead, reboot your computer and try again. Once you’re on the BIOS screen, repeat pressing F8, by doing so the Advanced Option shows up.
- To navigate the Advanced Option use the arrow keys and select SafeMode with Networking then hit
- Windows will now load the SafeMode with Networking.
- Press and hold both R key and Windows key.

- If done correctly, the Windows Run Box will show up.
- Type in the URL address in the Run dialog box and then tap Enter or click OK.
- After that, it will download the program. Wait for the download to finish and then open the launcher to install the program.
- Once the installation process is completed, run Restoro to perform a full system scan.

- After the scan is completed click the “Fix, Clean & Optimize Now” button.


