- Tasks
- Install and Set Up kubectl
- Before you begin
- Install kubectl binary via curl
- Download as part of the Google Cloud SDK
- Install with snap on Ubuntu
- Install with Homebrew on macOS
- Install with Chocolatey on Windows
- Configure kubectl
- Check the kubectl configuration
- Enabling shell autocompletion
- On Linux, using bash
- On macOS, using bash
- Using Oh-My-Zsh
- Tasks
- Kubernetes v1.17 documentation is no longer actively maintained. The version you are currently viewing is a static snapshot. For up-to-date documentation, see the latest version.
- Install and Set Up kubectl
- Before you begin
- Install kubectl on Linux
- Install kubectl binary with curl on Linux
- Install using native package management
- Install using other package management
- Install kubectl on macOS
- Install kubectl binary with curl on macOS
- Install with Homebrew on macOS
- Install with Macports on macOS
- Install kubectl on Windows
- Install kubectl binary with curl on Windows
- Install with Powershell from PSGallery
- Install on Windows using Chocolatey or Scoop
- Download as part of the Google Cloud SDK
- Verifying kubectl configuration
- Optional kubectl configurations
- Enabling shell autocompletion
- Introduction
- Install bash-completion
- Enable kubectl autocompletion
- Introduction
- Upgrade Bash
- Install bash-completion
- Enable kubectl autocompletion
- What’s next
- Feedback
- How to Install Kubernetes on Mac
- Installation Guide
- Come Together
- Learn Kube Faster. Get the #1 guide.
- Meet the Author
Tasks
Step-by-step instructions for performing operations with Kubernetes.
Install and Set Up kubectl
Here are a few methods to install kubectl.
Use the Kubernetes command-line tool, kubectl, to deploy and manage applications on Kubernetes. Using kubectl, you can inspect cluster resources; create, delete, and update components; and look at your new cluster and bring up example apps.
Before you begin
Use a version of kubectl that is the same version as your server or later. Using an older kubectl with a newer server might produce validation errors.
Install kubectl binary via curl
Download the latest release with the command:
To download a specific version, replace the $(curl -s https://storage.googleapis.com/kubernetes-release/release/stable.txt) portion of the command with the specific version.
For example, to download version v1.7.0 on MacOS, type:
Make the kubectl binary executable.
Move the binary in to your PATH.
Download the latest release with the command:
To download a specific version, replace the $(curl -s https://storage.googleapis.com/kubernetes-release/release/stable.txt) portion of the command with the specific version.
For example, to download version v1.7.0 on Linux, type:
Make the kubectl binary executable.
Move the binary in to your PATH.
Download the latest release v1.7.0 from this link.
Or if you have curl installed, use this command:
To find out the latest stable version (for example, for scripting), take a look at https://storage.googleapis.com/kubernetes-release/release/stable.txt
Add the binary in to your PATH.
Download as part of the Google Cloud SDK
kubectl can be installed as part of the Google Cloud SDK.
Run the following command to install kubectl :
Install with snap on Ubuntu
kubectl is available as a snap application.
If you are on Ubuntu or one of other Linux distributions that support snap package manager, you can install with:
Run kubectl version to verify that the verison you’ve installed is sufficiently up-to-date.
Install with Homebrew on macOS
If you are on macOS and using Homebrew package manager, you can install with:
Run kubectl version to verify that the verison you’ve installed is sufficiently up-to-date.
Install with Chocolatey on Windows
If you are on Windows and using Chocolatey package manager, you can install with:
Configure kubectl to use a remote kubernetes cluster:
Edit the config file with a text editor of your choice, such as Notepad for example.
Configure kubectl
In order for kubectl to find and access a Kubernetes cluster, it needs a kubeconfig file, which is created automatically when you create a cluster using kube-up.sh or successfully deploy a Minikube cluster. See the getting started guides for more about creating clusters. If you need access to a cluster you didn’t create, see the Sharing Cluster Access document. By default, kubectl configuration is located at
Check the kubectl configuration
Check that kubectl is properly configured by getting the cluster state:
If you see a URL response, kubectl is correctly configured to access your cluster.
If you see a message similar to the following, kubectl is not correctly configured:
Enabling shell autocompletion
kubectl includes autocompletion support, which can save a lot of typing!
The completion script itself is generated by kubectl, so you typically just need to invoke it from your profile.
Common examples are provided here. For more details, consult kubectl completion -h .
On Linux, using bash
To add kubectl autocompletion to your current shell, run source .
To add kubectl autocompletion to your profile, so it is automatically loaded in future shells run:
On macOS, using bash
On macOS, you will need to install bash-completion support via Homebrew first:
Follow the “caveats” section of brew’s output to add the appropriate bash completion path to your local .bashrc.
If you’ve installed kubectl using the Homebrew instructions then kubectl completion should start working immediately.
If you have installed kubectl manually, you need to add kubectl autocompletion to the bash-completion:
The Homebrew project is independent from kubernetes, so the bash-completion packages are not guaranteed to work.
Using Oh-My-Zsh
When using Oh-My-Zsh, edit the
/.zshrc file and update the plugins= line to include the kubectl plugin.
Источник
Tasks
Kubernetes v1.17 documentation is no longer actively maintained. The version you are currently viewing is a static snapshot. For up-to-date documentation, see the latest version.
Install and Set Up kubectl
The Kubernetes command-line tool, kubectl, allows you to run commands against Kubernetes clusters. You can use kubectl to deploy applications, inspect and manage cluster resources, and view logs. For a complete list of kubectl operations, see Overview of kubectl.
Before you begin
You must use a kubectl version that is within one minor version difference of your cluster. For example, a v1.2 client should work with v1.1, v1.2, and v1.3 master. Using the latest version of kubectl helps avoid unforeseen issues.
Install kubectl on Linux
Install kubectl binary with curl on Linux
Download the latest release with the command:
To download a specific version, replace the $(curl -s https://storage.googleapis.com/kubernetes-release/release/stable.txt) portion of the command with the specific version.
For example, to download version v1.17.17 on Linux, type:
Make the kubectl binary executable.
Move the binary in to your PATH.
Test to ensure the version you installed is up-to-date:
Install using native package management
Install using other package management
If you are on Ubuntu or another Linux distribution that support snap package manager, kubectl is available as a snap application.
If you are on Linux and using Homebrew package manager, kubectl is available for installation.
Install kubectl on macOS
Install kubectl binary with curl on macOS
Download the latest release:
To download a specific version, replace the $(curl -s https://storage.googleapis.com/kubernetes-release/release/stable.txt) portion of the command with the specific version.
For example, to download version v1.17.17 on macOS, type:
Make the kubectl binary executable.
Move the binary in to your PATH.
Test to ensure the version you installed is up-to-date:
Install with Homebrew on macOS
If you are on macOS and using Homebrew package manager, you can install kubectl with Homebrew.
Run the installation command:
Test to ensure the version you installed is up-to-date:
Install with Macports on macOS
If you are on macOS and using Macports package manager, you can install kubectl with Macports.
Run the installation command:
Test to ensure the version you installed is up-to-date:
Install kubectl on Windows
Install kubectl binary with curl on Windows
Download the latest release v1.17.17 from this link.
Or if you have curl installed, use this command:
To find out the latest stable version (for example, for scripting), take a look at https://storage.googleapis.com/kubernetes-release/release/stable.txt.
Add the binary in to your PATH.
Test to ensure the version of kubectl is the same as downloaded:
Install with Powershell from PSGallery
If you are on Windows and using Powershell Gallery package manager, you can install and update kubectl with Powershell.
Run the installation commands (making sure to specify a DownloadLocation ):
The installer creates $HOME/.kube and instructs it to create a config file
Test to ensure the version you installed is up-to-date:
Install on Windows using Chocolatey or Scoop
To install kubectl on Windows you can use either Chocolatey package manager or Scoop command-line installer.
Test to ensure the version you installed is up-to-date:
Navigate to your home directory:
Create the .kube directory:
Change to the .kube directory you just created:
Configure kubectl to use a remote Kubernetes cluster:
Download as part of the Google Cloud SDK
You can install kubectl as part of the Google Cloud SDK.
Run the kubectl installation command:
Test to ensure the version you installed is up-to-date:
Verifying kubectl configuration
In order for kubectl to find and access a Kubernetes cluster, it needs a kubeconfig file, which is created automatically when you create a cluster using kube-up.sh or successfully deploy a Minikube cluster. By default, kubectl configuration is located at
Check that kubectl is properly configured by getting the cluster state:
If you see a URL response, kubectl is correctly configured to access your cluster.
If you see a message similar to the following, kubectl is not configured correctly or is not able to connect to a Kubernetes cluster.
For example, if you are intending to run a Kubernetes cluster on your laptop (locally), you will need a tool like Minikube to be installed first and then re-run the commands stated above.
If kubectl cluster-info returns the url response but you can’t access your cluster, to check whether it is configured properly, use:
Optional kubectl configurations
Enabling shell autocompletion
kubectl provides autocompletion support for Bash and Zsh, which can save you a lot of typing.
Below are the procedures to set up autocompletion for Bash (including the difference between Linux and macOS) and Zsh.
Introduction
The kubectl completion script for Bash can be generated with the command kubectl completion bash . Sourcing the completion script in your shell enables kubectl autocompletion.
However, the completion script depends on bash-completion, which means that you have to install this software first (you can test if you have bash-completion already installed by running type _init_completion ).
Install bash-completion
bash-completion is provided by many package managers (see here). You can install it with apt-get install bash-completion or yum install bash-completion , etc.
The above commands create /usr/share/bash-completion/bash_completion , which is the main script of bash-completion. Depending on your package manager, you have to manually source this file in your
To find out, reload your shell and run type _init_completion . If the command succeeds, you’re already set, otherwise add the following to your
Reload your shell and verify that bash-completion is correctly installed by typing type _init_completion .
Enable kubectl autocompletion
You now need to ensure that the kubectl completion script gets sourced in all your shell sessions. There are two ways in which you can do this:
Source the completion script in your
Add the completion script to the /etc/bash_completion.d directory:
If you have an alias for kubectl, you can extend shell completion to work with that alias:
Both approaches are equivalent. After reloading your shell, kubectl autocompletion should be working.
Introduction
The kubectl completion script for Bash can be generated with kubectl completion bash . Sourcing this script in your shell enables kubectl completion.
However, the kubectl completion script depends on bash-completion which you thus have to previously install.
Upgrade Bash
The instructions here assume you use Bash 4.1+. You can check your Bash’s version by running:
If it is too old, you can install/upgrade it using Homebrew:
Reload your shell and verify that the desired version is being used:
Homebrew usually installs it at /usr/local/bin/bash .
Install bash-completion
You can test if you have bash-completion v2 already installed with type _init_completion . If not, you can install it with Homebrew:
As stated in the output of this command, add the following to your
Reload your shell and verify that bash-completion v2 is correctly installed with type _init_completion .
Enable kubectl autocompletion
You now have to ensure that the kubectl completion script gets sourced in all your shell sessions. There are multiple ways to achieve this:
Source the completion script in your
Add the completion script to the /usr/local/etc/bash_completion.d directory:
If you have an alias for kubectl, you can extend shell completion to work with that alias:
If you installed kubectl with Homebrew (as explained above), then the kubectl completion script should already be in /usr/local/etc/bash_completion.d/kubectl . In that case, you don’t need to do anything.
In any case, after reloading your shell, kubectl completion should be working.
The kubectl completion script for Zsh can be generated with the command kubectl completion zsh . Sourcing the completion script in your shell enables kubectl autocompletion.
To do so in all your shell sessions, add the following to your
If you have an alias for kubectl, you can extend shell completion to work with that alias:
After reloading your shell, kubectl autocompletion should be working.
If you get an error like complete:13: command not found: compdef , then add the following to the beginning of your
What’s next
- Install Minikube
- See the getting started guides for more about creating clusters.
- Learn how to launch and expose your application.
- If you need access to a cluster you didn’t create, see the Sharing Cluster Access document.
- Read the kubectl reference docs
Feedback
Was this page helpful?
Thanks for the feedback. If you have a specific, answerable question about how to use Kubernetes, ask it on Stack Overflow. Open an issue in the GitHub repo if you want to report a problem or suggest an improvement.
Источник
How to Install Kubernetes on Mac
This is a step-by-step guide to installing and running Kubernetes on your Mac so that you can develop applications locally.
You will be guided through running and accessing a Kubernetes cluster on your local machine using the following tools:
- Homebrew
- Docker for Mac
- Minikube
- virtualbox
- kubectl
Installation Guide
The only pre-requisite for this guide is that you have Homebrew installed. Homebrew is a package manager for the Mac. You’ll also need Homebrew Cask, which you can install after Homebrew by running brew tap caskroom/cask in your Terminal.
Install Docker for Mac. Docker is used to create, manage, and run our containers. It lets us construct containers that will run in Kubernetes Pods.
Install VirtualBox for Mac using Homebrew. Run brew cask install virtualbox in your Terminal. VirtualBox lets you run virtual machines on your Mac (like running Windows inside macOS, except for a Kubernetes cluster.)
Skip to step three if everything has worked to this point.
In my case, I already had the non-Homebrew VirtualBox app installed which caused issues when trying to start minikube.
If you already have VirtualBox installed, start the installation as before with brew cask install virtualbox . You will get a warning that confirms this saying Warning: Cask ‘virtualbox’ is already installed. . Once this is confirmed, you can reinstall VirtualBox with Homebrew by running brew cask reinstall virtualbox .
If you happen to have VirtualBox already running when you do this, you could see an error saying Failed to unload org.virtualbox.kext.VBoxDrv — (libkern/kext) kext is in use or retained (cannot unload).
This is because the kernel extensions that VirtualBox uses were in use when the uninstall occurred. If you scroll up in the output of that command, beneath Warning! Found the following active VirtualBox processes: you’ll see a list of the processes that need to be killed.
Kill each of these in turn by running kill first_column_number ( first_column_number is the process identifier for that process).
Now re-run brew cask reinstall virtualbox and it should succeed.
Install kubectl for Mac. This is the command-line interface that lets you interact with Kuberentes. Run brew install kubectl in your Terminal.
Install Minikube via the Installation > OSX instructions from the latest release. At the time of writing, this meant running the following command in Terminal…
Minikube will run a Kubernetes cluster with a single node.
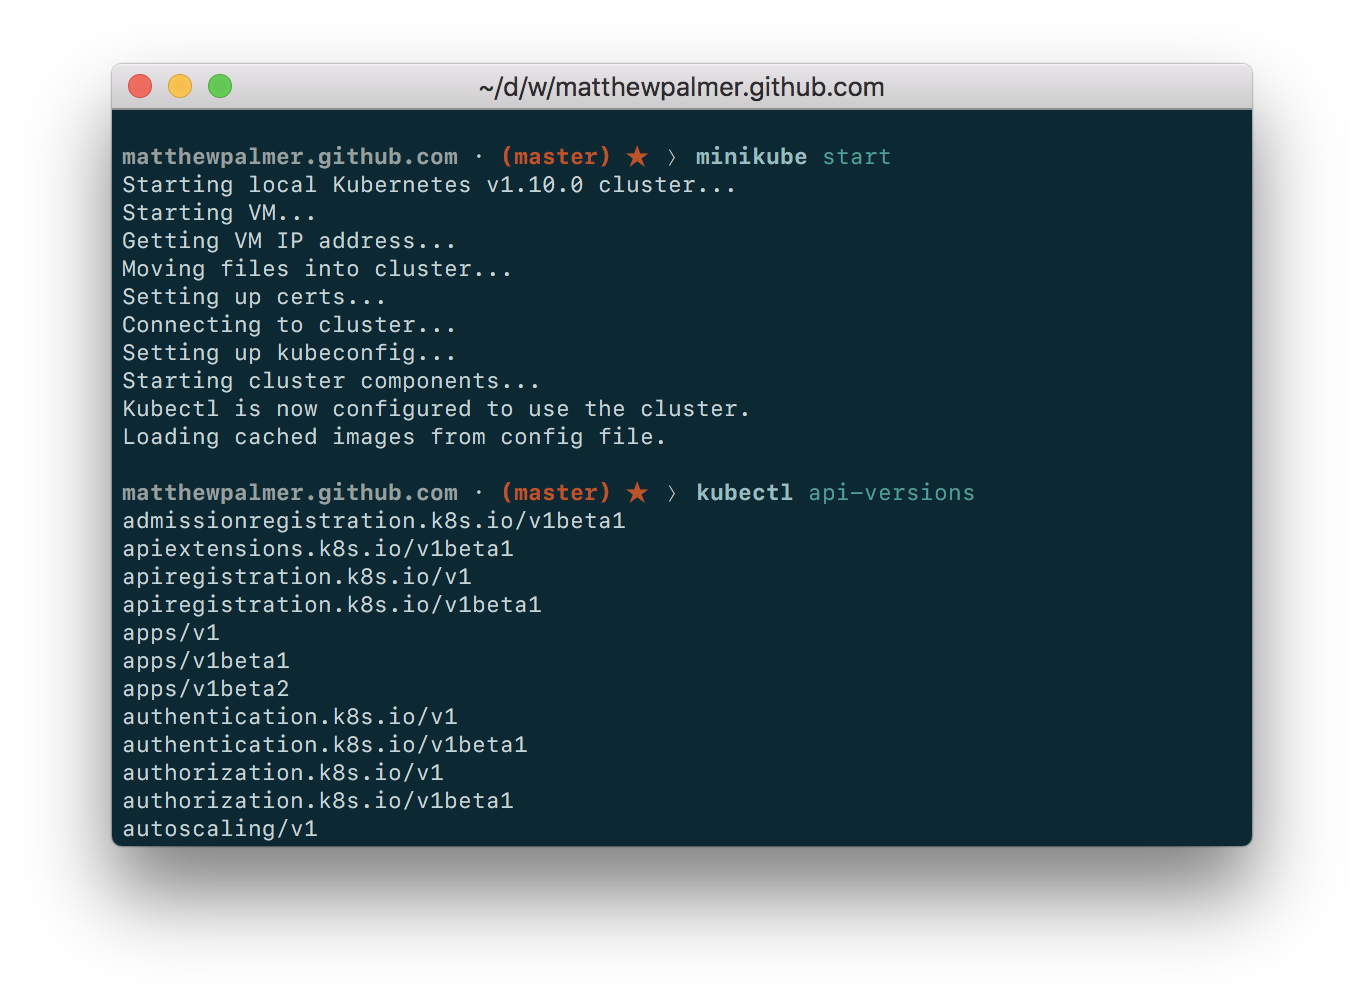
Everything should work! Start your Minikube cluster with minikube start . Then run kubectl api-versions . If you see a list of versions, everything’s working! minikube start might take a few minutes.
At this point, I got an error saying Error starting host: Error getting state for host: machine does not exist. because I had previously tried to run Minikube. You can fix this by running open
/.minikube/ to open Minikube’s data files, and then deleting and deleting the machines directory. Then run minikube start again.
Come Together
You’ve installed all these tools and everything looks like it’s working. A quick explanation of how the components relate is needed.
- VirtualBox is a generic tool for running virtual machines. You can use it to run Ubuntu, Windows, etc. inside your macOS operating system host.
- Minikube is a Kubernetes-specific package that runs a Kubernetes cluster on your machine. That cluster has a single node and has some unique features that make it more suitable for local development. Minikube tells VirtualBox to run. Minikube can use other virtualization tools—not just VirtualBox—however these require extra configuration.
- kubectl is the command line application that lets you interact with your Minikube Kubernetes cluster. It sends request to the Kubernetes API server running on the cluser to manage your Kubernetes environment. kubectl is like any other application that runs on your Mac—it just makes HTTP requests to the Kubernetes API on the cluster.
Learn Kube Faster.
Get the #1 guide.
Get my book on Kubernetes for software developers, used by engineers at Google, Microsoft, and IBM.
Meet the Author
 Matthew Palmer is a software developer and author. He’s created popular desktop apps, scaled SaaS web services, and taught Computer Science students at the University of New South Wales.
Источник


