- Как установить курсор macOS в Windows 10
- Как установить курсор MacOS на Windows?
- Как установить курсор MacOS на Windows?
- How to Download & Install Mac OS Cursor in Windows 10🖱
- How to Install Mac Cursor in Windows 10
- Restore Default Windows Mouse Cursor
- How To Get Mac Mouse Pointer (Cursor) In Windows 10
- Install Mac cursor in Windows 10
Как установить курсор macOS в Windows 10
Публикация: 11 Декабрь 2018 Обновлено: 9 Июль 2020
В Windows 10 есть несколько различных тем курсора, которые вы можете выбрать. Изменение внешнего вида курсора позволяет упростить взаимодействие с ПК. Если набор курсоров macOS кажется вам более привлекательным, вы можете установить их в Windows 10. Вот как вы можете установить курсор macOS в Windows 10.
Курсор — это не одно изображение. На самом деле, лучше всего думать о курсоре как целой теме с разными изображениями для разных состояний, которые ваш курсор мыши указывает, например, указатель, ожидание / задержка, каретка и т. Д.
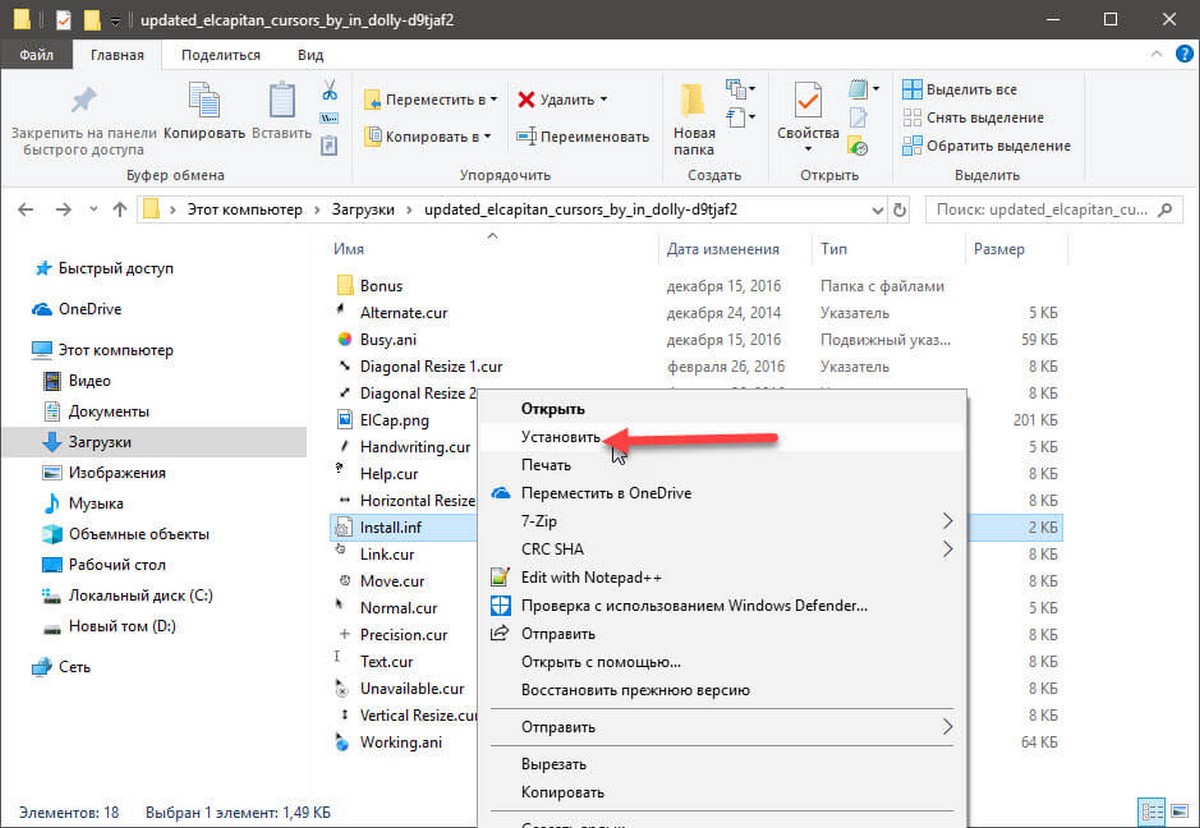
Шаг 1: Чтобы получить курсор macOS в Windows 10, вам необходимо загрузить этот файл из DeviantArt. Извлеките архивированный файл и откройте папку. Внутри вы найдете файл с именем install.inf. Кликните на нем правой кнопкой мыши и выберите в контекстном меню«Установить». Вы не получите визуальной информации о том, что курсор установлен, но он будет установлен в течение нескольких секунд.
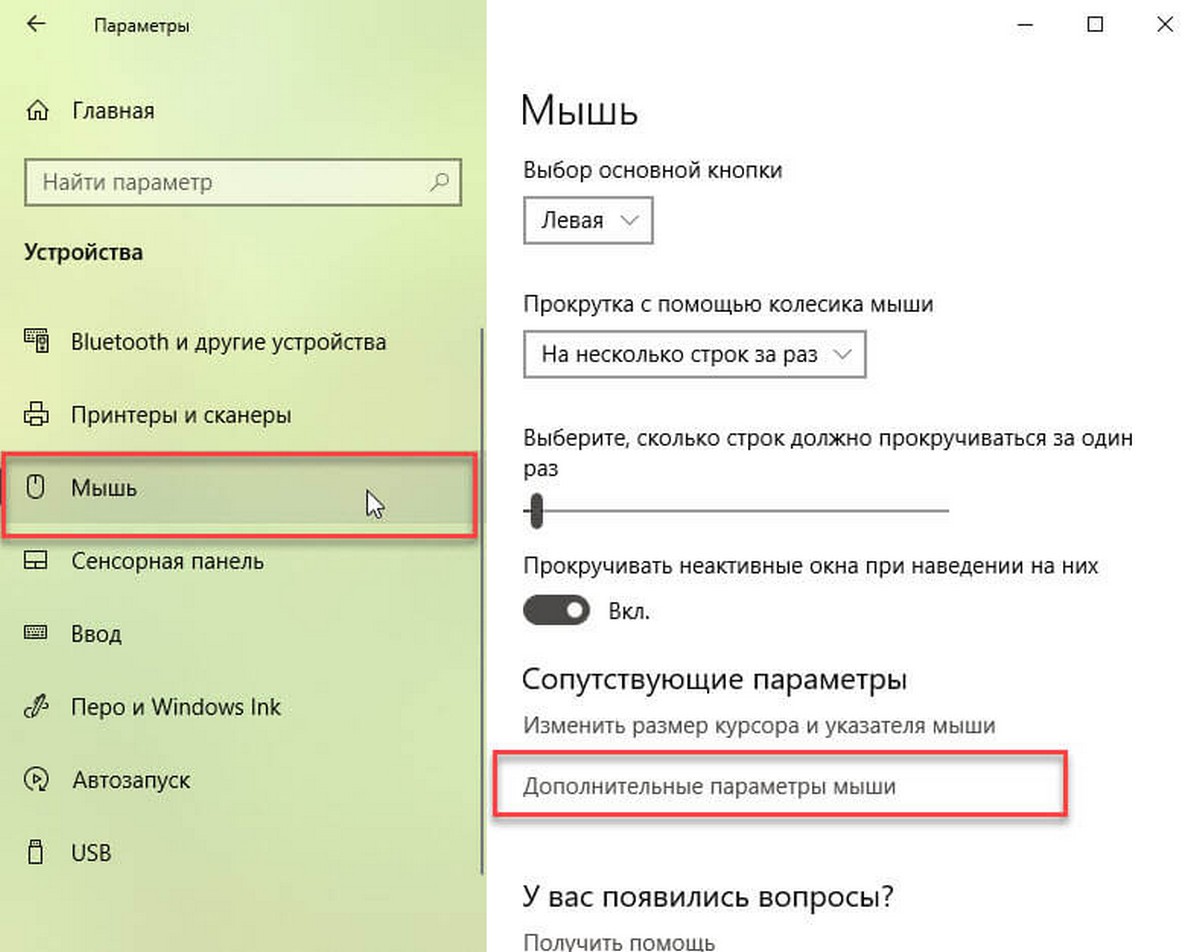
Шаг 2: После того, как вы установили курсор, вам нужно включить его. Откройте приложение «Параметры» и перейдите в группу настроек «Устройства». Выберите «Мышь» и нажмите «Дополнительные параметры мыши».
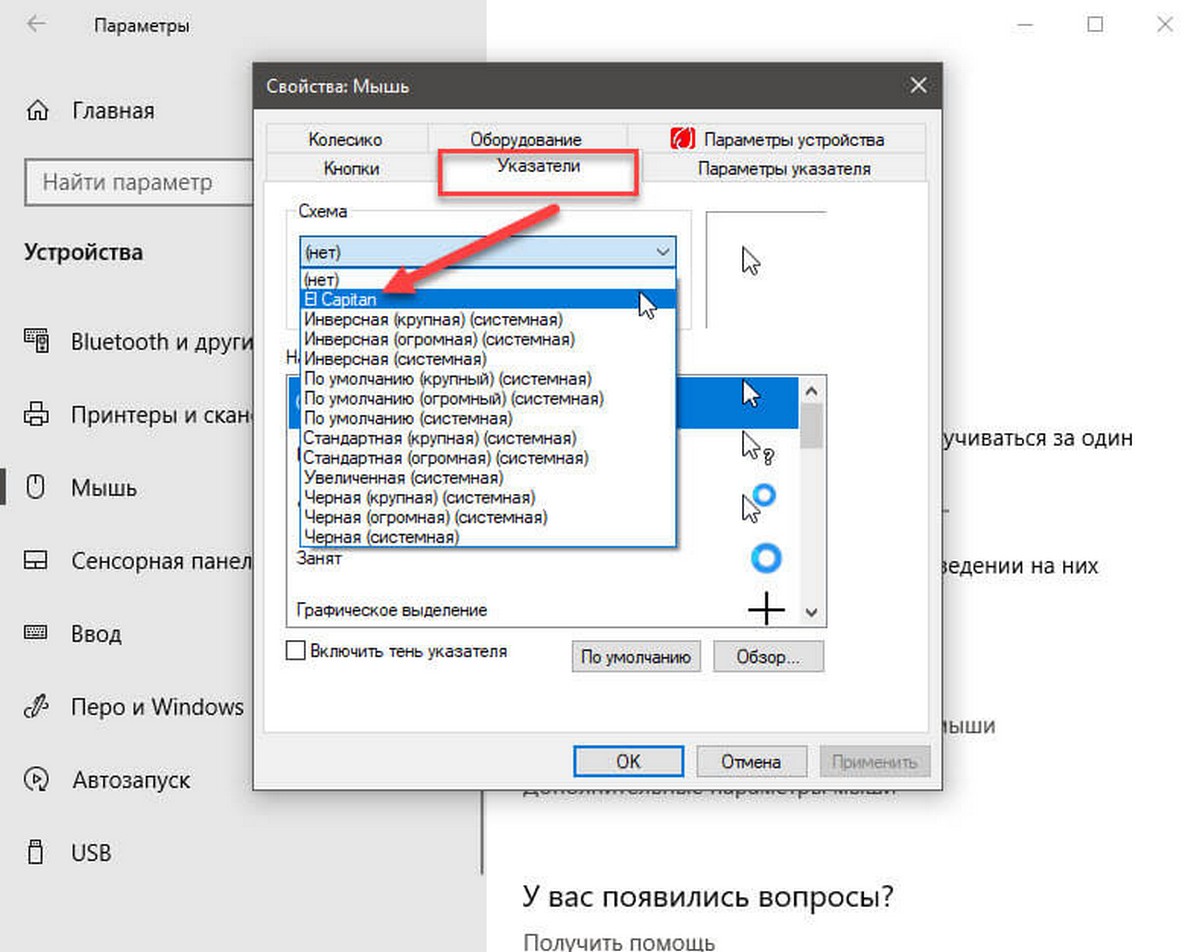
Шаг 3: В открывшемся окне перейдите на вкладку «Указатели». Откройте раскрывающийся список «Схема» и выберите из списка «El Capitan». Нажмите «Применить», а затем «ОК».
Курсор в вашей системе теперь будет имитировать те, которые вы используете в macOS. На скриншоте ниже показан курсор, который вы видите в macOS, когда система занята.
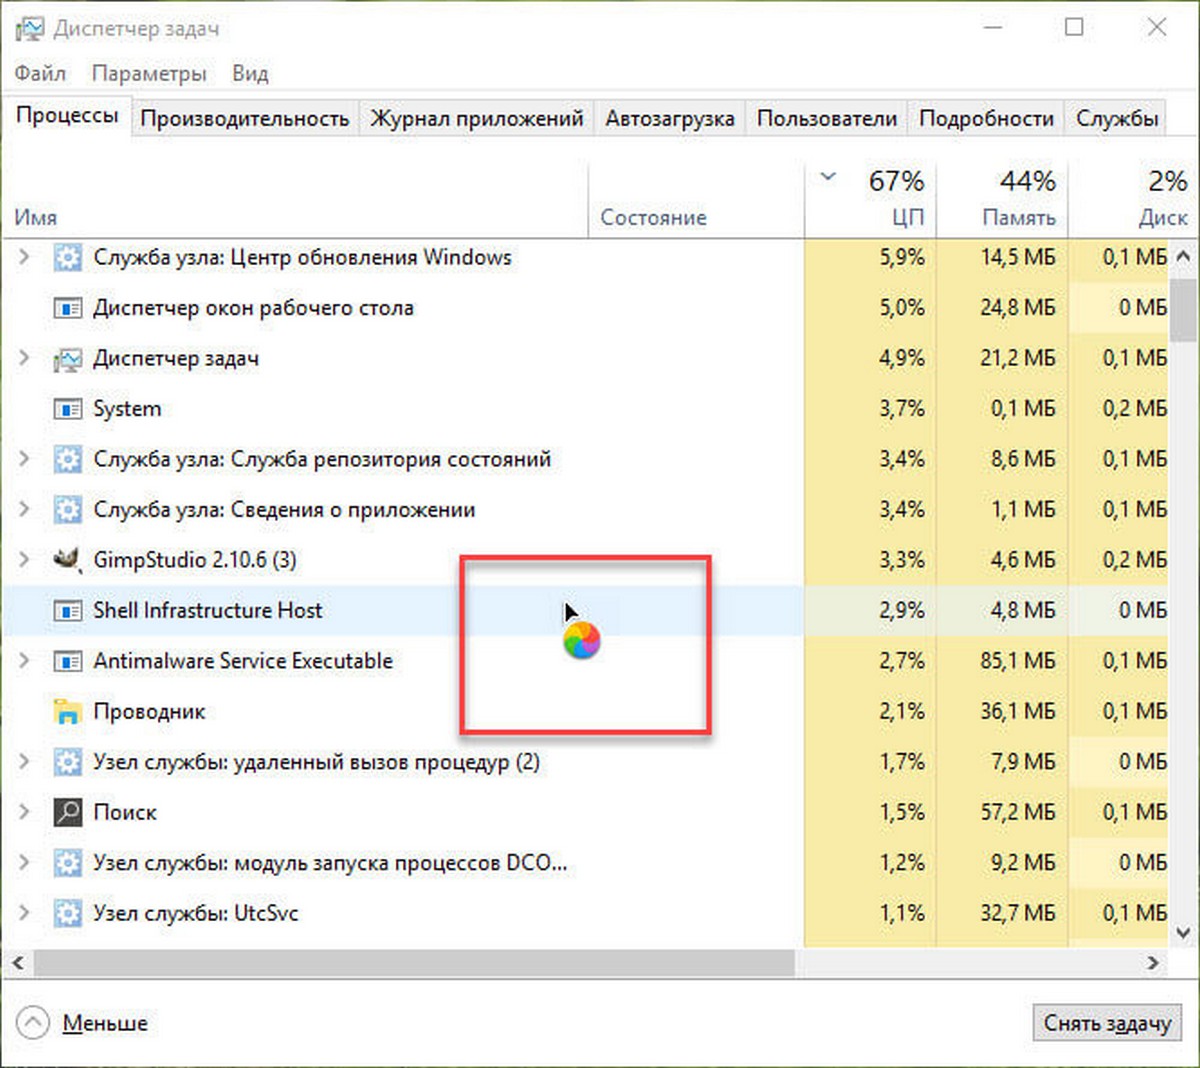
По мере того, как вы используете свою систему, вы увидите также другие курсоры из macOS. Если позже вы решите, что курсор Windows 10 по умолчанию лучше, вы можете изменить схему курсора на значение по умолчанию.
Чтобы изменить схему курсора, перейдите в то же окно «Свойства: мышь», перейдите на вкладку «Указатель» и снова откройте раскрывающийся список в разделе «Схемы». Выберите одну из системных схем Windows.Чтобы удалить установленный курсор, просто нажмите кнопку «Удалить» с выбранной схемой.
Если ни MacOS, ни схемы по умолчанию для Windows 10 не подходят для вас, вы можете искать дополнительные схемы в Интернете. Установка схемы курсора более или менее одинаковая.
Некоторые файлы схем могут содержать скрипт для установки, в то время как другие могут содержать EXE-файл. Если вы установите курсор из EXE-файла, вам придется удалить его с помощью панели управления.
Как установить курсор MacOS на Windows?
По мере нужд, разработчикам приходится иметь дело далеко не с одной операционной системой. Например ваш покорный слуга активно использует сразу 3 шт.:
- MacOS на макбуке;
- Windows 10, установленную на системном блоке;
- Ubuntu для разработки под Laravel и пр.
Когда постоянно занимаешься таким джампингом между ОС мимо воли начинают раздражать отличающие каждую операционную систему нюансы. Сегодня Вы узнаете, как изменить в несколько простых действий Схему мыши, чтобы указатели выглядели как на MacOS под Windows:

Для того, чтобы сделать себе такие указатели, надо выполнить несколько простых действий:
- Скачайте архив с курсорами. Ссылки: с моего блога или Зеркало с deviantart.com
- Разархивируйте полученный архив и найдите в нем файл install.inf
- Кликните правой кнопкой мыши на нем и выберите Install ( Установить )

Теперь можно идти в настройки Мышки, легче всего это сделать если в меню Пуск набрать main.cpl

В открывшимся окне выберите Схему El Capitan .
Как установить курсор MacOS на Windows?
По мере нужд, разработчикам приходится иметь дело далеко не с одной операционной системой. Например ваш покорный слуга активно использует сразу 3 шт.:
- MacOS на макбуке;
- Windows 10, установленную на системном блоке;
- Ubuntu для разработки под Laravel и пр.
Когда постоянно занимаешься таким джампингом между ОС мимо воли начинают раздражать отличающие каждую операционную систему нюансы. Сегодня Вы узнаете, как изменить в несколько простых действий Схему мыши, чтобы указатели выглядели как на MacOS под Windows:
Для того, чтобы сделать себе такие указатели, надо выполнить несколько простых действий:
- Скачайте архив с курсорами. Ссылки: с моего блога или Зеркало с deviantart.com
- Разархивируйте полученный архив и найдите в нем файл install.inf
- Кликните правой кнопкой мыши на нем и выберите Install ( Установить )
Теперь можно идти в настройки Мышки, легче всего это сделать если в меню Пуск набрать main.cpl
В открывшимся окне выберите Схему El Capitan .
How to Download & Install Mac OS Cursor in Windows 10🖱
If you like Mac mouse cursors, you can install them in Windows 10 too. Here are the steps you should follow to install mac cursor in Windows 10.
The default cursor style in Windows 10 is pretty good. If you want to, you can even change the cursor size. The good thing is, if you don’t like the default cursor style in Windows 10, you can change it to whatever you want using CUR files.
For instance, compared to the regular pointer cursor, I really like the gloved pointer in macOS. If you too like the mac cursor styles, you can install them in Windows 10 and make the Windows cursor look like mac cursor. All you have to do is download mac OS Mojave cursor or mac OS high sierra cursor and add them to the Windows 10 pointer styles.
In this quick and simple post, let me show you the procedure to install the mac mouse cursor in Windows 10.
How to Install Mac Cursor in Windows 10
To make Windows cursor look like mac os cursor, follow the steps listed here.
- First, go to the Github page to download macOS Sierra cursors for Windows.
- On the page, click on the “Code” dropdown menu and select the “Download as zip” option. This will download the cursor pack.

- After downloading the zip file, extract the folder in it to the desktop.
- Open the extracted folder.
- Find the “Install.inf” file.
- Right-click on the “Install.inf” file and select “Install“.
- If you see a UAC (User Access Control) prompt, click “Yes“.
- You’ve installed the mac cursors in Windows. Now you need to apply them.
- To apply mac os cursors in Windows, open the Settings app.
- Go to the “Devices” page.
- Go to the “Mouse” page.
- Click on the “Additional mouse options” link.
- Go to the “Pointers” tab.
- Select “macOS Sierra 200” from the Scheme dropdown menu.
- Click “Ok“.


That is all. As soon as you click the Ok button, Windows will apply the mac os cursors in Windows 10. In fact, you can instantly see the new cursor in action.
When you are saving the changes, if you see a Replace Scheme prompt, click “No”.
Note: If you are unable to download mac cursors from Github, here’s the direct download link.
Restore Default Windows Mouse Cursor
When needed, you can reset the Windows cursors to its original scheme. Here’s how to do it.
- Open the Settings with “Win + I” keyboard shortcut.
- Go to the “Devices → Mouse” page.
- Click on the “Additional mouse options” link.
- Go to the “Pointers” tab.
- Select “Windows Default (System scheme)” from the Scheme dropdown menu.
- Click “Apply” and “Ok” buttons.

As soon as you save the changes, the default Windows cursor scheme will be restored. You will see the changes instantly.
That is all. I hope that helps. If you are stuck or need some help, comment below and I will try to help as much as possible.
How To Get Mac Mouse Pointer (Cursor) In Windows 10
Last Updated on August 19, 2020 by admin 31 Comments
Are you bored of the default mouse cursor or pointer in Windows 10? Do you like the pointer offered in macOS? In this guide, we will see how to download and install the macOS pointer in Windows 10.

Like its predecessors, Windows 10 also ships with a bunch of mouse points. While there is nothing wrong with the default black and white cursor, the cursor has not seen a major update for years. Because of this, many users are bored of the default cursor and want to replace the default one with a cool cursor.
As said before, Windows 10 ships with a bunch of cursors and also allows you to change the default size and color of the mouse pointer, but most of the cursors available in Windows 10 look more or less the same.
Install Mac cursor in Windows 10
If you’re really bored with the default cursor, you should install the macOS cursor in Windows 10.
Complete the given below directions to download and install the Mac cursor in Windows 10.
Step 1: Visit this page of the Deviantart page and download the macOS mouse cursor pack for Windows 10. The download link is on the right side of the page.
Step 2: Once downloaded, extract the zip file to a new folder on desktop or any other place. To extract, right-click on the zip file, click Extract all, select a location to save extract files, and then click the Extract button.

Step 3: Locate the file named Install.inf, right-click on the same, and then click Install option to install the Mac cursor in Windows 10.

Step 4: Now that you have installed Mac cursors, it’s time to select the newly installed cursor. To do so, type Main.cpl in Start menu or Run command box and then press Enter key to open the Mouse Properties dialog.

Step 5: Switch to Pointers tab, select the new EI Capitan from the drop-down menu, and then click the Apply button.

The Mac-style cursor should appear now. Good luck!
The mouse cursor mentioned above is compatible with all builds of Windows 10, both 32-bit and 64-bit.


