- Как подключить телевизор с поддержкой SMART TV к компьютеру (Wi-Fi-сеть, LAN-кабель) при помощи операционной системы WINDOWS. Часть 2.
- DLNA сервер в Windows 10. Настройка, вывод на телевизор
- Выводим видео с Windows 10 на телевизор: быстрый и простой способ
- Запуск DLNA сервера на Windows 10 стандартными средствами
- Как добавить папку для DLNA сервера
- Еще несколько советов
- Если воспроизведение видео тормозит
- Connect Windows 10 PC to Smart TV
Как подключить телевизор с поддержкой SMART TV к компьютеру (Wi-Fi-сеть, LAN-кабель) при помощи операционной системы WINDOWS. Часть 2.
Начало читайте в нашей предыдущей статье.
Для того, чтобы наши папки были видны в сети, нам нужно посредством Windows Media Player добавить папки с фильмами, музыкой, изображениями в соответствующие категории.
Теперь нам необходимо открыть проигрыватель Windows Media Player. Найти его можно в списке программ в меню «Пуск» или через поиск в том же меню «Пуск».
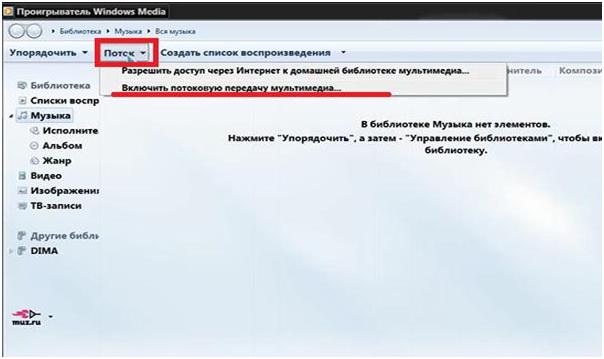
Открываем проигрыватель. Переходим в меню к библиотеке. Там выбираем пункт «Поток». В появившемся списке выбираем подпункт «Включить потоковую передачу мультимедиа…».
В следующем окне подтверждаем включение потоковой передачи мультимедиа.
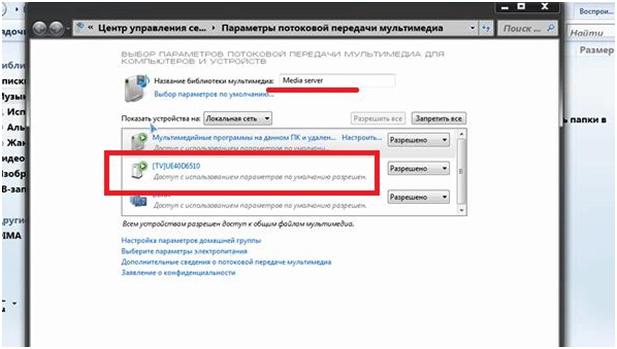
Далее, при желании, можно изменить название библиотеки мультимедиа. В списке ниже появятся устройства локальной сети, которым будет доступна библиотека. Так, на изображении ниже в прямоугольнике отмечен наш телевизор.
Нажимаем кнопку «ОК».
Попадаем снова в библиотеку Windows Media Player. Теперь будем «расшаривать» папки с изображениями, музыкой и видео.
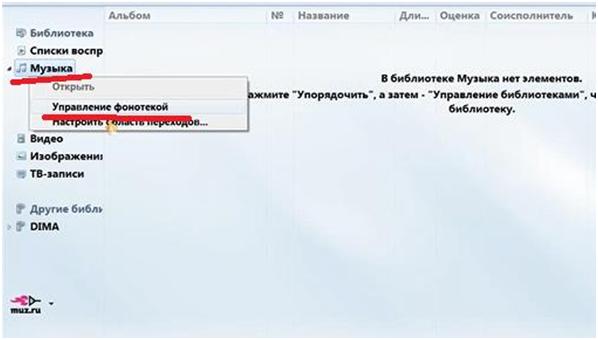
Выбираем пункт «Музыка». В контекстном меню нажимаем на пункт «управление фонотекой».
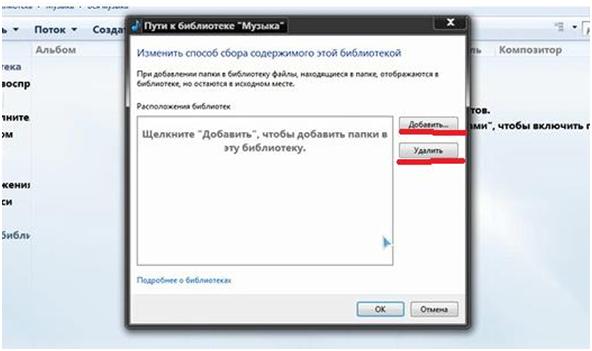
Если в этом окне уже есть, какие-то папки, то выделяем их и удаляем соответствующей кнопкой справа посередине окна.
После этого в окне надо нажать кнопку «Добавить».
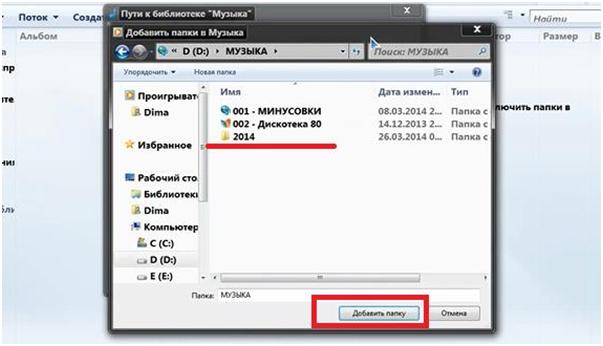
В появившемся окне находим на компьютере соответствующую папку с музыкой.
Нажимаем кнопку «Добавить папку». В следующем окне нажимаем кнопку «ОК».
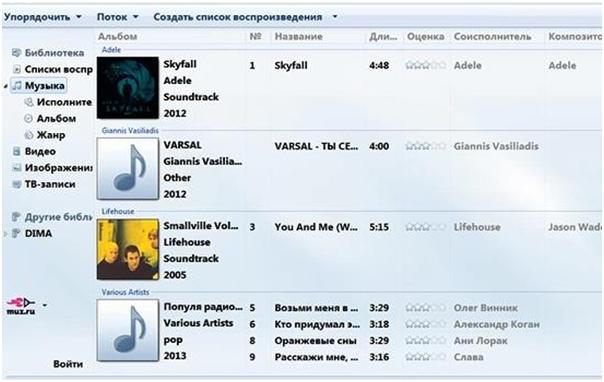
Произойдет синхронизация и обновление библиотеки.
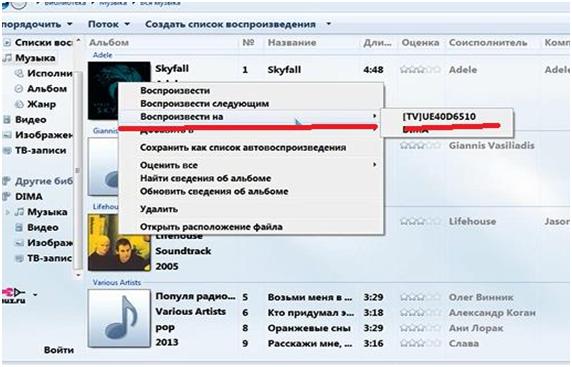
Прямо отсюда можно воспроизвести на телевизоре (если он включен и подключен к сети) любой файл из библиотеки. Нажимаем на файл правой кнопкой мыши. Далее выбираем пункт «Воспроизвести на». И потом выбираем устройство.
Те же самые действия произведем при «расшаривании» папок с видео и музыкой.
Открыть интересующие нас файлы можно и с телевизора. Для этого на пульте дистанционного управления выбираем кнопку источника сигнала. В списке источников выбираем нашу сеть. Нажимам на нее.
Появится список папок, ранее нами «расшаренных». В них находим нужный файл и открываем его.
При проверке видеофайлов результаты были следующие. Файлы форматов AVI, MKV, MP4 воспроизводятся отлично. Перемотка работает. Файлы в HD-качестве также хорошо воспроизводятся. Тип соединения (проводной или беспроводной) значения не имеет.
Ссылка на видеоинструкцию:
DLNA сервер в Windows 10. Настройка, вывод на телевизор
На тему настройки DLNA я уже опубликовал не одну статью. Мы запускали DLNA сервер разными способами, на разных устройствах, и для разных телевизоров. В этой инструкции, я покажу как включить DLNA сервер в Windows 10. Пускай это будет компьютер, или ноутбук, не важно. Главное, чтобы на нем была установлена Windows 10. Есть много разных программ, которыми на компьютере можно запустить медиа-сервер. Но в этой инструкции мы не будем использовать никаких сторонних программ. Будем использовать только стандартные средства Windows 10. Прочем, такая возможность есть и в Windows 8, и в Windows 7. Отличий там немного.
И так, для начала разберемся что же такое DLNA, зачем запускать этот сервер на компьютере, ноутбуке и что с ним делать. Все очень просто. По технологии DLNA можно передавать медиаконтент (видео, фото, музыка) между устройствами в локальной сети. Чаще всего, эту технологию используют для просмотра на телевизоре Smart TV видео, или фото, которые находятся на компьютере. Более подробно об этой технологии я писал в статье: технология DLNA. Использование DLNA на телевизорах Smart TV и других устройствах. Если интересно, можете почитать.
Как все это работает: телевизор со Smart TV должен быть подключен к нашему роутеру. По Wi-Fi сети, или по кабелю. Это не важно. К этому же роутеру, должен быть подключен компьютер, на котором мы хотим запустить медиа-сервер, и с которого хотим воспроизводить на телевизоре видео, фото, или музыку. Главное, чтобы устройства были в одной локальной сети (были подключены через один роутер) . Это не значит, что должен быть только один компьютер и один телевизор, их может быть несколько. Более того, в сети могут быть другие устройства, которые поддерживают DLNA. Например: игровые приставки, ТВ приставки, спутниковые ресиверы и т. д.
А еще в браузере Microsoft Edge в Windows 10 есть возможность выводить на TV видео, фото и музыку прямо с браузера. Как это сделать, я писал в этой статье.
Думаю, со всеми нюансами разобрались, теперь можно приступать к настройке.
Выводим видео с Windows 10 на телевизор: быстрый и простой способ
Видеоролик, фильм, практически любую видеозапись можно вывести с компьютера на телевизор в несколько кликов мышкой. Включите телевизор. Убедитесь, что он подключен к интернету (к вашему роутеру) .
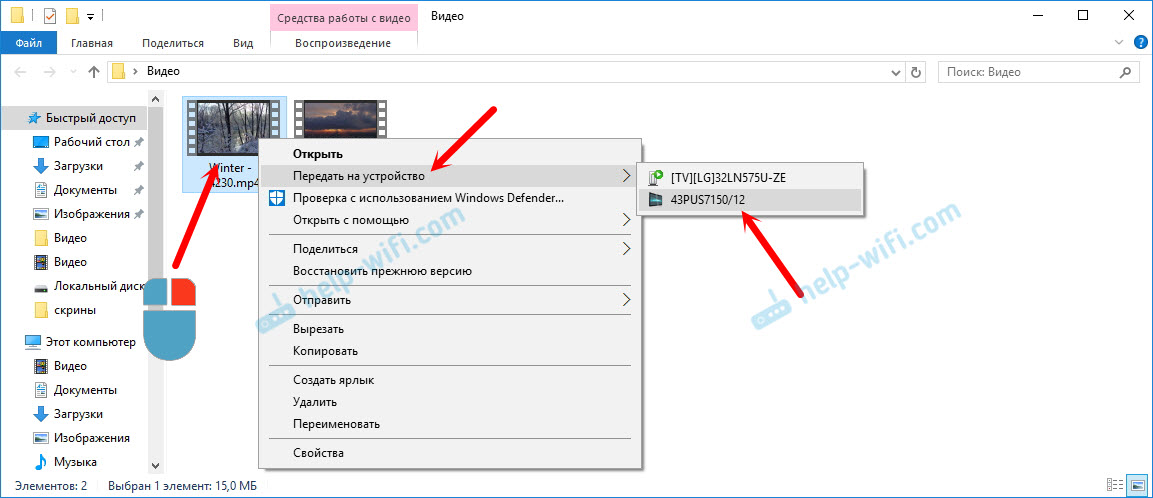
На компьютере открываем папку с видео, и правой кнопкой мыши нажимаем на файл, который хотим воспроизвести на телевизоре (Smart TV). Дальше наводим курсор на пункт «Передать на устройство». Там должен появится наш телевизор. Если там надпись «Поиск устройств. «, то нужно немного подождать. Оставьте открытое меню, или попробуйте через пару секунд. Как вы можете видеть на скриншоте ниже, у меня Windows 10 нашла два телевизора: LG и Philips.
Выбираем телевизор. Сразу появится окно управления проигрывателем. В нем вы сможете управлять воспроизведением видео на телевизоре, добавлять другие файлы в список воспроизведения, будете видеть информацию по телевизору и т. д.
На телевизоре сразу начнется воспроизведение запущенного фильма.
Мы только что запустили просмотр видео с компьютера на телевизор по технологии DLNA. Как видите, все работает. И все это без проводов, по воздуху. Кончено, если у вас оба устройства подключены по Wi-Fi.
Запуск DLNA сервера на Windows 10 стандартными средствами
Выше мы рассмотрели способ, когда с компьютера можно отправлять файлы на телевизор. Но, есть еще отличная возможность, когда мы с телевизора сможем просматривать все файлы (к которым открыт доступ) , которые хранятся на нашем компьютере. Думаю, именно это вам необходимо.
Для запуска DLNA сервера можно использовать сторонние программы, например, «Домашний медиа-сервер (UPnP, DLNA, HTTP)». О настройке с помощью этой программы я писал в статье настройка DLNA сервера для телевизора Philips. Смотрим фильмы с компьютера на телевизоре. Эта программа подходит для всех телевизоров. Но у каждого производителя, как правило, есть своя программа. У LG, например, это Smart Share. О настройке которой я писал здесь.
Ну а с другой стороны, зачем нам сторонние программы, если в Windows 10 все можно настроить встроенными средствами.
2 В новом окне нажимаем на кнопку «Включить потоковую передачу мультимедиа». Тем самым мы включаем DLNA сервер в Windows 10.
3 Дальше укажите название своего DLNA сервера. Затем, в списке устройств вы можете разрешить, или запретить доступ к медиа-серверу для определенного устройства в вашей сети. Если вы подключены к своей домашней сети, то можете оставить все устройства.
Если вашего телевизора в списке не будет, то немного подождите. Либо закройте и заново откройте настройки потоковой передачи мультимедиа.
Возле каждого устройства будет кнопка «Настроить. «. Если необходимо, то вы можете задать индивидуальные настройки для каждого устройства.
4 Теперь на телевизоре можно получить доступ к запущенному серверу. На разных телевизорах это выглядит по-разному. На телевизорах Philips (с Android TV), например, нужно запустить приложение Медиа. Или выбрать этот источник в доступных источниках сигнала.
Как можно увидеть на скриншоте выше, доступ сразу будет открыт к трем стандартным папкам: «Видео», «Изображения», «Музыка». Все файлы, которые находятся в этих папках, вы сможете просматривать на телевизоре.
Эти три папки находятся на системном диске. Согласитесь, не очень удобно все время копировать туда необходимые фильмы и другие файлы, чтобы смотреть их с телевизора. Поэтому, можно просто открыть общий доступ к другим папкам.
Как добавить папку для DLNA сервера
Запустите Проигрыватель Windows Media.
Если вы хотите добавить папку с видео, например, то нажмите слева на соответствующий пункт, и выберите «Управление видеотекой».
В новом окне нажмите на кнопку «Добавить». Выделите папку к которой нужно открыть доступ по DLNA, и нажмите на кнопку «Добавить папку».
Все, необходимая папка появится в списке, и будет отображаться на телевизоре. Я, например, открыл доступ к папке «Видео», в которой храню фильмы.
Вы таким способом можете добавить любые папки, или удалить их из списка.
Еще несколько советов
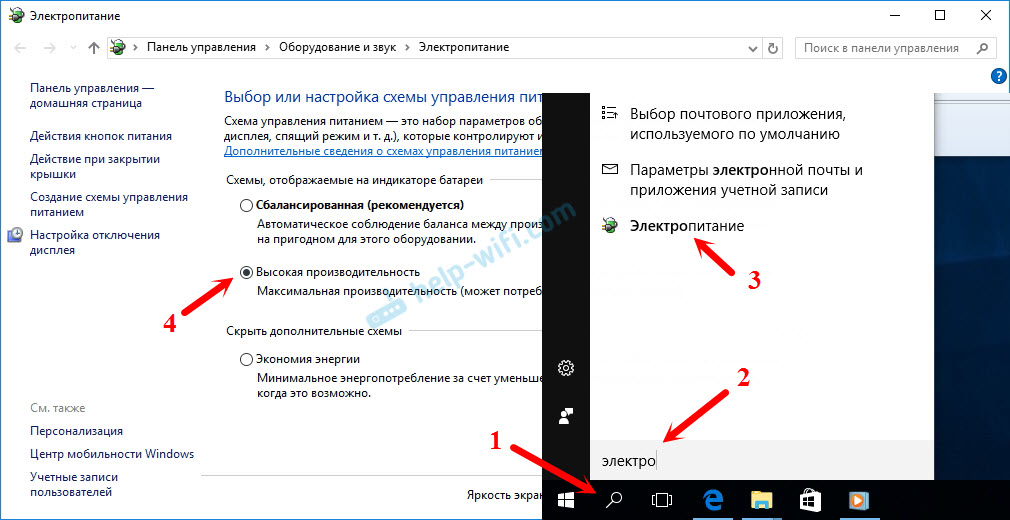
2 Если в процессе воспроизведения файлов по DLNA компьютер будет уходить в спящий режим, и воспроизведение будет прерываться, то просто включите схему электропитания «Высокая производительность».
Несколько статьей по теме:
Если воспроизведение видео тормозит
При воспроизведении видео этим способом, многие сталкиваются с нестабильной работой. Воспроизведение все время повисает, идет с задержками, останавливается и т. д. В основном, такие проблемы возникают при воспроизведении больших видеофайлов. Как правило, эти проблемы появляются из-за нехватки скорости соединения между компьютером и телевизором. Чаще всего, в этом виновен бюджетный, слабый маршрутизатор. Просто не хватает пропускной способности. Правда, мощный маршрутизатор не гарантирует стабильную передачу файлов по DLNA.
На момент просмотра отключите разные загрузки, онлайн игры, не используйте интернет на других устройствах. Если есть возможность, подключите телевизор, или компьютер (а лучше оба устройства) к роутеру по сетевому кабелю. Тогда соединение будет намного стабильнее, а скорость выше.
Если ничего не помогает, то для вывода изображения с компьютера, или ноутбука на телевизор можете использовать более стабильное соединение по HDMI кабелю. Или просто скопируйте фильмы с компьютера на флешку, или внешний жесткий диск, и смотрите их на телевизоре.
Connect Windows 10 PC to Smart TV
Multimedia files can be projected/played on a Smart TV from a Windows 10 PC by the following methods:
1. CAST (Media Streaming): Media is streamed in compressed file format from a source device to the media player on a receiver device which decompresses the file stream to play the media in real time.
2. PROJECT (Screen Mirroring): The image displayed on the screen of a device is replicated on the display screen of another device in real time. In essence, the video-out port of the sender device is connected to the video-in port of the receiver device. The bandwidth required for Screen Project is much higher than Cast, because the pixel data stream between the source and receiver is raw video in decompressed format.
3. DLNA (Media Sharing): A Media File is streamed from a media storage Server on request from a media player Client which decompresses the file stream to play the media in real time. Cast is a variation of DLNA where the sender (server) initiates media streaming to a ready-to-connect receiver (client) listening on a common Wired / Wireless network.
1. CAST: Cast is the easiest method to play a multimedia from a PC on to a Smart TV called Smart as they have an Operating System. However file formats supported for casting are limited to MP4, WMV, AVI, MOV for video and MP3, WMA, WAV for audio. The audio system of the TV can either be built-in or externally connected to a Hi-fi system.
The Cast setup requires that (i) the PC and the Smart TV are connected to the same Home WiFi network (ii) Network discovery And File sharing are enabled on your currently active network profile (Private / Public) through Control Panel > Networking and Sharing Centre > Change advanced sharing settings (on left panel).
Just as networking needs to be configured on the PC, similarly networking has to be configured on the Smart TV through the Settings menu, to either establish a peer-to-peer direct communication path Or inter-connect by hooking up to a common access point. As with any operating system, a network once created on a Smart TV, persists as the default network until a new network is created.
To play a video, Open File Explorer on the PC, right click on the video file and from the shortcut menu choose Cast to Device > Smart TV (name). It may take some time for the PC to search for the TV on the network before displaying its name on the shortcut menu.
Select the TV name on the shortcut menu and the media will automatically start playing on the TV, with the Cast Window for media control appearing on the PC. You can use the PC for other work by minimising the Cast Window while the media continue to play on the TV.
Once a TV is successfully linked to a PC, the TV-name gets registered in the Devices list under Windows Settings and the TV-name will be readily available thereafter in the Cast to Device menu.
On Windows 10, Casting is the simplest and most reliable choice for playing multimedia files from PC to any TV.
2. PROJECT: Project or Screen Mirroring allows a Windows 10 PC to project its Screen to a Smart TV by using the Miracast technology. Unlike Cast, Screen Mirroring allows any type of file that displays on the PC screen to be projected on to the TV, be it a text document or a movie played from the DVD drive.
Miracast is a standard introduced in 2012 by «Wi-Fi Alliance» – a non-profit organisation, for wireless screen mirroring of devices with an operating system like PC and Mobile, on to Displays such as TV, LED panels and Screen Projectors.
Microsoft is one of the main promoters of Miracast in their Windows OS, while Google dropped Miracast support in their Android OS starting Android 6 Marshmallow, in favour of Google’s own proprietary Chromecast technology. Miracast in android devices is now possible through miracast apps in Google Play Store. Some mobile device manufacturers with customised android provide Miracast built into their OS.
At the core of Miracast standard is the WiFi Direct technology originally developed by Intel but subsequently discontinued, on adoption by the Miracast organisation. Much like bluetooth, WiFi Direct devices creates its own hotspot to network with other WiFi enabled devices without the need of a Wireless Access Point. WiFi Direct must be built into the hardware of one of the communicating devices. In contrast, Chromecast works on a WiFi network hosted by the Router.
Miracast serves to establish a peer-to-peer WiFi Direct connection between a OS device and a Display device, and allows streaming of up to 1080p HD video and 5.1 surround sound.
The objective of Miracast is to separate the streaming network from the Home WiFi network used to access the internet. A PC on a home network use the WiFi direct path to stream data to a TV receiver, without having to consume the bandwidth of the home network used by other devices for inter-communication and accessing the internet. The PC can simultaneously stream data and access internet, but that could strain the WiFi port on the PC unless it has two separate WiFi ports – one configured for Miracast and the other for internet access.
Windows 10 implementation of Miracast requires that (i) the PC take ownership of the media streaming part of Miracast to effect pixel data streaming of the PC screen, and (ii) the Display Device (TV) take ownership of the WiFi Direct networking part of Miracast to establish a direct communication path with the PC, by incorporating the WiFi-Direct hardware technology which we shall henceforth refer to as a Miracast adapter.
In Windows 10, the Miracast feature is part of Windows installation depending upon the capability of the hardware. In other words, it is upto the PC manufacturer to provide the necessary hardware to ensure that the media streaming part of Miracast is in place. The hardware elements that engines the Miracast feature in a PC are the Processor, Graphics driver and the WiFi adapter driver which should correspond to the Windows 10 Network Driver Interface Specification (NDIS) version number.
Miracast is natively available on a TV when the Miracast adapter is integrated into the TV electronics. Even if a TV has Miracast built-in, it might not support the Windows 10 Wireless display protocol. Miracast can also go entirely missing on an android TV.
Whatever may be the case, a TV can be made to support Windows Wireless Display by attaching a Miracast dongle, which among others is also offered by Microsoft specifically for Windows PC projection. The dongle called Microsoft Wireless Display Adapter has to be connected to the HDMI port of the TV with the USB end of the adapter connected to an USB port — preferably the one on the TV set, to draw power.
To project a PC screen to a TV, the following steps are necessary:
(i) Enable WiFi on the PC and the TV. They can be on the same / different network.
(ii) First determine if the PC is Miracast compliant. Press Windows Key + P on the PC keyboard to open the Project action bar (Charms Menu) which must contain the link «Connect to a wireless display» at the bottom. Miracast is not available on the PC if the link is not seen on the action bar.
(iii) Ensure that the TV has a built-in Miracast adapter Or a Microsoft Wireless Display Adapter is attached to the TV.
(iv) Mirroring is enabled on the Smart TV.
(v) Set the Signal source for the TV with a built-in Miracast adapter to the Mirroring port; Or set the signal source to the HDMI port where the Microsoft Wireless Display adapter is attached.
(vi) Press Windows Key + P on the PC keyboard to invoke the Project action bar / Charms menu and select the «Connect to a wireless display» link at the bottom. The action bar will now broadcast the Microsoft adapter name Or the TV-name if it has a built-in Miracast adapter Or both including all nearby devices which are ready to connect via Miracast. Select the one applicable to start mirroring the PC screen on to the TV. If the TV-name or the Microsoft adapter name is not found on the Project action bar, ensure that you add the TV-name / adapter within Devices of Windows Settings.
If Miracast is not available / not possible on a PC, then the fail-safe alternative is to go for the legacy wired connection by a HDMI cable between the HDMI port of PC and the HDMI port of TV, provided the TV and the PC are in close proximity. Set the Signal source for the TV to the HDMI port where the cable is attached. Press Windows Key + P on the PC keyboard to invoke the Project action bar / Charms menu and choose the Duplicate option to simultaneously display the PC screen on to the TV.
Since Miracast evolved as an WiFi extension to HDMI, it is sometimes referred by the mnemonic «HDMI over WiFi».
A TV with Miracast will contain a Setting within the Networks section, which will show the SSID and Password of the WiFi Direct Access point. This access point on being enabled will show up as a hotspot on the «WiFi available networks list» of a PC. A PC can use the WiFi Direct hotspot for Cast and DLNA without the need of a Home network. However, Miracast will not be possible when using the WiFi Direct hotspot as a WiFi access point.
Caution ! A Smart TV can broadcast two names: The system defined Miracast SSID for Screen Project and the user defined name when using the Home network for Cast and DLNA.
3. DLNA: DLNA (Digital Living Networking Alliance) is the older standard for interoperability of digital multimedia devices. All participating devices must be DLNA certified to establish a network connection. Windows 10 is DLNA certified and you have to ensure that DLNA is available on the Smart TV.
The DLNA network between a PC (Digital Media Server) and a Smart TV (Digital Media Receiver) can be set up through a wired Ethernet connection or a wireless WiFi connection. The DLNA framework for communication is constituted by the Windows 10 Library Folders of the user which is configured by design to be the Digital Media Server (DMS) for sourcing and streaming the media files to a receiver TV via a wired or wireless network.
The TV performs the Digital Media Receiver (DMR) client functions by acting as a Digital Media Controller (DMC) for being able to access the media files on the DMS (PC) and instruct the PC to stream the media file, AND as a Digital Media Player (DMP) having a decoder unit capable of decompressing the streamed media for playing, AND also as a Digital Media Renderer to display the decoded stream on its screen.
DLNA services has to be explicitly enabled on a Windows 10 PC by opening the Control Panel > Networking and Sharing Centre > Media streaming options (on the left panel) > Turn on media streaming (button).
On the media steaming options window (screenshot above), enter a name for the user’s library folders on the PC and allow access to the TV-name appearing under the devices list on the Local network.
If the TV-name does not appear, first ensure that both the TV and PC are connected to the same local network. Then use the Cast to Device menu on any MP4 file to register the TV-name within the Devices list of Windows Settings and also to show up on the Media streaming options window.
Once enabled, DLNA services will automatically start everytime the PC is powered ON. To disable DLNA you need to open the Services applet by calling Run dialog (WinKey+R) and then entering services.msc in the dialog > scroll down on the Services applet and double click on «Windows Media Player Network Sharing Service» to open its Properties window > Stop the Service by clicking on the Stop button > change the Startup type to «Manual» from the drop-down > click OK and close the Services applet.
The DLNA network can be implemented in one of the following ways:
(i) Wired: A direct connection by an Ethernet Cross-Cable between the LAN (RJ-45) port of PC and the LAN (RJ-45) port of TV.
(ii) Wired: The PC and the TV connects to a Router / Switch by a normal Ethernet cable.
(iii) Wireless: The PC and the TV connects to a Router through WiFi.
(iv) Wireless: The PC connects to the WiFi Direct Hotspot of the TV.
The direct Ethernet cross-cable connection is the most reliable and simplest method. The WiFi connection although simple can cause stuttering and latency issues during HD video streaming.
Once the PC and TV establish a network path for mutual communication, the TV will automatically identify the PC as a DLNA server. If everything goes right, the PC-name will appear on the Device / Port / Server list of the TV, generally accessible from its Home Screen.
Finally, the PC has to be chosen as the signal source for the TV from the input port list Or the connected device / server list of the TV. The Windows 10 Library folders will display on the TV screen from which a media file can be selected for playing on the TV.
The Digital Media Player (DMP) module within the TV must provide native support to the media file format for playing on the TV, and this DMP which is built specific to every TV model defines all the types of media it can support. The easiest way to ascertain the capability of DMP within a TV, is to experiment playing different multimedia file types from a Pen Drive directly attached to an USB port of the TV.
DLNA scores over CAST when it comes to browsing and choosing to play files from the Media Library on the PC, right from your TV seat with the aid of TV Remote acting as a DMC — without having to move around and reach the PC to initiate media streaming individually for each file.
Windows Media Player (WMP) which was the original DLNA Server for Media Library and Media Streaming, now supports Cast. Right click on any media file on the WMP Library and you get the Cast to device function in the shortcut menu. WMP has a Playlist feature but the streaming controls remain in the Player itself — not accessible from a TV. Films and TV app is the new age media player in Windows 10 and is the one in the advancement path, although WMP remains a more popular and preferred DLNA networking device.
On the reverse direction, when the TV is enabled as a DLNA Server through the TV Network settings, it allows media files in storage devices attached to the TV to be accessible from the WMP of a networked PC.
