- Adding languages in Windows 10: Known issues
- Adding Local Experience Packs (LXPs) in Windows 10 version 2004 and later versions: Known issue
- Adding language packs in Windows 10, version 1803 and later versions: Known issue
- Cause
- Resolution
- Windows 10, version 1903(build 18362) and later
- Windows 10, versions 1803 and 1809
- Example
- Available languages for Windows
- Supported Language Packs and Language Interface Packs
- Language Packs
- Language interface packs (LIPs)
- Установка языкового пакета в Windows 7
- Процедура установки
- Способ 1: Загрузка через «Центр обновления»
- Способ 2: Ручная установка
Adding languages in Windows 10: Known issues
This topic captures known issues that affect language provisioning in Windows 10.
Adding Local Experience Packs (LXPs) in Windows 10 version 2004 and later versions: Known issue
When servicing a Windows image that contains LXPs with a cumulative monthly security update or public preview, the corresponding LXP ISO for that update needs to be downloaded and installed to the system image prior to launching OOBE. If this step is skipped, then the user may experience unexpected language fallback (e.g., see text in a language that they cannot understand) until they are able to update their LXP via the Microsoft Store. Note that LXPs cannot be updated via the Microsoft Store until OOBE is completed (i.e., device has reached the Desktop) and the device has established internet connectivity.
To find the correct LXP ISO for your associated monthly quality update, look for the abbreviation of your update in the LXP ISO filename (e.g., 9B). If a quality update doesn’t have a corresponding LXP ISO, use the LXP ISO from the previous release.
| Monthly quality update | Servicing update file name and KB article | LXP ISO part numbers and/or filenames |
|---|---|---|
| *9B | 2020-09 Cumulative Update for Windows 10 Version 2004 for x64-based Systems (KB4571756) | |
| *9C | 2020-09 Cumulative Update Preview for Windows 10 Version 2004 for x64-based Systems (KB4577063) | |
| *10C | 2020-10 Cumulative Update Preview for Windows 10 Version 2004 for x64-based Systems (KB4580364) | |
| *11C | 2020-11 Cumulative Update Preview for Windows 10 Version 2004 for x64-based Systems (KB4586853) | |
| *1C | 2021-01 Cumulative Update Preview for Windows 10 Version 2004 for x64-based Systems (KB4598291) | |
| *2C | 2021-02 Cumulative Update Preview for Windows 10 Version 2004 for x64-based Systems (KB4601382) | |
| *3C | 2021-03 Cumulative Update Preview for Windows 10 Version 2004 for x64-based Systems (KB5000842) | |
*The number aligns to the month (e.g., 9 = September), and the letter aligns to the quality update type. See this blog post for more information on the monthly update terminology and servicing cadence.
Adding language packs in Windows 10, version 1803 and later versions: Known issue
In Windows 10, version 1803 (build 17134) and later versions, you use Lpksetup.exe or Deployment Image Servicing and Management (DISM.exe) to add language packs to an image. However, the language does not automatically appear in the list of Windows display languages under Settings > Time & Language > Language.
Cause
Beginning in Windows 10, version 1803, a background cleanup task removes language packs that are not actively used. The list of Windows display languages shows only the languages of the language packs that have been used. It is possible for the cleanup task to remove a language pack before the language pack can be used.
Resolution
The specific steps to resolve this issue depend on the version of Windows 10 that you are using.
Windows 10, version 1903(build 18362) and later
After you install the language pack, change the Group Policy that governs the affected computer. To do this, set the BlockCleanupOfUnusedPreinstalledLangPacks Group Policy Object (GPO) to Yes.
After you make this change, the added language remains visible under Settings > Time & Language > Language > Windows display language.
Windows 10, versions 1803 and 1809
When you run the commands that are described in this section, you must use the security context of the user who will use the language pack. If more than one user will be using the system, you have to run these commands under the security context of each user in turn.
After you install the language pack, add the language pack to the user language list. To do this, open a Windows PowerShell window, and run the following commands:
In these commands, represents the language code of the language pack that you want to add.
To verify that the language pack was added to the user language list, run the Get-WinUserLanguageList cmdlet.
Example
This example adds the Spanish language pack (“es-es») to the list of Windows display languages. To add other language packs, replace all instances of “es-es” with the language code of the desired language pack.
Install a language pack by using Lpksetup.exe or DISM.exe. To do this, open an elevated Command Prompt window, and run one of the following commands:
Verify that the language pack is installed. To do this, type the following command at an elevated command prompt:

Depending on the version of Windows 10, do one of the following:
- Windows 10, version 1903(build 18362) and later: Change the Group Policy that governs the affected computer. Set the BlockCleanupOfUnusedPreinstalledLangPacks Group Policy Object (GPO) to Yes.
- Windows 10, versions 1803 and 1809: Open a PowerShell window and run the following commands:

To verify that the language is now available, do one of the following:
- In a PowerShell window, run Get-WinUserLanguageList.

- Select Settings >Time & Language >Language >Windows display language, and verify that EspaГ±ol (EspaГ±a) appears.

—>
Available languages for Windows
The following tables show the supported language packs for Windows 10 and Windows Server, and supported language interface packs (LIPs) for Windows 10. LIPs are available for Windows 10, but are not available for Windows Server. For more information, see Language packs.
The version of the language, LIP, or Feature on Demand must match the version number. For example, you can neither add a Windows 10 version 1809 LIP to Windows 10 version 1803 image, nor add a Windows Server 2019 language pack to Windows Server 2016.
You cannot add languages to Windows 10 Home Single Language and Windows 10 Home Country Specific editions.
To learn how to add languages to Windows, or where to get them, see Where to get language packs and LIPs.
For a complete list of supported languages and locales, see Locale Identifier Constants and Strings.
Supported Language Packs and Language Interface Packs
The following tables include these settings:
- Language/region— The name of the language that will be displayed in the UI. All 38 language packs are available for Windows 10 and Windows Server 2016. In Windows Server 2012 the user interface (UI) is localized only for the 18 languages listed in bold.
- Language/region tag— The language identifier based on the language tagging conventions of RFC 3066. This setting is used with the Deployment Image Servicing and Management (DISM) tool, or in an unattended answer file.
- Language/region ID— The hexadecimal representation of the language identifier. This setting is used with the keyboard identifier when specifying an input method using DISM.
- Language/region decimal identifier— The decimal representation of the language identifier. This setting is used in Oobe.xml.
Language Packs
| Language/region | Language/region tag | Language/region ID | Language/region decimal ID |
|---|---|---|---|
| Arabic (Saudi Arabia) | ar-SA | 0x0401 | 1025 |
| Bulgarian (Bulgaria) | bg-BG | 0x0402 | 1026 |
| Chinese (Hong Kong SAR) | zh-HK |
Note:В No longer used. See zh-TW.
Note: No longer used. See sr-Latn-RS.
Language interface packs (LIPs)
Except where noted, the following LIPs are available for Windows 10. For Windows Server, options to change keyboard and regional settings such as currency, time zones, and time/date format are available but LIPs are not available. For more information, see Language packs.
As of Windows 10, version 1809, LIPs are are distributed as .appx files. To learn how to add an .appx, see Add languages to Windows.
Установка языкового пакета в Windows 7
При работе с компьютером в особых случаях требуется сменить язык его интерфейса. Этого нельзя сделать без установки соответствующего языкового пакета. Давайте узнаем, как как поменять язык на компьютере с Windows 7.
Процедура установки
Процедуру установки языкового пакета в Windows 7 можно разделить на три этапа:
- Загрузка;
- Инсталляция;
- Применение.
Существует два способа установки: автоматический и ручной. В первом случае загрузка языкового пакета происходит через «Центр обновлений», а во втором проводится инсталляция заранее скачанного или перенесенного другими средствами на компьютер файла. Теперь рассмотрим каждый из этих вариантов более подробно.
Способ 1: Загрузка через «Центр обновления»
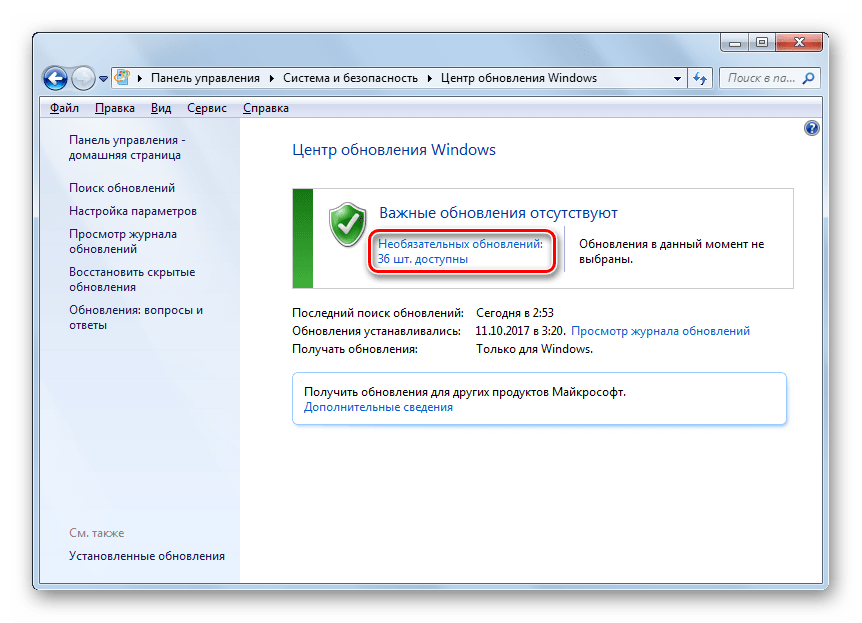
Для того чтобы загрузить необходимый языковый пакет, требуется перейти в «Центр обновления Windows».
- Щелкайте меню «Пуск». Переходите в «Панель управления».
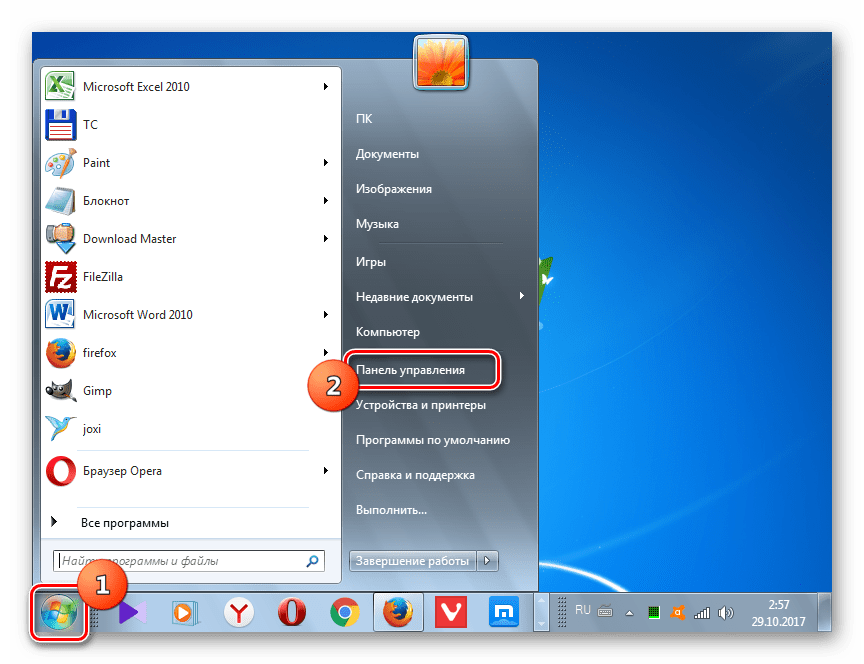
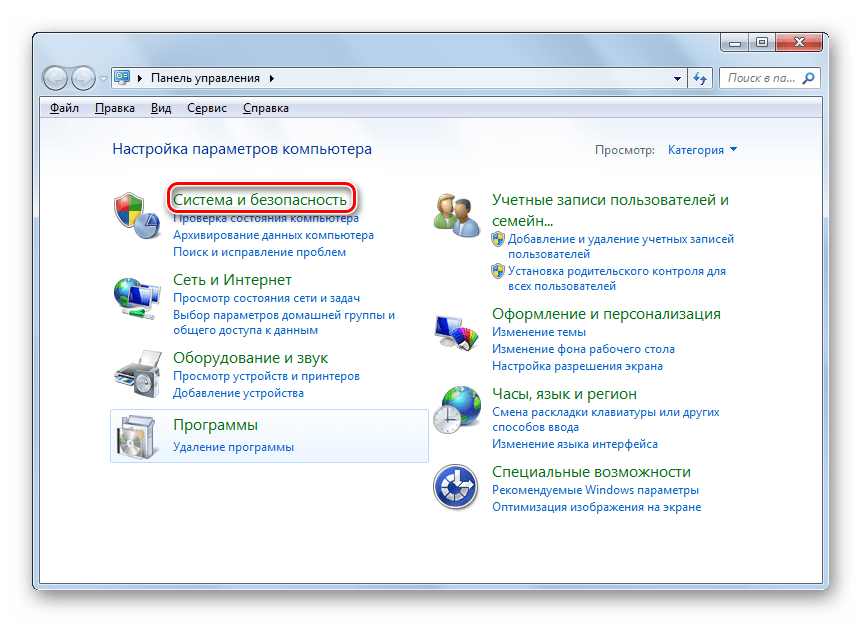
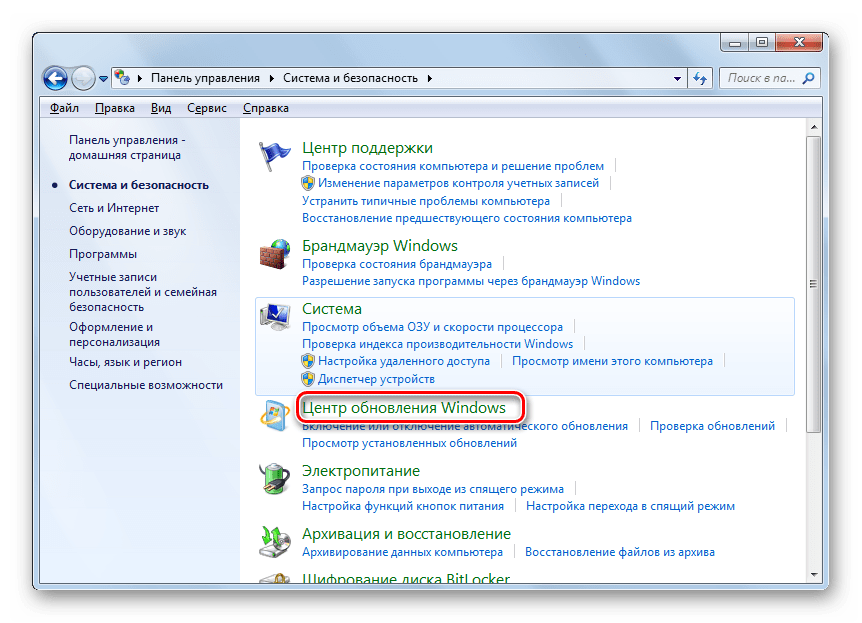
В появившемся окошке щелкайте по надписи «Центр обновления Windows».
В открывшейся оболочке «Центра обновления» жмите по надписи «Необязательных обновлений…».
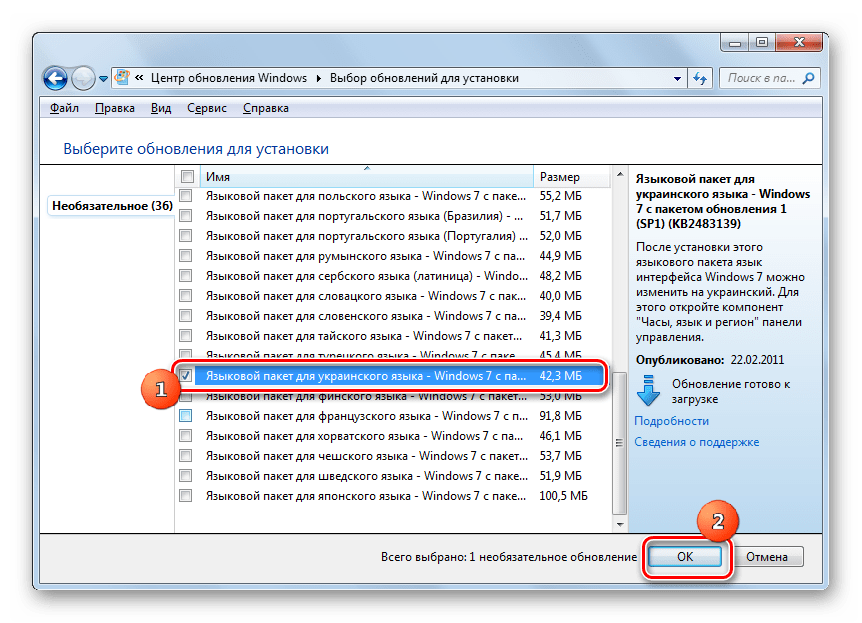
Открывается окошко доступных, но неустановленных необязательных обновлений. Нас интересует группа «Windows language Packs». Именно тут расположены языковые пакеты. Отметьте галочкой тот объект или несколько вариантов, которые вы хотите установить на ПК. Щелкайте «OK».
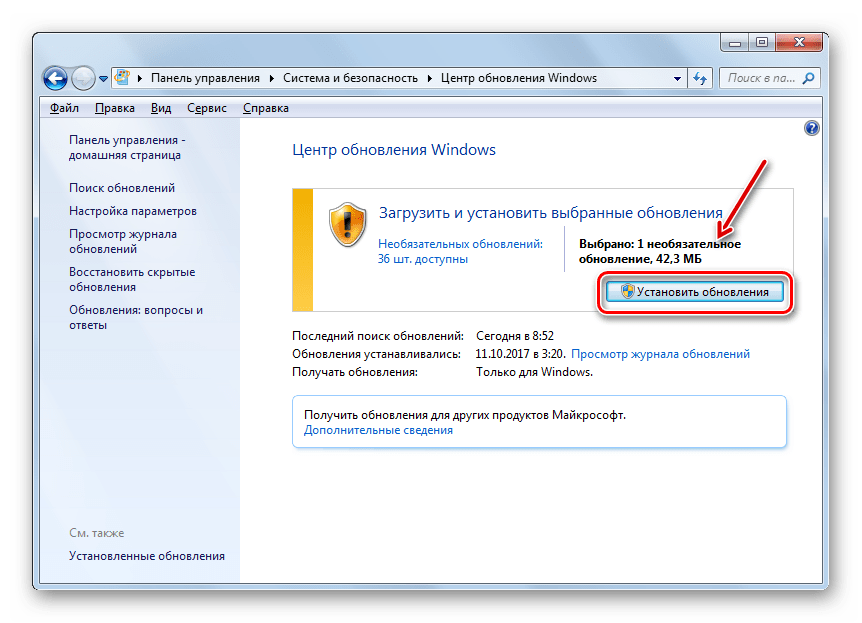
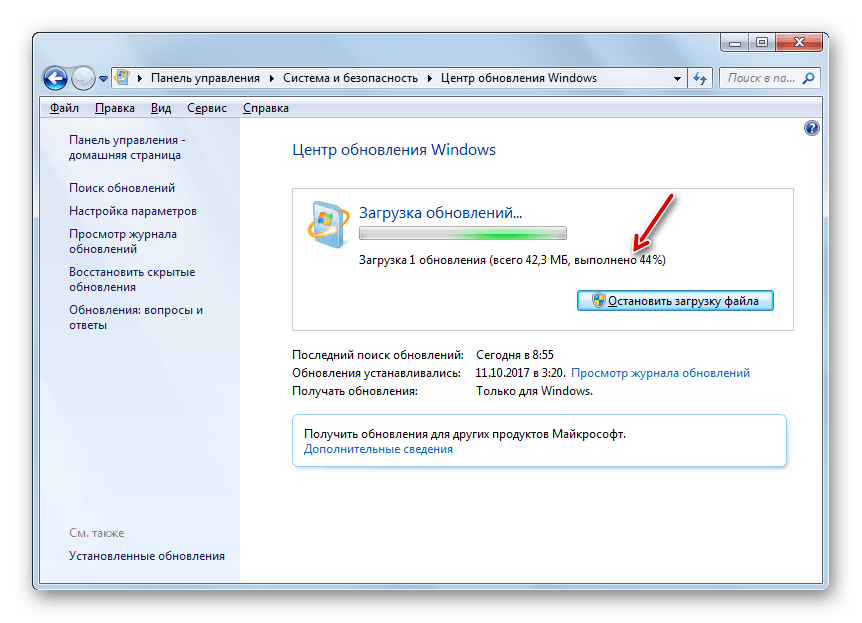
Выполняется процедура загрузки языкового пакета. Информация о динамике данного процесса отображается в том же окне в процентном отношении.
Способ 2: Ручная установка
Но не у всех пользователей есть возможность пользоваться интернетом на компьютере, нуждающемся в установке пакета. Кроме того, не все возможные варианты языков доступны через «Центр обновлений». В этом случае существует вариант использовать ручную инсталляцию заранее закачанного и перенесенного на целевой ПК файла языкового пакета.
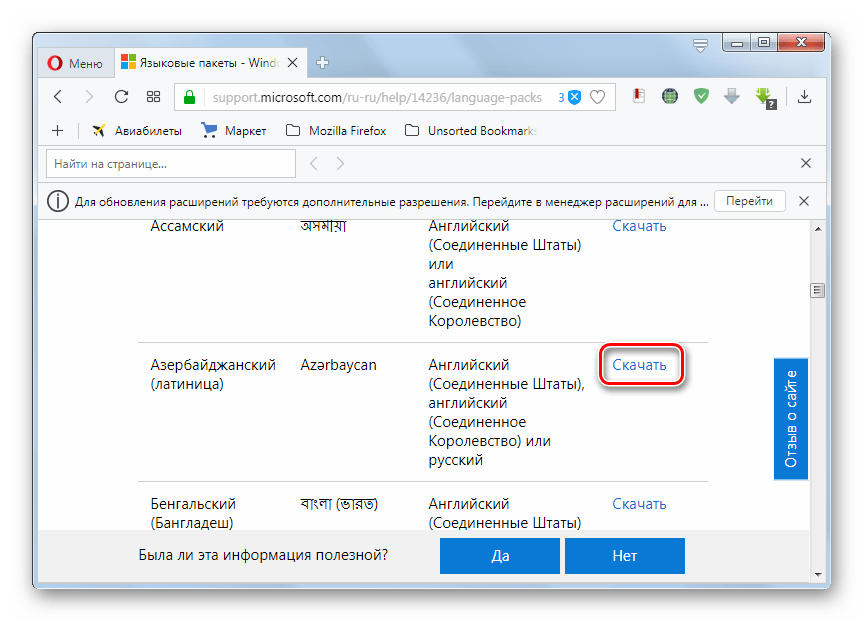
- Скачайте языковый пакет с официального сайта Microsoft или выполните перенос его на компьютер другим способом, например, при помощи флэшки. Стоит отметить, что на веб-ресурсе Майкрософт представлены только те варианты, которых нет в «Центре обновлений». При выборе важно учитывать также разрядность вашей системы.
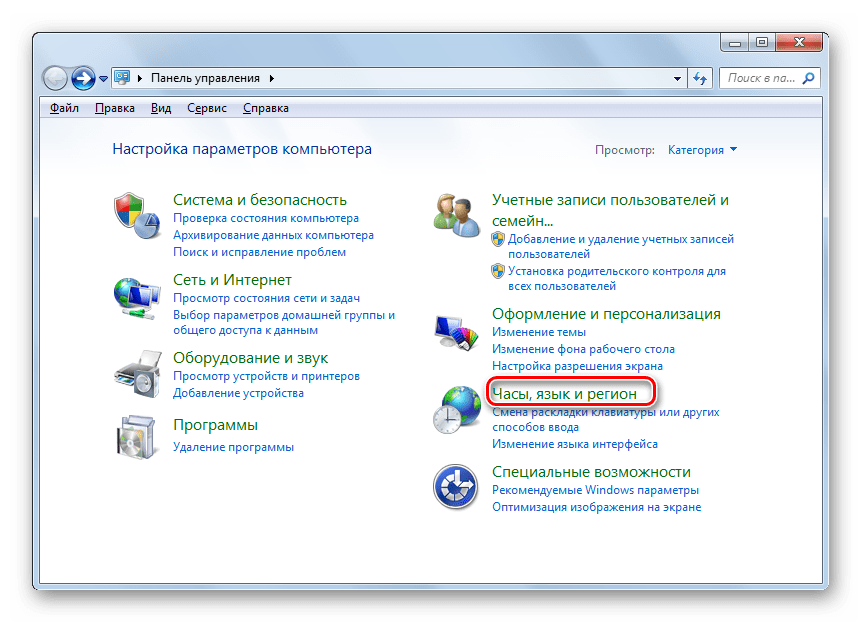
Теперь переходите в «Панель управления» через меню «Пуск».

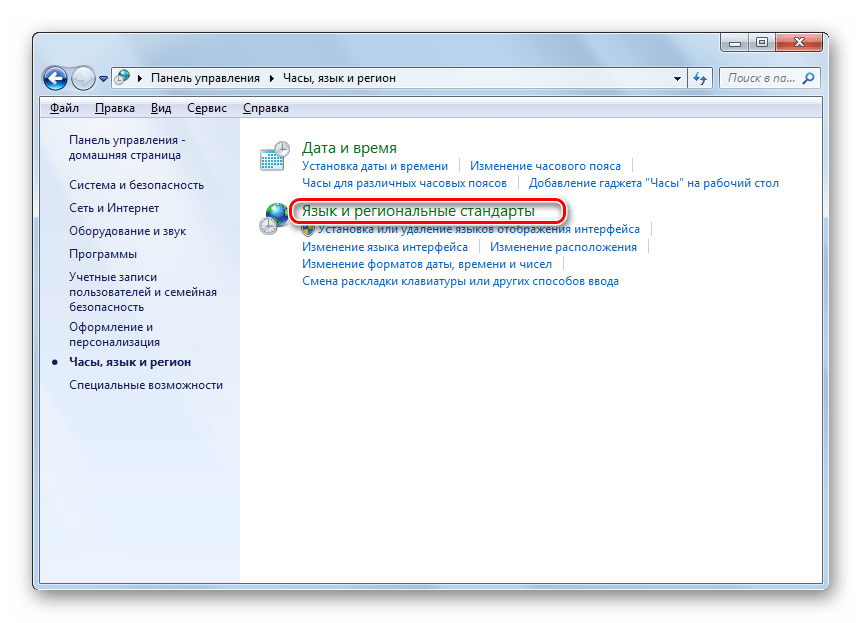
Переходите в раздел «Часы, язык и регион».
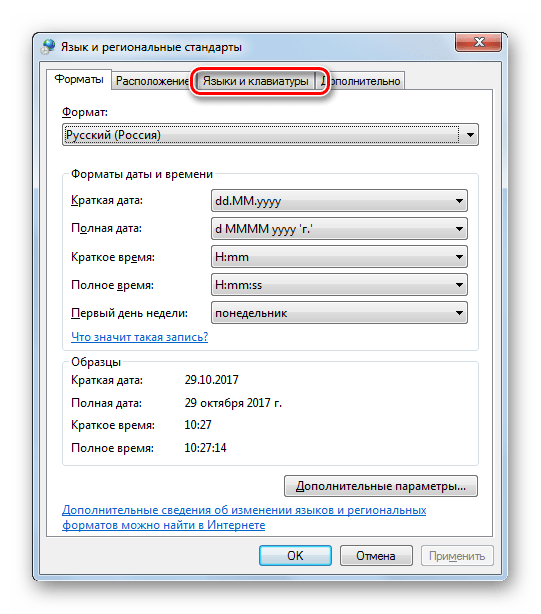
Далее щелкайте по наименованию «Язык и региональные стандарты».
Запускается окошко управления настройками локализации. Переходите во вкладку «Языки и клавиатура».
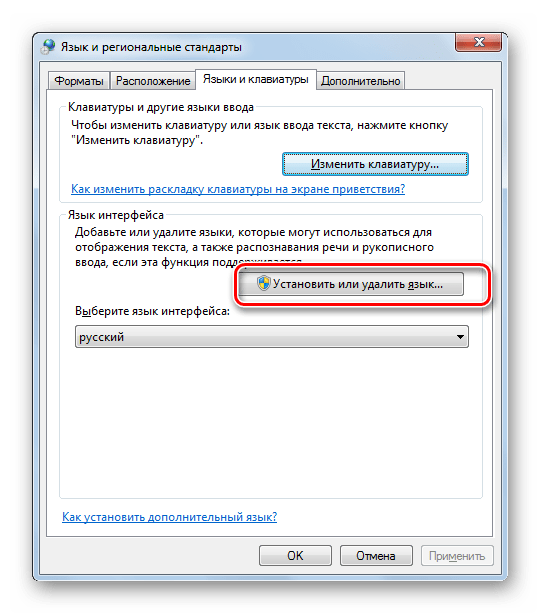
В блоке «Язык интерфейса» жмите «Установить или удалить язык».
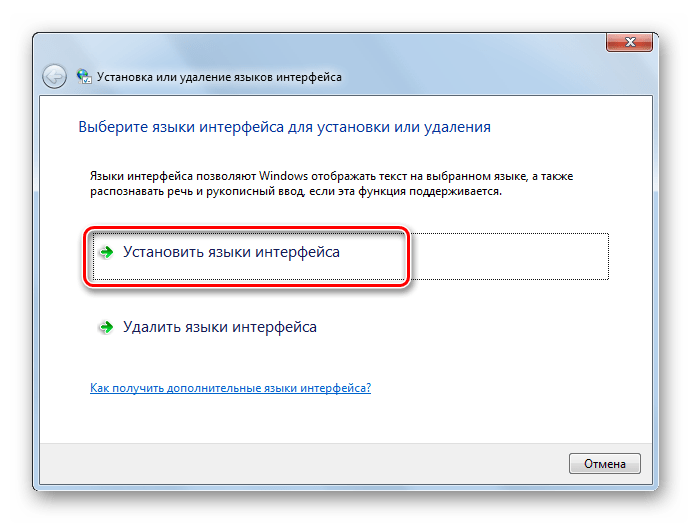
В открывшемся окошке выбирайте вариант «Установить язык интерфейса».
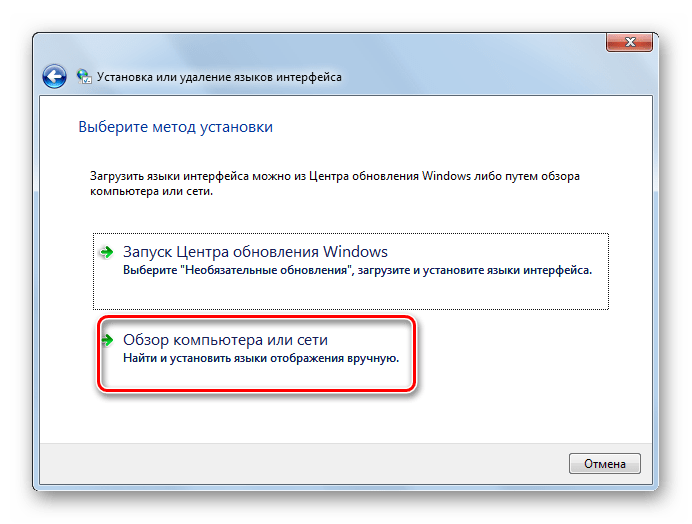
Запускается окно выбора метода установки. Щелкайте «Обзор компьютера или сети».
В новом окошке жмите «Обзор…».
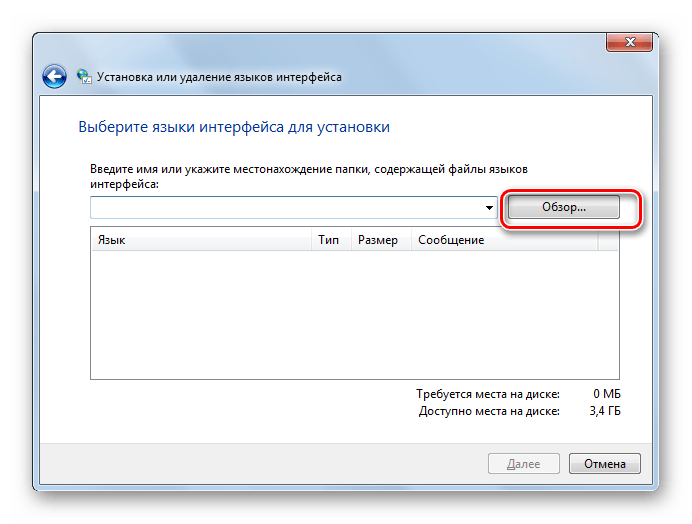
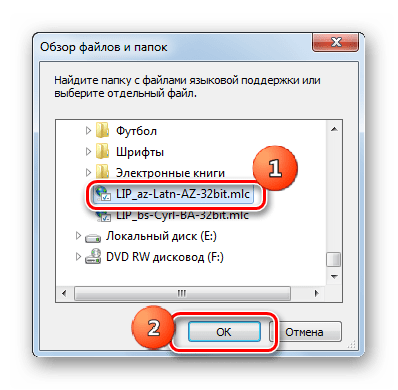
Открывается инструмент «Обзор файлов и папок». С его помощью перейдите в ту директорию, где находится скачанный языковый пакет с расширением MLC, выделите его и жмите «OK».
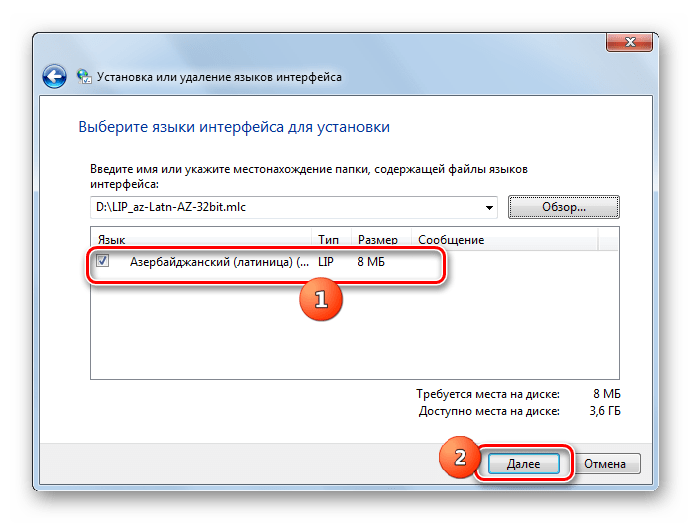
После этого наименование пакета отобразится в окне «Установки или удаления языков». Проверьте, чтобы напротив него была установлена галочка, и жмите «Далее».
В следующем окошке вам требуется согласиться с лицензионными условиями. Для этого ставьте радиокнопку в положение «Я принимаю условия» и жмите «Далее».

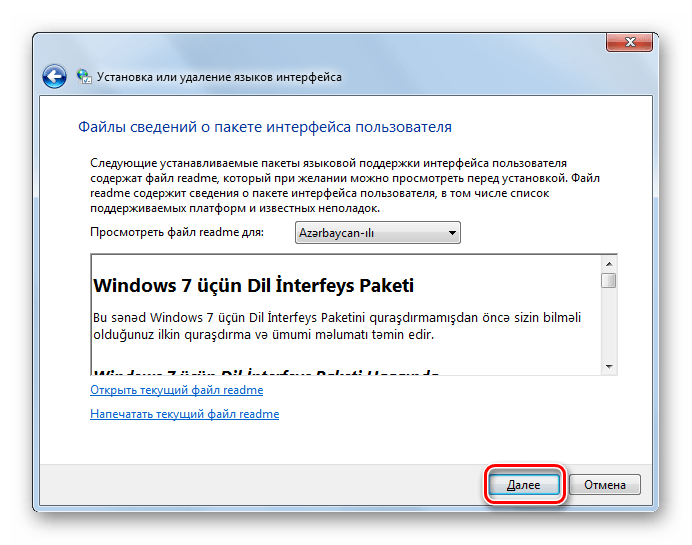
Затем предлагается ознакомиться с содержимым файла «Readme» для выбранного языкового пакета, которое отображается в этом же окне. После ознакомления жмите «Далее».
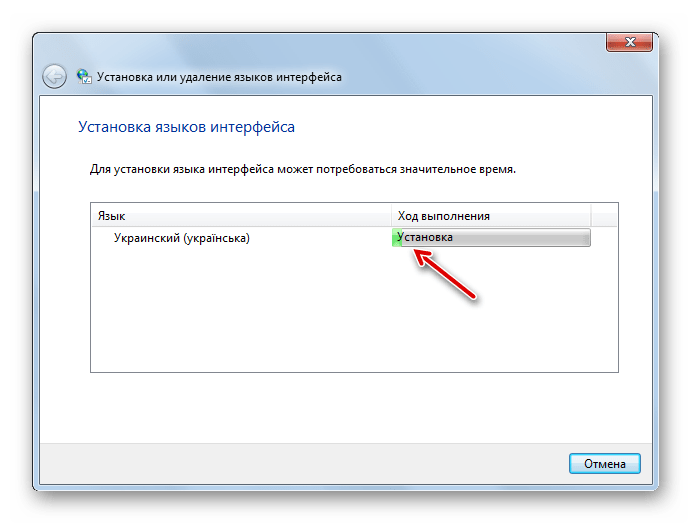
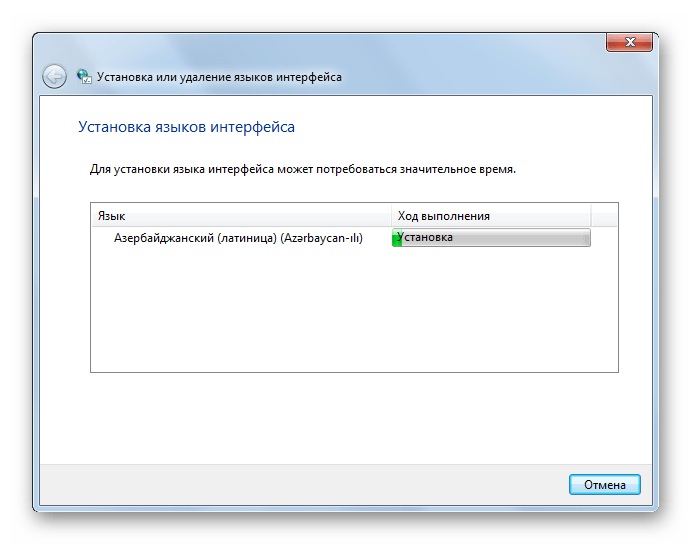
После этого стартует непосредственно процедура установки пакета, которая может занять значительное время. Продолжительность зависит от размера файла и вычислительных мощностей компьютера. Динамика установки отображается с помощью графического индикатора.
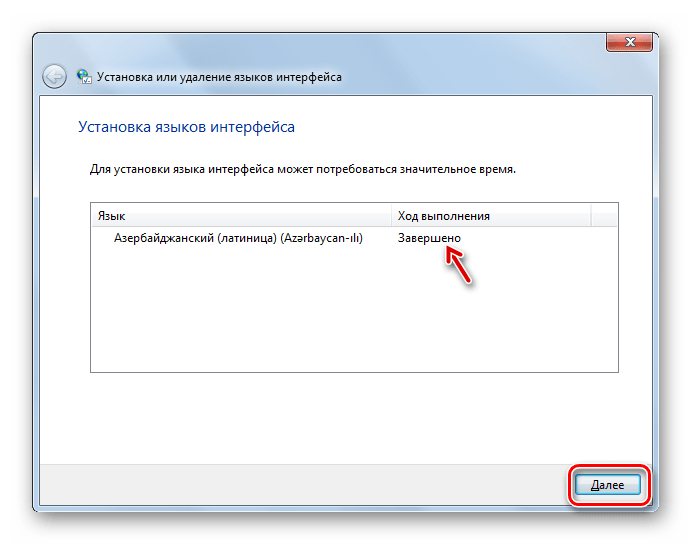
После того как объект будет инсталлирован, напротив него в окне установки языков интерфейса появится статус «Завершено». Щелкайте «Далее».
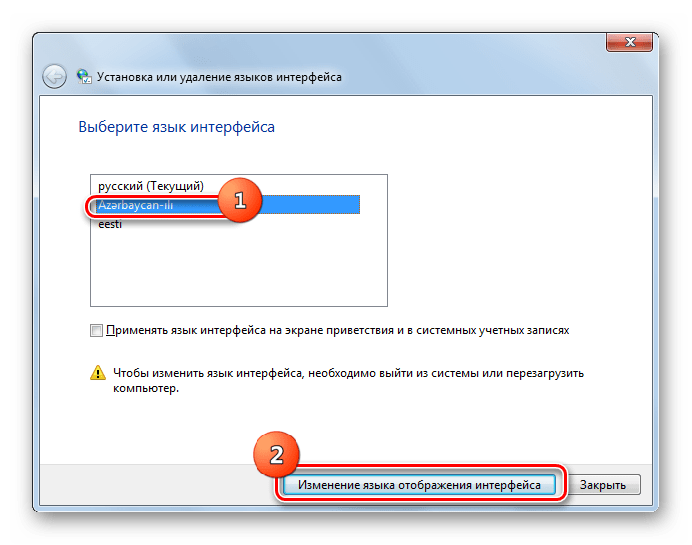
После этого открывается окно, в котором вы можете выбрать только что установленный языковый пакет в качестве языка интерфейса компьютера. Для этого следует выделить его наименование и нажать «Изменение языка отображения интерфейса». После перезагрузки ПК выбранный язык будет установлен.
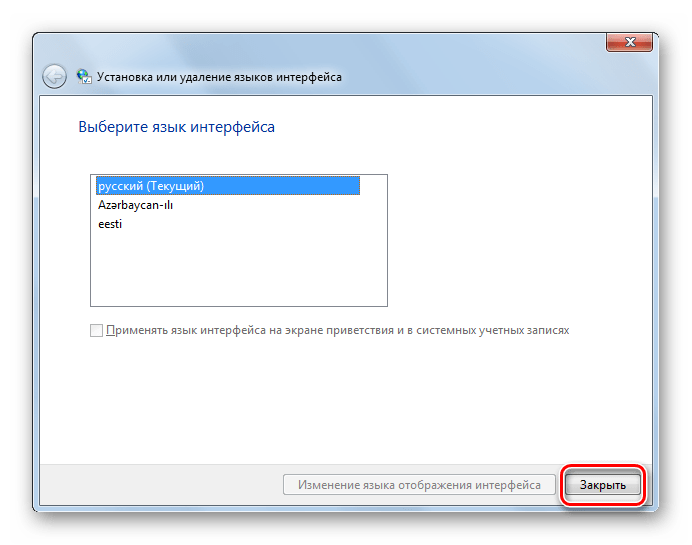
Если же вы пока не хотите применять данный пакет и изменять языковые настройки системы, то просто нажмите кнопку «Закрыть».
Как видим, процедура установки языкового пакета в целом интуитивно понятна, как бы вы не действовали: через «Центр обновления» или через настройки языковых параметров. Хотя, конечно, при использовании первого варианта действий процедура более автоматизирована и требует минимального вмешательства самого пользователя. Таким образом, вы узнали, как русифицировать Windows 7 или наоборот перевести ее на иностранный язык.


