- Почему Ноутбук на Windows 10 НЕ Видит Жесткий Диск или Внешний SSD по USB — Что Делать?
- Основные причины, почему ноутбук не видит диск по USB
- Управление дисками на Windows
- Проверяем BIOS
- Обновляем драйвера ноутбука
- How to Move Your Windows Drive to a New PC
- Step 1: Back Up the Entire Drive
- Step 2: Move Your Drive to the New PC
- Step 3: Install New Drivers (and Uninstall Old Ones)
- Step 4: Re-Activate Windows
- How to Connect a Desktop Hard Drive to a Laptop or Another Computer
- How to take the HDD out of the computer (IDE and SATA)
- Another important detail
- Connecting the disk to a laptop
- If your computer fails to recognize the disk
- Connecting the HDD to another computer
- Share
- Questions and answers
- Comments (15) #
Почему Ноутбук на Windows 10 НЕ Видит Жесткий Диск или Внешний SSD по USB — Что Делать?
Практически каждый человек с целью развлечений или для работы использует персональный компьютер. Кроме ПК разработано немало компьютерных устройств, которые дополняют или расширяют его возможности. На жестком диске компьютера хранится информация, используемая пользователем при необходимости. Сегодня известно довольно большое количество способов хранения данных не только на жестком диске компьютера или ноутбука, но и на картах памяти, флешках, внешних SSD дисках.
Благодаря портативным запоминающим устройствам важная для пользователя информация будет храниться в надежном месте и при необходимости может быть использована. Особенно популярны в последнее время внешние HDD и SSD диски. Они удобные и простые в эксплуатации. Но часто происходят непредвиденные ситуации и пользователи сталкиваются с тем, что ноутбук не видит подключенный диск по USB или через так называемые «салазки». Что делать в таком случае? Какие есть способы решения проблемы?
Кстати, на wifika.ru мы уже разбирали проблему, когда Смарт ТВ не видит USB флешек, можете тоже прочитать.
Основные причины, почему ноутбук не видит диск по USB
Иногда можно обнаружить, что с подключением внешнего устройства к USB ноутбук не видит диск. Причин на это может быть несколько, но основные из них: неисправность разделов накопителя, неправильная файловая система, неработающий USB-порт, отсутствие нужных драйверов в системе. Самый неприятный момент, это когда диск физически неисправен. В таком случае ничего не поможет, кроме его замены на исправный аналог.
Прежде чем приступать к решению проблемы, необходимо проделать следующее:
- Убедитесь, что неисправен именно внешний накопитель, а не порт USB. Для этого подключайте его в разные разъемы.
Подключение может не устанавливаться из-за поврежденного кабеля. Замените его и попытайтесь
Если вы выполнили эти действия, но ноутбук не видит диск Windows как и прежде, следует детальней разбираться в причинах. Если у вас есть второй ноутбук или настольный компьютер, попробуйте подключить внешний диск к нему. Это занятие отнимет совсем немного времени, но результат будет достоверным. Подключив HDD или SSD по USB к другому компьютеру, вы сможете понять, работоспособен он или нет.
Управление дисками на Windows
Убедитесь, что подключаемый внешний SSD обнаруживает операционная система. Если это HDD, проверьте, что после подсоединения к ноутбуку на его корпусе кнопка была переведена в положение «Вкл». В Windows предоставлен штатный инструмент по управлению всеми дисками. Открывается программа разными способами, но проще всего осуществить запуск через «Выполнить».
Нажимаем Win+R, дальше вводим команду «diskmgmt.msc» и жмем Enter.

На экране откроется окно программы, в котором отображены все главные элементы.
В левой части необходимо перейти по следующему пути: «Управление компьютером (локальным)» – «Запоминающие устройства» – «Управление дисками».

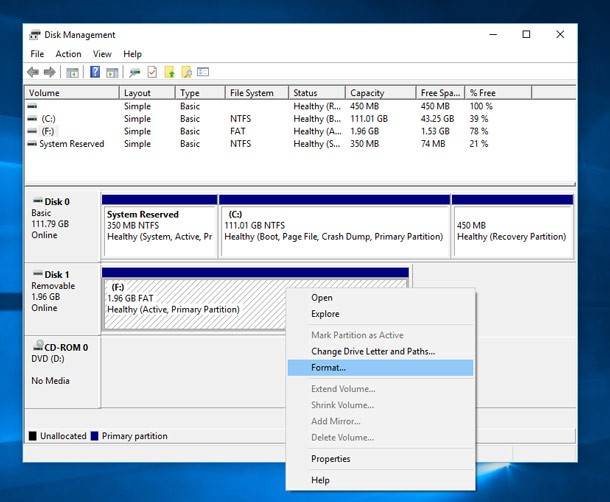
В правой части экрана вы должны увидеть подключенный внешний диск. Здесь он должен обязательно отображаться, даже при условии того, что его нет в «Проводнике». Останется только его отформатировать с той целью, чтобы операционная система могла распознать его. Но когда ноутбук не видит жесткий диск через USB в этом разделе, необходимо идти дальше по пунктам проверки.
Проверяем BIOS
Обычно БИОС не видит диски на ноутбуке по подключению через интерфейс SATA — например, когда вы хотите установить второй жесткий диск в свой лэптоп. Причина заключается в отключенном контроллере, Его основное назначение – обеспечить переключение между IDE и SATA в компьютере с подключенным к материнской плате периферийным устройствам по соответствующим портам.
Для активации контроллера CAT выполните такие действия:
- Перед включением или во время перезагрузки ноутбука еще во время первого экрана нажмите кнопку запуска BIOS. Это может быть F2, F12, Escape – все зависит от версии БИОС.
- Найдите раздел SATA Controller и выставите в нем необходимое значение, а именно Enabled. Если по умолчанию стоит Disabled, просто выделите его и нажмите клавишу Enter.
- Дальше переходим в раздел Advanced и атрибуту SATA Operation (Mode) присваиваем значение ACHI.
После этого вновь перезагрузите устройство, и дождитесь загрузки Windows. Если внешний накопитель упорно отказывается работать, еще раз зайдите в БИОС и сбросьте настройки, выбрав функцию Reset and Save Settings.
Обновляем драйвера ноутбука
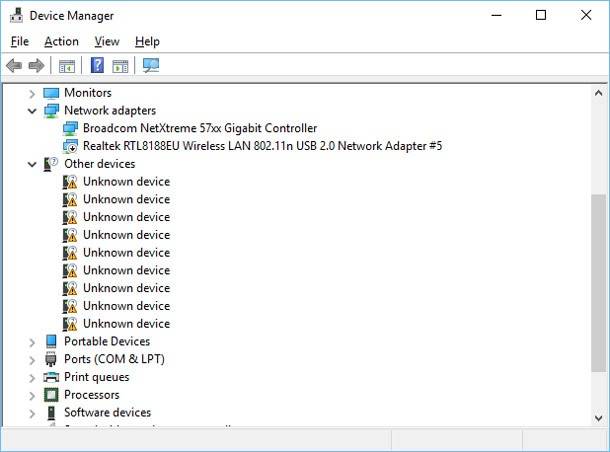
Немаловажно убедиться в наличии необходимых драйверов в системе. Обнаружив, что внешний диск определяется другим компьютером, но не работает ни через один USB на ноутбуке Asus, Lenovo или других брендов, проверьте управляющие программы, которые необходимы для исправного функционирования запоминающегося устройства. Для этого вновь потребуется запуск «Диспетчера устройств».
How to Move Your Windows Drive to a New PC
Need to migrate your Windows installation to a new PC? It’s technically possible, and Windows 10 streamlines the process, but there are caveats.


Buying a new computer can be fun, until you have to slog through migrating all your old apps, preferences, and files. Wouldn’t it be easier if you could just pop your old hard drive into the new PC and pick up where you left off? It’s technically possible, though it comes with some caveats.
With Windows 7, this was less tenable; it introduced driver conflicts, especially with lower-level hardware like your hard drive’s SATA controller. As a result, you’d often see a blue screen as soon as the computer booted, preventing you from even getting to the desktop.
Microsoft’s sysprep tool could sometimes help with this, but it wasn’t really meant for this purpose, and it came with many of its own caveats. You were almost always better off doing a clean install.
Windows 8 and 10, on the other hand, are much better about handling these conflicts. When you throw an existing Windows installation at a new PC, it’ll perform its first-time setup as if it were a new computer, grab drivers for your new hardware, and hopefully drop you onto the desktop without too much trouble.
You’ll have to do a few things yourself, but overall, it should work—I moved my drive from an AMD-based machine to an Intel/Nvidia machine with barely a hiccup. Windows Update was even able to download new patches.
That’s not to say you won’t run into any problems. This could all vary from PC to PC, and you never know what driver conflicts or performance issues may lay underneath the surface of a seemingly fine setup.
All told, I would still recommend doing a clean install if you’re migrating permanently to a new machine, but if you need something quick and dirty—like if your old PC dies and you need to access some data from your old installation—this should work well enough.
Step 1: Back Up the Entire Drive
Before making any substantial changes, it’s always a good idea to back up your data—and that goes double when you’re messing with hard drives. If you have a backup tool you really like, go ahead and use that.
However, for this particular case, I recommend cloning the entire drive. That way, if something goes wrong and you can’t boot, you can restore an exact image of the original drive and try a different approach.
Alternatively, if your new PC takes a different kind of drive than your old PC—say, you’re migrating from a PC with a 2.5-inch drive to one with an M.2 slot—you can clone the old drive to a new drive with the correct form factor, then plug that drive into your new PC.
Note that this may mean buying a new SSD and plugging it in with a USB-to-M.2 SATA or USB-to-M.2 NVMe enclosure in order to clone it. Do some research on which type of drives your new PC supports before buying.
Step 2: Move Your Drive to the New PC
Once your drive has been safely backed up, it’s time to swap it into your new PC, removing it from the external enclosure first (if you used one). You may have to look up instructions for opening up your specific machine and installing new storage.
Then, turn your PC on. Chances are, it’ll try to boot from the new drive automatically, but if not, you may need to press a key at startup to enter the BIOS settings, like F2 or Delete, and change the boot order.
Once the PC finds the right drive, you should be greeted with the Windows logo with the spinning wheel. It’ll likely say something like «Getting Devices Ready,» and you’ll have to let it do its thing—in my experience, this is pretty quick, though others have noted that it could require multiple restarts.
Step 3: Install New Drivers (and Uninstall Old Ones)
Windows will likely install a lot of the necessary drivers for you, especially once you connect your new PC to the internet. You may notice some flickering as it downloads the display drivers, so give it some time to go through its process (and restart when it asks you to do so).
You may find that you need to download some drivers manually, if Windows doesn’t do so on its own (or if it only downloads generic drivers instead of manufacturer-supplied ones).
To be safe, I recommend heading to your PC manufacturer’s website and downloading the chipset, audio, and other drivers yourself. If you built the computer yourself, go to the motherboard manufacturer’s website instead.
You can also head to Nvidia, AMD, or Intel’s website for graphics drivers, though again, Windows installed the non-generic versions for me without my intervention.
Finally, if you want to keep things clean, you can uninstall the old drivers left on your system by searching for «Add or Remove Programs» from the Start menu. For graphics drivers, you may want to use a tool like DDU to really clean them out.
For everything else, search the Start menu for Device Manager in the Control Panel, click View > Show Hidden Devices, and right-click devices you no longer use to uninstall their drivers.
Step 4: Re-Activate Windows
There’s one last hitch to this process: when you toss your drive into a new computer, Windows will recognize that the hardware has changed, and potentially—depending on the type of license you have—de-activate itself.
If this setup is temporary, and you’re only using it to grab a few things off your old PC, you don’t need to worry about activation—Windows should keep working as normal, with an activation watermark in the corner and a few features disabled.
If you plan on using this setup permanently, though, you should re-activate Windows. You can try entering the same product key you used before, but this may fail if you have an OEM license that isn’t meant to migrate to new hardware. I recommend trying the activate-by-phone option, though, as sometimes that will succeed when online activation fails.
Again, this whole thing is not a foolproof process—there are many tiny things that could trip things up, so you may have to do a bit of troubleshooting if something doesn’t work properly. And even then, there’s no guarantee you’ll be getting optimal performance if the system isn’t configured properly for your new hardware.
If you can take the time, a clean install is best—but when you need to get up and running right now, it’s nice to know Windows 10 has streamlined the process enough to make it usable.
How to Connect a Desktop Hard Drive to a Laptop or Another Computer
This article will tell you how to take out a hard disk from a computer properly and connect it to a laptop or another PC, and how to recover data from such disk. Quite a typical task: transfer a large number of files from a desktop hard drive to a laptop drive, or connect it to another computer in order to recover data from there.
In either case you will need to connect the HDD to a laptop or another computer. This is what this article is about. We are going to study one of the simplest and all-purpose variants to use.

How to take the HDD out of the computer (IDE and SATA)
It seems logical that before connecting a disk to another device it has to be taken out of the system unit. The matter is that depending on the interface through which your disk is connected (IDE or SATA) different boxes will be needed to make connection possible.
That is why instead of guessing what kind of interface your disk has it is best when you first take it out of the system unit and have a look at the interface.

As a rule, there is not much trouble in taking an HDD out:
- First, you turn off the computer, and unplug its power cable from the socket;
- Open the side panel of your system unit;
- Take out of the HDD all connectors;
- Unscrew fastening screws and take out the disk (usually it slips along two sliding bars).
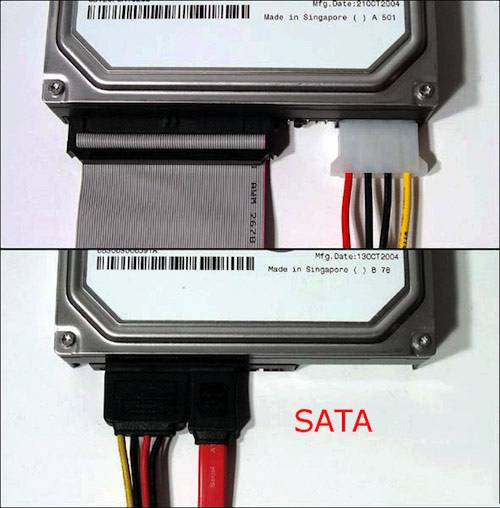
The procedure itself is quick and easy. Then have a careful look at the disk interface. Nowadays most hard disks are connected via SATA (a modern interface with the high-speed data transfer). If your disk is old, it can have an IDE interface.
Another important detail
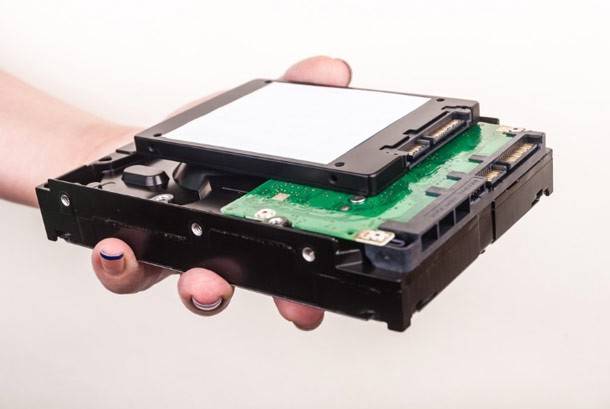
Computers usually have “big” 3.5-inch disks, while laptops have smaller ones of 2.5 inches (1 inch is 2.54 cm). The digits 2.5 and 3.5 are used to denote form factors and actually show the width of an HDD body when measured in inches.
The height of all modern 3.5” HDDs is 25 mm; it is known as “half-height” in comparison to older models. Manufacturers use this height to fit inside from one to five platters.
In 2.5” HDDs things are different as their original height of 12.5 mm was replaced by the 9.5 mm one which can contain up to three platters (nowadays there are also thinner disks than that). The height of 9.5 has actually became a standard for most laptops but some companies still produce 12.5 mm hard disks based on three platters.
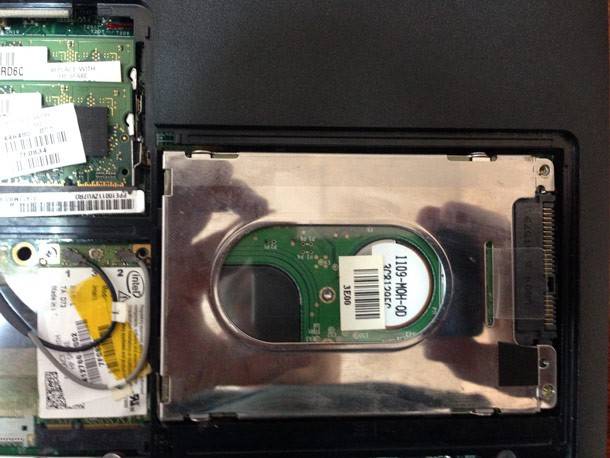
Connecting the disk to a laptop
Let us suppose we have sorted the things that concern the interface. For actual connection we will need a special BOX. They can be of various types:
- 3.5 IDE -> USB 2.0 – this box is designed for a 3.5-inch disk (which is what an average PC uses) with IDE interface to help connect it to a USB 2.0 port (actual transfer speed under 20-35 MB/s);
- 3.5 IDE -> USB 3.0 – the same but the transfer speed is higher;
- 3.5 SATA -> USB 2.0 (similar, the only difference is the interface);
- 3.5 SATA -> USB 3.0 and so on.
This box is actually a rectangular container a bit larger than the disk itself. Usually this box opens at the rear side and an HDD is put inside.
In fact, after you have done all that you need to connect a power supply (adapter) to this box and use a USB cable to connect the box to another PC or a laptop.
If the disk and the box are all right, in “This PC” you will see one more disk which you can use as an ordinary HDD (format, copy, delete etc.)
If your computer fails to recognize the disk
In this case, you may need two steps.
Check if you have drivers for your box. Usually Windows installs them itself, but if your box is non-standard, there may be problems.
To begin with, launch Device Manager and see if there are drivers for your device and make sure there are no yellow exclamatory marks.
Go to Disk Management in Windows (in order to go there in Windows 10 right-click on START button) and check if you can see the connected HDD there. If it is there, the most probable way of getting it right will be changing the drive letter and formatting it.
There is a dedicated article on this topic in our blog.
Connecting the HDD to another computer
In a modern system unit, a CD/DVD drive and HDD should be connected via SATA interface. That is, instead of a CD/DVD drive you can connect an HDD from another computer.
In fact, the only thing left to do is to disconnect cables from the disk drive and connect them to the other HDD. Then you just turn on the computer and copy all necessary information or scan it with the help of data recovery software
The new hard disk will be represented in “This PC” i.e. you can work with it as an ordinary local disk.
If you want to just have this HDD permanently connected to your PC, the only thing you have to do is to fix it properly.
Basically, that’s all. If you want to transfer many files from a PC to a laptop (and you’re not planning to use a desktop HDD with the laptop all the time), then you may like the other way: connect the PC and the laptop to a local network and just copy the files you need. For that purpose what you need is just one cable… (provided that there are network interface cards in both the laptop and the desktop computer).

Author: Vladimir Artiukh, Technical Writer
Vladimir Artiukh is a technical writer for Hetman Software, as well as the voice and face of their English-speaking YouTube channel, Hetman Software: Data Recovery for Windows. He handles tutorials, how-tos, and detailed reviews on how the company’s tools work with all kinds of data storage devices. Read more
- Published:
- 5.07.2016 10:15
- Updated:
- 9.03.2021 14:04
Share
Questions and answers
Passwords stored in the browser are protected by the operating system password of the current user.
To access passwords, select the user account to sign in, and run the program.
Most modern smartphones save photos to a memory card, not to internal storage. To restore a photo, remove the card from the phone, connect it to the computer, and run the analysis.
The program can also recover data from the internal storage of some phones. Connect the phone to the computer and run the analysis. The program will display the photos available for recovery.
This utility is designed to recover data from deleted partitions and repartitioned disks. Follow these steps:
- Abort the Windows installation or reset operation.
- Connect the drive to another computer if you cannot boot the operating system.
- Use Full Analysis for the entire physical device to restore data from previously deleted partitions.
Ransomware viruses delete documents and creates their encrypted copies. Our program allows you to recover deleted documents and get access to the original files.
It depends on the payment method you use. If you order online with your credit card or PayPal, you will receive the registration key immediately after payment.
For successful recovery, you must stop using the storage device until the necessary files are fully restored.
If it is an external drive, memory card or flash drive, then connect it to the PC and analyze them using our program.
If the data is deleted as a result of formatting the system disk, resetting the operating system or reinstalling Windows, then stop further installation of the operating system and programs. Connect the drive to another computer and perform recovery operations.
Recovered files must be saved to a different drive.
Data recovery can take a long time if you work with a disk larger than 1 terabyte. Faulty drives can also be scanned for a long time. However, in most cases, recovery takes less than 30 minutes.
Comments (15) #
Ok here is my dilemma. I have an old Dell desktop with windows XP it was new in 2005 and was factory image restored in about 2015 then shortly after died power wise just wont fire up. On this hard drive at one time I had a Bitcoin wallet with 2 tenths of a bitcoin on it and at the time I backed it up to a stick drive and thought I was good. Later on found out that the back up didn’t take. Since the drive space wasn’t all re written over it there a way to locate a recover the wallet files. If so what is the safest, cheapest and easiest way to do this with out a forensic team. Thanks in advance for any answers or advice.
Take out the drive and connect it to a new computer via USB with something like Vantec SATA/IDE to USB 3.0 Adapter.
Hey man, I’m just trying to figure out how to back up my ps4 hard drive files onto my computer becuase I am getting a bigger one and I want all my data but it doesn’t look like I have all that’s required lol. I wish people would make things a little easier sometimes
Nobody will give you a one hundred percent guarantee, but it’s worth a try. Download the Hetman Partition Recovery program from our website. Install it, run as administrator. Then, scan the drive to find the deleted partitions, then scan the desired partition, when the program shows you the found files, click on them one by one and view the preview of each file. If you like what you see, then proceed to the purchase of the program and restore the files. https://hetmanrecovery.com/en/hard_drive_recovery/software-3.htm
i want to connect two hdd in my computer(hp) but my cp have not one way use to drive a data
Please describe your question in more detail? Make sure you have an administrator rights What do you want to do? What exactly did not work? What error does it give? At which step did the error occur?
i have a dell desktop pc that was running on windows7 and about a 18 monthes ago i was encouraged to try windows 10 download. I tried 10 and didn’t like! So iI tried to recover by switching back to windows7 which was an option one the menu, the pc began the process «this may take some time» . about 4 hours later i came back to my pc and the screen showed the same screen as before, «Do not shut off or disconnect from power, downloading». Next day, about 30 hours later still on the same screen except i notice the tower wasn’t making any noise indicating it was doing «Anything» not even the fan. i pushed different button on the keyboard and nothing. I turned the monitor off and on, nothing. Still the screen read the same «Do not power off or unplug from power source until installation is complete». scared and not wanting to loose all my info and memory stored i patiently waited and 4 days later the monitor was the same. Then unfortunately i decided to restart the pc and when i did it would not go past the DELL intro screen with many attempts in 1 hour time between each attempt. Finally after a dozen tries i decided to power down the desktop and by holding in the power button and unplugging it after. Now nothing, the monitor shows nothing, as to see any picture but the monitor will indicate, «A no signal» but when i hit the power button on the tower to restart, only at the very first 2 seconds the monitor will show, «the computer is trying to communicate», then back to «No signal» I can hear it turn on with the fan, and maybe the sound of what might be booting but thats it, no picture signal or anything else. And mind you i dont hear or see anything from the HDD to indicate its working. I have also tried different monitors, but «no signal.» i have tried installing a second hdd still nothing, the cables seem to be connected properly i even inserted the dell driver utilitries disc, yet nothing.. i need the info in that PC bad. please help..
Try to connect your monitor not to the video card connector, but to the embedded video output of the motherboard (if there is one). Perhaps the PC does not see the monitor because it can not install the correct video driver.
You are doing this the hard way. Plus, some of us were not put on the earth to be handy with tools/ connecting internal things in computers. Myself for instance, I tried and I failed big! This is what I did. I got a Cooler Master case which comes with (2) hot swappable front docks. Picture taking your internal hard drive out of the computer and putting it in a case, then connecting the case to a port on the back of your computer, either usb or sata. But that’s lame, so let’s do something better. What if we could take the DVD recorder out of our computer and instead put the case with our hard drive where the DVD was? But all we have done is to move the hard drive from inside to the front of the computer case, still need to have a way to take the drive out from it’s case if we ever need to. Now what if the case we put our hard drive in, has an opening on the front? And a lever/button? Now you’re talking! So we put the case where the DVD writer was. It stays there in the front of the computer case. Now we can pop hard drives in and out directly from the front of the computer — just like changing disks on DVD writers. And this, is what a hot-swappable dock is. Cooler Master HAF case has 2 of them. Which means I can copy from one hard drive to another. This case also has two drive bays. I found a unit that can hold (3) hard drives in the space of two drive bays. That’s 5 hard drives I can copy to and from. Why do this? I have several drives for data storage, and a couple for operating systems that I have already installed. If windows ever crashes or doesn’t run well I just pop that hard drive out then in the time it takes to slip in another drive with the operating system I am up and going again. Why fight your computer to fix Windows when you don’t have to? And why hold your breath while installing images? (They have been known to fail) And why risk installing Windows on the wrong drive? (Been known to happen) I just pop out the other hard drives while I am installing Windows on the drive I want. What if the computer case doesn’t have room for all this? Well, it is true you do need sata ports for each drive, but there are addin cards with more ports. But space may be a problem in some computers, there just isn’t enough room for all these drives. Laptop drives to the rescue! I found a unit that fits (4) laptop drives in the space of a DVD writer. There are also gadgets called toasters (because they look and act like one). So I can take a hard drive out of my unit (and remove it from the tray) then pop it in my toaster to copy files as the toaster connects by usb or sata. I also have an external unit that can hold (4) 3.5 hard drives but I am a little leery of that without using a fan on it. So I don’t keep it powered on all the time. Otherwise it works great and I can even boot from it.


