- soma-zone: software for apple computers
- See the big picture…
- …and the details
- Absolute freedom
- Say good bye to launchctl
- Jobs at your finger tips
- Discover what is possible
- System requirements
- LaunchControl 1.42.1 – Create, manage, and debug launchd(8) services
- Контролируемый пуск. Автоматизируем macOS при помощи Python и launchctl
- Содержание статьи
- Агенты и демоны
- Простой конфиг: запуск по времени
- Тонкости активации
- Продолжение доступно только участникам
- Вариант 1. Присоединись к сообществу «Xakep.ru», чтобы читать все материалы на сайте
- Как включить новую функцию Universal Control в macOS Monterey до официального релиза
- Что даёт Universal Control
- Какие устройства поддерживаются
- Как включить
- Launch an app on OS X with command line
- 12 Answers 12
soma-zone: software for apple computers


LaunchControl is a fully-featured launchd GUI allowing you to create, manage and debug system- and user services on your Mac.
See the big picture…
With LaunchControl you see all services and their respective status at a glance. Invalid services are highlighted and a problem description is provided. You can enable or disable services with a single click. The same goes for loading, unloading and ad-hoc starting. A long list of jobs may be filtered by job name and/or various properties, helping you to find what you are looking for in an instant.
…and the details
But LaunchControl is not just another .plist editor. It provides a dedicated interface for every single launchd configuration key. The interface is adaptive. It displays only information that is relevant for the selected job.

Absolute freedom
While the default editing mode in LaunchControl supports all documented features of launchd, you may sometimes need to use unofficial features. Switch to ‘Expert Mode’ and you’re set. Both modes are fully synchronized. Changes in one editor will instantly show up in the other one.

Say good bye to launchctl
Don’t waste time trying to figure out why a job does not behave as expected. LaunchControl performs exhaustive analysis of your job and chances are that it will find the problem in an instant and tell you how to fix it. It provides most of the functionality of the launchctl command line utility, everything you need to create, edit, remove or debug launch services and even includes a log viewer, so you don’t have to fire up Console.app and build custom queries.

Jobs at your finger tips
Sometimes it is desirable to quickly load, unload, start or stop a job on demand without hunting it down in LaunchControl every time. QuickLaunch is a small menu extra living in your menu bar. It contains a user confgurable list of jobs and their respective status. Jobs may be grouped and a group of jobs may be controlled with a single click.

Discover what is possible
launchd currently supports some 36+ documented keys. LaunchControl makes it easy to discover them. Every key in the palette panel is annotated, so you don’t have to consult the man page. Search them by category, name or description. Once found, drag an item from the palette section to the configuration section to add this key.

System requirements
LaunchControl supports all macOS versions from Mavericks (10.9) * to Monterey (12). It requires a 64bit Intel or Apple Silicon Mac. Both architectures are supported natively.
Note: Starting with macOS Big Sur the system volume is sealed and it is no longer possible for any process to modify its contents. This affects LaunchControl’s ability to modify system agents and daemons.
Источник
LaunchControl 1.42.1 – Create, manage, and debug launchd(8) services
LaunchControl is a launchd(8) frontend allowing you to manage and debug system and user services on your Mac. All documented  features of launchd(8) are supported. It reports potential problems even before a job is started and makes sure you always create valid configurations.
- Sophisticated interface – With LaunchControl you see all services and their respective status at a glance. Invalid services are highlighted and a problem description is provided. You can enable or disable services with a single click. The same goes for loading, unloading and ad-hoc starting. Long list of jobs may be filtered. You find what you are looking for in an instant. But LaunchControl is not just another .plist editor. It provides a dedicated interface for every single launchd(8) configuration key. The interface is adaptive. It displays only information that is relevant for the selected job.
- Absolute freedom – While the default editing mode in LaunchControl supports all documented features of launchd(8), you may sometimes need to use unofficial features. Switch to ‘Expert Mode’ and you’re set. Both modes are fully synchronized. Changes in one editor will instantly show up in the other one.
- Everything you need – LaunchControl provides everything you need to create, edit, remove or debug launch services. It even includes a log viewer, so you don’t have to fire up Console.app and build custom queries.
- Discover what’s possible – launchd(8) currently supports some 36+ documented keys. LaunchControl makes it easy to discover them. Every key in the palette panel is annotated, so you don’t have to consult the man page. Search them by category, name or description. Once found, drag an item from the palette section to the configuration section to add this key.
- Wrong colors on macOS versions prior to Mojave having ‘Dark Menu Bar and Dock’ enabled. This bug was introduced in version 1.42
- Intel, 64-bit processor
- OS X 10.7 or later


Using VPN will prevent your ISP from tracking your activity especially when downloading torrents, so it is highly recommended to use VPN service to hide your identity & avoid DMCA notices!! GET VPN SUBSCRIPTION NOW
If you are using Adblocker!! Please support this website by adding us to your whitelist. Ads are what helps us bring you premium content! Or read this to know how you can support us. Thank you!
Источник
Контролируемый пуск. Автоматизируем macOS при помощи Python и launchctl

Содержание статьи
Эта статья — уже третья из моего небольшого цикла о macOS. В первой («Обвес macOS») мы изучали скрытые настройки и собирали полезный софт, во второй («Кунг-фу для маковода») прошлись по большинству уникальных утилит командной строки. В ней я уже касался launchctl, но лишь вкратце. Что эта штука достойна отдельной статьи, было ясно сразу.
Благодаря гибкости настроек launchd, этот сервис заменил в macOS целый список более старых систем, которые пришли из Unix. Он управляет процессом загрузки ОС и сервисов (вместо init), он реагирует на подключения по сети (вместо inetd), он же запускает скрипты по времени (вместо cron) и при разных условиях. Мы воспользуемся этими богатыми возможностями для настройки всякой автоматизации: запуска скриптов по времени, срабатывания при помещении файла в папку, при изменении файла и при подключении внешнего носителя.
Я буду писать именно про launchctl, поскольку работаю в macOS, но если ты предпочитаешь Linux, то можешь позаимствовать идеи и скрипты, которые мы будем писать, и проделать все то же самое при помощи systemd. Эта система похожа на launchd и есть во многих современных дистрибутивах. Однако ее настройки в корне отличаются, и параллельно разбирать еще и их я не возьмусь.
Агенты и демоны
Файлы с правилами — это XML с расширением .plist. Внутри содержатся инструкции, которые указывают launchd, что и когда запускать. Эти файлы разложены в системе по пяти папкам:
/Library/LaunchAgents — агенты текущего пользователя;
Отличие агентов от демонов довольно тонкое: демоны — это процессы, которые запускаются сразу после загрузки машины, а агенты могут работать только после логина в систему (соответственно, демонов для конкретного пользователя не бывает). К тому же демоны после активирования работают непрерывно, а агенты обычно срабатывают при определенных условиях.
Делать мы будем именно агенты и для личного пользования, так что первая папка из списка подойдет как нельзя лучше.
Для создания конфигурационных файлов launchd есть пара графических оболочек — LaunchControl и Lingon (обе стоят по десять долларов). Они слегка облегчают дело, но можно обойтись и без них.
Простой конфиг: запуск по времени
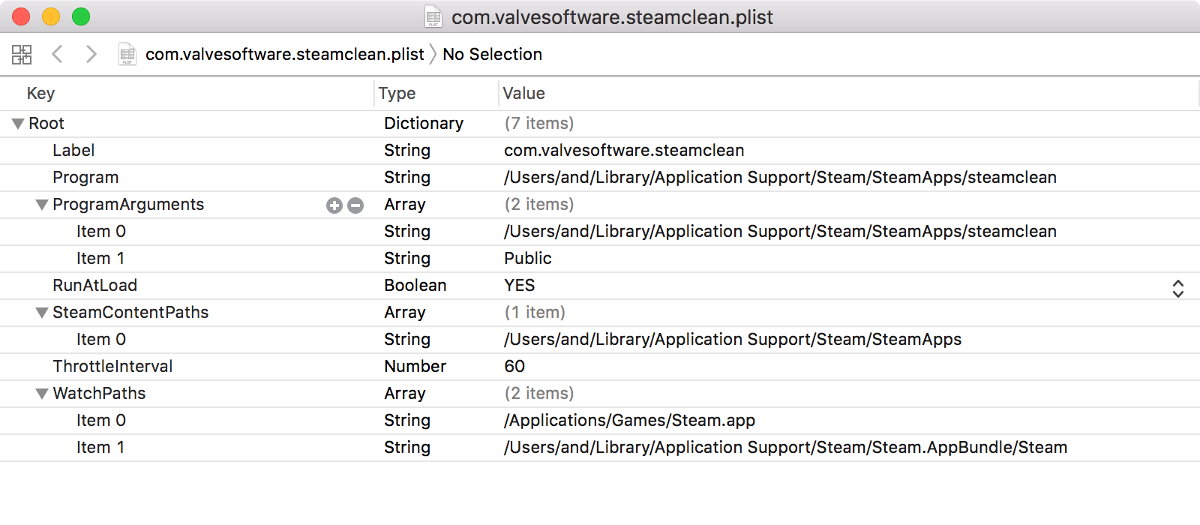
Начнем с самого простого — запуска чего-нибудь в определенное время. Вот как выглядит один из самых простых вариантов конфига.
Несмотря на развесистый вид, структура здесь довольно несложная. Внутри основного словаря ( ) идут ключи и следом — параметры к ним. Иногда это строки, иногда массивы, иногда вложенные словари.
Заменяй слово «название» на какое-нибудь название (обычно «com.домен.имя» — я, например, назвал тестовый агент com.and.launchtest ), укажи путь к исполняемому файлу в качестве первого параметра ProgramArguments , а затем задай, во сколько и по каким дням запускать.
 Конфиги удобно редактировать в Xcode
В примере выставлено время 1:30 каждую субботу. Если ты снесешь ключ Day , скрипт начнет запускаться в половине второго каждую ночь, а если уберешь и Hour , то каждые полчаса. Думаю, ты понял идею. Аналогичная запись в crontab выглядела бы как
Если команда, которую ты запускаешь, принимает аргументы, то их нужно перечислить после пути, добавив дополнительные поля . Например:
Когда все будет готово, сохраняем файл в
/Library/LaunchAgents/ . Хорошей идеей будет сразу прописать в названии условия запуска, чтобы потом было легче ориентироваться. Например, мой тестовый конфиг я сохранил как com.and.launchtest.StartInterval.plist .
Тонкости активации
К сожалению, обратная сторона гибкости — это развесистость настроек. Даже включать и выключать конфиги launchd можно несколькими способами. Вот старый и наиболее простой. Для загрузки пиши:
Ключ -w заодно включает флаг enabled, что экономит нам один шаг ( launchctl enable ) и сразу активирует конфиг. Помни, что после загрузки компьютера и входа в систему все агенты, лежащие в соответствующих папках, будут загружены автоматически. Именно поэтому при выгрузке удобно тоже добавлять -w — тогда launchctl запомнит, что конфиг неактивен.
После того как что-то меняешь в конфиге, его нужно выгружать и загружать заново.
Можешь спокойно пользоваться этими командами, однако если откроешь man, то узнаешь, что они считаются устаревшими и поддерживаются лишь для совместимости. Более правильный способ — использовать команды bootstrap и bootout . Они требуют указывать, помимо пути к файлу конфигурации, domain-target, который состоит из домена и UID пользователя. Целиком команды будут выглядеть вот так:
Узнать свой UID можешь командой id -u . Первый пользователь компьютера обычно записан под номером 502.
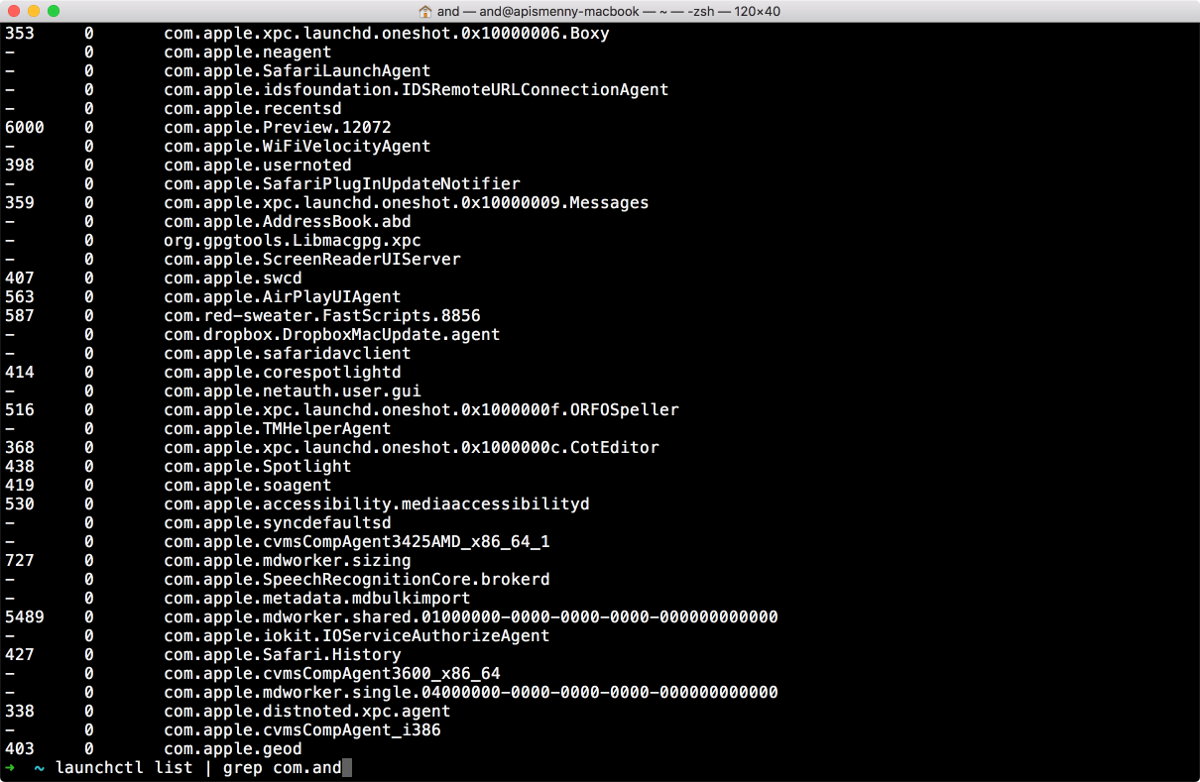
Другая команда, которую хорошо помнить, — это list . Чтобы проверить, какие из твоих конфигов загружены, можешь написать:
Опять же — существует более современный, более продвинутый и, конечно, более замороченный метод:
На выходе будет куда больше информации, чем при запросе списка. Но опять же, использовать print совершенно не обязательно. В ответ на вопрос о том, когда устаревшие команды перестанут работать, кто-то из разработчиков ответил на форуме, что на старый синтаксис слишком много завязано, чтобы убирать его.
Продолжение доступно только участникам
Вариант 1. Присоединись к сообществу «Xakep.ru», чтобы читать все материалы на сайте
Членство в сообществе в течение указанного срока откроет тебе доступ ко ВСЕМ материалам «Хакера», позволит скачивать выпуски в PDF, отключит рекламу на сайте и увеличит личную накопительную скидку! Подробнее
Источник
Как включить новую функцию Universal Control в macOS Monterey до официального релиза
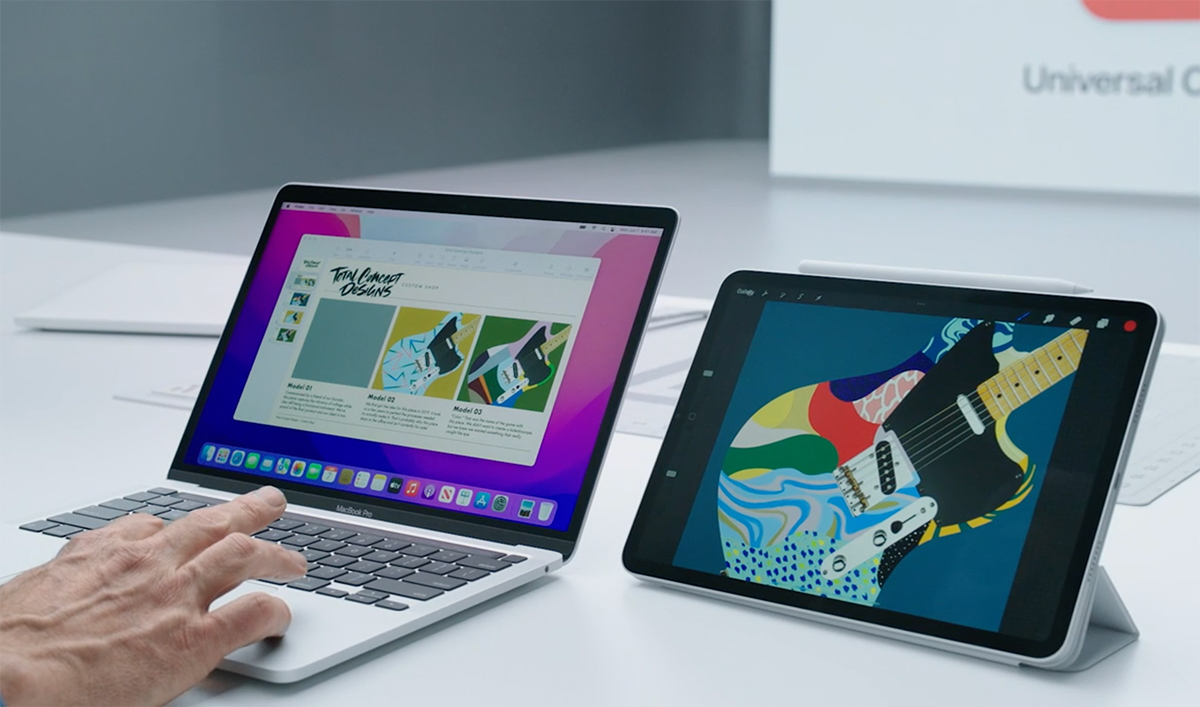
Разработчик с ником Zhuowei Zhang опубликовал у себя в Twitter и на GitHub инструкцию по включению Universal Control в macOS Monterey Beta 5.
Он отмечает, что опция пока работает не идеально, но для бета-версии вполне неплохо. iPad пока не поддерживается.
Что даёт Universal Control
Например, если рядом с вашим MacBook стоит iPad, то вы можете потянуть курсор в его сторону и он появится на планшете. Или, наоборот, при помощи клавиатуры и трекпада iPad вы можете управлять компьютером Mac, который находится рядом.
Штука удобная и я её очень жду. Потому что частенько открываю на iPad заметки с черновиком статьи и ставлю его рядом с MacBook, на котором пишу материал.
Какие устройства поддерживаются
Любой компьютер Mac 2016 года и новее. iPad пока не поддерживается, но если у вас есть, например, новый iMac и MacBook на macOS Monterey можете попробовать.
Как включить
1. Поместите файл Ensemble.plist в папку Domain (находится по пути: /Library/Preferences/FeatureFlags/Domain/Ensemble.plist)
2. Перезагрузите компьютер
3. Убедитесь, что Bluetooth, Wi-Fi и функция Handoff включены
4. Выключите и включите Bluetooth
5. Откройте Терминал
6. Введите по порядку команды: launchctl stop http://com.apple.ensemble и launchctl start http://com.apple.ensemble
7. Откройте Системные настройки → Дисплей → Добавить монитор
8. Выберите из выпадающего списка нужный девайс
Автор подчёркивает, что способ может в некоторых случаях не сработать. Пишите в комментарии, получилось ли у вас воспользоваться Universal Control или нет. [Twitter]
Источник
Launch an app on OS X with command line
I want to launch an app on OSX from a script. I need pass it command line arguments. Unfortunately, open doesn’t accept command line args.
The only option I can think of is to use nohup myApp > /dev/null & to launch my app so it can exist independently of the script that launches it.
Any better suggestions?
12 Answers 12
As was mentioned in the question here, the open command in 10.6 now has an args flag, so you can call:
open -n ./AppName.app —args -AppCommandLineArg
In OS X 10.6, the open command was enhanced to allow passing of arguments to the application:
But for older versions of Mac OS X, and because app bundles aren’t designed to be passed command line arguments, the conventional mechanism is to use Apple Events for files like here for Cocoa apps or here for Carbon apps. You could also probably do something kludgey by passing parameters in using environment variables.
An application bundle (a .app file) is actually a bunch of directories. Instead of using open and the .app name, you can actually move in to it and start the actual binary. For instance:
That is the actual binary that might accept arguments (or not, in LittleSnapper ‘s case).

In case your app needs to work on files (what you would normally expect to pass as: ./myApp *.jpg ), you would do it like this:
You can launch apps using open :
This should open the application that you want.
I would recommend the technique that MathieuK offers. In my case, I needed to try it with Chromium:
I realize this doesn’t solve the OP’s problem, but hopefully it saves someone else’s time. 🙂
open also has an -a flag, that you can use to open up an app from within the Applications folder by it’s name (or by bundle identifier with -b flag). You can combine this with the —args option to achieve the result you want:
To open up a video in VLC player that should scale with a factor 2x and loop you would for example exectute:
Note that I could not get the output of the commands to the terminal. (although I didn’t try anything to resolve that)
I wanted to have two separate instances of Chrome running, each using its own profile. I wanted to be able to start them from Spotlight, as is my habit for starting Mac apps. In other words, I needed two regular Mac applications, regChrome for normal browsing and altChrome to use the special profile, to be easily started by keying ⌘-space to bring up Spotlight, then ‘reg’ or ‘alt’, then Enter.
I suppose the brute-force way to accomplish the above goal would be to make two copies of the Google Chrome application bundle under the respective names. But that’s ugly and complicates updating.
What I ended up with was two AppleScript applications containing two commands each. Here is the one for altChrome :
The second line starts Chrome with the alternate profile (the —user-data-dir parameter).
The first line is an unsuccessful attempt to give the two applications distinct icons. Initially, it appears to work fine. However, sooner or later, Chrome rereads its icon file and gets the one corresponding to whichever of the two apps was started last, resulting in two running applications with the same icon. But I haven’t bothered to try to fix it — I keep the two browsers on separate desktops, and navigating between them hasn’t been a problem.
Источник


