- Automatically launch program on startup in Windows 7
- Automate launching Windows 10 UWP apps
- Introduction
- Protocol activation
- Command line
- Launcher application
- Launch activation
- Command line
- Launcher application
- Accepting arguments
- Summary
- Launch Windows program with custom environment variable
- Update: Solution that worked for me
- How to launch multiple programs with one shortcut in Windows 10
- Launch multiple programs with one shortcut
- 1] Get the programs’ target paths
- 2] Create a batch file
- 3] Create a shortcut with the batch file
- Windows batch script launch program and exit console
- 6 Answers 6
Automatically launch program on startup in Windows 7
When Windows starts, it automatically launches background processes it needs to run properly. When users logs into their user account, more apps and utilities will be launched — previously used mouse and keyboard drivers, for example (even when they’re not plugged in). But you can add any program to your list of startup programs. That’s a great way to gain a few seconds in the morning. Just let Windows open all the apps you need while you go fill that cup of coffee!
Your profile contains everything that makes your Windows experience unique, and doesn’t share anything (necessarily) with other users on that machine. Just like the start menu, which can include apps available to you only, but also includes app shortcuts for all Windows users, you have a startup folder under your profile which Windows looks at during startup, once you’ve logged in. That folder’s content is visible in the start menu under All Programs > Startup.
Any file inside that folder will be launched, any folder (or folder shortcut) you place inside that folder will automatically be opened, and any program which has a shortcut to it in that folder will be executed when you logon. This is called the «startup folder«. And you don’t need to remember its complicated path, because you can launch it simply by typing «shell:startup» in the start menu, or by right-clicking on it under All Programs, and choosing «Open«.
Hit Enter, and your startup folder will open in Windows Explorer. To prevent a program from automatically starting with Windows, delete its shortcut from that folder (that won’t delete the program — just its shortcut, but you can uninstall the program by going through the Control Panel). Likewise, drag-and-drop or paste any shortcut in that folder to make the program automatically start. To drag a shortcut from the start menu without removing it, just hold down the Alt key and drag the shortcut from the start menu onto the startup folder — then, release.
From the Program Files folders, you can Alt-drag a program to your startup folder, or right-click on it and choose «Create shortcut«. Because that’s a protected folder, you’ll get a «Windows can’t create a shortcut here. Do you want the shortcut to be placed on the desktop instead?» message. Click Yes, then cut-and-paste that shortcut into your startup folder. Don’t save actual files in that folder, just shortcuts. They’ll open in their default program.
Bonus Tip — startup folder for all users: Windows includes a startup folder for all users. Any shortcut in that folder automatically launches for anyone who logs into Windows. Same principle, but place your shortcuts inside this startup folder instead: C:\ProgramData\Microsoft\Windows\Start Menu\Programs\Startup. You can access it by right-clicking on the Startup folder in the start menu (under All Programs), and choose «Open all users» from the context menu.
Automate launching Windows 10 UWP apps
Introduction
Developers have several options for achieving automated launching of Universal Windows Platform (UWP) apps. In this paper we will explore methods of launching an app by using protocol activation and launch activation.
Protocol activation allows an app to register itself as a handler for a given protocol.
Launch activation is the normal launching of an app, such as launching from the app tile.
With each activation method, you have the option of using the command line or a launcher application. For all activation methods, if the app is currently running, the activation will bring the app to the foreground (which reactivates it) and provide the new activation arguments. This allows flexibility to use activation commands to provide new messages to the app. It is important to note that the project needs to be compiled and deployed for the activation method to run the newly updated app.
Protocol activation
Follow these steps to set up protocol activation for apps:
Open the Package.appxmanifest file in Visual Studio.
Select the Declarations tab.
Under the Available Declarations drop-down, select Protocol, and then select Add.
Under Properties, in the Name field, enter a unique name to launch the app.

Save the file and deploy the project.
After the project has been deployed, the protocol activation should be set.
Go to Control Panel\All Control Panel Items\Default Programs and select Associate a file type or protocol with a specific program. Scroll to the Protocols section to see if the protocol is listed.
Now that protocol activation is set up, you have two options (the command line or launcher application) for activating the app by using the protocol.
Command line
The app can be protocol-activated by using the command line with the command start followed by the protocol name set previously, a colon (“:”), and any parameters. The parameters can be any arbitrary string; however, to take advantage of the Uniform Resource Identifier (URI) capabilities, it is advisable to follow the standard URI format:
The Uri object has methods of parsing a URI string in this format. For more information, see Uri class (MSDN).
Protocol command-line activation supports Unicode characters up to a 2038-character limit on the raw URI.
Launcher application
For launching, create a separate application that supports the WinRT API. The C++ code for launching with protocol activation in a launcher program is shown in the following sample, where PackageURI is the URI for the application with any arguments; for example myapplication: or myapplication:protocol activation arguments .
Protocol activation with the launcher application has the same limitations for arguments as protocol activation with the command line. Both support Unicode characters up to a 2038-character limit on the raw URI.
Launch activation
You can also launch the app by using launch activation. No setup is required, but the Application User Model ID (AUMID) of the UWP app is needed. The AUMID is the package family name followed by an exclamation point and the application ID.
The best way to obtain the package family name is to complete these steps:
Open the Package.appxmanifest file.
On the Packaging tab, enter the Package name.
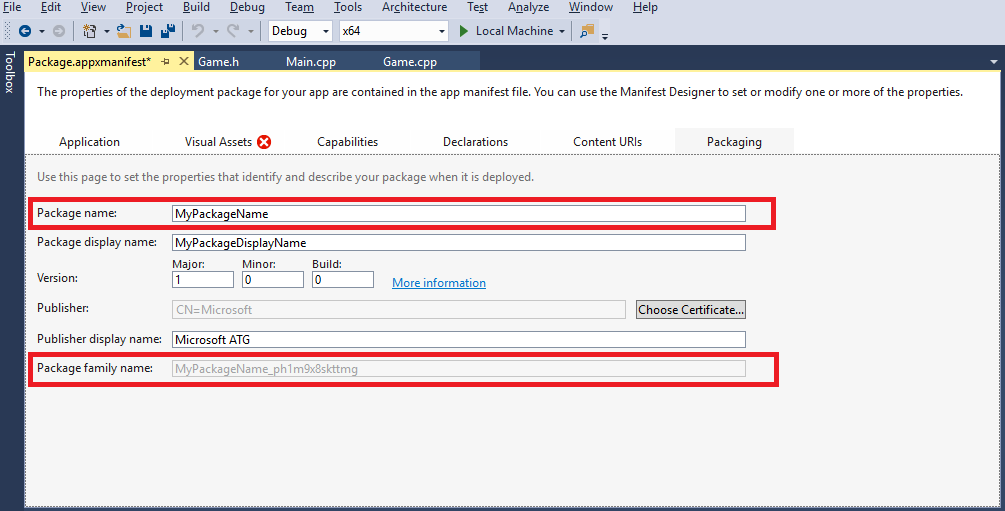
If the Package family name is not listed, open PowerShell and run >get-appxpackage MyPackageName to find the PackageFamilyName.
The application ID can be found in the Package.appxmanifest file (opened in XML view) under the element.
Command line
A tool for performing a launch activation of a UWP app is installed with the Windows 10 SDK. It can be run from the command line, and it takes the AUMID of the app to be launched as an argument.
It would look something like this:
This option does not support command-line arguments.
Launcher application
You can create a separate application that supports using COM to use for launching. The following example shows C++ code for launching with launch activation in a launcher program. With this code, you can create an ApplicationActivationManager object and call ActivateApplication passing in the AUMID found previously and any arguments. For more information about the other parameters, see IApplicationActivationManager::ActivateApplication method (MSDN).
It is worth noting that this method does support arguments being passed in, unlike the previous method for launching (that is, using the command line).
Accepting arguments
To accept arguments passed in on activation of the UWP app, you must add some code to the app. To determine if protocol activation or launch activation occurred, override the OnActivated event and check the argument type, and then get the raw string or Uri object’s pre-parsed values.
This example shows how to get the raw string.
Summary
In summary, you can use various methods to launch the UWP app. Depending on the requirements and use cases, different methods may be better suited than others.
Launch Windows program with custom environment variable
My JAVA_HOME on my dev machine — which is Windows 7 Pro 64 Bit — points to a 64-bit Java, and that’s fine in general. However, I just installed a program — to wit, the FlashDeveloper IDE — for which this setting is not fine: a 32-bit Java is required instead, and the JAVA_HOME setting prevents the 32-bit Java from being picked up.
So I’d like to unset JAVA_HOME just before launching the Flash IDE.
One way to achieve this would be via a batch script.
But isn’t there a better way? I searched the various tabs of the Windows Shortcut properties window for such an option but there doesn’t seem to be any. (I did discover, however, a checkbox for running the program through the shortcut as Administrator .) Any suggestions?
Update: Solution that worked for me
That will open up a command prompt which I can then just close. You can make the shortcut have the icon of the executable you’re calling from the command prompt by instructing the shell via the shortcut properties to go looking for an icon inside the actual executable.
I couldn’t get the solutions involving START to work, which opens up a new cmd.exe window on my machine when passed the following (no idea why):
Must say that my cmd.exe is tuned — that might have an influence here and there.
Update regarding the start issue: As can be learnt following the link in the comments, the start command uses the first arguments in quotes as the title of the windows to be created … So when you pass a path in quotes, it’ll be misinterpreted as the title of the new window. Workaround is to provide an explicit title as first argument, which may also be empty ( start «» «some path\with spaces» ).
How to launch multiple programs with one shortcut in Windows 10
Want to learn a simple tip that saves 2 seconds of your time? I’ll show you how to launch multiple programs from a single shortcut. Some apps go together naturally. For instance, Steam and Raptr, Winamp and Last.fm, MS-Word and Photoshop, etc.
Depending on what you do on your PC, you’ll notice that you are constantly using two or more programs at the same time always. After reading this guide, you’ll learn how to bundle these apps to launch when you double-click one shortcut.
Launch multiple programs with one shortcut
We’ll categorize the process into three easy steps:
- Get the programs’ target paths.
- Create a batch file.
- Create a shortcut with the batch file.
Read on, as we go through the detailed steps for configuring a shortcut that opens multiple windows programs at once.
1] Get the programs’ target paths
The first step to opening multiple programs with one shortcut is to get the target paths of all the programs. Here’s how to find the program paths.
Press the Windows button and search for the programs. When the application shows up in the search results, right-click on it and select the Open file location option. This takes you to the directory in which the application’s executable file resides.
Right-click on the shortcut and go to the Properties option. In the Properties window, switch to the Shortcut tab. Copy out everything in the Target field and paste in a Notepad note in the format below:
Enter cd, paste the full path to the application, and hit ENTER. This changes the directory to that of the program. Example:
Enter start and the name of the file. It’s always the last part of the path after the last slash (\). Start launches the executable file. Example:
Carry out the above steps for all the programs that you want to open with the shortcut. Hit ENTER after the paths to each of the applications.
2] Create a batch file
With the application paths saved in your Notepad, you now have to create the batch file from which we can run both programs at once.
Open the Notepad on which you saved the paths to all the applications you want to open with a single click. Modify the content of the note following the guide below:
- Add @echo off to the top of the note. With this, commands won’t display in the Command Prompt while executing the batch file.
- Add exit at the bottom of the note to quit the batch file after executing the batch file.
The content of your Notepad should now look like this:
The script above is an example of one done for starting Google Chrome and Wunderlist at the same time.
Finally, go to File > Save as, and in the Save as type, choose All files. Append .bat at the end of the File name. For example, we used batchfile.bat.
Note where you save the batch file. You’ll need to path to this batch file when creating the shortcut in the next step.
3] Create a shortcut with the batch file
Launch File Explorer and go to the directory in which you want the shortcut that opens multiple apps. You can do it on your desktop. Right-click on the white space and select New > Shortcut from the context menu.
Enter the path to the newly created batch file in the Type the location of the item field. Alternatively, hit Browse to find the file. After getting the location, click on the Next button below.
Give the shortcut a name that you’ll remember and hit the Finish button.
That’s all it takes! On double-clicking the new shortcut, your computer will open all the programs whose shortcuts are in the batch file.
Windows batch script launch program and exit console
I have a batch script that I use to launch a program, such as notepad.exe . When I double click on this batch file, notepad starts normally, but the black window of the cmd who launched notepad.exe remains in the background. What do I have to do in order to launch notepad.exe and make the cmd window disappear?
edit: is more complicated than using \I .
The cmd calls cygwin , and cygwin starts notepad . I use
start \I \path\cygwin\bin\bash.exe
and the first window (cmd) disappears, but a second window (\cygwin\bin\bash.exe) is still on the background. In the cygwin script I used notepad.exe & and then exit.
6 Answers 6
Keep the «» in between start and your application path.
Added explanation:
Normally when we launch a program from a batch file like below, we’ll have the black windows at the background like OP said.
This was cause by Notepad running in same command prompt (process). The command prompt will close AFTER notepad is closed. To avoid that, we can use the start command to start a separate process like this.
This command is fine as long it doesn’t has space in the path. To handle space in the path for just in case, we added the » quotes like this.
However running this command would just start another blank command prompt. Why? If you lookup to the start /? , the start command will recognize the argument between the » as the title of the new command prompt it is going to launch. So, to solve that, we have the command like this:


