- Install Windows from a USB Flash Drive
- What you need
- Step 1 — Format the drive and set the primary partition as active
- Step 2 — Copy Windows Setup to the USB flash drive
- Step 3 — Install Windows to the new PC
- If your Windows image is larger than 4GB
- How to Run a Portable Version of Windows from a USB Drive
- What You’ll Need (and What You’ll Get)
- Step One: Install WinToUSB
- Step Two: Create Your Portable Drive
- 1. Select Your Installer Media
- 2. Select Your Hard Drive
- 3. Start the Installation
- Step Three: Boot From Your Portable Drive
- Share This Story
- Get our `newsletter`
- DISCUSSION
- How to Run Windows 10 From a USB Drive
- Running Windows 10 From a USB Drive
- Running WinToUSB
- Running Rufus
- Launch Windows 10 With USB
- Windows 7/8/10 Won’t Boot from USB Flash Drive! How to Fix?
- Part 1: Check If Your PC Supports USB Booting
- Part 2: Re-Make A New Bootable USB with WizBurn
- Part 3: Set up Your PC for USB Boot
- Part 4: Check If Your USB Drive Is Actually Bootable
- Conclusion
Install Windows from a USB Flash Drive
Here’s how to create a bootable Windows installation USB drive starting with a Windows .iso file or a Windows Setup DVD.
If you’re looking for an easy way to create a bootable USB Windows installation drive, use the media creation tool.
What you need
- Windows 10 install .iso or DVD
- USB flash drive with at least 5GB free space. This drive will be formatted, so make sure it doesn’t have any important files on it.
- Technician PC — Windows PC that you’ll use to format the USB flash drive
- Destination PC — A PC that you’ll install Windows on
Step 1 — Format the drive and set the primary partition as active
Connect the USB flash drive to your technician PC.
Open Disk Management: Right-click on Start and choose Disk Management.
Format the partition: Right-click the USB drive partition and choose Format. Select the FAT32 file system to be able to boot either BIOS-based or UEFI-based PCs.
Set the partition as active: Right-click the USB drive partition and click Mark Partition as Active.
If Mark Partition as Active isn’t available, you can instead use diskpart to select the partition and mark it active.
Step 2 — Copy Windows Setup to the USB flash drive
Use File Explorer to copy and paste the entire contents of the Windows product DVD or ISO to the USB flash drive.
Optional: add an unattend file to automate the installation process. For more information, see Automate Windows Setup.
Step 3 — Install Windows to the new PC
Connect the USB flash drive to a new PC.
Turn on the PC and press the key that opens the boot-device selection menu for the computer, such as the Esc/F10/F12 keys. Select the option that boots the PC from the USB flash drive.
Windows Setup starts. Follow the instructions to install Windows.
Remove the USB flash drive.
If your Windows image is larger than 4GB
Windows USB install drives are formatted as FAT32, which has a 4GB filesize limit. If your image is larger than the filesize limit:
Copy everything except the Windows image file (sources\install.wim) to the USB drive (either drag and drop, or use this command, where D: is the mounted ISO and E: is the USB flash drive.)
Split the Windows image file into smaller files, and put the smaller files onto the USB drive:
How to Run a Portable Version of Windows from a USB Drive
Ever wanted a copy of Windows you can take with you wherever you go, to use on any computer you want? It’s possible: here’s how to install a portable version of Windows 8 on a USB hard drive that you can take anywhere.
The Enterprise version of Windows 8 has a feature called Windows To Go that lets you install a portable version of Windows on a «certified» flash drive. Unfortunately, most of us don’t have the Enterprise edition of Windows 8, nor a certified flash drive. However, there is a tool called WinToUSB that can essentially do the same thing, no matter what version of Windows you have. Here’s how it works.
(Note that this is different from installing Windows from a USB drive , which allows you to install Windows on a computer that doesn’t have a CD drive. Here, we’re actually installing Windows on a USB drive so we can run it from a drive on any computer you want, and take it with you for troubleshooting, remote work, and so on. If you’re a Mac user, check out this post for more info on how to do this with OS X.)
What You’ll Need (and What You’ll Get)
You only need a few simple things to make this work. They include:
- A Windows installation disc or ISO image. We recommend using Windows 8 . Windows 8 will allow you to use your portable installation on any computer, but Windows 7 is not as portable and may have driver or activation issues if you use it on other computers. (If you must use Windows 7, this alternative method may be preferable).
- A USB drive. An external hard drive is preferred over a flash drive, since it will run significantly faster. USB 2.0 will suffice, but if you have a USB 3.0 drive, we recommend using it (though it will only work if you’re installing Windows 8, not Windows 7).
- WinToUSB . This is the simple program that will walk you through the installation process.
As you can see, there are a few caveats. We tested this using Windows 8.1 on a USB 2.0 external hard drive, and the results were quite satisfactory. It ran at a reasonable speed, automatically installed the drivers it needed, and worked on multiple computers. But your mileage may vary if you try to use Windows 7 or a flash drive.
Step One: Install WinToUSB
First, download WinToUSB and install it on your system, just like you would any other program. Note that you’ll need to be an administrator on the computer you install WinToUSB on.
While you’re at it, find your Windows installation disc or ISO and get it ready, because you’re going to need it in the next step. If you don’t have one, you can download one from Microsoft .
Step Two: Create Your Portable Drive
Next, you just need to start up WinToUSB and follow its (short) wizard to create your portable installation. There are only a few steps involved:
1. Select Your Installer Media
When you start WinToUSB, you’ll be prompted to choose your ISO file or disc. Click the browse button to find it, select the operating system you want to install, then click Next.
2. Select Your Hard Drive
Next, you’ll be asked to select your hard drive and choose the system and boot partitions. You can find more information about this here , but with a USB hard drive you should just be able to select the first partition as system and the second partition as boot, as shown above. Make sure your drive is formatted as NTFS.
3. Start the Installation
When you click next, the installation will begin. I found it only took a half hour or so, though your mileage may vary depending on the speed of your hard drive.
Step Three: Boot From Your Portable Drive
That’s it! It’s actually a very quick and easy process, and when it’s done, you can start running your portable installation on whatever computer you want. To do so, just plug it in, restart the computer, and boot from the drive just like you would a CD or flash drive (on my computer, that meant pressing F11 at boot and choosing the drive from a list).
The first time it starts, it’ll install the necessary drivers and take awhile to boot, after which you can set up your machine just like you would a new Windows 8 PC. You may have to manually adjust some things like screen resolution, but once you’re done, you can shut it down, move it to another computer, and run it from there. It may go through the driver installation step on each new computer (which means it’ll take awhile to boot), but I found it moved between my two PCs quite well. Enjoy!
Share This Story
Get our `newsletter`
DISCUSSION
Can I run the this portable version of Windows, on a Macbook Pro??
How to Run Windows 10 From a USB Drive
Loading and running Windows 10 from a USB drive is a handy option when you’re using a computer saddled with an older version of Windows.


You run Windows 10 on your own computer, but now you’re using another PC outfitted with an older operating system. If you prefer to use the newest version of Windows, though, there’s a way to run Windows 10 directly through a USB drive.
You’ll need a USB flash drive with at least 16GB of free space, but preferably 32GB. You’ll also need a license to activate Windows 10 on the USB drive. That means you have to either purchase one or use an existing one that is associated with your digital ID.
You can then use a Windows USB utility to set up the USB drive with Windows 10. Once you’re done, you’ll be able to boot up off the drive to launch Windows 10.
The major downside of booting from a USB drive is that Windows 10 will run slower than it does off your hard drive. But if you’re in a pinch you can at least work with the OS and access different apps this way.
Microsoft once offered its own tool called Windows to Go, which could generate a bootable Windows USB drive with the Enterprise and Education versions of Windows 10. However, the company has stopped development on that program and no longer updates it.
Instead, you can turn to two utility programs, WinToUSB and Rufus. These tools can create a bootable drive from any version of the operating system and on any type of USB drive.
Running Windows 10 From a USB Drive
If you want to run Windows from a USB, the first step is to sign into your current Windows 10 computer and create a Windows 10 ISO file that will be used to install the operating system onto the drive.
To do this, browse to the Download Windows 10 website. This site offers the latest edition of Windows 10, which at this point is the Windows 10 November 2019 Update, or Windows 10 version 1909.
Click the Download tool now button, then double-click the downloaded MediaCreationTool.exe file to install the program. At the first screen for Applicable notices and license terms, click the Access button. Then click the Create installation media (USB flash drive, DVD, or ISO file) for another PC button and hit Next.
At the Select language, architecture, and edition screen, confirm that all of the options are correct and then click Next.
You’ll then need to choose what media you want to use. Given the option between a USB flash drive and an ISO file, click ISO file. Then click Next.
Choose a location on your hard drive to store the Windows.iso file and click Save. Windows 10 will then generate the necessary ISO file. When the process is done, click Finish.
Running WinToUSB
Next, it’s time to enlist the aid of a third-party Windows USB program. Let’s kick things off with WinToUSB. This program comes in three flavors: Free, Professional, and Enterprise.
Start with the free version to see if you like it, but be aware that the freebie poses certain limitations. Most notably, you can create an installation of Windows 10 Home but not Professional or Enterprise.
If you need either of these editions, the Professional version of WinToUSB costs $29.95, while the Enterprise option will run you $199.95. Download and install the WinToUSB software from the dedicated website.
Next, connect a blank USB flash drive to your computer. Launch WinToUSB from its Start menu shortcut. At the introductory screen, click the button to the right of the Image File field and choose the ISO file you created for Windows 10.
Select the version of Windows 10 you wish to clone onto the USB stick. If you’re using the free version, your only choice is one of the Windows 10 Home versions, so select that one and hit Next.
At the next screen, you’ll need to determine your destination disk. Open the drop-down menu and choose your USB drive. A message pops up asking you to select a partition scheme. Click the MBR for BIOS option and hit Yes.
At the next screen, click the option for Legacy to choose the Installation mode. Click Next and your Windows 10 USB drive will now be created.
When the installation process reaches 100 percent, indicating that it’s finished, close the WinToUSB program and remove the USB drive.
Running Rufus
Now let’s check out Rufus. Download and install the Rufus program from its website, then launch the software. At the Drive Properties window, select your USB drive in the Device field, if it’s not already selected. Click the Select button next to the Boot selection field and select your Windows 10 ISO file.
Click the Image option field and change it to Windows to Go. You can leave the other options at their default values. If you wish, change the Volume label to something like Windows 10. Then click the Start button.
At the next screen, choose the version of Windows that you want to run on the USB drive, then click OK. A warning message flashes that all data on your USB drive will be destroyed. Click OK to continue.
Rufus will now copy the necessary files to the USB drive. After the USB drive has been set up, close the Rufus window.
Launch Windows 10 With USB
When you want to launch Windows 10 on a different computer, insert your USB drive into that PC. Press the appropriate key to launch your Boot menu and choose the option to boot up off the USB drive. The easiest way is to hold the Shift key and restart the computer.
The first time you run Windows 10 off the USB drive, you’ll need to go through the familiar Windows setup process. You’ll also need to activate Windows 10.
You can then install apps onto the USB drive and access any files or documents stored online, so the experience comes close to working on one of your own Windows 10 PCs.
Windows 7/8/10 Won’t Boot from USB Flash Drive! How to Fix?
Many computers do not have the external CD/DVD drive and thus you need the bootable USB drive to install Windows. Creating a bootable USB is fairly easy and all thanks to some really good freeware programs available for this purpose. But, what if the computer wouldn’t boot from the USB drive? If you have run into such a problem, here are some solutions for you.
Part 1: Check If Your PC Supports USB Booting
Your computer will boot from the USB bootable drive only if it supports this type of boot. Not all the computers support USB boot. While most modern computers today support USB booting, there are some that do not. In order to find whether your computer is USB bootable or not, you will need to check the BIOS setup. The steps may vary across computer models but remain more or less the same for all PCs:
Step 1. Restart the computer or if it is shut down, power it on.
Step 2. When the PC starts to run, on the first screen it will display the key you need to press in order to enter the BIOS setup. Usually, it is the ‘Delete’ or ‘Del’ key
Note: If you have previously set the BIOS password you will need to provide the password to enter BIOS setup. If you forgot BIOS password, you will need to reset it by taking out the CMOS battery from the motherboard. In case you haven’t done this before, it is best to take the help of a technician. If you forgot Windows login password, try to reset your Windows 10 password with PC Unlocker software.
Step 3. You will need to explore a bit and find the ‘Boot Options’ (or something like that). Once you are there you can set the Boot Priority
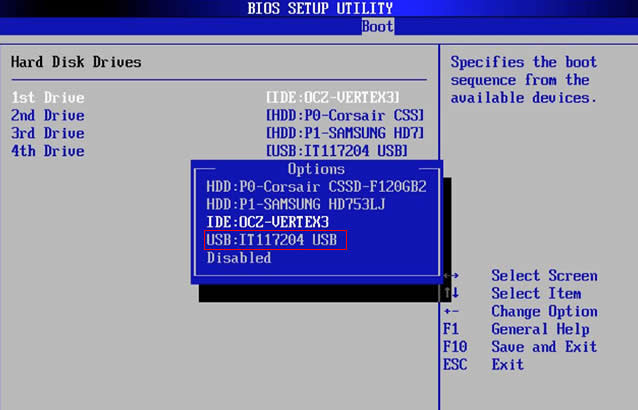
If you do not see the USB boot option, it means that your motherboard does not support it. You will need to boot using some other method.
Part 2: Re-Make A New Bootable USB with WizBurn
In most cases, you need to reexamineВ if the ISO burning software is the right one for you? As we know there are many free ISO burning tools out there, like Rufus, RMPrepUSBВ , Windows USB/DVD Download Tool or ISO to USB, etc. These free burning tools can’t be updated continuously and provide any support service, even some tools don’t support UEFI BIOS! Eventually, the generated USB disk cannot normally boot the computers. But only a small part of computers can boot win8/Win7 except Win10. These computer will generally display «NTLDR is missing», for this problem there is no good solution currently.
If your computer won’t boot from USB, the only solution is try to re-make a new bootable USB disk with professional ISO burning software. We recommend iSeePassword Dr.Boot tool.
Step 1. Click the «Download» button to get the latest version of Dr.Boot software, then install it on another working computer.
Step 2. After installation, launch it and you will see the main interface below. Easy to use and user-friendlyВ interface.
Step 3. Click «Browse» button to import local ISO file and add it to progarm.
Step 4. Now insert an USB drive to the computer and select the drive name from the list undert «Create A Bootable USB».
NOTE: For Win 10 ISO file, if your computer is UEFI, then just select «UEFI boot» from Partition Style.
Step 5. After settings, click «Burn» button to start make a bootable USB disk. It may take around 10 minutes. After making a boot disk, insert it to your computer and boot from USB.
Part 3: Set up Your PC for USB Boot
Even if your computer supports USB booting, remember that USB is not always the first boot priority. It is also possible that your computer has not been set up to boot from the USB at all even though it is supported. So, what you need to do is change the BIOS settings so that your computer accepts USB boot. Follow the simple steps below:
Step 1. Restart your PC or if it is already shut down, turn it back on.
Step 2. When the PC starts to run, on the first screen you will see the key you need to press in order to enter the BIOS setup. More often than not it is the ‘F2’, ‘Del’ or whichever is the appropriate key for your computer. It may vary depending upon your computer model. For example, Dell computer has different ways to enter BIOS setup, see how to get into BIOS on a Dell computer.
Step 3. Find the ‘Boot Options’ or something similar to it (the steps may vary across computers but it is easy to find).
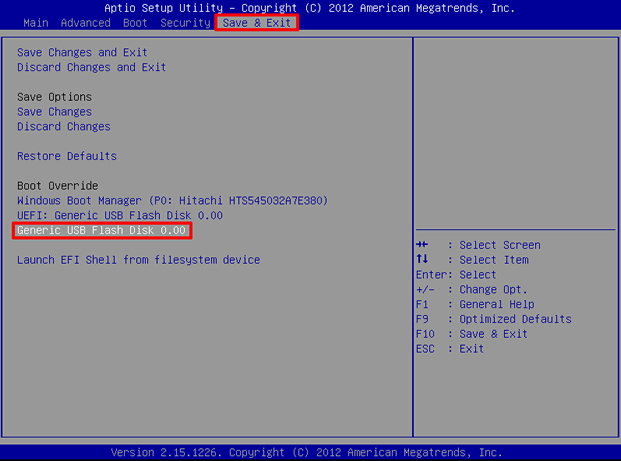
Step 4. Once you are in the Boot section of the BIOS, you can select the ‘First Boot Device’. Select the appropriate option from the Boot Menu.
This will instruct the computer to prioritize the boot and select USB drive as the first option, and insert the bootable USB drive and restart your computer.
Part 4: Check If Your USB Drive Is Actually Bootable
If the USB bootable drive has not been created the right way or if it is corrupt, you will not be able to install Windows with it. You need to make sure that USB drive has been prepared using the right tools and the right method. You will be able to boot Windows only if the drive is bootable.
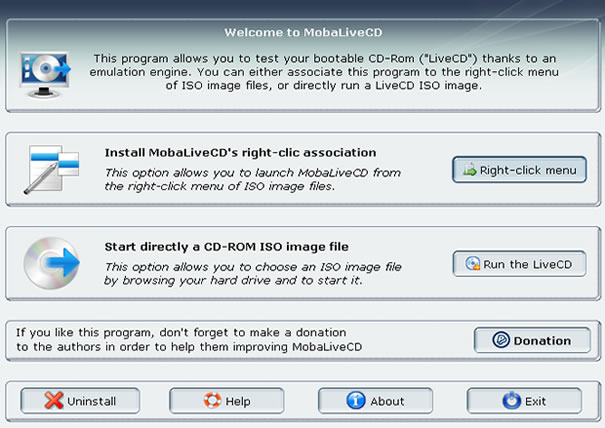
This is why it would be worth your while to check if the drive is actually bootable. For this you will need to install a portable application called MobaLiveCD, which uses QEMU emulator to determine if the drive is bootable. Here are the steps:
Step 1. Download the application from http://www.mobatek.net/ (you don’t need to install it as it is a portable app for Windows)
Step 2. Launch the app and click ‘Run the LiveUSB’ button on the screen.
Step 3. You don’t need to create any virtual disk image. You can test the validity of the drive by clicking NO when the next confirmation dialogue box appears:
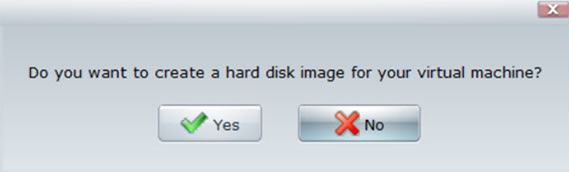
Step 4. The QEMU emulator runs and if the drive is bootable, you will see ‘Press any key to boot from CD or DVD. ‘

Step 5. If the drive isn’t bootable it will ask you to insert a bootable device.
If the USB drive is not bootable, you will need to create the proper bootable drive first. Different versions of Windows use different file systems. If you are trying to use the NTFS formatted bootable drive to install the Windows in the legacy-BIOS or UEFI mode, it will not work. If you are not sure what this is all about, you may contact Microsoft support for more help.
Conclusion
There are a number of factors that may prevent USB bootable from working. You need to make sure that USB drive is actually bootable and has been formatted using the correct file system, make sure that your computer supports USB boot. You will also need enter the BIOS setup to configure your computer to accept USB bootable drive. Hope these methods would be helpful if your laptop can’t boot from USB drive.

Vicky is a professional Windows technology author with many experience, focusing on computer technology. She’s very much enjoy helping people find solutions to their problems. Her knowledge and passion always drive her to discover everything about technology.


