- Install Windows 10 on your Mac with Boot Camp Assistant
- What you need to install Windows 10 on Mac
- How to install Windows 10 on Mac
- 1. Check your Secure Boot setting
- 2. Use Boot Camp Assistant to create a Windows partition
- 3. Format the Windows (BOOTCAMP) partition
- 4. Install Windows
- 5. Use the Boot Camp installer in Windows
- How to switch between Windows and macOS
- Learn more
- Загрузка и установка ПО поддержки Windows на компьютере Mac
- Установка последних обновлений macOS
- Форматирование флеш-накопителя USB
- Загрузка ПО поддержки Windows
- Установка ПО поддержки Windows
- Дополнительная информация
- Manage windows on Mac
- Move, align and merge windows
- Maximise or minimise windows
- Quickly switch between app windows
- Close windows
Install Windows 10 on your Mac with Boot Camp Assistant
With Boot Camp, you can install Microsoft Windows 10 on your Mac, then switch between macOS and Windows when restarting your Mac.
What you need to install Windows 10 on Mac
- MacBook introduced in 2015 or later
- MacBook Air introduced in 2012 or later
- MacBook Pro introduced in 2012 or later
- Mac mini introduced in 2012 or later
- iMac introduced in 2012 or later 1
- iMac Pro (all models)
- Mac Pro introduced in 2013 or later
The latest macOS updates, which can include updates to Boot Camp Assistant. You will use Boot Camp Assistant to install Windows 10.
64GB or more free storage space on your Mac startup disk:
- Your Mac can have as little as 64GB of free storage space, but at least 128GB of free storage space provides the best experience. Automatic Windows updates require that much space or more.
- If you have an iMac Pro or Mac Pro with 128GB of memory (RAM) or more, your startup disk needs at least as much free storage space as your Mac has memory. 2
An external USB flash drive with a storage capacity of 16GB or more, unless you’re using a Mac that doesn’t need a flash drive to install Windows.
A 64-bit version of Windows 10 Home or Windows 10 Pro on a disk image (ISO) or other installation media. If installing Windows on your Mac for the first time, this must be a full version of Windows, not an upgrade.
- If your copy of Windows came on a USB flash drive, or you have a Windows product key and no installation disc, download a Windows 10 disk image from Microsoft.
- If your copy of Windows came on a DVD, you might need to create a disk image of that DVD.

![]()
How to install Windows 10 on Mac
To install Windows, use Boot Camp Assistant, which is included with your Mac.
1. Check your Secure Boot setting
Learn how to check your Secure Boot setting. The default Secure Boot setting is Full Security. If you changed it to No Security, change it back to Full Security before installing Windows. After installing Windows, you can use any Secure Boot setting without affecting your ability to start up from Windows.
2. Use Boot Camp Assistant to create a Windows partition
Open Boot Camp Assistant, which is in the Utilities folder of your Applications folder. Follow the onscreen instructions.
- If you’re asked to insert a USB drive, plug your USB flash drive into your Mac. Boot Camp Assistant will use it to create a bootable USB drive for Windows installation.
- When Boot Camp Assistant asks you to set the size of the Windows partition, remember the minimum storage-space requirements in the previous section. Set a partition size that meets your needs, because you can’t change its size later.
3. Format the Windows (BOOTCAMP) partition
When Boot Camp Assistant finishes, your Mac restarts to the Windows installer. If the installer asks where to install Windows, select the BOOTCAMP partition and click Format. In most cases, the installer selects and formats the BOOTCAMP partition automatically.
4. Install Windows
Unplug any external devices that aren’t necessary during installation. Then click Next and follow the onscreen instructions to begin installing Windows.
5. Use the Boot Camp installer in Windows
After Windows installation completes, your Mac starts up in Windows and opens a ”Welcome to the Boot Camp installer” window. Follow the onscreen instructions to install Boot Camp and Windows support software (drivers). You will be asked to restart when done.
- If the Boot Camp installer never opens, open the Boot Camp installer manually and use it to complete Boot Camp installation.
- If you have an external display connected to a Thunderbolt 3 port on your Mac, the display will be blank (black, gray, or blue) for up to 2 minutes during installation.
How to switch between Windows and macOS
Restart, then press and hold the Option (or Alt) ⌥ key during startup to switch between Windows and macOS.
Learn more
If you have one of these Intel-based Mac models using OS X El Capitan or later, you don’t need a USB flash drive to install Windows:
- MacBook introduced in 2015 or later
- MacBook Air introduced in 2017 or later 3
- MacBook Pro introduced in 2015 or later 3
- iMac introduced in 2015 or later
- iMac Pro (all models)
- Mac Pro introduced in late 2013 or later
For more information about using Windows on your Mac, open Boot Camp Assistant and click the Open Boot Camp Help button.
1. If you’re using an iMac (Retina 5K, 27-inch, Late 2014) or iMac (27-inch, Late 2013) or iMac (27-inch, Late 2012) with a 3TB hard drive and macOS Mojave or later, learn about an alert you might see during installation.
2. For example, if your Mac has 128GB of memory, its startup disk must have at least 128GB of storage space available for Windows. To see how much memory your Mac has, choose Apple menu > About This Mac. To see how much storage space is available, click the Storage tab in the same window.
3. These Mac models were offered with 128GB hard drives as an option. Apple recommends 256GB or larger hard drives so that you can create a Boot Camp partition of at least 128GB.
Information about products not manufactured by Apple, or independent websites not controlled or tested by Apple, is provided without recommendation or endorsement. Apple assumes no responsibility with regard to the selection, performance, or use of third-party websites or products. Apple makes no representations regarding third-party website accuracy or reliability. Contact the vendor for additional information.
Загрузка и установка ПО поддержки Windows на компьютере Mac
После использования приложения «Ассистент Boot Camp» для установки или обновления Microsoft Windows на компьютере Mac вам может понадобиться также установить последнее ПО поддержки Windows (драйверы) от Apple.
При установке Microsoft Windows на компьютер Mac приложение «Ассистент Boot Camp» автоматически открывает установщик Boot Camp, который устанавливает последнее ПО поддержки Windows (драйверы). Если этого не произошло или возникли описанные ниже проблемы с использованием Windows на компьютере Mac, следуйте инструкциям, представленным в этой статье.
- В Windows не работает мышь, трекпад или клавиатура Apple.
Windows не поддерживает Force Touch. - В ОС Windows отсутствует звук из встроенных динамиков компьютера Mac.
- В ОС Windows не распознается встроенный микрофон или камера компьютера Mac.
- В Windows отсутствует либо недоступно одно или несколько разрешений дисплея.
- В Windows невозможно настроить яркость встроенного дисплея.
- В Windows возникают проблемы с Bluetooth или Wi-Fi.
- Появляется предупреждение о прекращении работы приложения Apple Software Update.
- Появляется сообщение о том, что на вашем компьютере установлены драйвер или служба, которые не готовы для работы с текущей версией Windows.
- После установки Windows при запуске компьютера Mac отображается черный или синий экран.
Если ваш компьютер Mac оснащен видеокартой AMD и при этом возникают проблемы с работой графики в Windows, вместо описанной процедуры вам может потребоваться обновить драйверы для видеокарты AMD.
Установка последних обновлений macOS
Прежде чем продолжить, установите последние обновления macOS, которые могут включать обновления для Boot Camp.
Форматирование флеш-накопителя USB
Чтобы установить последнее ПО для поддержки Windows, требуется флеш-накопитель USB емкостью не менее 16 ГБ, отформатированный как MS-DOS (FAT).
- Запустите компьютер Mac в macOS.
- Подключите к компьютеру Mac флеш-накопитель USB.
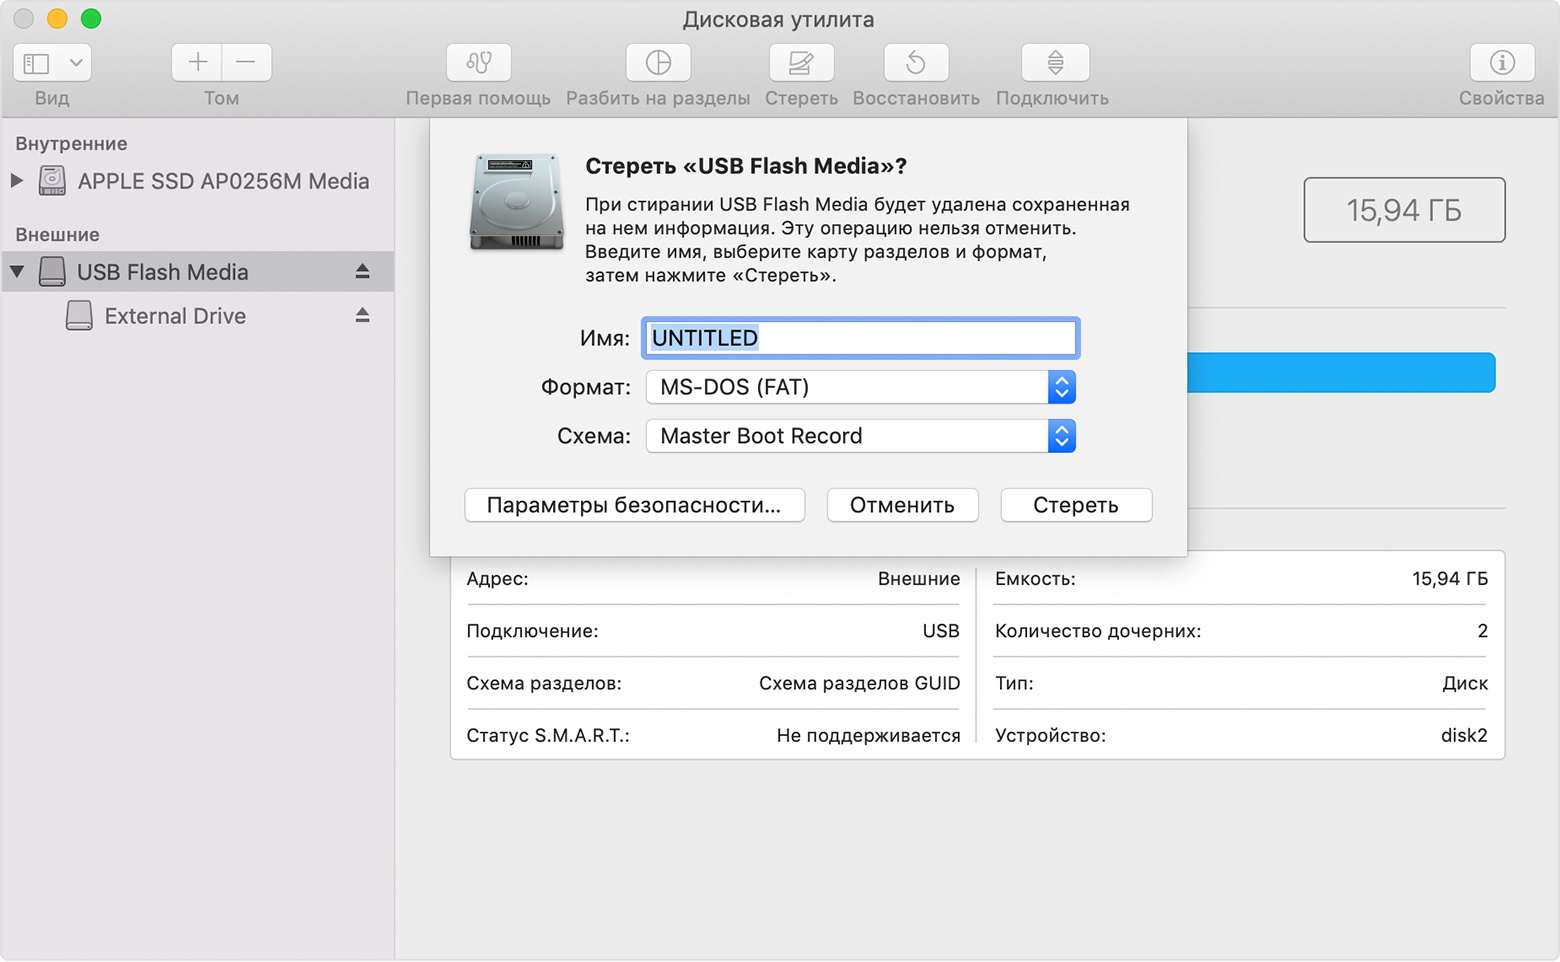
- Запустите приложение «Дисковая утилита» (оно находится во вложенной папке «Утилиты» папки «Приложения»).
- В строке меню выберите «Вид» > «Показать все устройства».
- В боковом меню приложения «Дисковая утилита» выберите флеш-накопитель USB. (Необходимо выбрать имя диска, а не имя тома, которое отображается под ним.)

- Нажмите кнопку или вкладку «Стереть».
- В качестве формата выберите MS-DOS (FAT), а в качестве схемы — основную загрузочную запись.
- Нажмите «Стереть», чтобы отформатировать диск. По окончании выйдите из приложения «Дисковая утилита».
Загрузка ПО поддержки Windows
После подготовки флеш-накопителя USB выполните следующие действия.
- Убедитесь, что компьютер Mac подключен к Интернету.
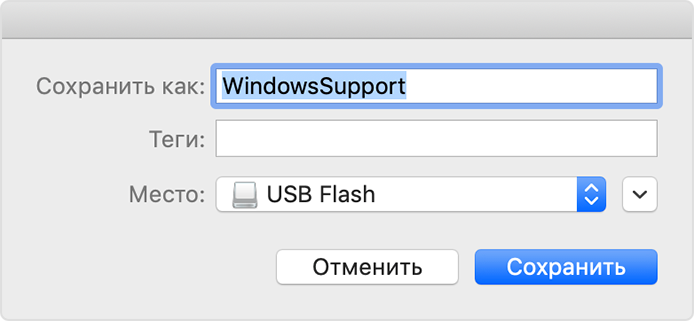
- Откройте приложение «Ассистент Boot Camp» во вложенной папке «Утилиты» папки «Программы».
- В строке меню в верхней части экрана выберите пункт «Действие» > «Загрузить ПО поддержки Windows», а затем — флеш-накопитель USB для сохранения. По окончании загрузки выйдите из приложения «Ассистент Boot Camp».
Установка ПО поддержки Windows
После загрузки ПО поддержки Windows на флеш-накопитель следуйте инструкциям по его установке. (Если в процессе решения проблем мышь или клавиатура подключены через Bluetooth, возможно, следует выполнить указанные ниже действия, подключив мышь или клавиатуру через USB.)
- Убедитесь, что флеш-накопитель USB подключен к компьютеру Mac.
- Запустите компьютер Mac в Windows.
- В проводнике откройте флеш-накопитель USB, а затем выберите файл Setup или setup.exe, который находится в папке WindowsSupport или BootCamp. Если отобразится запрос разрешить Boot Camp внести изменения на вашем устройстве, нажмите «Да».
- Нажмите «Восстановить», чтобы начать установку. Если появляется сообщение о том, что устанавливаемое программное обеспечение не было проверено на совместимость с этой версией Windows, нажмите кнопку «Продолжить».
- По окончании установки нажмите «Завершить», а когда появится запрос на перезагрузку компьютера Mac — «Да».
Дополнительная информация
Если не удается загрузить или сохранить ПО поддержки Windows
- Если ассистент сообщает, что ПО поддержки Windows не удалось сохранить на указанный диск или не удается использовать флеш-накопитель USB, убедитесь, что емкость флеш-накопителя USB составляет не менее 16 ГБ и он правильно отформатирован.
- Если приложение «Ассистент Boot Camp» не находит флеш-накопитель USB, нажмите кнопку «Назад» и убедитесь, что диск подключен непосредственно к порту USB на компьютере Mac, а не к дисплею, концентратору или клавиатуре. Отключите и повторно подключите диск, затем нажмите кнопку «Продолжить».
- Если приложение «Ассистент Boot Camp» сообщает, что не удается загрузить ПО из-за проблемы с сетью, убедитесь, что компьютер Mac подключен к Интернету.
- Проверьте компьютер Mac на соответствие системным требованиям для установки Windows с помощью Boot Camp.
Если после обновления ПО поддержки Windows нужная функция Mac по-прежнему не работает, попробуйте найти сведения о своем симптоме на веб-сайте службы поддержки Apple или Microsoft. Некоторые возможности компьютера Mac несовместимы с Windows.
Информация о продуктах, произведенных не компанией Apple, или о независимых веб-сайтах, неподконтрольных и не тестируемых компанией Apple, не носит рекомендательного или одобрительного характера. Компания Apple не несет никакой ответственности за выбор, функциональность и использование веб-сайтов или продукции сторонних производителей. Компания Apple также не несет ответственности за точность или достоверность данных, размещенных на веб-сайтах сторонних производителей. Обратитесь к поставщику за дополнительной информацией.
Manage windows on Mac
When you open an app or the Finder on your Mac, a window opens on the desktop. Only one app at a time is active; the name of the app (in bold) and the app menus are shown in the menu bar.
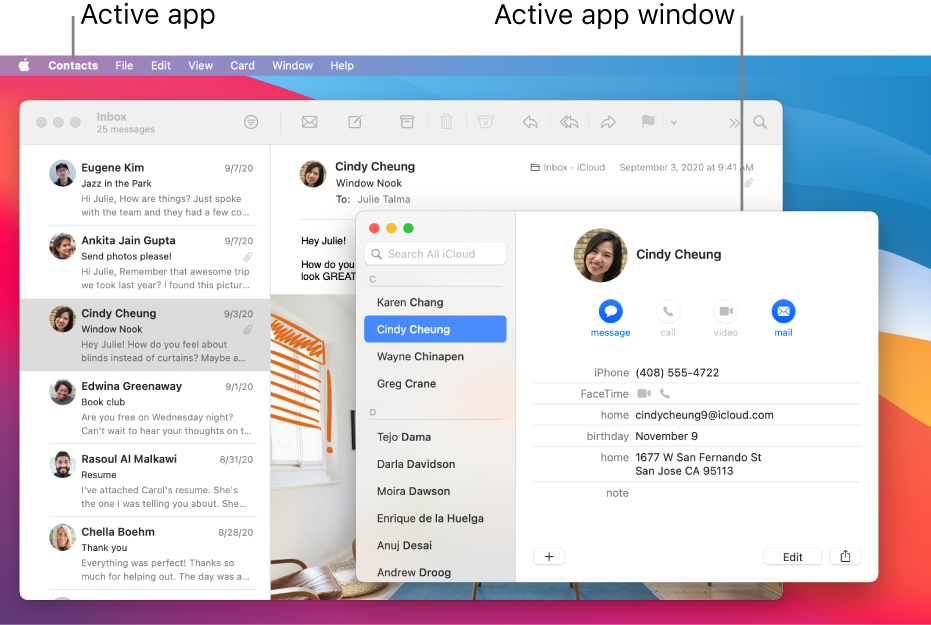
Some apps, such as Safari or Mail, let you open multiple windows or different types of windows at the same time. macOS provides several ways to manage open apps and windows.
Move, align and merge windows
On your Mac, do any of the following:
Move a window: Drag the window by its title bar to where you want it. Some windows can’t be moved.
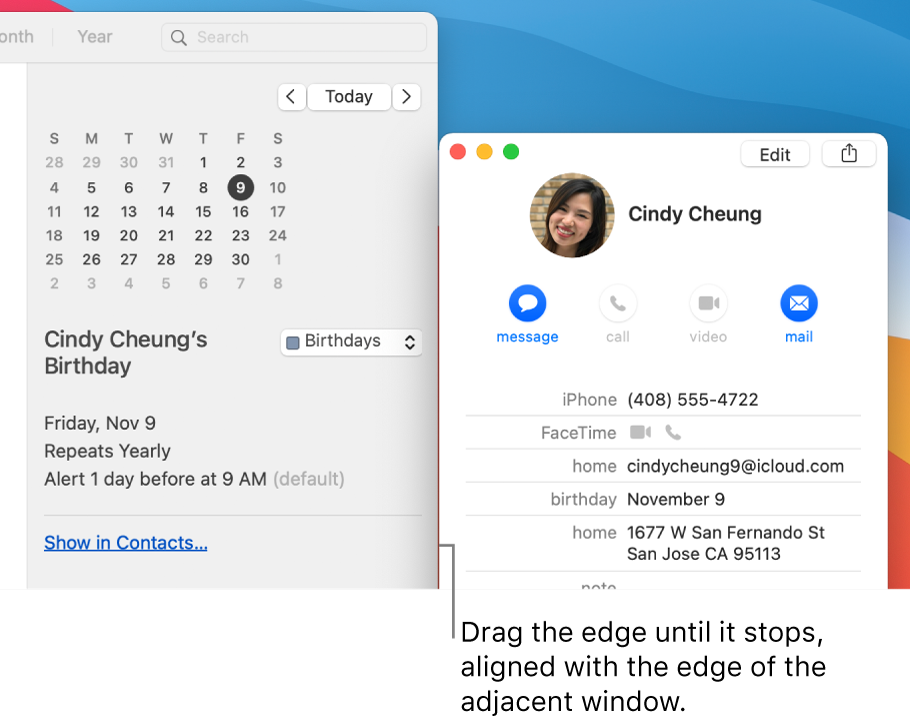
Align windows: Drag a window close to another one — as the window nears the other one, it aligns without overlapping. You can position multiple windows adjacent to each other.
To make adjacent windows the same size, drag the edge you want to resize — as it nears the edge of the adjacent window, it aligns with the edge and stops.
Merge an app’s windows into one tabbed window: In the app, choose Window > Merge All Windows.
To make a tab a separate window again, select the tab, then choose Window > Move Tab to New Window, or just drag the tab out of the window. See Use tabs in windows.
Maximise or minimise windows
On your Mac, do any of the following in a window:
Maximise a window: Press and hold the Option key while you click the green maximise button  in the top-left corner of an app window. To return to the previous window size, Option-click the button again.
You can also double-click an app’s title bar to maximise the window (as long as the option to do so is set to “zoom” in Dock & Menu Bar preferences).
Minimise a window: Click the yellow minimise button  in the top-left corner of the window or press Command-M.
You can set an option in Dock & Menu Bar preferences to have a window minimise when you double-click its title bar.
Most windows can be manually resized. Drag the window’s edge (top, bottom, or sides) or double-click an edge to expand that side of the window.
Quickly switch between app windows
On your Mac, do any of the following:
Switch to the previous app: Press Command-Tab.
Scroll through all open apps: Press and hold the Command key, press the Tab key, then press the Left or Right arrow key until you get to the app you want. Release the Command key.
If you change your mind while scrolling through the apps and don’t want to switch apps, press Esc (Escape) or the Full Stop key, then release the Command key.
Close windows
On your Mac, do any of the following:
Close a single window: In a window, click the red Close button  in the top-left corner of the window, or press Command-W.
Close all open windows for an app: Press Option-Command-W.
Closing one or all windows for an app does not close or quit the app. To do so, press Command-Q, or click the app’s name in the menu bar, then choose Quit [App]. See Quit apps.
You can hide the active app by pressing Command-H.
Use Mission Control to quickly arrange open windows and spaces in a single layer to easily spot the one you need.


